Posted on Leave a comment

Frumpy Knit Tube Dress to Cute T-Shirt Refashion

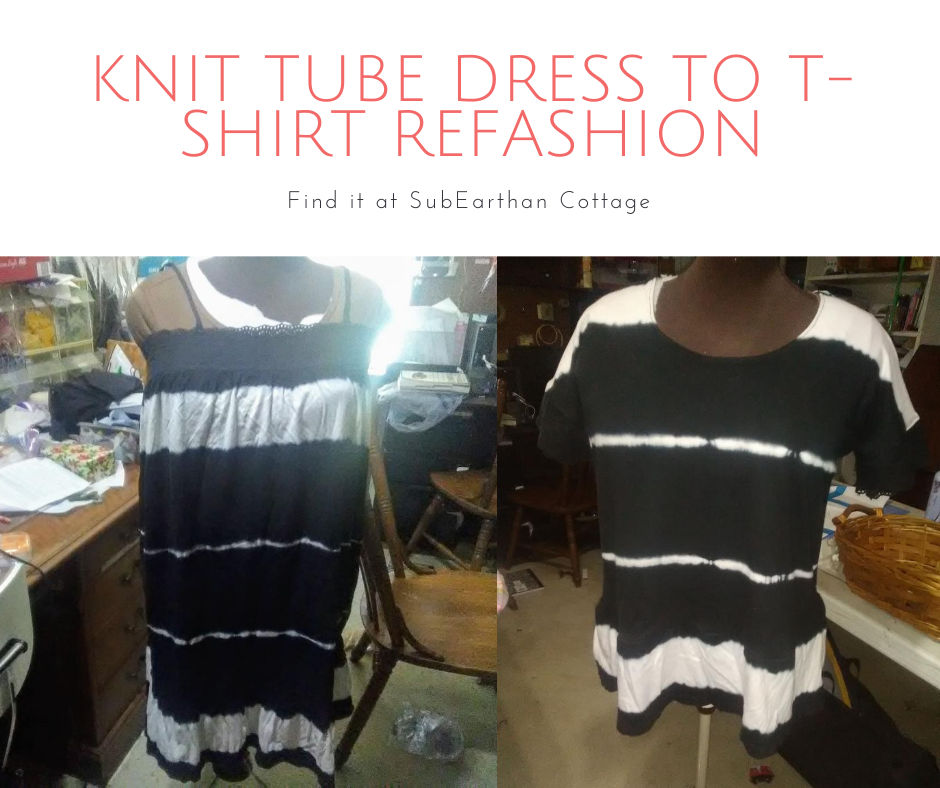
I’ve had two striped knit dresses in my refashion pile for about six months now. One black and white and one navy blue and white. The knit is soft, and I like the tie dye stripe, but the shape is basically a tube with a ruffle on the bottom. They are so unflattering, I don’t even want to wear them around the house. There’s a good amount of fabric in them, though, so I decided to try turn one of the knit tube dresses into a t-shirt.

Knit Tube Dress
Here’s the original shapeless dress. Excuse the background, please.

Knit tube dress to T-Shirt Refashion T shirt Process

I wasn’t sure what I would do at first, but I knew whatever it was wouldn’t need the straps, so I cut them off. I briefly considered leaving it close to as-is at that point and turning it into a skirt. It still wouldn’t have been very flattering, and I really don’t need any more casual skirts, so I moved on to other ideas.

T-shirts are always something I need, so that was my next direction. I didn’t take any process photos, so I’ll do my best to describe it. Refashioning always requires a little improvising based on what you have to work with, so consider this more as a guide than a complete how-to.

Turn the dress into fabric

I find it’s easiest to see what I have to work with when I’m looking at deconstructed pieces of fabric. Unless I think I’m going to use an element intact, I cut or rip out all seams and remove elements like buttons so that I can see how much fabric I have to use.

For this project, I cut off the black cotton eyelet band at the top and cut off the ruffle from the bottom before cutting off the side seams. I left the ruffle intact by cutting just above the seam that connected it to the dress because I thought it might come in handy. I chose to cut, rather than rip the seams, because the seams were narrow, so I wasn’t losing much fabric.

The Base Pattern

I thought about using a t-shirt as a pattern, but that doesn’t always work out as well. In my pattern files, I have a copy of the breezy tee from it’s always autumn, so I used that. I didn’t have enough fabric to make it exactly like the pattern, but it was a good starting point.

Laying it out

I squared up the main pieces of fabric and cut out the pattern. The fabric was too short for the pattern’s length, so I just focused on fitting in the top portion. I had to shorten the sleeves slightly because there wasn’t enough width.

Constructing the T-shirt

I serged (overlocked) the neckline folded it over and hemmed. I will probably regret not doing a banded neckline, because I’ve had hemmed necklines get wonky with wear. I can change it later if needed, though.

I serged the shoulder seams and then started thinking about the sleeves. The original pattern has pieces to create wide bands on the sleeves. I didn’t have enough scraps from the sides to create those bands. Instead, I decided to use the eyelet from the top of the dress. Honestly, I really wanted to use some of the ruffle to make flutter sleeves, but I figured that would be needed to add length.

Knit tube dress to T Shirt Refashion T shirt Eyelet Sleeve Band Closeup.
I’m still not sure about this. I may remove it after wearing it a few times.

After attaching the eyelet, I serged the underarm and side seams, then straight stitched just inside the serged seam to reinforce.

The shirt was more of a crop top at that point, so I attached the ruffle to the bottom by serging and then straight stitching like I did on the side seams. Here’s the final result.

Knit tube dress to T Shirt Refashion T shirt Finished Product.
Finished, other than steaming the ruffle.

I like it, other than the eyelet on the sleeves. I’m not sure about that. It’s not tight, but it makes the sleeves snug. I’ll probably wear it a few times and decide if I just want to take it off altogether. Overall, though, it’s a cute t-shirt and definitely something more wearable than the original.

Like this post? To make sure you never miss a future post, please sign up for my newsletter.

Posted on Leave a comment

Simple Striped Sundress Refashion

If you search for refashioning ideas online, you’ll find tons of amazing examples of outdated styles being turned into trendy pieces that bear little resemblance to the original. (https://refashionista.net/ is one of my favorite refashion blogs to browse for inspiration.) It’s easy to get overwhelmed with ideas, especially if you’re new to sewing. The main goal of refashioning is to take a piece that is unflattering or unwearable and turning it into something that will be worn again. Sometimes a few simple tweaks are all that is needed to accomplish that goal.

The Dress

Before

This sundress is a perfect example. In it’s original form, it was breezy and comfortable for summer, except that it required a strapless bra to be flattering. Strapless bras tend to be uncomfortable in general. When it’s August in Texas hot, they’re almost unbearable. Having to wear one took away from the comfort of this dress, leaving it regulated to the back of my closet most of the time.

The refashion Fix

In order to fix the problem, I needed to add coverage and a little support to keep the cups in place.

First, I sewed elastic into the seams under the bust. I sewed it onto the seam allowance to keep my stitches invisible from the outside.

I cut the elastic a little shorter than the length of the seam and stretched it to gather it slightly. When worn, it doesn’t look gathered, but it keeps the cups in place.

For coverage, I took the cup inserts from a soft seamless bra and hand stitched them in place. I never use them in the bras, so I have several sets sitting around. By hand stitching, I was able to keep my stitches from showing on the right side of the fabric. Rather than sew all around the cups, I strategically tacked them to keep them secure but invisible from the front.

The result

After

Those two simple tweaks only took about twenty minutes. The final result is a smoother, more flattering fit that doesn’t sacrifice comfort.

What simple refashions have you done that made a huge impact on wear-ability? I’d love to hear about them in the comments.

Like this post? To make sure you never miss a future post, please sign up for my newsletter.

Posted on Leave a comment

Dress to Tunic Refashion

I finally got around to refashioning the green knit dress that I found at Goodwill over a year ago.

Green Knit Dress
Green knit dress

What I did to the dress

I decided to shorten it to mid-thigh and take in the top for a better fit. In order to keep the pretty stitching at the bottom, I took the excess length from the middle.

I took the top in a little at the sides, but not enough to make it too fitted. It’s hot, so loose and breezy isn’t a bad thing.

To join the two parts, I added elastic to the waist of the skirt and then reattached it to the top.

Refashioned green knit dress.

End result

Here’s the result. In retrospect, I wish I had made the elastic fit a bit tighter. Right now, it just hangs fairly straight. I may go back and redo that some other time.

As it is, it’s comfortable to wear over leggings, so perfect for hanging out at home with the kiddos.

A note for homeschoolers

I’ve been cleaning the office and getting our homeschooling supplies ready for our official start to the school year. If you’re new to homeschooling, or just looking for new ideas, I’ll post photos of our setup, as well as other homeschooling tips next week.

Like this post? To make sure you never miss a future post, please sign up for my newsletter.

Posted on 1 Comment

Refashion a Camisole into a Tunic Tank Top

I have tons of clothes waiting for me to refashion them into something more wearable, but haven’t had much inspiration. Recently, though, I came across CreoleSha on Etsy. I love her flowy designs. Luckily, she offers classes on Teachable, so I took her free course on upcycling a sweatshirt or t-shirt into a tunic.

Refashion Camisole Tunic Tank 1
Almost forgot to take a before photo.

My refashion notes

It’s summer, so rather than use a sweatshirt, I started with a camisole tank that I didn’t wear much. I liked the color, but the fit was too loose to use for layering, and the skinny straps made it difficult to wear with a bra. By adapting the techniques in CreoleSha’s class, I turned it into a longer, flowing tank and then added a bit of cotton lace salvaged from an older refashion project to widen the straps.

The added material came from a t-shirt with a large logo on the front. I liked the color, but not the logo, so it was perfect and added some nice contrast.

Of course, pockets are always handy, so I added some patch pockets on the front.

Final result

It’s not perfect, but it’s something I’m more comfortable wearing now. The shirts were wrinkled from storage to the point that the wrinkles came back even after ironing. Luckily they smoothed out with laundering, so I don’t look like I just rolled out of bed when I wear it. More importantly, trying something a little on the artsy side and just jumping in has me ready to tackle more refashions.

A note on my dress form

Before working on this, I took the time to add some batting to my dressform, Athena. She’s a little less padded in some areas than I am, so the batting makes it easier to use her as a fit guide when I don’t want to try things on over and over. The brown t-shirt helps hold it all together and provides something to pin into.

Like this post? To make sure you never miss a future post, please sign up for my newsletter.

Posted on 1 Comment

Easy Leggings Hack for Summer

If you or your kiddos wear leggings, you’ll love this easy leggings hack for summer. While you can use any leggings, it’s perfect for turning leggings that have worn out at the knees or ended up being a little too see-through into something usable, especially when the weather turns hot. This hack is so simple, I feel a bit silly making a post about it. It’s really one of those “Why didn’t I think of that?” things.

How to do it.

All you need is a pair of leggings you want to make shorter and some good scissors. Fold them in half so that the legs lay on top of each other. Make sure the fabric is smooth and the legs match up at the hem. Decide how much shorter you want them and cut them at that length, keeping the line parallel to the hem. My scissors cut through both legs easily, but you can always cut one and use it as a guide to cut the other.

Here’s what I cut off. I like leaving mine either just above or just below the knee.

Because knit doesn’t fray, you don’t have to hem the raw edge. When stretched, the edge will roll a tiny bit and hide the edge. You may want to seal the seam that you cut through with a little fabric glue or a few stitches. I have some I cut last summer without doing anything to the seams and they’ve held up through many wearings and washings without coming apart.

How I like to wear my shortened leggings

I like wearing dresses or skirts in the summer because Texas is hot, lol. With little kids, though, I’m constantly up and down or bending to pick things up off the floor. Cropped leggings underneath give me enough coverage to make dresses practical for everyday. Leggings under my dresses also prevents uncomfortable chafing from being a bit, um, curvy in the thighs. For this purpose, I really like using this hack for leggings that I wouldn’t feel comfortable wearing without a long tunic or dress. Instead of taking up space at the back of my closet, they get used and make my other clothes more wearable.

Ways to repurpose the cut off section

The cut off sections can be repurposed, too. A really simple thing to do is make hair bands by cutting them in one inch strips parallel to the hem. Be sure to keep the seam intact so they’re a circle.

You can also make a pocket for your leggings out of the cut off section. Decide how big you want your pocket to be and add a half inch or so seam allowance to each side and the bottom. Use the existing hem as the top of your pocket to save time. Fold the seam allowance under and stitch in place on your leggings where you want the pocket. You’ll want to use a narrow zig-zag or stretch stitch to prevent the thread from breaking. A ball point needle is ideal for sewing knits, so if you have one, use it.

Leggings hack pocket
Here’s one pocket I’ve added.

Like this post? To make sure you never miss a future post, please sign up for my newsletter.

Posted on 2 Comments

Drafting a Pants (Trousers) Pattern from RTW Shorts

Pants pattern drafting

Lately Christopher and I have been talking a lot about fashion. It started as a discussion about not being able to find comfortable clothes, especially pants (trousers for British English speakers) and how hard it is to find clothing that goes against the trends. Being crafty, we explored making our own clothing. The cost of fabric, supplies, time it takes to cut and sew all highlighted how impossible it is to produce clothing ethically at the low prices charged for much ready-to-wear clothing. That doesn’t even take into account the raw materials that are used to make the fabric and problems with content, pesticides, sustainability, etc.

At the same time, like many, our budget, doesn’t allow us to spend a ton on clothes. We try to make the most of our clothing budget guilt-free by shopping thrift stores and second hand shops. That way we aren’t adding to the problem by purchasing new. Most thrift shops are charity-based, so our purchases help others. We often find better quality items than what we would otherwise be able to afford this way, too.

With thrift shopping, you’re not as limited by trends. If you’re looking for something in particular, unless it’s a common item, you’re still likely to come up empty handed. That has been our problem when it comes to comfortable men’s and boy’s pants. Both Finn and Christopher would prefer something a little roomier, like karate gi pants. Unfortunately, nothing like that has been in fashion since M.C. Hammer. That means it’s time to put my sewing machines to use.

Making a Pattern from Shorts

This summer, I started by trying to copy a pair of the cotton knit gym shorts they practically lived in, adding a gusset for comfort and mobility. I used to buy bulk bags of t-shirts from Thrift Town before they closed, so instead of using new fabric, I used some XL t-shirts I had on hand. That way, if things went horribly wrong I wouldn’t feel as bad.

If you follow me on Instagram, you might remember seeing this photo with some enticing caption like, “Working on a new project!” Then, nothing else was said. Sorry.

I have zero experience with pattern making, so this was a learning experience. Here’s a brief overview of how I did it.

shorts pattern

I laid the shorts inside out and folded in half, front to the inside, smoothing them as flat as possible. Then I traced them, adding about an inch all around. The inch is for seam allowance and to account for the fact that it’s impossible to get finished shorts to lay flat. I always err on the side of too big, because that is much easier to fix.

At the waistband, I measured the waistband and extended the pattern by that amount plus seam allowance above the waistband. This allows it to be folded down for elastic and a drawstring casing. At the hem, I extended the lines two times the width of the hem to allow enough fabric to fold and hem. On the pattern, I drew lines straight across to show where the finished hem and waistband hit on the original shorts for reference.

Then I folded them in half , backs to the inside and repeated the above steps since the back is cut differently than the front.

Drafting the Gusset

For the gusset, I drew kind of a triangle with the top point cut off. To do this evenly, I folded a piece of paper in half, drew a half inch line perpendicular to the fold, moved over about four inches and drew another perpendicular line measuring one and a half inches. Then I drew a straight line connecting the tops of the lines.  I cut along the lines and opened it up to get my gusset pattern. Sewing the gusset in with the wider part at the crotch seam and using a half inch seam allowance results the gusset tapering down to a point.

Shorts to Pants

Shorts work for summer, but I needed to come up with a pants pattern for fall and winter. Chris suggested just making the shorts pattern longer, so I did by measuring the waist to floor measurement and extending my pattern the needed amount, including seam allowances.

pants pattern drafting

I did this by taping the bottom of the pattern to a big piece of paper, sketching out the needed length and side seams and cutting it out.

Final Pants Result

My pattern isn’t perfect. I think I’ve tweaked it each time I’ve used it. Since the pants are made to be loose and flowy it hides the imperfections.

These are my first attempt. I made them with a linen blend, elastic and drawstring combo waistband and no pockets. I added side-seam pockets later.

Pants

My goal is to find or draft a few more basic, customizable patterns for pants and shirts that can be made in linen or a similar material. Then I can buy a bulk amount of undyed fabric and dye it as needed.

Like this post? To make sure you never miss a future post, please sign up for my newsletter.


Posted on Leave a comment

T-Shirt to Yoga Shorts Refashion

If you’re new to refashioning or sewing clothing in general, loungewear is a great place to start. It’s less intimidating because, since you’ll only be wearing it at home, it doesn’t have to be perfect. This refashion project is perfect for a beginner because you only need two t-shirts to make it, and it’s mostly straight lines or slight curves.

I originally shared this tutorial a few years ago, before Thaddeus. The weather is beginning to warm up , so it’s a great time to sew some shorts.


I went on a little Pinterest binge a couple days ago looking for ideas to help clear my refashion stash. Saturday night I decided to make a pair of yoga pants out of a t-shirt using this tutorial. I wear a size eight on average, and used an XL adult t-shirt.

Adaptations from the original refashion project

I did make a few changes to the design. First, instead of cutting the shirt down the middle, I cut it down the sides from the middle of the underarm to the hem. This also means you’ll have an inseam and no side seams. That keeps any design on the front or back intact and moves them to the hips.

For the waistband, I cut the underarm seam from the sleeves and squared them up to be two equal rectangles, leaving the hem intact. I sewed the short sides together making a big, short tube from the sleeves. I then put the tube inside the waist of the pants with the pants right side out and the right side of the tube facing the inside of the pants. The raw edge of the tube lines up with the raw edge of the pants. I serged the top together like that. This made it so when the tube is folded down to the outside, the seam is covered.

T-shirt yoga pants refashion
IMG_4452
IMG_4459
Sorry for the awkward pictures. No one was around to take the pictures and Doctor Who was about to start.

I sewed it all on my serger. The entire refashion project took less than ten minutes. I probably should have added two minutes and switched from white to black thread. Or not.

If you don’t have a serger, you can use a zig-zag stitch to prevent breakage. Many sewing machines have specialty stitches for sewing knits, too, so check your machine to see if that is an option. This DIY T-Shirt Bag Tutorial has more information on stitch selection for knits.

Final verdict

They are a little loose at the waist. If I were planning to actually do yoga or wear them in public I should probably add some elastic at the seam. Since they will probably be used mainly for watching Doctor Who while sitting on the sofa, I probably won’t bother.

I personally don’t mind the length, but you could easily make them shorter by cutting them off to the length you prefer. Knit doesn’t unravel, so you can leave the edges raw, or turn them under and hem.

To make sure you never miss a post, please sign up for my newsletter.

T-shirt to yoga pants refashion

If you click through any of the Amazon links and make a purchase, I will receive a small commissionThere is no added cost to you.