Posted on Leave a comment

Upcycling Fabric Scraps

Fabric-Scrap-Upcycle

This isn’t going to be a full tutorial because I didn’t do a great job of documenting the process. If you’d like a full tutorial, please let me know. I will link to the page I learned it from here.

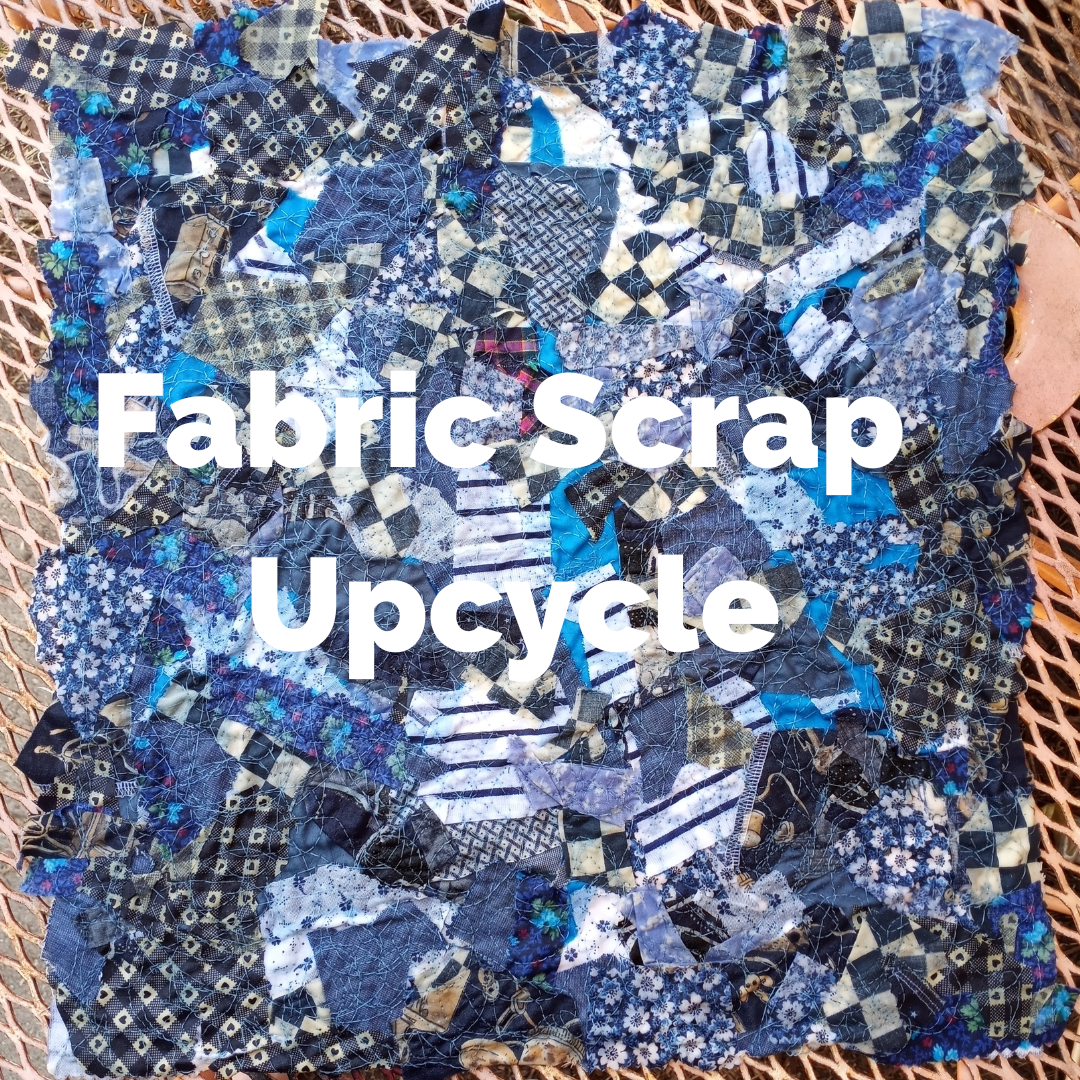
I saw this really cool way to make a bunch of fabric scraps into new, usable fabric that is really textured and cool. First, you need a backing piece of fabric. I used an upholstery sample square that I hadn’t found a use for yet. Then, you cover it in fabric scraps. I went with all pieces from my “blue” sorter bin and let them fall all over randomly. I did try to keep it all in one or two layers and moved pieces around to cover all the empty spots. I left some upside down to add more variety in the colors, and I didn’t worry about ironing the pieces first. 

Once I had everything in place, I pressed it with my iron to smooth it down. Then I pinned water soluble stabilizer on top to help hold everything in place for the sewing machine. To sew, I lowered the feed dogs on my machine and crazy free motion quilted everything together. You can see that in the first video below.


@subearthancottage

Trying a new technique to make usable fabric from my fabric scraps. #upcycling #zerowaste #asmr #sewing #quilting

♬ original sound – Charity

After I had everything thoroughly stitched down, I rinsed out the stabilizer, shown here.

@subearthancottage

Rinsing out the water soluble stabilizer. It’s so cool to finally see the colors pop out as the stabilizer dissolves. #upcycling #sewing #quilting

♬ Lofi Vibes – Gentle State

That’s it. Now I have this really cool piece of fabric. I can’t decide what to do with it. It almost looks like it could hang on the wall like that as art. I also thought about making a couple of zipper pouches or sets of coasters out of it. It would also be fun to use as patches for clothing. 

What would you make with it? Leave your suggestions below. 🙂

Posted on 1 Comment

Sewing Chores: Tips to maximize sewing time

Even if you love sewing, there’s some parts that can be a chore. Ignoring those tasks or leaving them for later can result in wasted sewing time and money. Here’s a list of chores I try to tackle when I have a few minutes so that my real sewing time is spent actually sewing.

Bobbin winding

If you have a Side Winder, bobbin thread running out mid-project might not be a big hassle. If you rely on your machine to wind bobbins, though, running out means stopping your work, re-threading your machine to wind a bobbin and then setting it back up to sew. To prevent this headache, when you have a few spare moments, wind a few bobbins in your most commonly used colors. If you have a project in mind, wind a couple of bobbins in the needed colors. Keep extra bobbins on hand and wind at least one for every different thread color you have. 

Pre-winding extra bobbins makes this notice less annoying.

Clean your machine

Lint, threads and dust build up over time and can cause poor stitch quality or even damage your machine. It’s a good idea to make a habit of brushing the debris out at the end of each project, or during projects with linty fabrics.

If the inside of your machine looks like this, you should probably clean it more often.

Periodically you’ll want to vacuum out your machine to really clean it. Vacuum attachments made for cleaning computers work well for this. Some people use canned air, but that’s not recommended. It pushes some of the debris deeper into your machine.

Oil your machine

Once your machine is thoroughly clean, take a moment to oil it according to your manual. This will keep it running smoothly and reduce the need for costly repairs. If you don’t have the manual, you can usually find one online. 

After oiling, always sew a few rows on scrap fabric to soak up excess oil. That way, you won’t risk ruining a project with oil spots. 

Tidy up

The best practice is to put away tools and excess fabric as you go. It’s easy to get distracted and forget, though. Taking a moment here and there to run through your sewing area to tidy up when you aren’t working on a project can save sewing time later.

Keep a shopping list

Nothing is more annoying than having to stop work because you ran out of a necessary supply. Make note of supplies that are low or that have run out on a notepad to take on your next shopping trip.

Prewash fabric

Unless you know your final project will never be washed, you should always prewash your fabric. One way to make sure this happens is to wash it as soon as you bring it home from the store. You could also work it into your usual laundry schedule. Having a prewashing routine prevents delaying a project or worse, giving in to the temptation to make something and have your final product ruined in the wash.

Tip: Serging or zig-zag stitching the cut edges will prevent excess fraying in the wash.https://subearthancottage.com/random-sewing-tip-painless-prewash

These are the chores that, for me, are the biggest sewing time-wasters when neglected. Please share your dreaded sewing chores and tips to keep them from becoming time-wasters in the comments.

Posted on 3 Comments

Easy Natural Furniture Polish

I have quite a bit of finished wood furniture that I love, except when it comes to polishing. There’s always some sticky fingerprints or a glob of something unidentifiable (thank you, Thaddeus). Most commercial polishes do okay on relatively clean surfaces, but don’t do a great job on the really messy stuff. Sometimes I’d spray some polish right on the spots, polish the rest and hope the globs loosened up enough to wipe away. Once in a while it worked. Other times it resulted in a ring around the spot while the sticky may or may not have loosened at all.

I finally did a little research on homemade furniture polish recipes. Here’s the one I use.

DIY Natural Furniture Polish

Ingredients:

3 parts olive oil
1 part vinegar
Splash lemon juice (optional)

Combine everything in a spray bottle and shake to mix. Some recommend storing it in the refrigerator or only making what you’ll use in a day. I make about 1-2 cups worth at a time  and keep it at room temperature. So far I haven’t had problems with it spoiling.

IMG_1875
IMG_1878

For light polishing, I spray the rag and wipe. For heavier cleaning, I spray directly where needed. I have never had it leave a ring, and it buffs nicely without leaving a residue. It works equally well on furniture with a matte stain and pieces with a high gloss varnish.

I love that this recipe uses things I have around the house and costs less than even the cheap commercial polishes.  I also like knowing that it is completely nontoxic. I can let Thadd help without worrying that it might hurt him if he sprays it in his face. Or my face. Seriously, you never know with this kid.

You could probably customize it with a few drops of essential oils, too. I think something citrus-y would be nice. Also, if you don’t have olive oil, you could try swapping it with whatever you have on hand.

Give it a try and tell me what you think. If you’d like more “green” cleaning options check out my recipe for soft scrub and my all purpose cleaner recipe.

For my handmade home and laundry products, click the link below.

Like this post? To make sure you don’t miss out on future posts, sign up for my newsletter.

Posted on 1 Comment

DIY Embroidery Patch Quick Tip

I love upcycling in my crafting. I love that it saves money and keeps things out of the landfill. One of my latest ways to upcycle is using denim as a base for machine embroidery patches. Just about everyone has a pair of worn out jeans. Denim is the perfect weight for patches, so I take usable fabric from old jeans and stitch my patch designs on that. Give it a shot!

Patch stitched on a scrap of denim.

You can find this design in my shop here.

Stitching mini patches on a denim scrap from blue jeans.

Like this post? To make sure you don’t miss out on future posts, sign up for my newsletter.

Posted on Leave a comment

How to Make a Port Pillow

Something that I have found very useful since getting my chemo port put in is a port pillow. Port pillows are small pillows that attach to seatbelts to prevent the seatbelt from irritating the port. Luckily, they are super easy to make with very little materials needed. There are many organizations that accept them as donations to give to cancer patients, so that’s something to consider if you are looking for a charitable way to use up your stash.

Materials for a port pillow.

Materials needed for One Port Pillow

  • 2 rectangles of soft fabric, approximately 4 inches by 7 inches. I like using quilting cotton.  There is enough fabric in my soap’s wrapping to make one pillow, so upcycle if you have it. 
  • 2 pieces of hook and loop tape (Velcro) measuring 3.5 inches each. 
  • Polyfil or other stuffing.
  • Thread

Step one: Baste the Velcro

Separate the Velcro pieces and baste them in place on one piece of the fabric close to the edges. I just eyeball the placement at about halfway between the middle and short edge of the rectangle for each Velcro piece. I like to make the softer piece face up, but it doesn’t really matter. You could also use pins to hold it in place instead of basting, but I find machine basting easier. 

Step Two: Sew the pillow

Sew the fabric rectangles wrong sides together as shown in the photo below. Be sure to leave an opening for turning. I left the opening on a long side for this one, but it’s easier to sew closed if you leave it on a short side. 

Leave the opening on the end next time.

Step Three: Turn and Stuff

Clip the corners, being careful not to cut the thread, turn the pillow right side out and stuff. I like to press the empty pillow before stuffing for a crisper look. Just be careful not to melt the Velcro if you do this too. 


Turned and pressed.
Stuffing. Needs a little more to be semi-firm.

Step Four: Sew it Closed

If you want the seam hidden, you can sew it closed by hand. I don’t mind the seam, so I use my machine to make it quick. This is much easier when the opening is on the end as evidenced by the number of pins I used to hold it closed. I hate using pins. 

I can usually manage without pins when the opening is on the end.

Done

The end result should look something like this.


This is one of those projects that I’ve done so often I may have overlooked something in trying to tell someone else how to do it. If anything is confusing, please ask in the comments. I will clarify it ASAP.

Like this post? To make sure you don’t miss out on future posts, sign up for my newsletter.

Posted on 3 Comments

Quick Drawstring Bag Tutorial or How to Reuse Your SubEarthan Cottage Soap Wrapping

I wrap my soaps in fabric because it looks nice, it allows the soap to breathe (read here for why), and because it feels better than plastic. I often wonder what happens to the wrapping. I’m sure there are some that toss it. I know of one person who collects the fabric for quilts. For those of you who, like me, don’t want to throw away something that could be useful but don’t know what to do with it, I have a tutorial for a drawstring pouch, just for you.

This is done with the wrapping from one of my soaps, but you could make it in any size you like.

Materials
Cloth wrapper from soap (roughly 8×11 inches)
Jute string from soap (about 29 inches)
Thread

Tools
Needle or Sewing machine
Safety pin or Bodkin
Scissors
Iron

First, iron your fabric flat. Then, fold down a long edge about 3/4 of an inch to one inch and press. This is for the casing. It doesn’t have to be super precise.

Sew a straight seam along the bottom of the flap to form the casing. All the sewing can be done by hand or machine. I have no time or patience, so I choose machine. Fold your material in half with right sides together like a book.

The fold is at the bottom of this photo.

Next, starting just below the casing seam, sew down the side and across the bottom. I use anywhere from a 1/4 to 1/2 inch seam allowance for this. Again, it doesn’t have to be precise.

With scissors, clip the bottom corners, being careful not to cut your stitching. You could probably skip this step, but it helps the corners look square and crisp. Turn your bag right side out.

Now it’s time to thread the string. Tie one end of the string to a safety pin, large paper clip, or attach a small bodkin. This makes it easier to work it through the casing. Thread it through the casing, safety pin first.

Once you get the string to the other side, remove your safety pin or other tool and adjust the string so that the ends are even.

Knot the ends together once or twice to keep it from coming out.

Ta-da! It’s done! Perfect for organizing your purse, storing jewelry or other small items, or as a small gift bag.

Or holding your favorite bar of soap.

Tutorials are always a little complicated to write because it’s easy to overlook small steps in things you do frequently. If something is unclear, please ask. 🙂

If you have any other creative uses for a SubEarthan Cottage soap wrapper, I would love to hear it!

Posted on Leave a comment

Homemade Candles are the Way To Go

I love candles. Making your own is a great way to recycle old wax into something uniquely yours. This post from Crafting a Green World shares several methods for candle making.

Whether you’re rolling beeswax candles with kids or pouring a multi-color, multi-layer jarred candle, homemade candles give you the power to fill …

Homemade Candles are the Way To Go