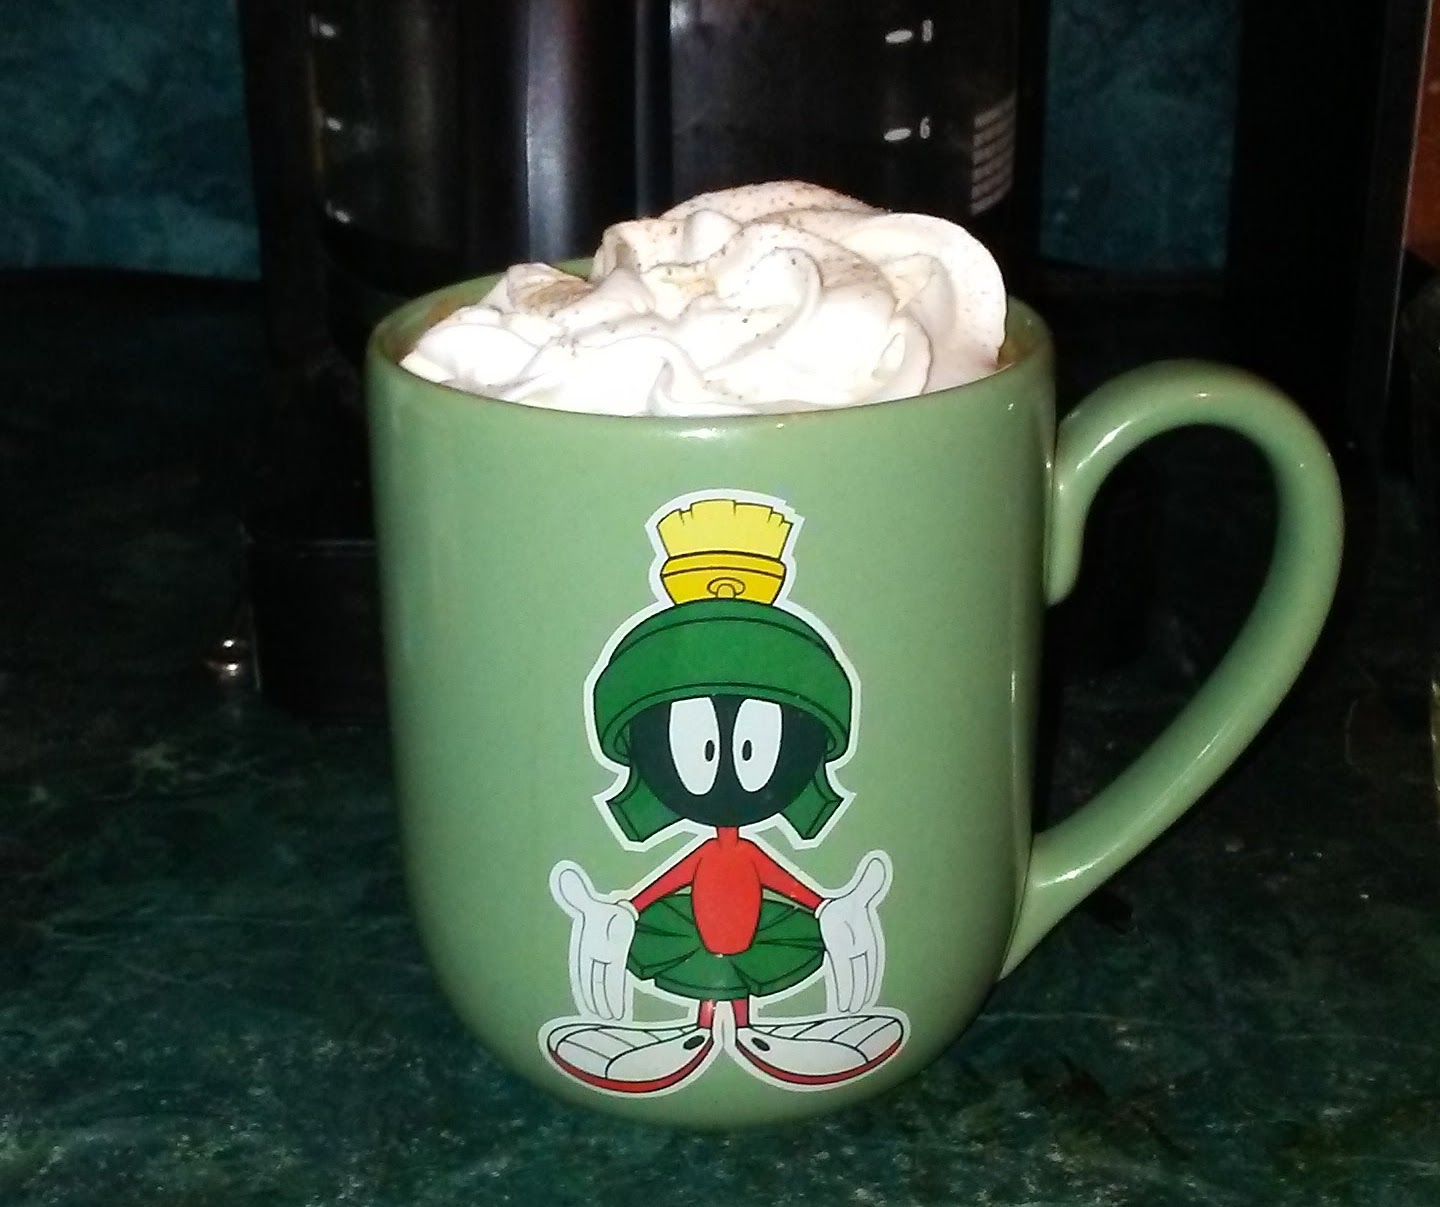
Ready for all things pumpkin? Here’s my favorite recipe to make a pumpkin spice latte. Make it with tea, coffee or milk in a smoothie for a healthy, frugal way to enjoy pumpkin spice at home.
2-3 tablespoons of milk (original recipe called for coconut. I usually use almond milk. You can use whole milk, too.)
1/3-1/2 teaspoon cinnamon
1/8 teaspoon cloves
¼ teaspoon ginger
1/8 teaspoon allspice
1/8 teaspoon nutmeg
Optional: a dash to 1/8 teaspoon of turmeric
Maple syrup, sugar or honey to taste. I like maple syrup.
To make:
Blend all ingredients together. Top with whipped cream and a dash of nutmeg. Enjoy. Repeat. 🙂
I’ve also used this basic recipe to make a pumpkin spice smoothie. All you do is swap out the coffee for the milk of your choice and add a frozen banana or a fresh banana and some ice. While it’s healthy as is, I also like to add an extra spoonful of pumpkin to up the vitamin content, as well as some chia or flax seeds. You could easily leave those out, though.
With just a few simple ingredients, you can make a yummy pumpkin spice latte inexpensively at home. I've included variations for a chai latte and smoothie, too! The recipe serves one or two, depending on how much coffee you drink. 😉
2-3Tablespoons Milk of choice.I usually use almond milk.
1/3-1/5Teaspoonground cinnamon
1/4Teaspoonground ginger
1/8Teaspoonground cloves
1/8Teaspoon ground allspice
1/8Teaspoonground nutmeg
1/8Teaspoonground tumeric (optional)
Maple syrup, sugar or honey to taste.
Whipped Cream (optional)
Instructions
Blend all ingredients together.
Top with whipped cream and a dash of nutmeg. I like the non-dairy Reddi-Wip
Enjoy.
Notes
I’ve also used this basic recipe to make a pumpkin spice smoothie. Just swap the coffee or tea for the milk of your choice and add a frozen banana or fresh banana and ice. Blend thoroughly. While it’s healthy as-is, I like to add an extra spoonful of pumpkin to up the vitamin content, as well as some chia or flax seeds. You can easily leave those out, though.
Have a happy Pumpkin season!
Like this post? To make sure you never miss a future post, please sign up for my newsletter.
It’s my birthday on Saturday (yes, April Fool’s, I know, lol). If you use coupon code April2023 you’ll get 20% off your entire order at SubEarthan Cottage. Valid on regular and sale-priced items through April 3, 2023.
And, since birthday’s are weird without cake, here’s my favorite allergen-friendly chocolate cake recipe.
This is a simple chocolate cake recipe that is super easy. It is dairy-free, egg-free, and if you swap the wheat flour for a gluten-free flour blend, it's gluten-free, too! To make it gluten free, I like Bob's Red Mill 1 to 1 gluten free blend because it already contains xanthan gum. If you use a different gluten-free flour without xanthan gum, I would add about 1-1.5 teaspoons of xanthan gum.To top, make a simple buttercream (with shortening and non-dairy milk to keep it non-dairy) or use your favorite store bought frosting. You could also sprinkle the warm cake with dairy-free chocolate chips, let them melt a little, then spread across the top for a rich, chocolaty treat.
Prep Time10 minutesmins
Cook Time35 minutesmins
Course: Dessert
Keyword: 9 x 13, cake, chocolate, dairy free, easy, egg free, gluten free, one bowl, simple
Servings: 292×2 inch servings
Equipment
9 x 13 rectangle pan
Ingredients
3CupsFlour see recipe summary for gluten-free adjustment
1teaspoonsalt
2teaspoonsbaking soda
2cups sugar
6tablespoonscocoa powder
2tablespoonsvinegarwhite or apple cider vinegar
1cup vegetable oilany light flavored liquid vegetable oil is fine
2cups cold water
2teaspoonsvanilla
Instructions
Preheat the oven to 375 degrees Fahrenheit
Grease the 9 x 13 inch pan, either with shortening, butter, or cooking spray
Combine the first five (dry) ingredients in a large mixing bowl and mix until evenly blended. Alternatively, sift them together into the bowl.
Add the remaining (wet) ingredients and mix until thoroughly blended. You can use a spoon or an electric mixer.
Pour the batter into the greased 9 x 13 inch pan.
Bake at 375 degrees Fahrenheit for 35 minutes or until a toothpick inserted near the middle comes out clean.
Notes
I frosted this cake with buttercream tinted blue, then used gel food coloring to paint the faces. I then piped buttercream for the eyes, facial features, outlines, writing and trim. I clearly am not a trained cake decorator, so I can’t really say which tips I used or any other details.
Like this post? To make sure you never miss a future post, please sign up for my newsletter.
With freezing temperatures and possible snow in the forecast, it seemed like the perfect time to revisit this delicious sausage potato soup recipe.
I love the slightly spicy, creamy Zuppa Toscana soup from Olive Garden. Since going gluten-free and dairy-free, Zuppa Toscana and pretty much anything Olive Garden are out of the question. With the cold weather, though, I really crave soups. I made some potato soup a few days ago that was yummy, but just not the same. Today I realized I happened to have everything I needed to attempt a sausage and potato soup very much like Zuppa Toscana.
It doesn’t have quite the same creaminess due to substituting almond milk. Cashew milk is a creamier substitute, but I didn’t have any on hand. For a first dairy-free attempt, it turned out pretty darn close.
I made my sausage potato soup in my electric pressure cooker. You could easily make it in a slow cooker or on the stove top, but I like how the pressure cooker really develops the flavors, similar to cooking in a slow cooker but without the long cook time. I also love that I can use the saute function on my pressure cooker to brown the sausage. This prevents having to dirty a skillet, like I would if I used a slow cooker.
Dairy and gluten free sausage potato soup inspired by Olive Garden's zuppa toscana. I prefer making it in my electric pressure cooker but it could easily be done in a slow cooker or on the stove top.
Electric Pressure Cooker, unless cooking on stove top or slow cooker.
Ingredients
1lb Ground Sausage
3-4 Largish potatoes, sliced
1medium Onion, dicedWhite or yellow.
2-3 cups Kale, torn or chopped.Could substitute spinach or other greens.
6-8 cups Chicken broth (gluten-free if desired)You want enough to cover the rest of the ingredients in the pot without too much over.
2cups Almond or Cashew milk
Salt to taste
Crushed red pepper to taste
1tbspolive oil
Instructions
Select the "Saute" function on the pressure cooker.
Add the olive oil and brown the sausage.
Add the onion a few minutes before the sausage finishes browning to soften.
When the sausage is browned, turn off the "Saute" function.
Add the potatoes, kale, broth and seasonings. Do not add the almond or cashew milk yet.
Lock the pressure cooker's lid in place and select the "Soup" function. I used the 30 minute function.
After the cooking is complete, either wait for pressure to naturally release or CAREFULLY do a manual release. Soups spray and spatter if you immediately try to release the pressure, so I recommend waiting at least ten minutes if you are going to manually release the pressure.
Add the almond/cashew milk and stir. The soup should be hot enough to heat the milk addition without additional cooking.
Enjoy!
Notes
I don’t really measure recipes like this, so most measurements are approximate.The stove top instructions are basically the same. Brown the sausage in a big soup pot, add the ingredients except the milk and simmer for around thirty minutes. Add the milk and serve. For the slow cooker, brown the meat on the stove, add everything but the milk to the slow cooker and cook on low for 4-6 hours. Add the milk and serve.
Please leave a comment if you try this and let me know how it turns out. If any of my instructions need clarification, don’t hesitate to ask in the comments, too.
For more electric pressure cooker recipes and tips, click here. To stay up to date on SubEarthan Cottage happenings, please sign up for my newsletter.
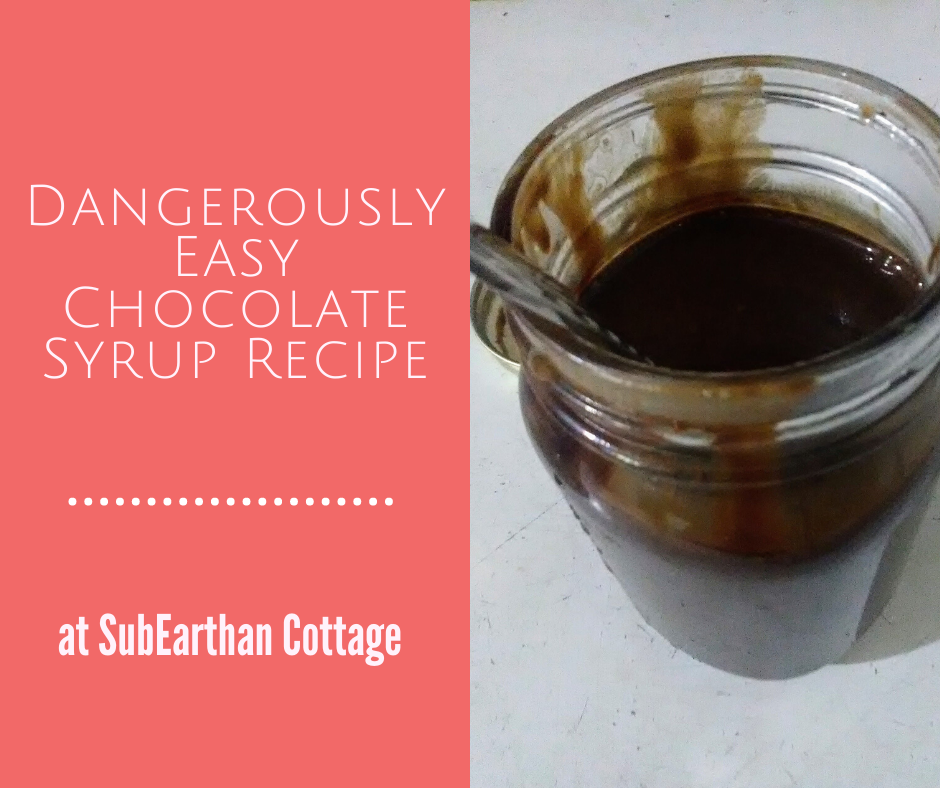
Chocolate syrup is deliciously versatile. Stir it in hot or cold milk or coffee for a treat or pour over ice cream to make it even more decadent. Then there’s old fashioned sodas and baked goods made with chocolate syrup. With this chocolate syrup recipe, you can make delicious chocolate syrup with just a few basic pantry staples whenever you need it.
Sure, it’s easy to pick up a bottle from the supermarket, but with this easy chocolate syrup recipe, you can make it for a fraction of the cost and without a trip to the store. By making it, you also have control over the ingredients. Use your favorite cocoa powder, experiment with the type and amount of sugar or swap out the vanilla extract for something a little more creative to make it your own. I can totally see using peppermint extract to mimic the flavor of Andes mints. Or, if you’re a fan of Terry’s Chocolate Orange chocolates, add orange extract.
Like most of my recipes, this chocolate syrup is gluten free and dairy free.
This chocolate syrup recipe is so easy and delicious. With only a few pantry-staple ingredients needed, you'll never have an excuse not to make it. Should be good for at least a month when stored properly. I usually find plenty of ways to use it up before then.
Prep Time2 minutesmins
Cook Time5 minutesmins
Course: Dessert
Ingredients
1cup cocoa powder
1 cup sugar
1 cupwater
1/2teaspoonsaltor to taste
1teaspoon vanilla extractor to taste
Instructions
Mix the sugar and cocoa together in a saucepan until thoroughly combined.
Add the water and half of the salt (1/4 teaspoon). Bring to a boil over medium heat, stirring constantly.
Continue to boil while constantly stirring until the mixture thickens a little. (It will thicken more as it cools) This should take around 3 or 4 minutes.
Carefully taste and add the rest of the salt, if desired.
Remove from heat and add vanilla extract.
Cool and store in an airtight container in the refrigerator. I like using a glass jar.
Notes
The vanilla extract and salt amount can be adjusted according to taste. I can also see swapping out the vanilla for peppermint or orange extract.
While I try to write recipes as clearly as possible, it’s easy to miss a step or make assumptions. If anything is confusing, please don’t hesitate to comment with your questions. If you make this recipe, please let me know what you think.
Like this post? To make sure you never miss a future post, please sign up for my newsletter.
This post contains affiliate links. If you click through any of the Amazon links and make a purchase, I will receive a small commission. There is no added cost to you.
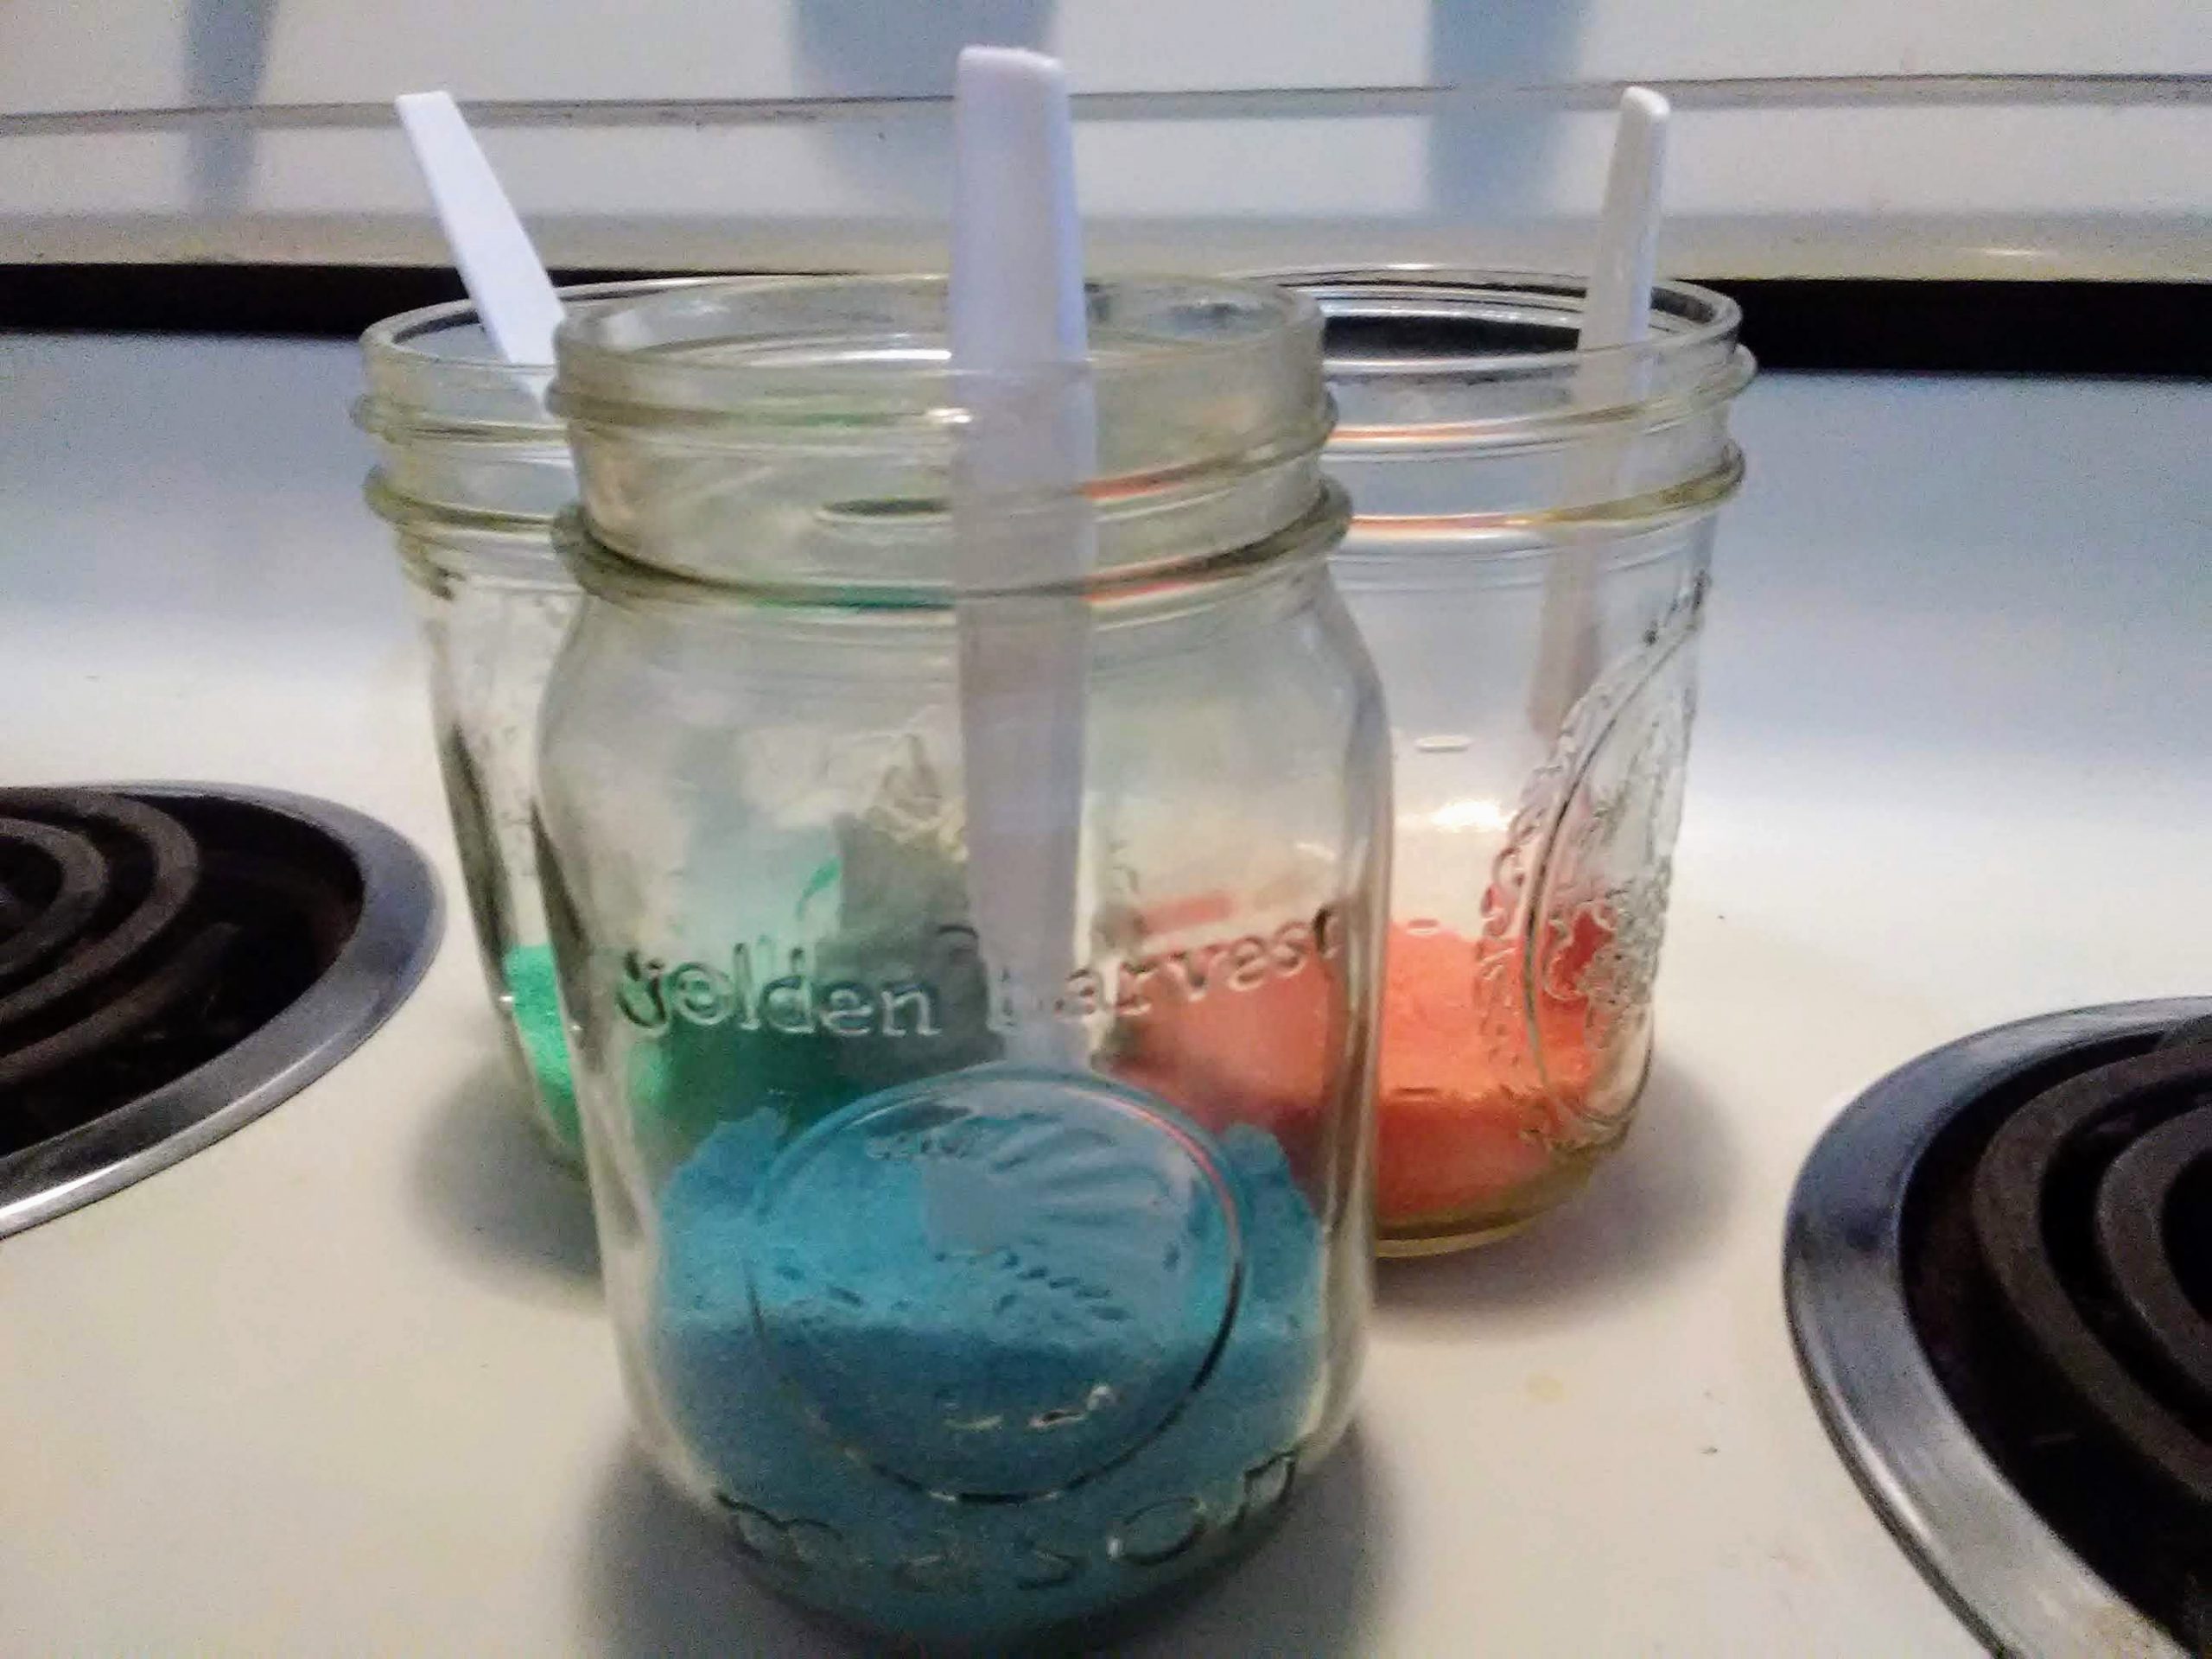
A few days ago, I thought it would be fun to make Christmas cookies. Then I remembered that my Christmas cookie cutters had disappeared, we were out of any sort of sprinkles for the cookies and I really didn’t want to make decorator frosting or go to the store for supplies. My solution? DIY sugar sprinkles!
Ingredients
Granulated sugar
Food coloring
Supplies
Jars, plastic containers or sandwich bags, one per color. (Ideally something with a shaker top, which I didn’t have)
Spoons or shakers
How to make the sugar sprinkles
Measure about 1/4 cup of sugar into each container.
Add 2-3 drops of food coloring to the sugar.
Shake or stir until the color is evenly distributed.
Let air dry. I just left the lids off the jars and set them on the stove while the cookies baked, stirring occasionally. If you use bags or plan to store it for a longer period of time, you may want to spread it on parchment or a cookie sheet to make sure it is super dry.
Mom tip: If your cookie decorating skills are not Pinterest-worthy, just let your kiddos do the decorating.
The recipe I used for the cookies was the sugar cookie cutout recipe from my trusty red and white Better Homes and Gardens cookbook. To make them gluten free, I substituted Bob’s Red Mill 1 to 1 gluten free flour. If you are new to gluten free baking, it is a great flour to start with. I have had lots of success making all my old recipes gluten free with just that simple substitution.
My solution for not having cookie cutters was to use a round glass to cut out “ornaments”. We dusted some of the cookies with the sprinkles prior to baking. For the rest, I made a simple icing that got dusted or caked with sprinkles, depending on who was doing the decorating.
No matter what our budget looks like, food is always a part of it. You have to eat, right? There are many thoughts on the best way to save on food. These are the things that work for me.
Eat at home
This one is probably the most important. If you eat out, regardless of whether it’s a dine-in or fast food restaurant, you are going to spend more than if you cook and eat at home. It’s fine to splurge once in a while, but if you’re looking to save, eating at home gives you the most bang for your buck.
Buy mostly ingredients
Prepackaged foods are sometimes quicker, but they are usually more expensive per serving. If it’s a choice between eating out and eating convenience foods from the grocery, it’s still usually cheaper than eating out, so if it’s a choice between KFC or a deli rotisserie chicken, bagged salad and prepackaged dinner rolls, the deli chicken is probably the cheaper and healthier option.
There are some convenience items that I find helpful, especially when life gets hectic. Jarred sauces, bouillon and frozen potatoes in various forms are things that I like to have on hand to help me get a meal on the table quickly. When there’s not time to make the sauce from scratch or I don’t have homemade broth on hand those can make it easy to still throw something together. They’re also usually fairly inexpensive, so I feel they are budget friendly convenience choices.
Buy in bulk where it makes sense
Don’t buy a ton of perishables like fresh fruit just because it’s on sale. If you have time to prep and freeze or can the fruit, then go for it. Things like canned goods, freezer staples and shelf stable items are great for buying in bulk, if you have the room. We have a small chest freezer, so I’m able to buy fruit on sale to freeze for smoothies or desserts and an extra ham or turkey when they are on sale for under $1 per pound around the holidays.
I also buy basmati rice in 20 lb bags because we prefer it over other types of rice and it is so much cheaper that way. To keep it fresh and manageable, I keep a small container of it in the cupboard and the rest goes into the freezer.
Shop creatively
It’s easy to have one or two grocery stores or box stores where you do all of your shopping. If you have farmer’s markets, discount groceries or ethnic groceries in your area, you may find better deals on some items.
For starters, if you have an Aldi nearby and haven’t given them a try, please do. I’ve found them to have a good selection of staples and they have a good guarantee on everything they sell. You won’t find many name-brands at Aldi, but with their guarantee, it’s worth trying and seeing if you like their store brands. They also carry a lot of gluten-free options, as well as dairy-free milk alternatives and a dairy-free mozarella cheese.
I also frequently shop a local Vietnamese grocery store. They have tons of fresh greens and other produce at really good prices. I also get a lot of specialty items, like things for making pho or sushi for sometimes half the cost or less of what I would pay at Kroger or Walmart. Bulk spices and rice are also cheaper there. For gluten-free pasta, rice noodles from there are cheaper than gluten-free options from Kroger and Walmart.
Find a method of meal planning that works for you.
Some people do really well with having every meal, every day planned out to every last detail. I prefer something more flexible that allows for changes based on last minute plans or whatever is on sale that week or whatever leftovers we need to eat. Regardless of the type of meal planner you are, have some sort of game plan in place.
Meal planning is one area where I need to improve, but I do have a basic game plan for meals that I’ll post on at a later date.
While you’re planning, don’t forget lunch. Leftovers are quick and easy lunches, so if you’re planning a dinner that reheats well, make enough for lunch the next day.
Keep staples for one or two quick meals on hand always
This is important in case you forget to plan, or something doesn’t work out with your plan. Whether it’s spaghetti and premade sauce, eggs, fruit and toast or some other meal you can throw together in under thirty minutes, keep the ingredients on hand for one or two backups that you like. Having a backup option makes it easier to eat at home when you might otherwise be tempted to eat out.
Eat real food
If you have to change your eating habits due to health or personal beliefs, it’s easy to try to substitute faux or “free” foods tailored to that diet. Price-wise though, it’s better to adapt your diet with real foods. Rather than faux meat burgers, try grilling portobello mushrooms or making your own patties with chickpeas. Instead of gluten free pasta, substitute rice or potatoes. Instead of diet drinks, flavor water, tea or soda water with fruit.
If you’re really craving cheese and you’re dairy free or bread and you’re gluten free, go ahead and splurge on the dairy or gluten free options. If you’re on a plant-based diet but desperately want something like a real burger, go for one of the faux meat patties. Just try to keep those splurges to a minimum and you’ll save money.
Find recipes for soups, stews and beans that you like
Soups, stews and beans are usually cheap, filling and can be a one pot meal. Having a few recipes you like and keeping the ingredients on hand can really help save money on food. They also are easy to make in bulk and usually freeze well, so making a bunch and having it for lunch or in the freezer for nights that dinner plans don’t work out helps prevent eating out. I love crock pots or pressure cookers for making soups and stews. It’s absolutely not necessary to run out and buy a slow cooker or pressure cooker, but if it’s something you’ve been considering, I love my electric pressure cooker for so many things.
Even the best meal planners have days where things don’t go according to plan. Fast food is convenient, but usually more expensive and less healthy than what you can make at home. If you have any dietary restrictions, eating out safely can be extra challenging. For those nights, I like to keep a few staples on hand that make it easy to make a last minute meal that’s healthy and frugal.
Here’s my list of grocery staples I like to keep on hand for last minute meals, along with ideas for how to use them. Depending on your tastes, you may not find everything I use helpful. Since we eat gluten and dairy free, my list doesn’t include common staples like bread or cheese.
Grocery Staples for Last Minute Meals
Proteins
Flash Frozen Boneless, Skinless Chicken – I always have one or two bags of frozen chicken. Because they are individually frozen, it’s easy to separate out just what I need. The pieces don’t have to be thawed before cooking, so it’s perfect for a quick meal. I alternate between breasts, thighs and tenderloins.
Eggs – Eggs cook in minutes for when time is short.
Ground Beef – It’s easier to cook ground beef if it’s thawed, but it’s not impossible to cook it from frozen. I like using my electric pressure cooker if I need to cook it from frozen. Place it on a trivet, add about half of a cup of water to the pot and cook under high pressure for about 20 minutes. When it’s done, drain the water, remove the trivet and cook with the saute function with seasonings to remove excess moisture and finish it if it’s still a little pink in the middle.
Canned Beans – Dried beans are cheaper and don’t take that long with a pressure cooker, but sometimes you need something fast. Canned beans are a great plant-based protein for quick meals or for stretching left over meat in stews and chili.
Lentils – Dry lentils don’t have to be soaked and cook in about 20 minutes. I love this Coconut Lentil Curry from A Couple Cooks for a fast meal.
Vegetables
Frozen mixed vegetables – Perfect on their own as a side, or add to soups, rice dishes, scrambled eggs, curries, etc.
Onion – Sauteed onion adds lots of flavor to just about any meal.
Potatoes – Potatoes are great as an ingredient, a side or bake them and add toppings for a meal on their own.
Frozen greens – I like freezing chopped kale to add to soups and curries because it’s hardy and freezes well. Spinach or other greens work, too.
Grains
Rice – Nice to have as a side, with curry or stir-fry or to make a quick jambalaya or similar dish.
Quinoa – Cooks quickly in the pressure cooker and high in protein. Easy Instant Pot Chicken and Vegetable Quinoa is a quick quinoa based meal that is easy to customize and a great way to use up leftover meats and vegetables. You can also make it with rice with adjustments to the cooking time.
Pasta (I buy Aldi’s gluten free or Skinner brand gf at Kroger. ) – Cooks quickly and can be topped with a variety of sauces, tossed with sauteed vegetables and drizzled with olive oil or added to soups.
Tortillas or Taco Shells – These are especially handy because my kids love tacos. Putting anything in a taco shell increases the chances that they’ll eat it. Corn tortillas are also a cheap gluten free bread substitute.
Sauces and Seasonings
Simmer Sauces – These are the closest thing I use to hamburger helper. All you need is the sauce, a protein, a vegetable and rice for delicious last minute meals. Find a variety you like and turn it into an all in one meal if you have an electric pressure cooker if you’re super busy. This is one of my favorite places to use the frozen chicken. I cook it all together and cut up the chicken into bite sized pieces before serving. While it’s cooking in the pressure cooker, I’m free to catch up on housework or whatever else needs done.
Curry Paste – I love the flavor of curry, and adding curry paste to a dish is a way to add a ton of flavor.
Bouillon – Bouillon is another way to add flavor with little effort, or use it to make broth in a pinch.
Canned Coconut Milk – I can usually work around this ingredient with whatever milk or broth I have on hand, but I prefer it for curry.
Tomato Sauce and/or paste – Add to soup, stew or chili, or make a marinara sauce for pasta.
Salsa – serve as a condiment or add to chicken, ground beef or beans during cooking for flavor.
Commonly Used Herbs and Spices – My staples are salt, black pepper, chili powder, cayenne, cumin, basil, oregano, garlic powder, and poultry seasoning. There’s plenty of others I keep around as well, but those are the ones that I use almost daily.
Last Minute Meal Ideas
I’ve provided a few specific recipes above. Really, though, as long as I have one or two things from each category handy, I can combine them to come up with delicious last minute meals. Here’s a few more of my go-to combinations:
Season and oven bake the chicken. Serve with vegetables and rice.
Saute onion using whatever oil or butter I have available until translucent, then add chicken and a little broth. Simmer until the chicken is cooked through. Cut into bite sized pieces and add a spoonful of curry paste, vegetables and a can of coconut milk. Heat until the vegetables are done, being careful not to boil. Serve over rice.
Saute onion in a skillet and toss in a handful of frozen greens. Once the greens are thawed, add whisked eggs and scramble.
Brown ground beef (or pressure cook) add onion and cook until the onion is translucent. Add tomato sauce, basil, oregano, garlic and a little salt. If you like your sauce thicker, add some tomato paste. To cut the acidity, add a spoonful of brown sugar. Serve over pasta. You can also make it with chicken, canned white beans, or skip it and just have the sauce and pasta.
Pressure cook ground beef and season with salt, garlic powder, chili, cumin and cayenne. Make Mexican rice ( I use this recipe). Serve with canned black beans or refried beans and salsa. You can make tacos with the meat if you have tortillas or taco shells, or just have the meat on the side or atop the rice. Shredded lettuce, shredded cheese and diced onion all make it even yummier, but if you’re limited to what’s on hand, it’s still yummy without.
What are some of your favorite last minute meals? I’d love for you to share them in the comments.
Like this post? To make sure you never miss a future post, please sign up for my newsletter.
I, Charity Sloan, am a participant in the Amazon Services LLC Associates Program, an affiliate advertising program designed to provide a means for sites to earn advertising fees by advertising and linking to Amazon.com. Any purchases through those links will result in my receiving a small percentage in commission.
Prices are the same whether you click an affiliate link or a non-affiliate link, so you will not be charged more. Thank you for your support!


