Posted on Leave a comment

Easy Paper Towel Replacement with Upcycled Reusable Cloths

Relying on paper towels to clean up spill after spill stinks. Sure, it’s not so eco-friendly, but, even more immediately distressing to me, at least, is it’s practically throwing money away. Plus, a paper towel is usually not as good at cleaning up a mess.

There’s always the option of buying a huge supply of kitchen towels and cloth napkins, but the initial cost of buying enough to keep up with a toddler’s destructive capabilities is off-putting to say the least. Retiring old clothes, sheets, etc. to rags is a viable and frugal option, not to mention you’re upcycling (or is it recycling? or repurposing?). I don’t really mind just using scraps as rags, but I prefer something a little more aesthetically pleasing, especially if guests are involved.

There’s also the convenience factor to consider. I have limited storage space, so devoting a kitchen drawer or part of a cabinet to hold all the towels isn’t practical. Neither is a basket on the counter, because counter space is even more limited.

My reusable paper towel solution

Here’s my solution. First, I cut up any appropriate worn fabric (t-shirts, flannel sheets, old bath towels, anything soft and absorbent) to whatever size I want. I started with something close to paper towel size but then started cutting some smaller to make more use of the fabric. Then I serged the edges to make them pretty. You could also do a zig-zag, overcast stitch or even just a straight stitch a little in from the edge on a sewing machine. If you are really ambitious you could do a real hem. I’m going for nice but quick to do in bulk. Any edge finishing is unnecessary for t-shirt knits, but they will be more durable being finished. Wovens like flannel will need something to keep them from fraying.

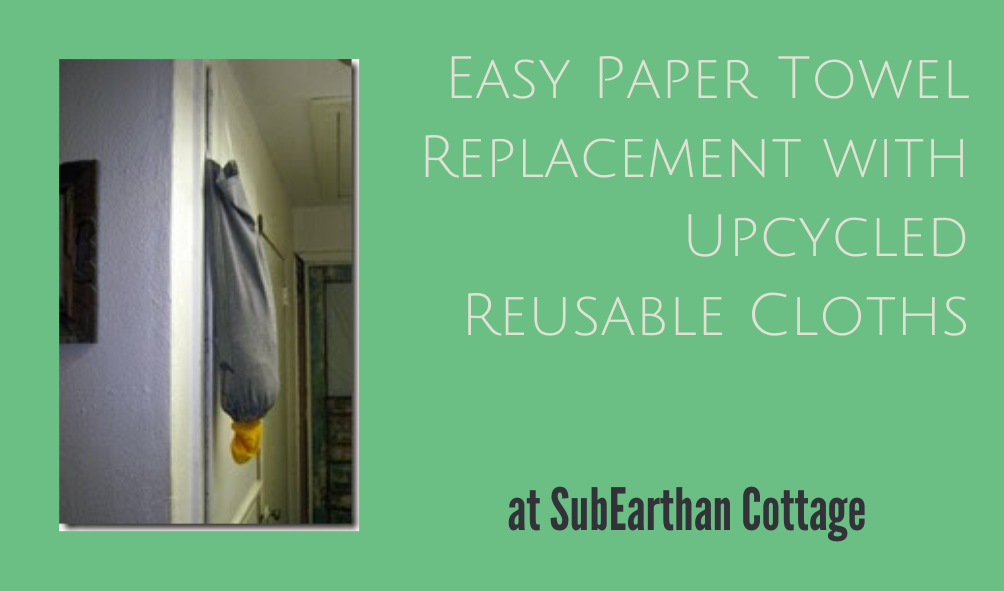
Easy storage with limited counter space

For the storage, I made a hanging tube similar to a plastic bag dispenser. If you have one of those around it will probably work perfectly. If not, there are tons of tutorials for them floating around. The basic design is a tube of fabric with a handle at the top and elastic at the bottom. The elastic tightens the opening enough to keep the towels/bags from falling out. This solves my lack of space problem because I can hang it anywhere and it’s as easy as pulling a paper towel off a roll. They stay in and dispense better if I just shove them in the top without folding them, so no extra laundry folding time.

Un-paper towel dispenser
IMG_4535

This was my quick nap-time prototype. I made it out of half a t-shirt. You can easily make one out of any fabric to match your décor.

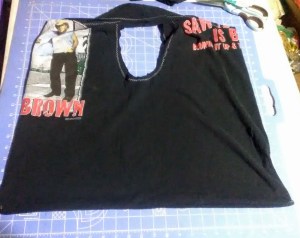
I also made a little tote bag to hang in the kitchen to put the dirty towels in. Unless they are really gross or soaking wet, there’s no reason to keep them separate from the rest of the laundry.

Since making these, I have almost eliminated my need for paper towels. I do try to keep a roll on hand in case the cats do something gross because eww. I have to hide it, though, to keep other people from reaching for them out of habit.

If you need some heavier cleaning cloths, double up the fabric. To use up smaller scraps of flannel, finish the edges of small squares to use in place of cotton balls.

Like this post? To make sure you never miss a future post, please sign up for my newsletter.

Posted on 1 Comment

Simple DIY Rainbow Cupcake Crayons

rainbow cupcake crayons

I originally shared this tutorial for rainbow cupcake crayons almost ten years ago when Finn was my little preschooler and I made rainbow cupcake crayons for him using all of our broken crayons. It’s easy, and you can get little ones to help with peeling the paper off of the broken crayons, and they get fun new crayons to play with once they have cooled.

Unfortunately my photos of our project got lost, but a quick Etsy search shows lots of examples of similar multicolored crayons in fun shapes. If you like the idea but don’t have tons of broken crayons around, consider supporting one of the shops on Etsy by purchasing from them.

rainbow cupcake crayons
Photo by Kristin Brown on Unsplash

DIY Rainbow Cupcake Crayons Tutorial

  • Line a muffin pan with foil or a double thickness of cupcake liners. (Note: The wax will likely melt through, so you probably want to use a pan that you reserve for non-food projects.)
  • Remove all the paper from your crayons.
  • Break into smaller pieces if needed. I just broke them as small as I could with my fingers. Most pieces were about an inch long or smaller.
  • Sort the pieces into the lined cups. I sorted by color, but you could also mix for super swirly crayons.
  • Fill the cups to the top but don’t overfill.
  • Melt in the oven at about 200-250 degrees F. I recommend setting a baking sheet under the muffin pan. You really don’t want to have to scrape melted crayon off your oven.
  • Check about every 10-15 minutes. I let them cook until there were just a few solid chunks in the middle. Then I gently swirled them with toothpicks to sink the chunks and blend the colors.
  • When they are sufficiently melted, turn off the oven. You can carefully remove them at this point or let them cool in the oven. I didn’t need my oven, so I let them cool in there overnight.
  • Once they’ve cooled completely you can remove the papers and color away.

Mask Update

I made a few of the fitted masks I mentioned in Wednesday’s post. Overall, I think they fit well, but they are a little tedious to make, particularly if you have lots of interruptions.

Awkward photo of me modeling a fitted mask.

I looked into it a little more and found that it seems more hospitals are asking for a more simplified mask, so I’m switching to ones made by this tutorial. With batch cutting and then sewing two or three assembly line style, I can make 3-4 in a hour, even with interruptions.

Shop update: Freebies and a sale

Knowing that so many are stuck at home right now needing distractions, I’ve decided to make all of my machine embroidery design files free until April 7. That’s the day my area’s shelter in place order expires. If it is extended, I’ll extend the embroidery design freebies, too. If you make something with one of my designs, I would love to see it.

My full shop is still open, and will be as long as everyone in my household is healthy. I’m using extra care with handwashing and using hand sanitizer before coming into contact with products and packaging as well.

All of my handmade soaps are currently on sale for 20% off. You can find them here.

Like this post? To make sure you never miss a future post, please sign up for my newsletter.

Posted on Leave a comment

27 Activities for Kids at Home

Sometimes, even a rainy weekend stuck at home is difficult for kids. Now, with schools closing due to COVID-19, children and parents everywhere are off-schedule, stressed and going stir-crazy. To help out, I made a list of activities for kids at home.

Backyard Fun

  • Play Ball- Catch and kicking a ball around are always fun. Try using a laundry basket and see who can toss the ball into the basket from an increasing distance away. Or, use empty soda bottles to make bowling pins and play backyard bowling.
  • Get Dirty- Playing in the mud or digging in the dirt is fun for littles. For something more structured, save seeds from fruits and vegetables to plant and see what sprouts or tend an existing garden.
  • Picnic- On sunny days, take meals outside. If you don’t have an outdoor table, grab a tablecloth or bed sheet to spread on the ground and sit on.
  • Explore Nature- Observe insects, compare plants and leaves. You could also download a plant identification app and use it to learn about plants growing in your yard.
  • Sidewalk chalk- Patios, driveways, and sidewalks become canvases.
Backyard fun activities for kids at home

Indoor Crafts

  • Break Out the Art Supplies- Drawing, painting, cutting and pasting can be fun for all ages. If they need a little motivation, give a general theme and have awards for the most creative, detailed, colorful, etc.
  • Think Outside the Box- Old magazines, newspapers, junk mail, cereal boxes, cardboard tubes, etc. make creative art supplies. Tubes become telescopes or binoculars. Cutout pictures and letters to make collages.
  • Playdough- Use store-bought or make your own. I think it’s easier to clean up than slime, but of course, that’s an option, too.
  • Go Big- If you have any large cardboard boxes, get creative with them. Rolls of butcher paper or the plain side of wrapping paper are great for large murals or full body tracing.
Artwork activities for kids at home

Indoor Games

  • Board games- Break out the ones you have, invest in a couple of classics like Candy Land or Monopoly (Amazon means not having to leave the house), or create your own.
  • Charades– No pieces or props are needed to take turns acting out and guessing your favorite books, shows and movies.
  • Pictionary– Similar to charades, all you need is something to draw on and draw with.

Advanced Crafts

  • Share Your Skills- Do you sew, knit, or crochet? Whatever your craft, think of a beginner lesson and teach it to your children.
  • Learn Together- Do you have supplies for a project that never happened or a skill you never got around to learning? Look up tutorials or YouTube videos and learn it together.

In the Kitchen

  • Make Cookies- Or cake, or brownies. Baking introduces basic cooking skills, reading instructions and fractions. Depending on what you’re making, all of the measuring and mixing can be done without needing the stove or oven until it’s time to bake.
  • Let Them Help- Give them options and let them help with meal planning. Older kids and teens can be more hands on with meal prep. Even little ones can help with washing vegetables, setting the table, mixing and measuring.

Educational Screen Time

  • Stream Documentaries- Netflix and other streaming services have tons of documentaries available. Pick a subject your child is passionate about, or look for something fun and quirky and watch it together.
  • Khan Academy– This website has lessons on just about anything you want to learn for all ages.
  • Preschoolers- PBS Kids has games and videos for all the PBS Kids shows. Starfall.com is a fun way for kids to learn ABC’s and reading basics.
  • Google Sketchup– My kids enjoy playing around with this drafting program (website).

DIY Toys

  • Dress up- Look in the back of your closets for old clothing and accessories, or dig out old Halloween costumes. Or, make a super hero costume from an old t-shirt.
  • Blanket forts- Use blankets, pillows, couch cushions, whatever you can think of to build a hideaway for the kiddos to hang out.
  • Bath time- While not exactly a toy, playing in water is fun and calming for little ones, so if they’re getting a little stir-crazy, let them play in a bath. If older kiddos are feeling antsy or stressed, suggesting a bath or shower might help them, too.

Storytime

  • Break out old favorites- Keep a basket of books in a handy spot, like on a coffee table to make it easy to grab one and read.
  • Read aloud- Adults can read to everyone or have older children read to younger ones. Beckett doesn’t always like listening to me or reading on his own, but he sometimes enjoys reading aloud to Thaddeus.
  • Explore new books- Many public libraries give you the ability to checkout ebooks online. Project Gutenberg has over 60,000 books online for free. Or, try Kindle Unlimited to get unlimited access to tons of ebooks and audio books for a low monthly fee. Use this link to get your first month free.
  • Write your own- Take turns making up stories or turn it into a project by folding paper books and adding illustrations. Pre-k and younger can draw pictures to tell their stories.

What at home activities do you like to do with your kids? Please share your activities for kids at home in the comments.

Like this post? To make sure you never miss a future post, please sign up for my newsletter.

This post contains affiliate links. If you click through any of the Amazon links and make a purchase, I will receive a small commission. There is no added cost to you.

Posted on Leave a comment

T-Shirt to Yoga Shorts Refashion

If you’re new to refashioning or sewing clothing in general, loungewear is a great place to start. It’s less intimidating because, since you’ll only be wearing it at home, it doesn’t have to be perfect. This refashion project is perfect for a beginner because you only need two t-shirts to make it, and it’s mostly straight lines or slight curves.

I originally shared this tutorial a few years ago, before Thaddeus. The weather is beginning to warm up , so it’s a great time to sew some shorts.


I went on a little Pinterest binge a couple days ago looking for ideas to help clear my refashion stash. Saturday night I decided to make a pair of yoga pants out of a t-shirt using this tutorial. I wear a size eight on average, and used an XL adult t-shirt.

Adaptations from the original refashion project

I did make a few changes to the design. First, instead of cutting the shirt down the middle, I cut it down the sides from the middle of the underarm to the hem. This also means you’ll have an inseam and no side seams. That keeps any design on the front or back intact and moves them to the hips.

For the waistband, I cut the underarm seam from the sleeves and squared them up to be two equal rectangles, leaving the hem intact. I sewed the short sides together making a big, short tube from the sleeves. I then put the tube inside the waist of the pants with the pants right side out and the right side of the tube facing the inside of the pants. The raw edge of the tube lines up with the raw edge of the pants. I serged the top together like that. This made it so when the tube is folded down to the outside, the seam is covered.

T-shirt yoga pants refashion
IMG_4452
IMG_4459
Sorry for the awkward pictures. No one was around to take the pictures and Doctor Who was about to start.

I sewed it all on my serger. The entire refashion project took less than ten minutes. I probably should have added two minutes and switched from white to black thread. Or not.

If you don’t have a serger, you can use a zig-zag stitch to prevent breakage. Many sewing machines have specialty stitches for sewing knits, too, so check your machine to see if that is an option. This DIY T-Shirt Bag Tutorial has more information on stitch selection for knits.

Final verdict

They are a little loose at the waist. If I were planning to actually do yoga or wear them in public I should probably add some elastic at the seam. Since they will probably be used mainly for watching Doctor Who while sitting on the sofa, I probably won’t bother.

I personally don’t mind the length, but you could easily make them shorter by cutting them off to the length you prefer. Knit doesn’t unravel, so you can leave the edges raw, or turn them under and hem.

To make sure you never miss a post, please sign up for my newsletter.

T-shirt to yoga pants refashion

If you click through any of the Amazon links and make a purchase, I will receive a small commissionThere is no added cost to you.

Posted on 3 Comments

Easy All in One Electric Pressure Cooker Meal

For busy weeknights, there’s nothing better than an all in one meal that practically cooks itself. Prepare everything the night before and keep it in the refrigerator until it’s time to cook for even more time in the evening. You could even prep the vegetables and meat and store in the freezer for last minute meals.

The basics

This is more of a how-to than a recipe. You can really use however much of the ingredients based on how much food you need and your pressure cooker’s size. For my family of five with two little appetites, I used about four chicken breasts, three cups of rice and water, one jar of sauce and all the broccoli I could squeeze in and around everything.

You can easily swap out the protein for whatever you prefer. Ideally, it should be cut into small, bite sized pieces prior to cooking. With the chicken breasts, I’ve been able to cook them from frozen first and cut them later, but it’s not ideal.

This time, I used broccoli, but it was a little overdone for my liking. Root vegetables cut into bite sized pieces or frozen peas or green beans are probably better for all in one meals like this.

The sauce

To make it super easy, I started with a jar of Korma simmer sauce from Aldi. You could easily substitute any store bought or homemade sauce. Canned soup, salsa, tomato sauce or even just broth are all options. Tailor it to your family’s tastes.

Assemble the ingredients

I used an old rice cooker pot for the rice. Any heatproof container that is big enough to hold the rice and cooking liquid but small enough to fit in your pressure cooker’s cooking pot would work.

I put the chicken and broccoli under and around the rice pot. Then I filled the rice pot with appropriate amounts of rice, water and salt.

The Korma went on top of the broccoli and chicken, and I added about half a cup of water just to make sure there was plenty of liquid. If you use broth or a thinner, liquid sauce, the water isn’t necessary.

Cooking

Finally, I set the whole thing in my pressure cooker and cooked it with the “Rice” setting. My electric pressure cooker is a GoWISE USA brand. Recipes for the Instant Pot brand usually work as written for mine, so I assume that setting would work for the Instant Pot and other similar pressure cookers.

Here is a terrible picture of the end result. I promise it tasted better than it looks. A homemade sauce would have been healthier, I’m sure. When you are strapped for time or having to make do without a fully functioning kitchen, though, it’s lots better than having to rely on fast food.

Like this recipe? Sign up for my newsletter to never miss future tips, tutorials and recipes.

All in one Electric Pressure Cooker Meal

Welcome!

Thank you for visiting SubEarthan Cottage. SubEarthan Cottage is divided into two parts. On the blog, you’ll find sewing tutorials, recipes, educational posts, behind the scenes and a little family randomness. In the shop, you’ll find SubEarthan Cottage handmade and vintage products. All product categories are found in the drop down menu under “Shop” or by visiting our shop page.  Free shipping in the USA for all orders of $35.00 or more.

Latest Products

[wcpcsu id=”13390″]

Recent Posts

[recent_post_carousel slides_to_show=”3″ slides_to_scroll=”1″]

Best Sellers

Posted on 1 Comment

T Shirt Bag Upgrades

Last week, I showed you how to upcycle a t shirt into a shopping bag with a little basic sewing. Now, I’m going to show you a few ways to upgrade your t shirt bag design.

Bottom hem

In last week’s tutorial, the bottom hem was double stitched but otherwise left raw. Since knits don’t unravel, it is fine to leave it that way. I prefer to finish the raw edge, either with a serger or by enclosing the cut edge.

Bag upgrades bottom seam

The top seam is finished by serging the raw edge. If you don’t have a serger/overlock machine, you can use a zig-zag or overcast stitch on a regular sewing machine.

The bottom seam is enclosed. Do do this, when following the first tutorial (found here) do NOT turn the shirt inside out when sewing the first bottom seam. Instead, sew it with the shirt right side out. Once it is sewn, trim any excess material from below the stitch line, leaving about 1/8-1/4 of an inch.

Now, turn the shirt inside out and smooth the bottom seam flat, like in this photo:

T-shirt-bag-finished
Pretend the bag is inside out this time.

Once it is all smooth (ironing helps) sew a seam at least 1/2 inch to 5/8 inch from the bottom. This stitch line encloses the raw edge. Since it is the bottom seam that will get the most stress, I still stitch it twice. Turn it right side out, and you’re done, unless you’d like to add a little shape to your bag.

Boxing the bottom

Boxing the bottom of the bag basically squares off the bottom, similar to a paper bag. I rarely do this with t shirt bags. They are too floppy for it to make much difference without adding a ton of interfacing for support. I also like these bags because they are easy to fold and stash in the car or my purse. Boxing the bottom complicates that a little. Even so, sometimes a boxed bottom can help things like cereal boxes or egg cartons fit neatly, so having one or two is nice.

Step 1

With your bag inside out, flatten the bottom seam so that it forms a triangle. That is a horrible description, so hopefully you can see what I mean from this photo:

Bag Upgrades inside boxed flat

The white stitching is the bottom hem of the bag. It should be in the middle, cutting the triangle in half. 

Step 2

Measure about 3 inches down from the point of the triangle and draw a straight line perpendicular to the hem stitching.

Bag Upgrades inside boxed measuring

Step 3

Sew along the line you drew twice to make it a strong seam. This photo shows my stitching in red and my chalk line.

Repeat steps 1-3 on the other side.

Bag Upgrades inside boxed bottom sewn line

Step 4

To finish, you could cut the excess part of the triangles and leave them raw or overcast/zig-zag stitch the cut edges. If you want to add strength and more structure to the bag, leave the triangles intact. Fold them down flat into the bottom of the bag and either tack in place with a few stitches at the point or sew along the loose sides of the triangles.

Bag Upgrades inside boxed bottom
Inside of the bag with one triangle sewn down.
Bag Upgrades outside boxed bottom
View from the outside of the bottom of the bag.