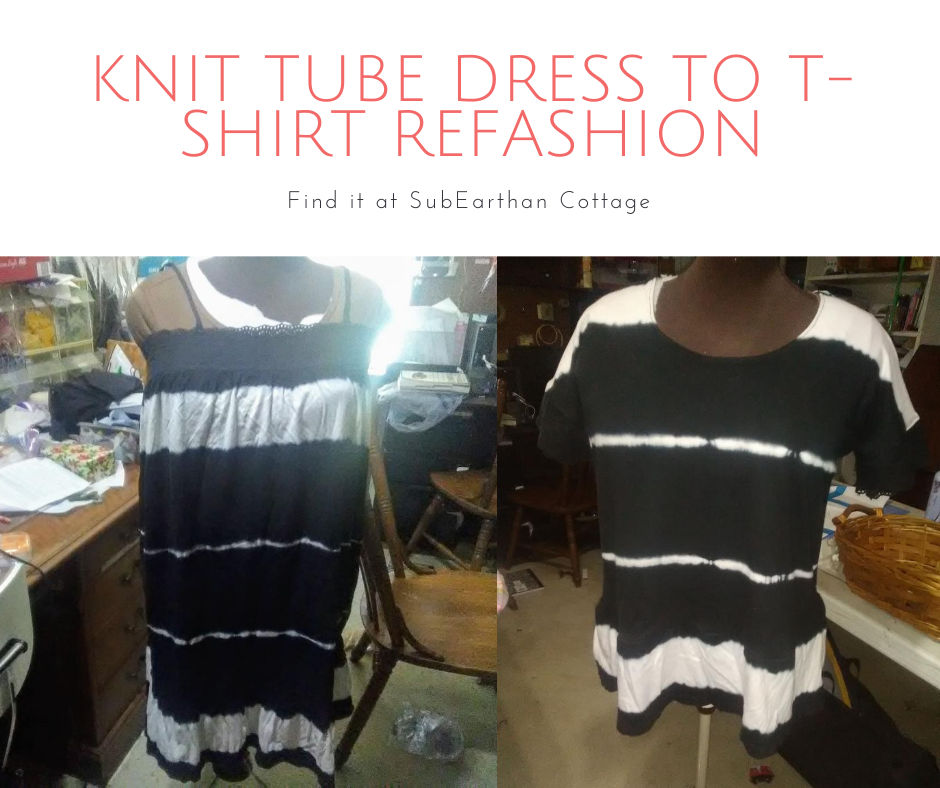
I’ve had two striped knit dresses in my refashion pile for about six months now. One black and white and one navy blue and white. The knit is soft, and I like the tie dye stripe, but the shape is basically a tube with a ruffle on the bottom. They are so unflattering, I don’t even want to wear them around the house. There’s a good amount of fabric in them, though, so I decided to try turn one of the knit tube dresses into a t-shirt.

Knit tube dress to T-Shirt Refashion T shirt Process
I wasn’t sure what I would do at first, but I knew whatever it was wouldn’t need the straps, so I cut them off. I briefly considered leaving it close to as-is at that point and turning it into a skirt. It still wouldn’t have been very flattering, and I really don’t need any more casual skirts, so I moved on to other ideas.
T-shirts are always something I need, so that was my next direction. I didn’t take any process photos, so I’ll do my best to describe it. Refashioning always requires a little improvising based on what you have to work with, so consider this more as a guide than a complete how-to.
Turn the dress into fabric
I find it’s easiest to see what I have to work with when I’m looking at deconstructed pieces of fabric. Unless I think I’m going to use an element intact, I cut or rip out all seams and remove elements like buttons so that I can see how much fabric I have to use.
For this project, I cut off the black cotton eyelet band at the top and cut off the ruffle from the bottom before cutting off the side seams. I left the ruffle intact by cutting just above the seam that connected it to the dress because I thought it might come in handy. I chose to cut, rather than rip the seams, because the seams were narrow, so I wasn’t losing much fabric.
The Base Pattern
I thought about using a t-shirt as a pattern, but that doesn’t always work out as well. In my pattern files, I have a copy of the breezy tee from it’s always autumn, so I used that. I didn’t have enough fabric to make it exactly like the pattern, but it was a good starting point.
Laying it out
I squared up the main pieces of fabric and cut out the pattern. The fabric was too short for the pattern’s length, so I just focused on fitting in the top portion. I had to shorten the sleeves slightly because there wasn’t enough width.
Constructing the T-shirt
I serged (overlocked) the neckline folded it over and hemmed. I will probably regret not doing a banded neckline, because I’ve had hemmed necklines get wonky with wear. I can change it later if needed, though.
I serged the shoulder seams and then started thinking about the sleeves. The original pattern has pieces to create wide bands on the sleeves. I didn’t have enough scraps from the sides to create those bands. Instead, I decided to use the eyelet from the top of the dress. Honestly, I really wanted to use some of the ruffle to make flutter sleeves, but I figured that would be needed to add length.

After attaching the eyelet, I serged the underarm and side seams, then straight stitched just inside the serged seam to reinforce.
The shirt was more of a crop top at that point, so I attached the ruffle to the bottom by serging and then straight stitching like I did on the side seams. Here’s the final result.

I like it, other than the eyelet on the sleeves. I’m not sure about that. It’s not tight, but it makes the sleeves snug. I’ll probably wear it a few times and decide if I just want to take it off altogether. Overall, though, it’s a cute t-shirt and definitely something more wearable than the original.
Like this post? To make sure you never miss a future post, please sign up for my newsletter.

