I finally got all of the upcycled boho tops listed in the shop. I’ve been calling them poncho tops, but they’re really more kaftan-like. So Kaftan tops? Anyway.
I also finished another upcycle that I’ve been working on for over a year now. If you follow me on the socials, you’ve seen a little teaser of it. Either way, here it is!
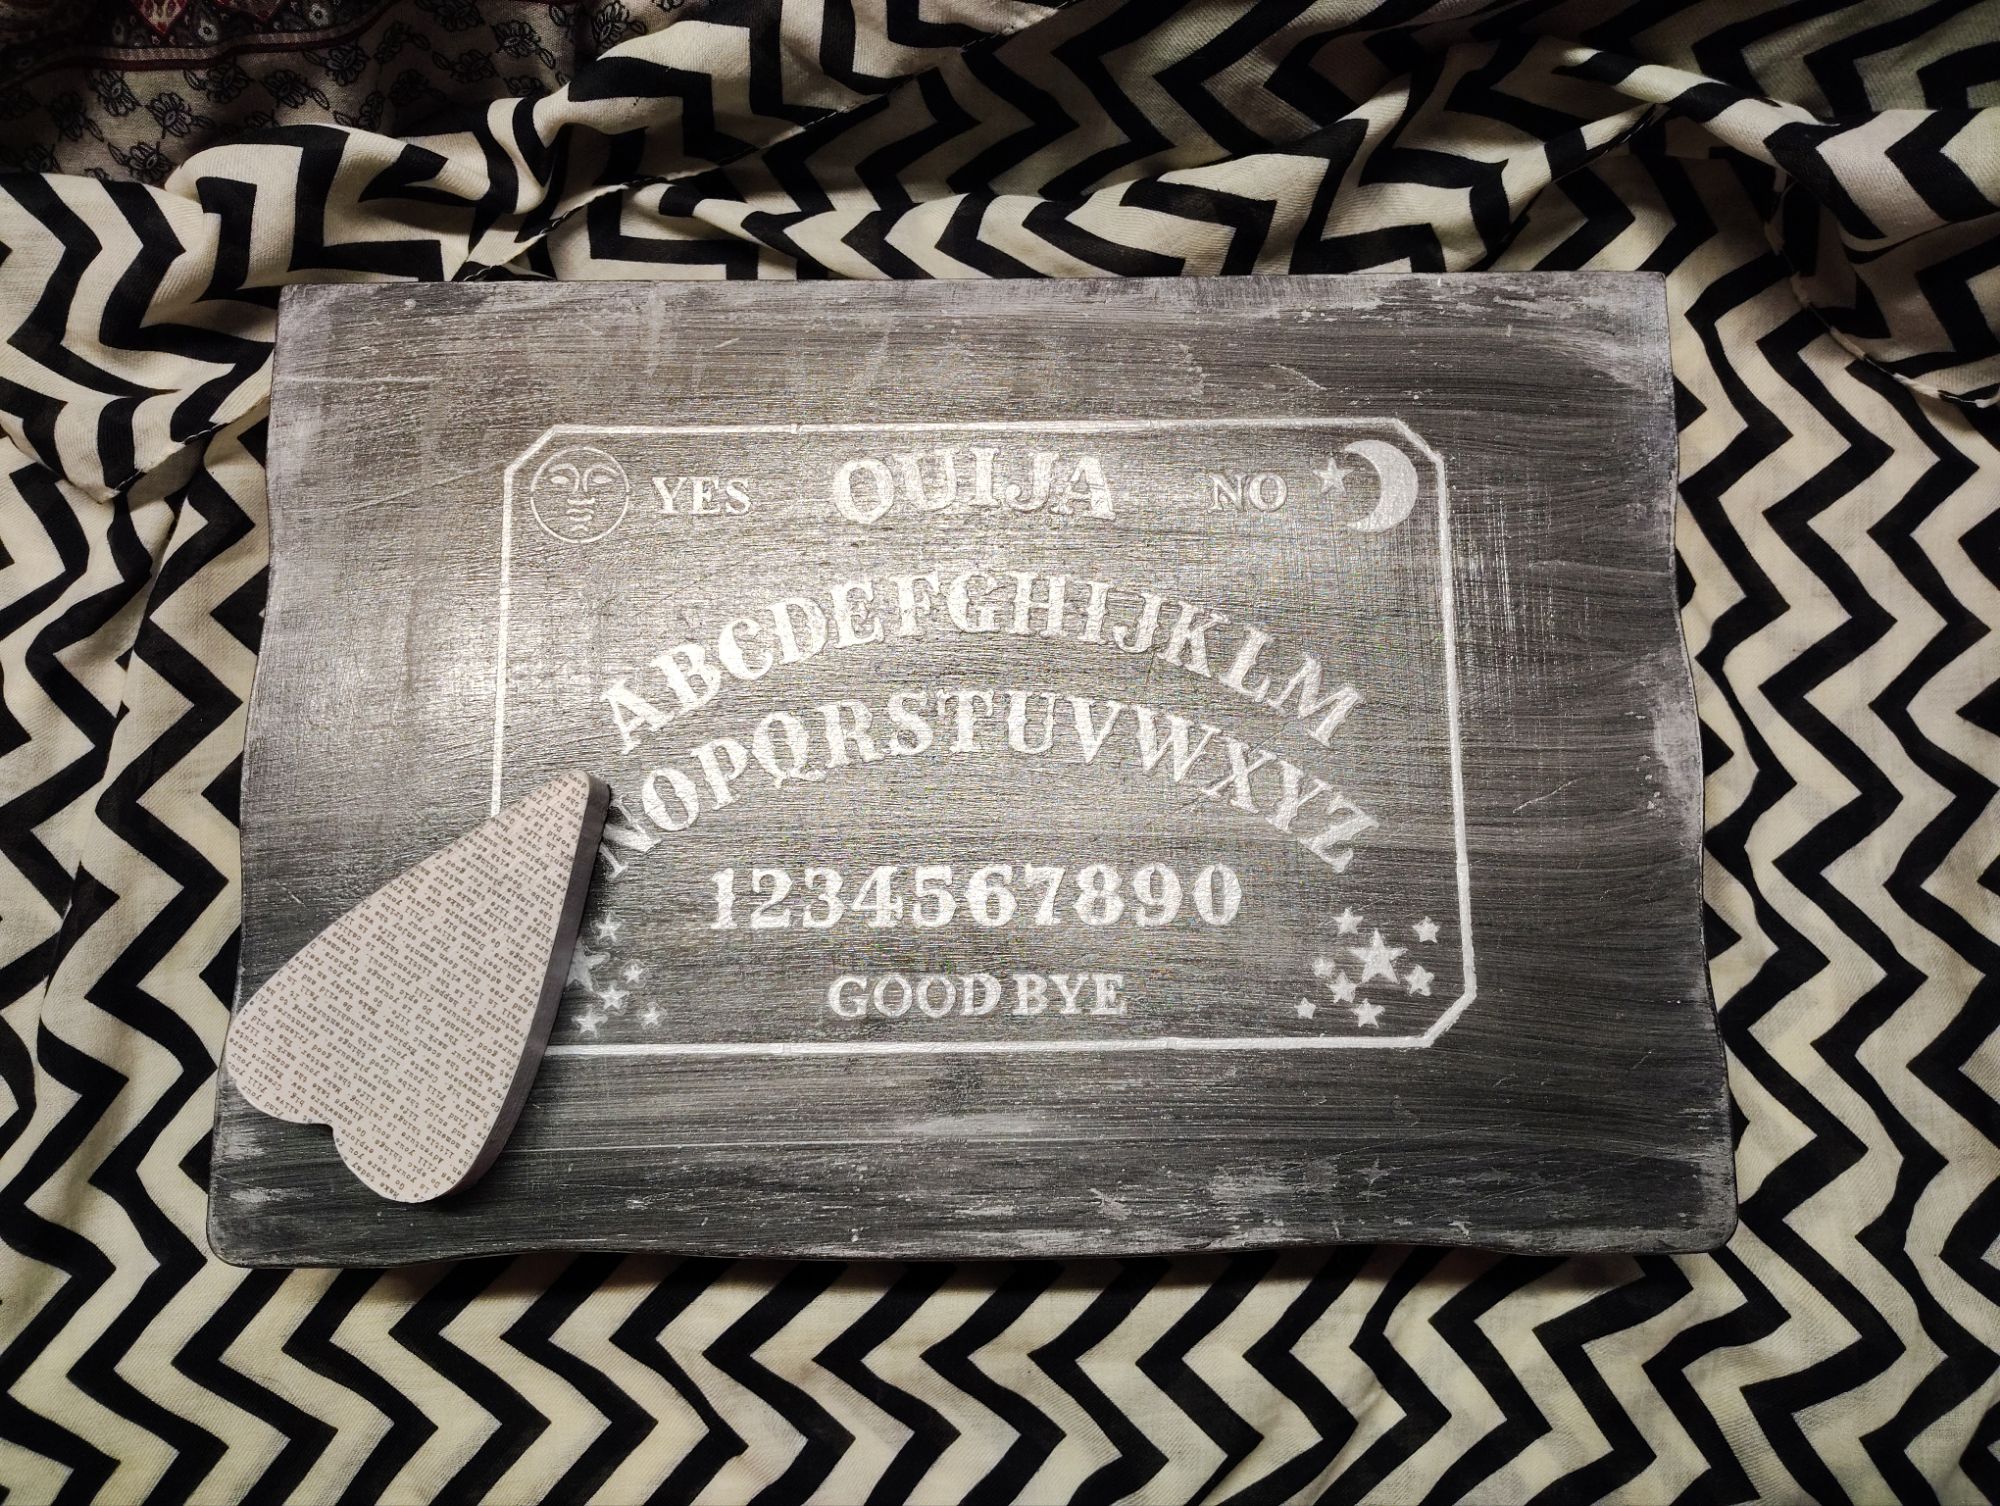
This spooky box began its life as a vintage silverware storage box that had seen better days. (Of course I forgot to take before pictures. Grrr.) I gutted it, painted it, re-lined it with some lovely purple velvet and made a cute wooden planchette to go with it. I absolutely love it. It’s great for spooky or goth decor, or for storing tarot decks, crystals and ritual tools if that’s your thing.
Here’s the inside. the purple is such a nice contrast to the black and silver on the outside.
Everything above can be found in my shop. It’s all one of a kind, though, so if you see something you like, don’t miss out.
Hello lovelies! If you follow me on all the socials, you know I owe you a quick how-to on this:
But, I haven’t written it yet. I apologize.
I did want to let you know, though, that I added some new planners/journals to my shop. There’s a Meal Planner, a Reading Journal, and a Fitness Journal now, as well as a set of Literary Terms posters for my teacher friends. I may get some more added tomorrow, if the kiddos don’t keep me too busy to work on them tonight. They are all in PDF format, so you can either print the pages you want or use them with a digitally with something like Goodnotes.
Now for the SALE part: ALL digital products that are normally $5 are on sale for $0.99. That’s all the planners, journals, and all of my machine embroidery designs. I have also made a few more of my older embroidery designs FREEBIES!
Please, check them out. If they’re not for you, but you know someone who would like them, please share.
This sale only lasts through August 22, so don’t miss out!
The end of the school year and summer are crazypants in my household, so here’s an older post with some upcycling inspiration for you.
Last Christmas we received a new set of bath towels. Many of our old ones had worn through in places and were ready to be retired. I hate to throw out something that still has some life left in it, so here’s what I did:
I cut the towels to salvage the most usable material possible. Then, I serged the edge with my serger. You could also use a wide zig-zag, fold and hem, or use bias binding to finish the edges and prevent fraying.
The white towels were cut down to about half-size. This makes them perfect for wiping up big spills or as a bath mat. The green towels on the right are smaller sized for kitchen and cleaning towels. The stack of squares in the middle can be used in place of disposable cotton squares for toner, make-up remover, etc.
The small squares are also handy for DIY dryer sheets. I keep a few in a small tub on the dryer soaking in diluted white vinegar and lavender essential oil. I wring one out slightly and toss it into the dryer to add a fresh, lavender scent to our laundry.
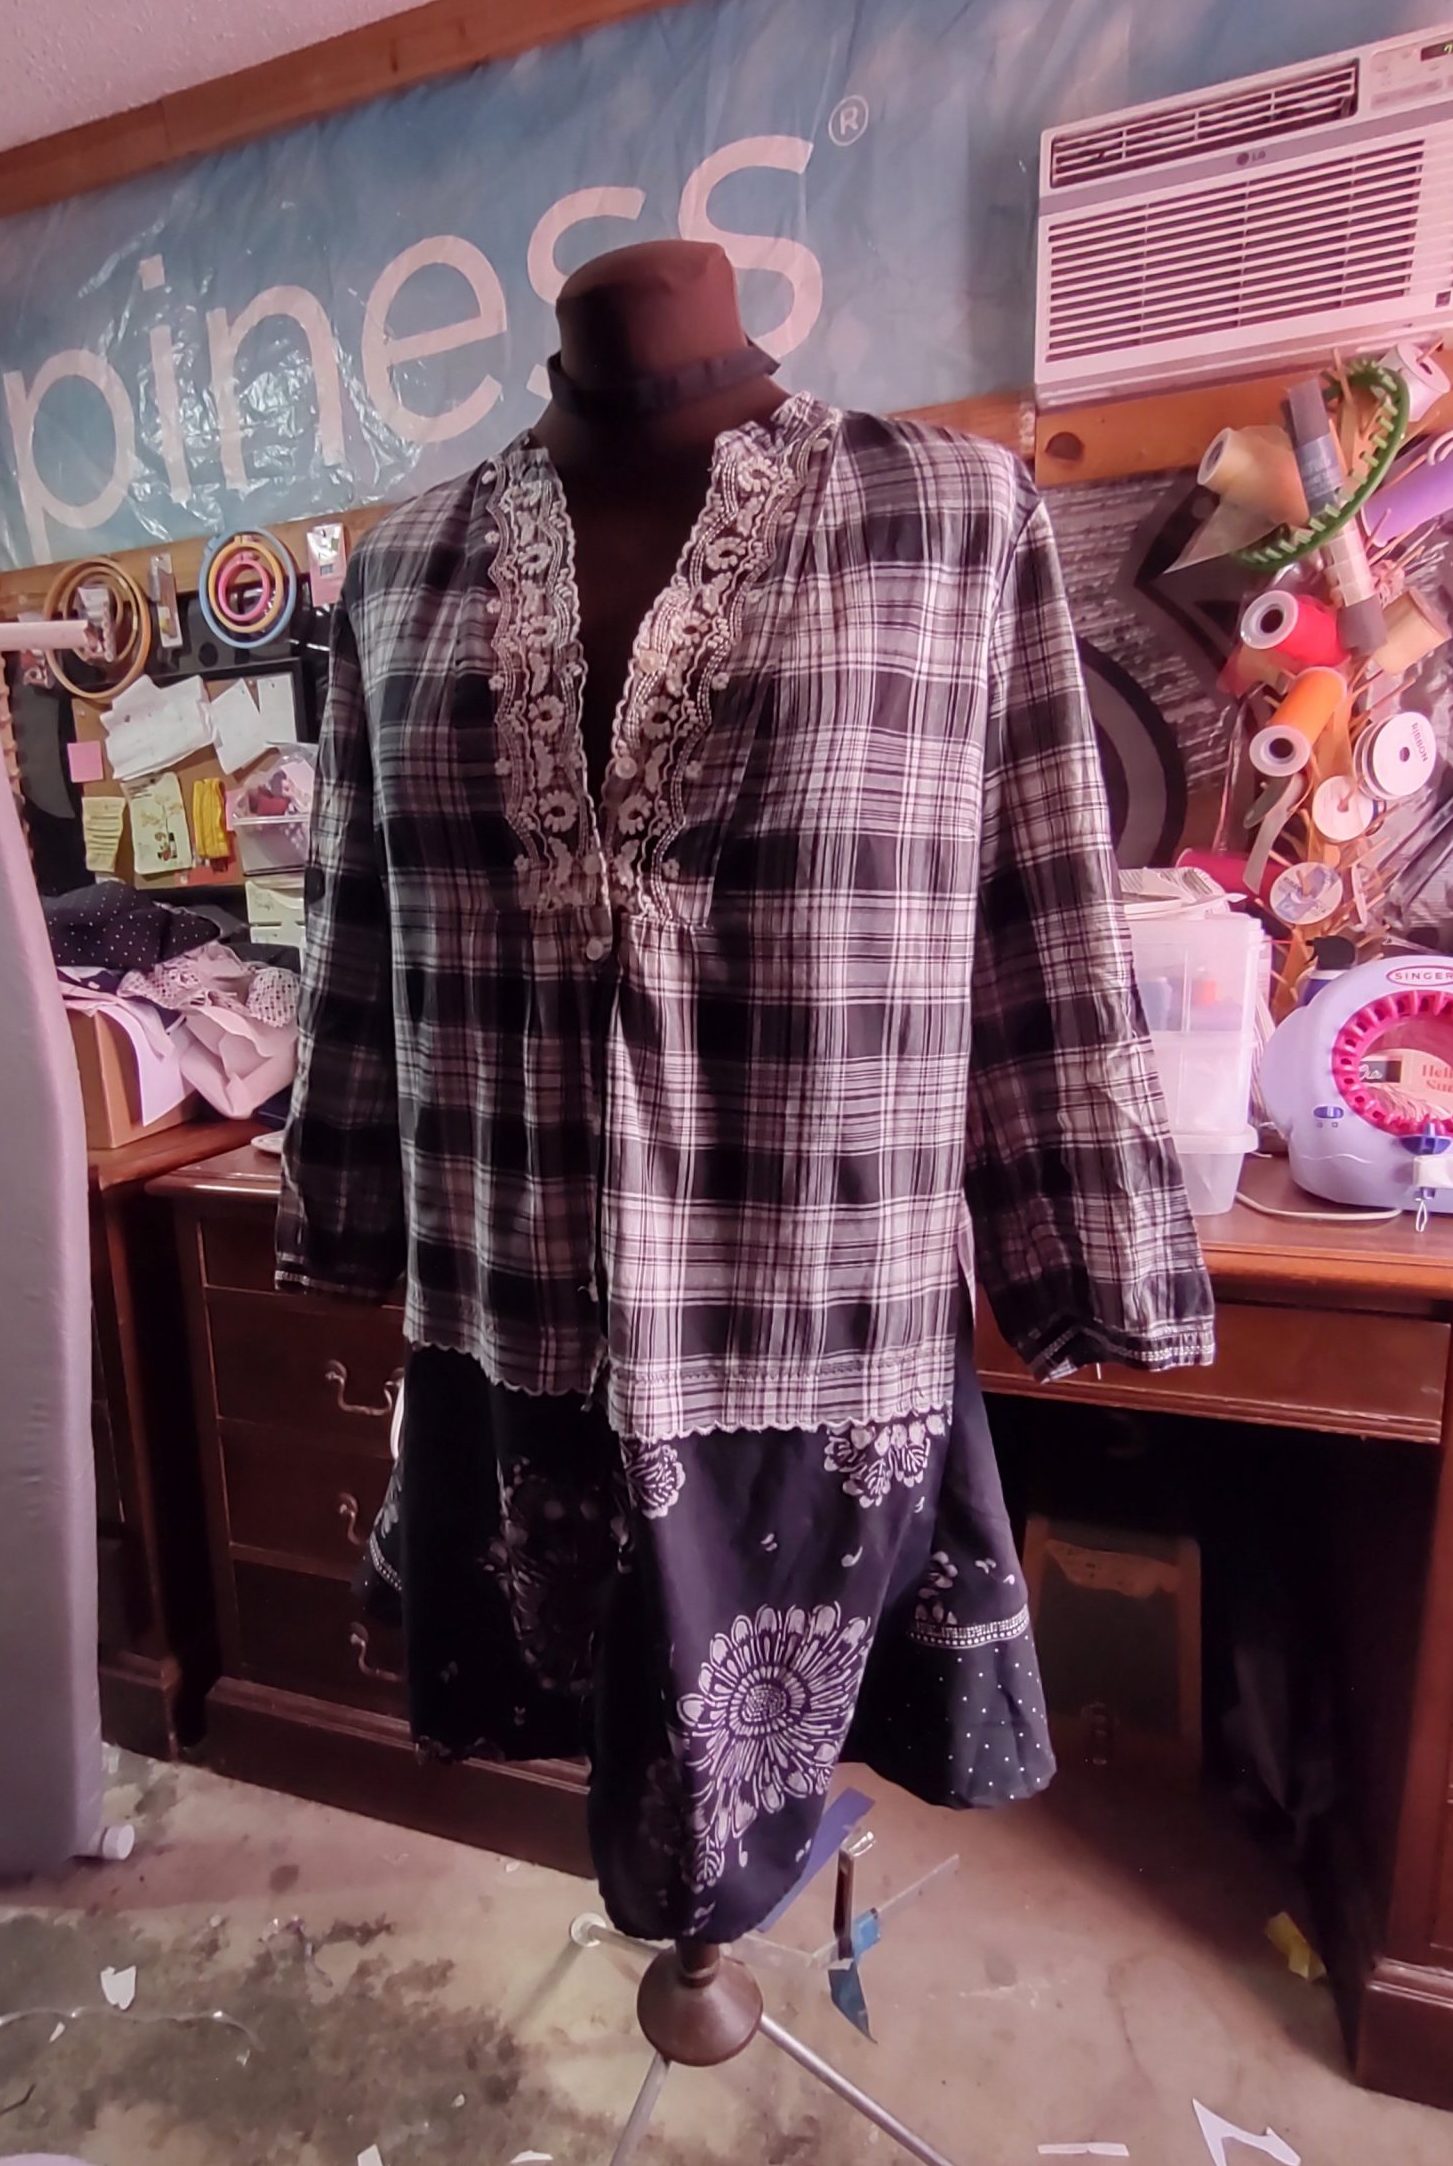
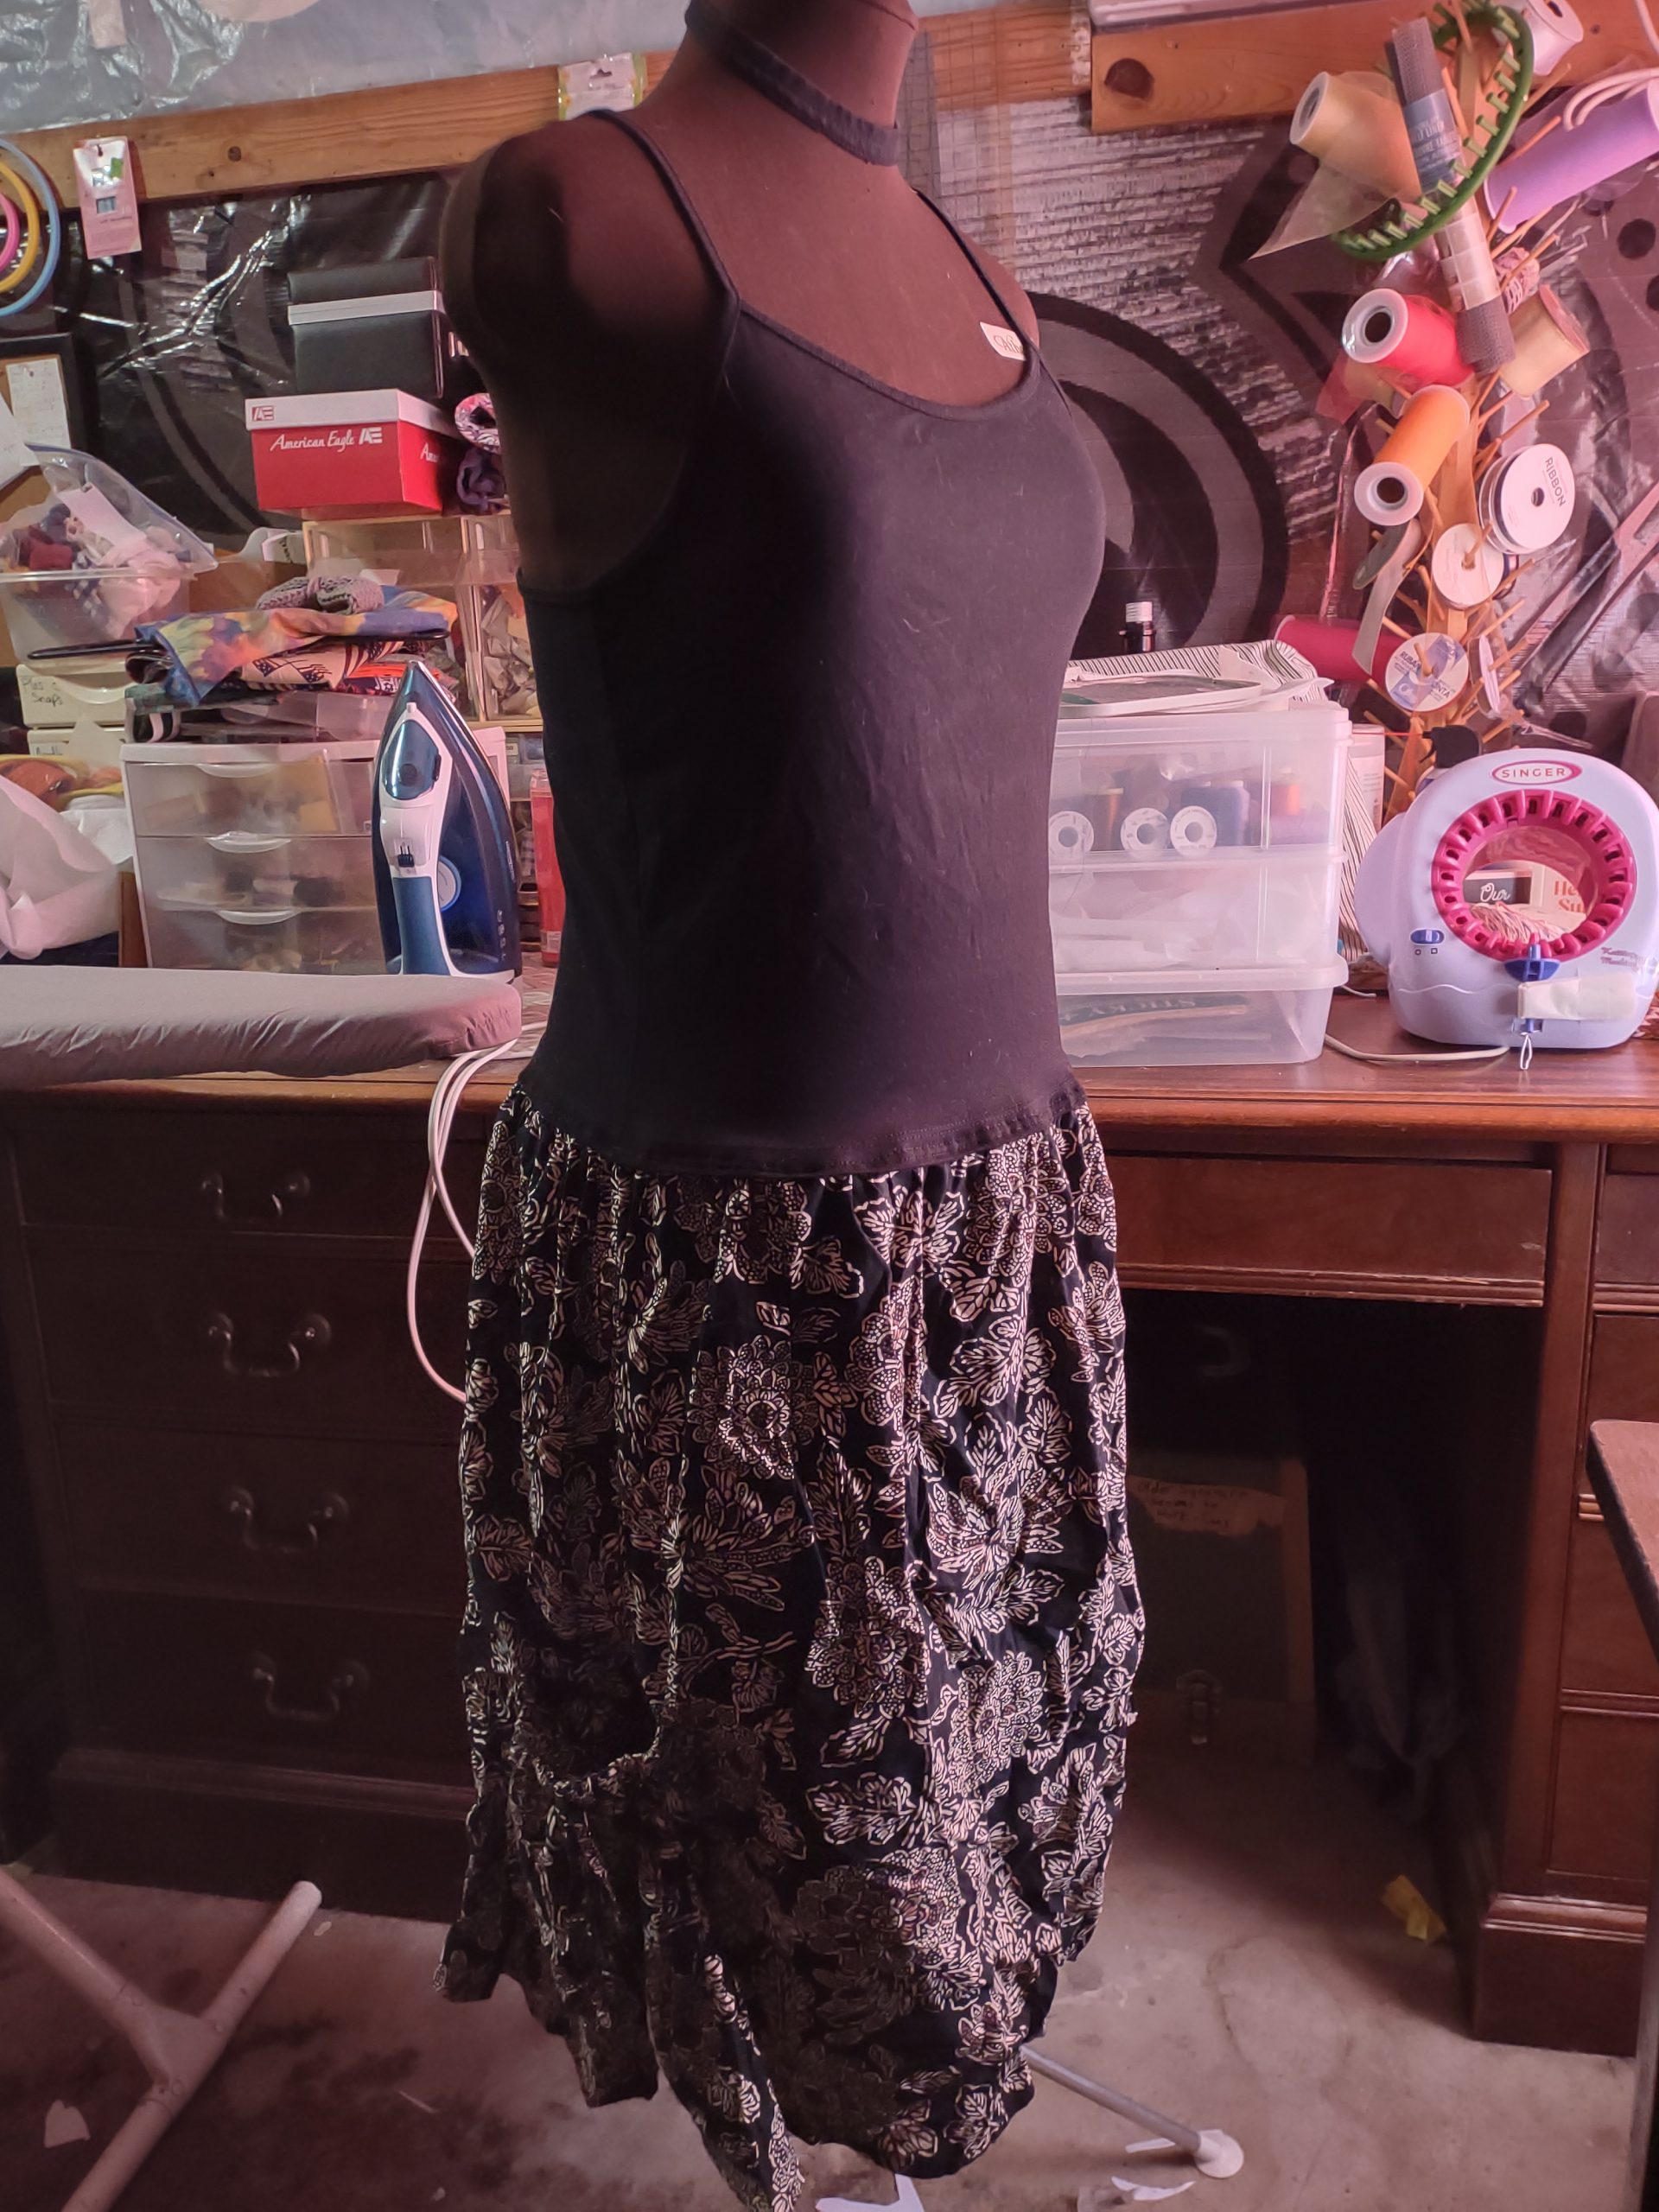
My mom gave me this blouse to play with because her puppy had ripped the bottom of it. I had already cut off the torn part and sewed the raw edge with a scalloped stitch to match the embroidery on the top. That made the shirt too cropped for my preference, so it stayed in my refashion pile.
In an attempt to eliminate said pile (who am I kidding, piles), I pulled it out, along with another black and white top with stretched out elastic and a black and white fabric remnant for good measure.
Shirt with stretched out elastic.Remnant
I decided to both lengthen it and add more room at the sides by inserting triangles of fabric. I hate wearing woven tops that are fitted, so I thought that might make it more wearable to me. Here is the end result:
FrontSideBack
I’m not sure that I’m happy with it. Looking at it now, I think I need to add something from the bottom fabric to the top to tie it all together. I may make two patch pockets and attach them at the bottom of the original shirt and overlap onto the new fabric. Maybe an applique on the back as well? Thoughts?
Like this post? To make sure you never miss a future post, please sign up for my newsletter.
I’ve been working my way through my clothing stash and thought I’d share a couple of refashion projects. For the first, I took the leg of an old pair of denim jeans and upcycled it into an apron. Here’s a quick video of that project.
For the second, I refashioned a sundress. I didn’t take a before photo of the sundress, unfortunately. A strap on it had broken and the top was shaped for boobs, which I don’t have, lol. I really liked the dress, though, because it’s a lightweight, breathable cotton and it has big pockets. So, I took a Wild Fable cami that I didn’t like because the hem would ride up and attached the bottom of the sundress to it.
Now I have another super-comfy dress to wear in this insane heat. I am so ready for fall.
Like this post? To make sure you never miss a future post, please sign up for my newsletter.
I’ve listed two “new” vintage fabrics in the shop, but wondering if anyone can help with giving more information about them. I love second hand materials, but not having all the details is a bit frustrating. They are:
I’ve burn tested them, and they tend to burn quickly. The burned edge seems more melted than ashy, which leads me to believe they are a synthetic or a synthetic blend. Here’s a video of the beige burn test:
Burn testing some vintage fabric. I think this one is a synthetic or synthetic blend. I’m listing some of my fabric stash at https://subearthancottage.com #sewing#vintagefabric#fabricdestash
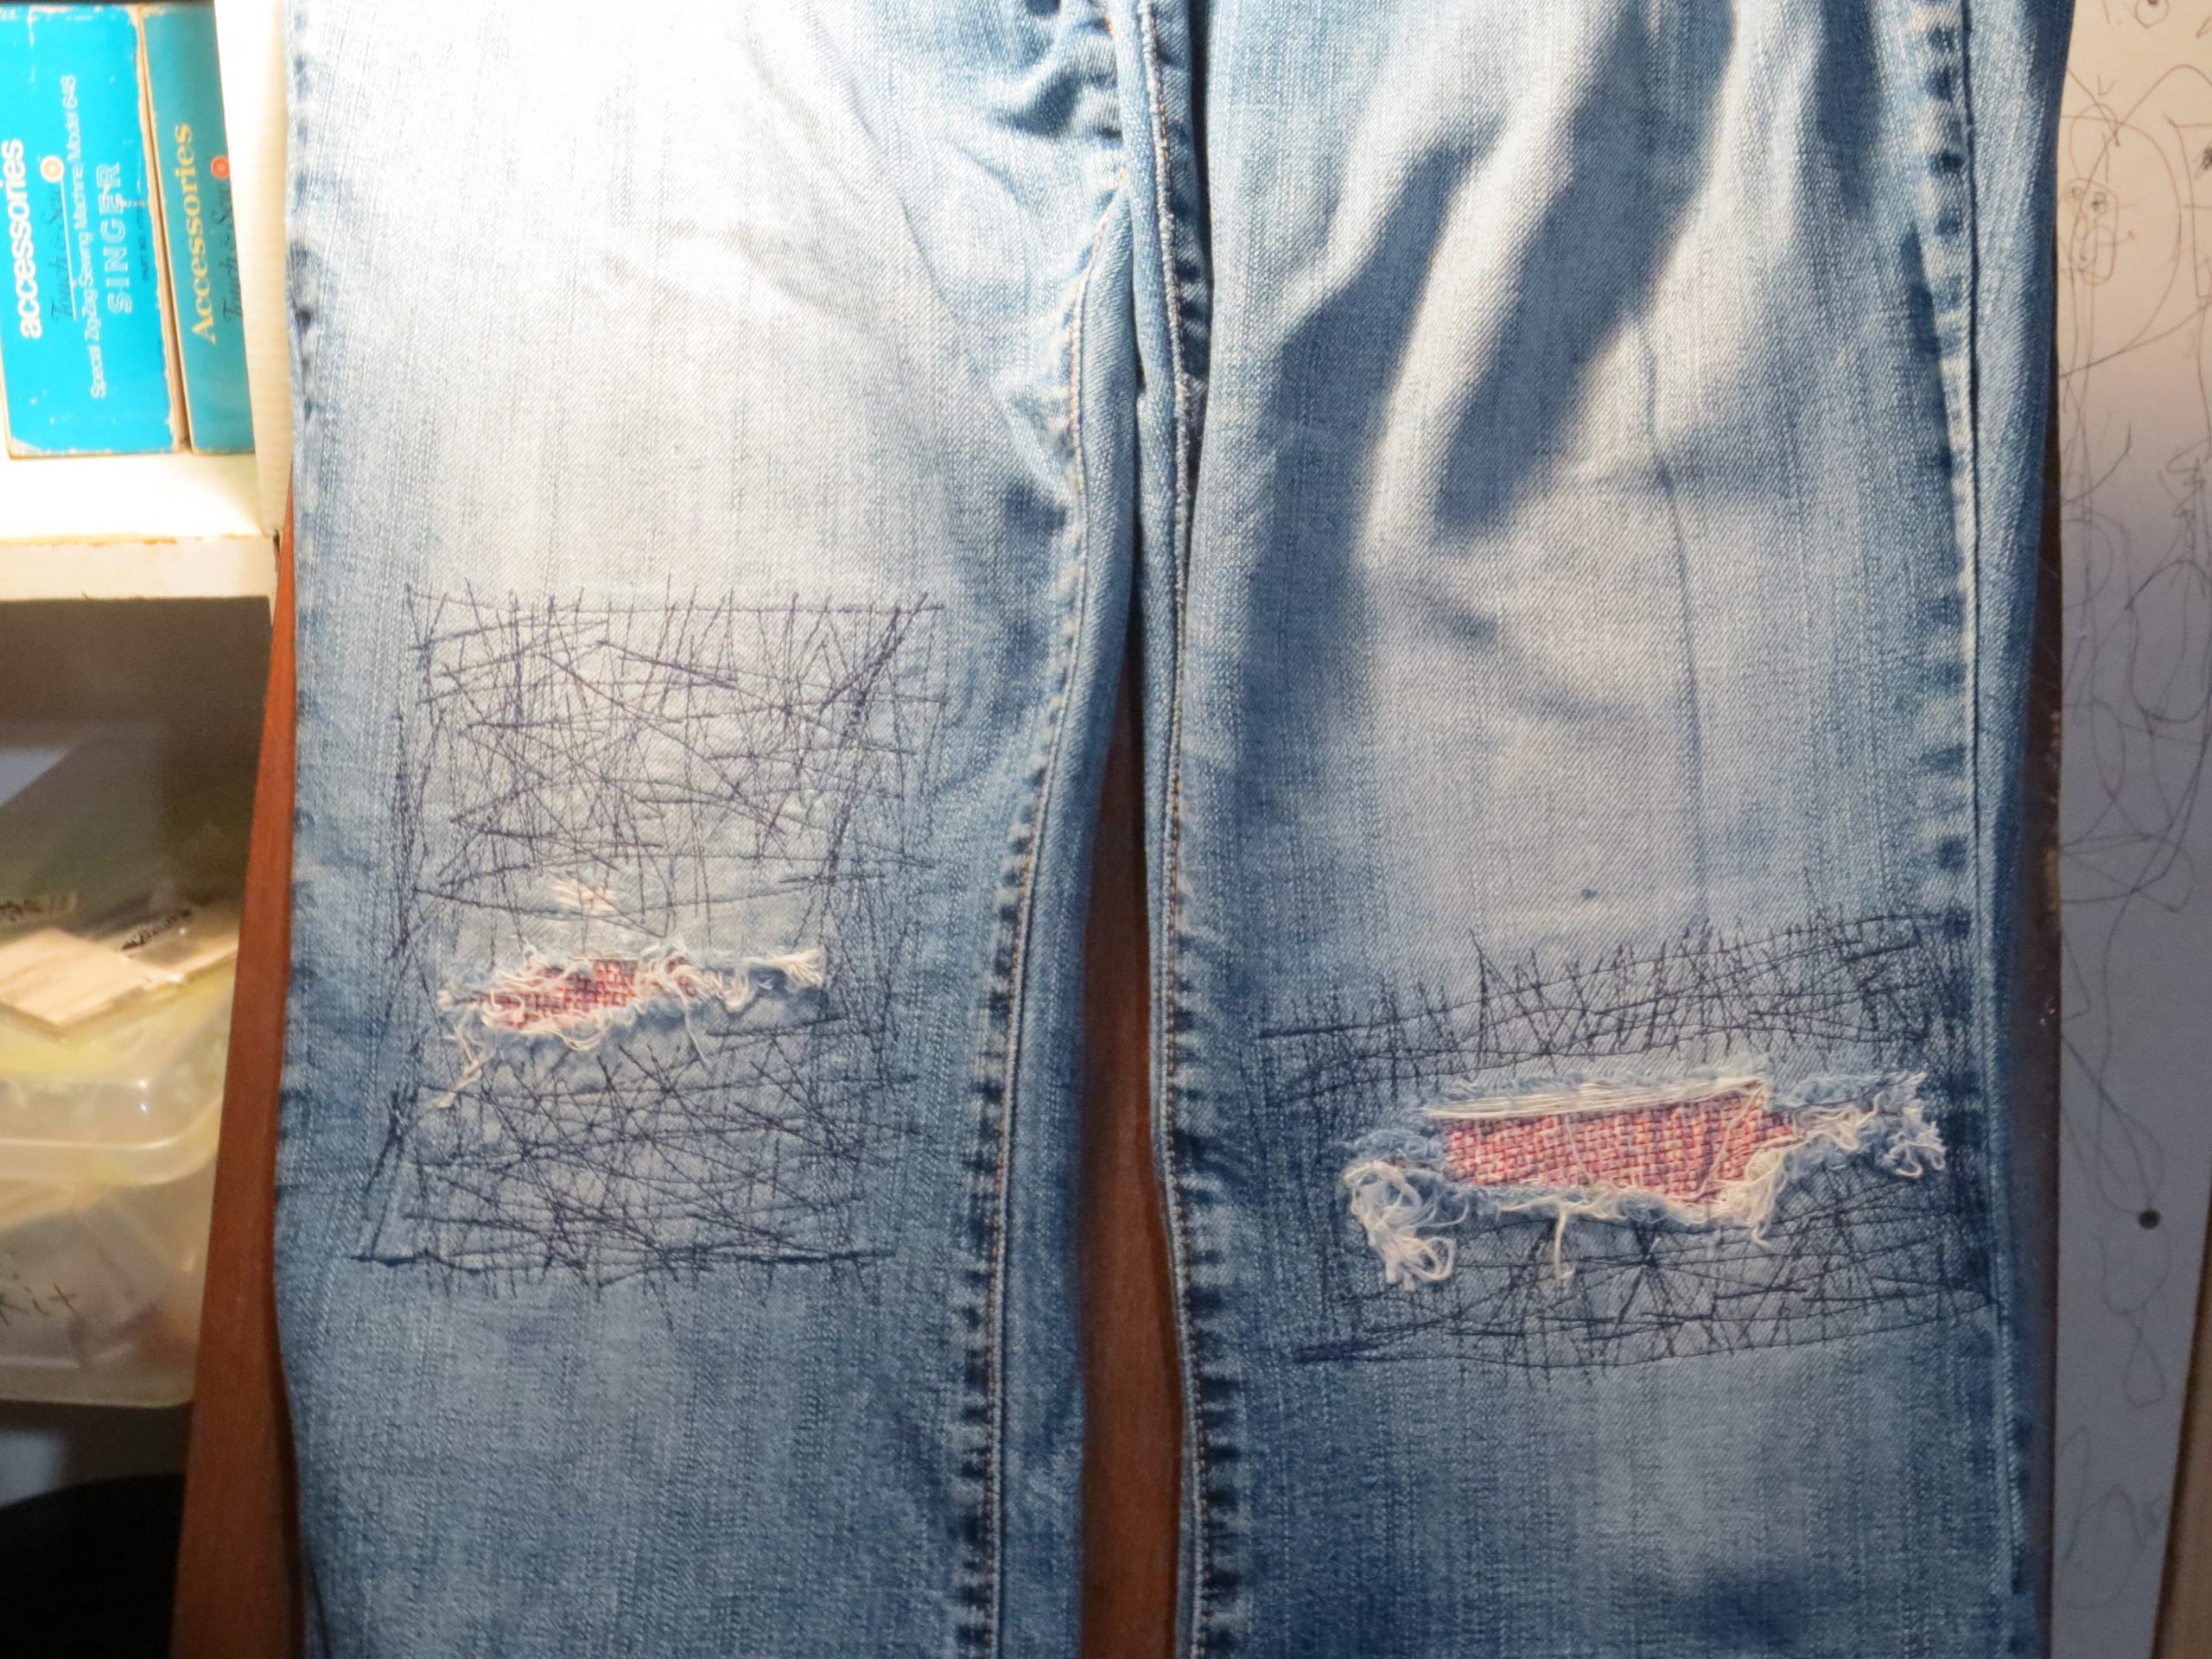
My mom gave me several pairs of worn out denim jeans for me to play with several months ago. A few just happened to be my favorite style from Old Navy and in my size. Rather than cut them up for other projects, I decided to make them cute with patches and a little embroidery. Here’s the method I used for patching denim jeans.
First, the knees.
Patching the knees
Prepping the denim jeans
In order to sew at the knees, you have to carefully rip out the stitches along one leg seam. You don’t have to rip out the entire seam, but you need to give yourself plenty of room above and below the knee to work. One seam is usually top-stitched. To make it easier all around, do NOT rip out the top-stitched seam.
After ripping out the seam, press the denim as smooth as possible with an iron.
Prepping the fabric
To patch the denim jeans, I chose to go underneath the rips and leave the torn edges visible. For the patches, I used cotton quilting material left over from sewing masks . I cut the fabric into squares a few inches bigger than I needed to patch. In the future, I will probably interface the fabric at this time. I knew I planned to interface everything at a later step, though, so I didn’t.
I pinned the fabric to the inside of the denim jeans.
Sewing the patches
Before sewing the crazy stitches shown in the photos, I sewed a single line of stitching all around the patch about a quarter of an inch inside the edge of the quilting fabric. This kept it in place while I did the crazy reinforcing stitches. After it was secure, I stitched in all different directions between the edge of the tear and slightly overlapping the first single line of stitching.
This side was more worn out, so it got more reinforcement stitching.
When jeans rip, usually the material around the tear is worn thin as well. In the past, I often left too much of the worn area without reinforcement. This results in new rips soon after the first repair. This time I reinforced at least an inch and a half around the tears.
Reinforcing the patched denim jeans with interfacing
After I was done stitching, I ironed interfacing to the inside. I did the interfacing last to act as a soft layer between my knees and the stitching. In retrospect, I probably should have interfaced the quilting cotton first, and then interfaced again at this step if I felt it was necessary. So far my jeans are holding up with the way I did it, though.
Sew it up
With the patches done, all that’s left is resewing the side seams. I just pinned it closed and sewed it back along the original stitching line. For the overcasting to finish the raw edges, I was lazy and used the overedge stitch on my sewing machine instead of switching to my serger. Zig-zag stitching along the edge to finish it would also work.
Embroidering the pocket
To embroider the pocket, I first removed the pocket from my jeans. Since it’s too small to hoop, I hooped tear away stabilizer alone and secured the pocket to the stabilizer with a glue stick. I used my Damask Rose embroidery pattern for the embellishment.
After the embroidery machine was done working its magic, I removed the stabilizer and replaced the pocket on my jeans using a heavy denim thread in a close shade to the original thread.
Simple, right? Actually, I tried to do that, messed up the hook timing on my Kenmore sewing machine AGAIN within the first few stitches and had to move to my backup vintage Montgomery Ward Signature machine. It took a few minutes of fiddling with the settings, but once I got it set up correctly it sewed through the heavy denim layers like butter.
In all fairness to my Kenmore, I did probably deserve it this time, between the crazy reinforcement stitches and then trying to sew through multiple layers of denim with thick thread. At least this time it let me reset the hook timing without much fuss.
Have you gotten more acquainted with your sewing machine lately? I’d love to see your projects in the comments.
Like this post? To make sure you never miss a future post, please sign up for my newsletter.
I, Charity Sloan, am a participant in the Amazon Services LLC Associates Program, an affiliate advertising program designed to provide a means for sites to earn advertising fees by advertising and linking to Amazon.com. Any purchases through those links will result in my receiving a small percentage in commission.
This only refers to Amazon links found in/on my blog pages. All products in my shop are 100% mine and not linked to Amazon.
Prices are the same whether you click an affiliate link or a non-affiliate link, so you will not be charged more. Thank you for your support!