I’ve gotten a lot of questions about my upcycled kaftan or poncho shirts. I thought many of them could be best answered by seeing them on a real person. I didn’t have a model readily available, so you get me with my camera and tripod.
I want to do a product Q&A soon, so if you have any questions, please write them in the comments or send me a message.
My mom gave me several pairs of worn out denim jeans for me to play with several months ago. A few just happened to be my favorite style from Old Navy and in my size. Rather than cut them up for other projects, I decided to make them cute with patches and a little embroidery. Here’s the method I used for patching denim jeans.
First, the knees.
Patching the knees
Prepping the denim jeans
In order to sew at the knees, you have to carefully rip out the stitches along one leg seam. You don’t have to rip out the entire seam, but you need to give yourself plenty of room above and below the knee to work. One seam is usually top-stitched. To make it easier all around, do NOT rip out the top-stitched seam.
After ripping out the seam, press the denim as smooth as possible with an iron.
Prepping the fabric
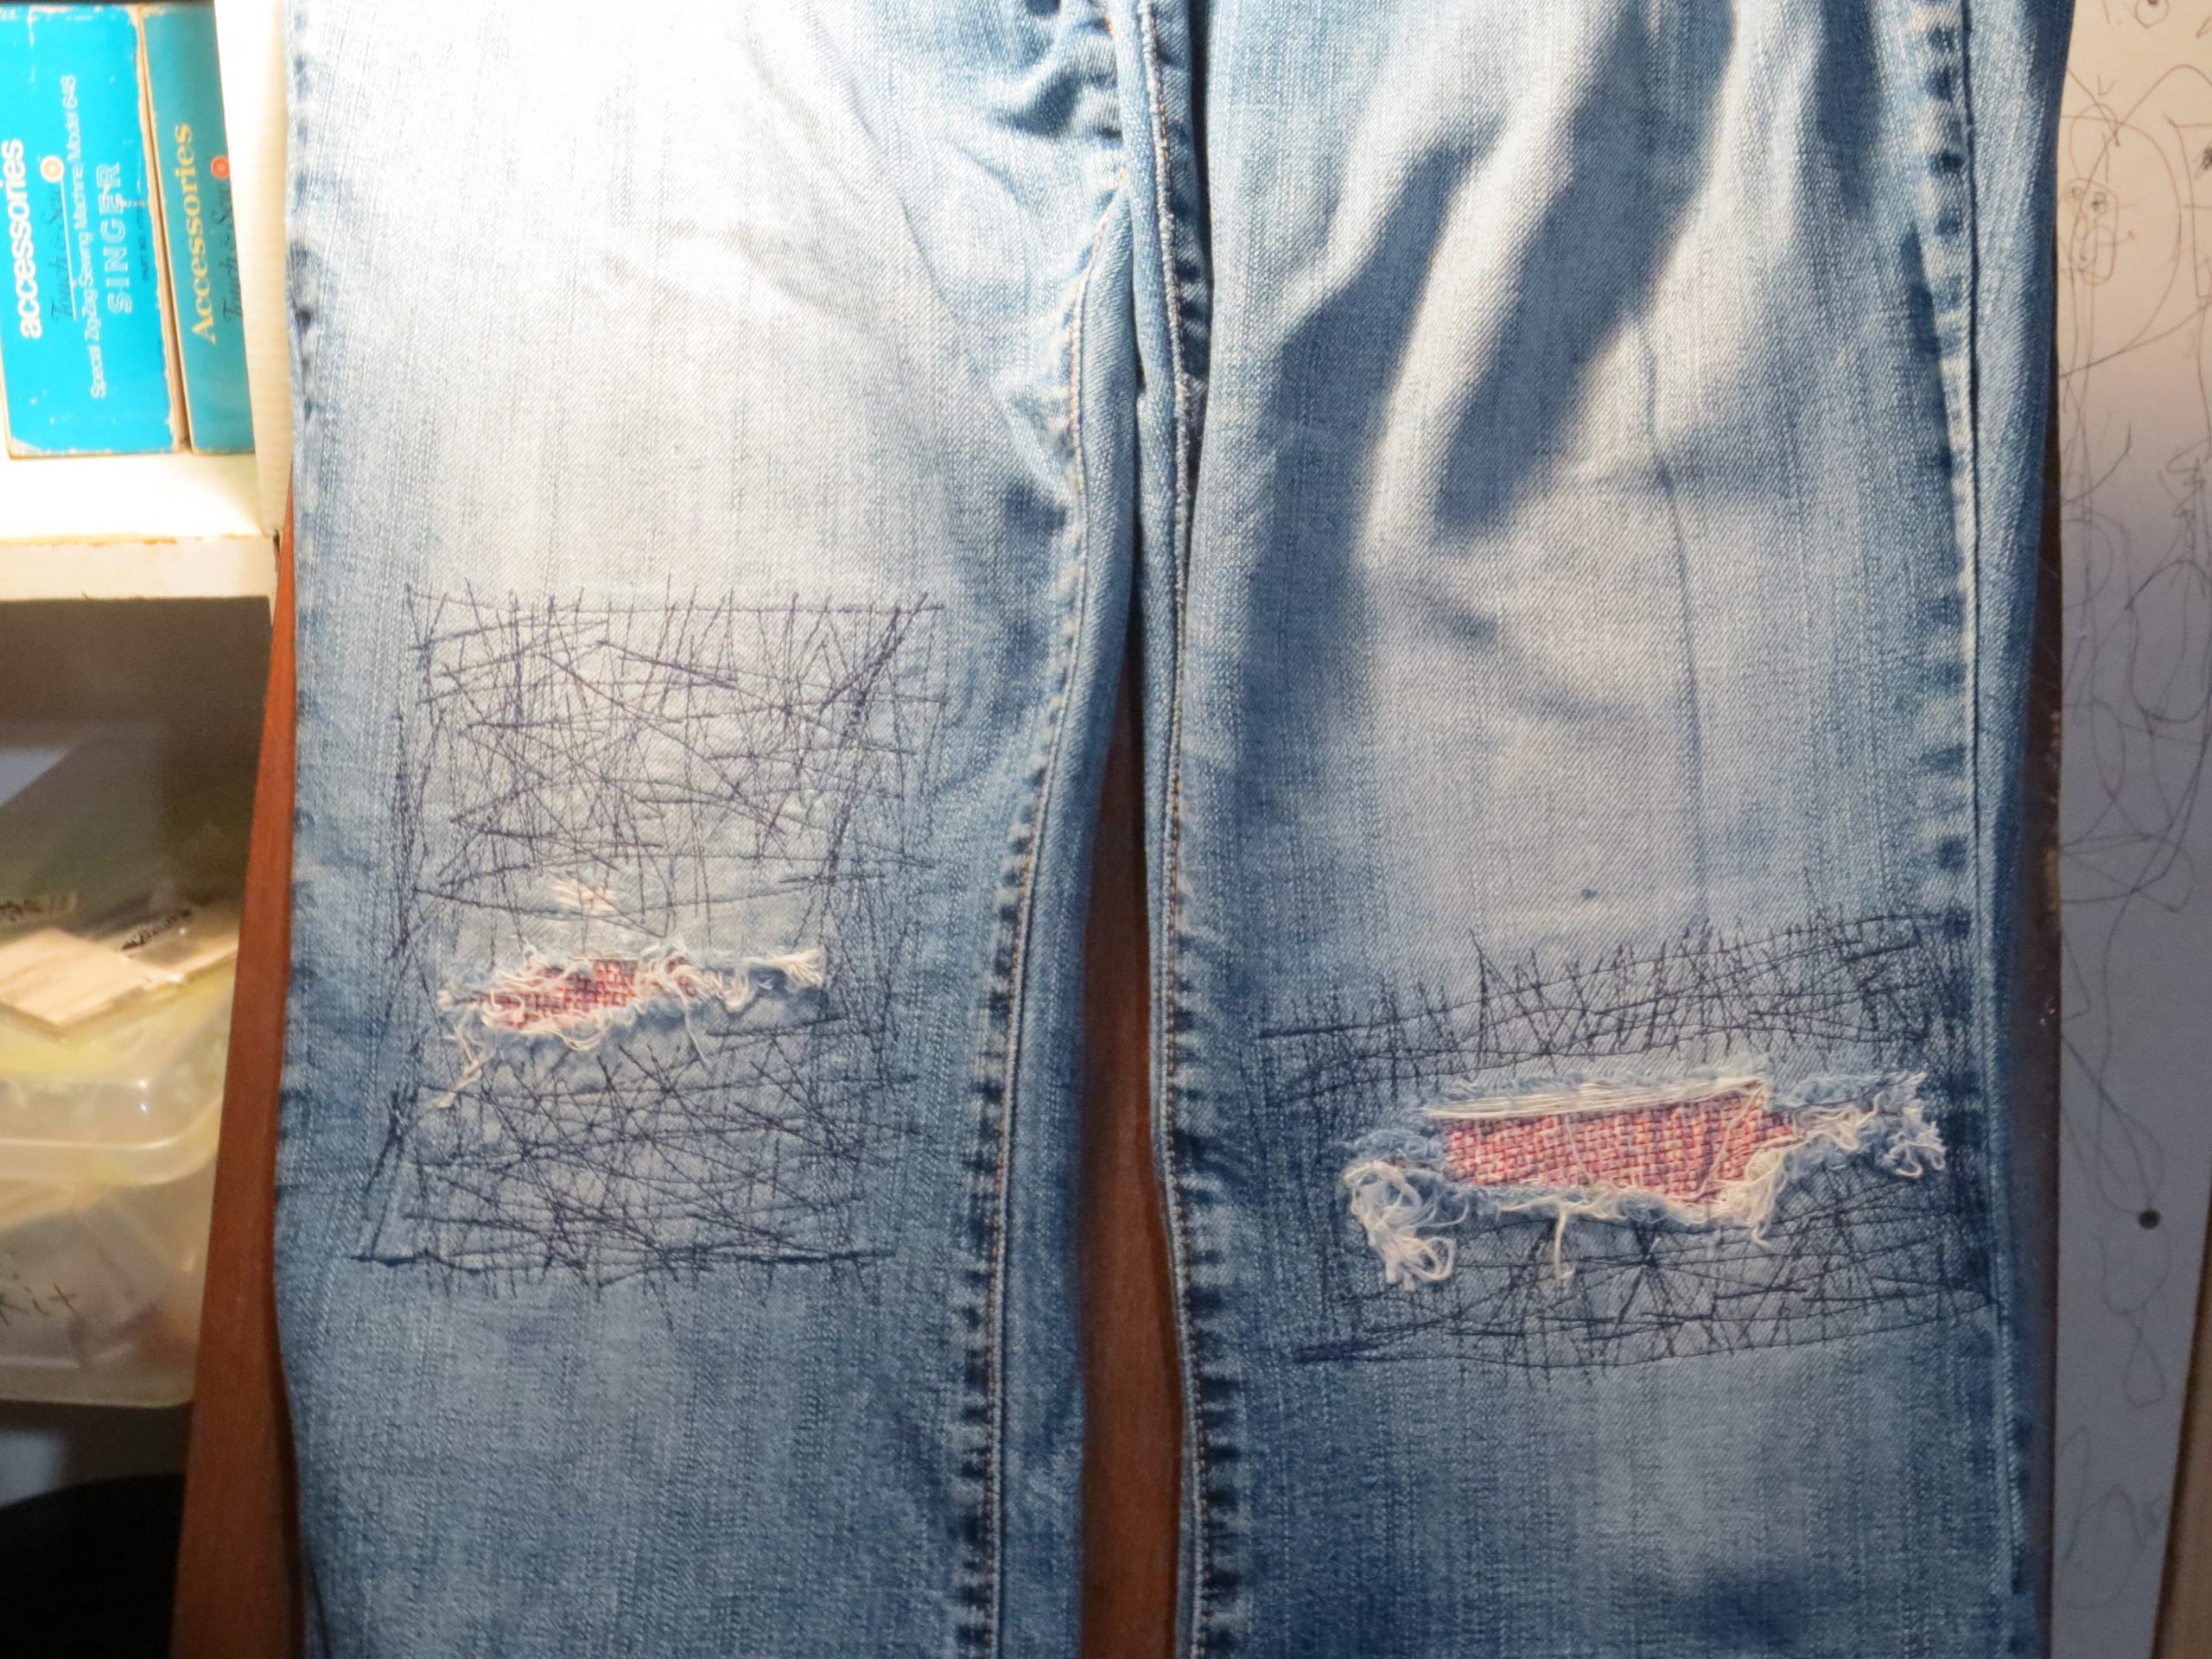
To patch the denim jeans, I chose to go underneath the rips and leave the torn edges visible. For the patches, I used cotton quilting material left over from sewing masks . I cut the fabric into squares a few inches bigger than I needed to patch. In the future, I will probably interface the fabric at this time. I knew I planned to interface everything at a later step, though, so I didn’t.
I pinned the fabric to the inside of the denim jeans.
Sewing the patches
Before sewing the crazy stitches shown in the photos, I sewed a single line of stitching all around the patch about a quarter of an inch inside the edge of the quilting fabric. This kept it in place while I did the crazy reinforcing stitches. After it was secure, I stitched in all different directions between the edge of the tear and slightly overlapping the first single line of stitching.
This side was more worn out, so it got more reinforcement stitching.
When jeans rip, usually the material around the tear is worn thin as well. In the past, I often left too much of the worn area without reinforcement. This results in new rips soon after the first repair. This time I reinforced at least an inch and a half around the tears.
Reinforcing the patched denim jeans with interfacing
After I was done stitching, I ironed interfacing to the inside. I did the interfacing last to act as a soft layer between my knees and the stitching. In retrospect, I probably should have interfaced the quilting cotton first, and then interfaced again at this step if I felt it was necessary. So far my jeans are holding up with the way I did it, though.
Sew it up
With the patches done, all that’s left is resewing the side seams. I just pinned it closed and sewed it back along the original stitching line. For the overcasting to finish the raw edges, I was lazy and used the overedge stitch on my sewing machine instead of switching to my serger. Zig-zag stitching along the edge to finish it would also work.
Embroidering the pocket
To embroider the pocket, I first removed the pocket from my jeans. Since it’s too small to hoop, I hooped tear away stabilizer alone and secured the pocket to the stabilizer with a glue stick. I used my Damask Rose embroidery pattern for the embellishment.
After the embroidery machine was done working its magic, I removed the stabilizer and replaced the pocket on my jeans using a heavy denim thread in a close shade to the original thread.
Simple, right? Actually, I tried to do that, messed up the hook timing on my Kenmore sewing machine AGAIN within the first few stitches and had to move to my backup vintage Montgomery Ward Signature machine. It took a few minutes of fiddling with the settings, but once I got it set up correctly it sewed through the heavy denim layers like butter.
In all fairness to my Kenmore, I did probably deserve it this time, between the crazy reinforcement stitches and then trying to sew through multiple layers of denim with thick thread. At least this time it let me reset the hook timing without much fuss.
Have you gotten more acquainted with your sewing machine lately? I’d love to see your projects in the comments.
Like this post? To make sure you never miss a future post, please sign up for my newsletter.
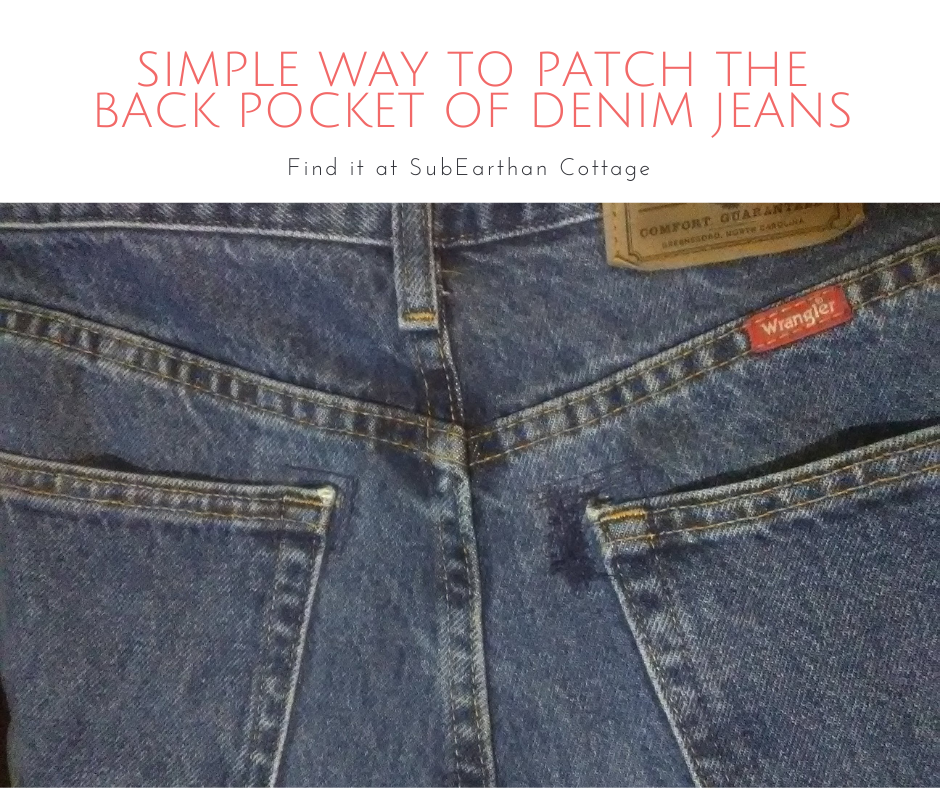
The back pockets of denim jeans are prone to wearing out at the top corners with use. If that’s where you carry your phone or wallet, you’ll almost certainly develop holes at those stress points long before the rest of the jeans are worn out. Luckily, repairing a back pocket is a pretty simple fix.
These are my husband’s work jeans. You can see the inside corner of the right pocket has a small hole and another one is forming on the inside corner of the left pocket. These are the steps I used to repair and reinforce the pockets.
Choosing your patch material
The first thing you’ll want to do is add material to patch the hole. The material should extend past the edges of the hole, overlapping onto the good fabric by about a centimeter or so. I like to use the iron-on denim patches, but fusible webbing or strong interfacing works, too. This product is similar to the one I used. You can also just use a scrap of fabric a bit larger than the hole, but I prefer the added strength of an iron-on product. An iron-on product is also easier in that it won’t shift while you sew it in.
Iron-on patch Wrong side of iron-on patch
Securing the patch to the pocket
If you’re using an iron-on product, iron it on to cover the hole from the inside according to the manufacturer’s instructions. For sewn-in patches, baste in patch to keep it from shifting.
Patches ironed in place on the inside of the jeans.
Reinforce the patch
Regardless of whether you chose an iron-on or sew-in patch, you need to reinforce the patch by sewing a strong row of stitches around the edges. For a less visible patch, I like to sew a square of stitching around the hole, making sure to include the corner of the pocket in the square. I sew over the square a few times to reinforce. Choosing a thread that matches the denim or is slightly darker makes the patch less noticeable.
For the actual hole, I like to sew back and forth over the hole in a matching thread. This secures the area to the patch, hides the frayed edges and prevents further ripping.
For a more visible patch, you can get creative with the patch material and choose a contrasting thread. You can also crazy stitch over the area, similar to what I did here.
Preventing the problem
Whenever I patch one pocket rip, I take the time to reinforce all the corners with iron-on patches and a square of reinforced stitching. It doesn’t take much extra time, and keeps the rest of the corners from needing repair in the near future. You could even do this to new jeans as a preventative measure if you have this problem frequently.
Final result
Here’s the finished patches. I’m pretty satisfied with the results. The work isn’t that noticeable and matches the variations in blue on the rest of the jeans. It’s definitely better than holes that will continue to rip in a revealing location.
Like this post? To make sure you never miss a future post, please sign up for my newsletter.
Shop sales!
For the entire month of September, all of my handmade soaps are 20% off. Shop handmade soaps here.
My machine embroidery files are also on sale all month for just $1 each! Be sure to check out my latest Halloween designs. Shop embroidery designs here.
I love wearing denim blue jeans, but chasing my boys and taking care of my small zoo, they get lots of wear and tear. One of the worst things is having to scrap a favorite pair because of one too many rips. I’ve repaired rips in a utilitarian way in the past. This time I thought I’d try patching denim using my embroidery machine. I haven’t done much applique, so I learned some things along the way.
This tutorial makes use of an embroidery machine and serger. You could also adapt it to use a sewing machine or applique by hand and embellishing with hand embroidery.
Items needed
Denim jeans or other item to repair
Interfacing
Thread in colors of choice
Seam ripper or similar tool
Scrap of fabric at least 4 in x 4 inches
Stabilizers: Cut away or tear away, water soluble optional
Since I’m repairing a ripped knee, I needed to take out one of the side leg seams on my jeans. Using a seam ripper made this easy, but you could use small scissors, too. I left the seam intact at the hip and ankle, only removing what was necessary to lay the ripped area flat in the hoop without risking sewing it to the back. Leaving a little intact makes it easier to resew the seam at the end.
Step 2: Prepare the rip.
Iron the area around the rip so it’s smooth and flat. If there’s a lot of loose threads around the rip, trim them. I caught this rip before it frayed too badly, so no trimming was needed.
Side seam removed and jeans ironed flat.
I wanted the embroidered area to be solid, so I applied some interfacing to the back of the rip. I used some medium weight interfacing, but any should work, since it’s job is just to hold it together while the jeans are embroidered. This is a perfect project for using whatever scraps are handy.
Back of rip with interfacing applied.
Step 3: Hooping.
For denim, tear away or cutaway stabilizer is best. I chose cutaway for the most stability. It’s stiff, but it should soften in the wash. If not, I’ll switch to tear away next time.
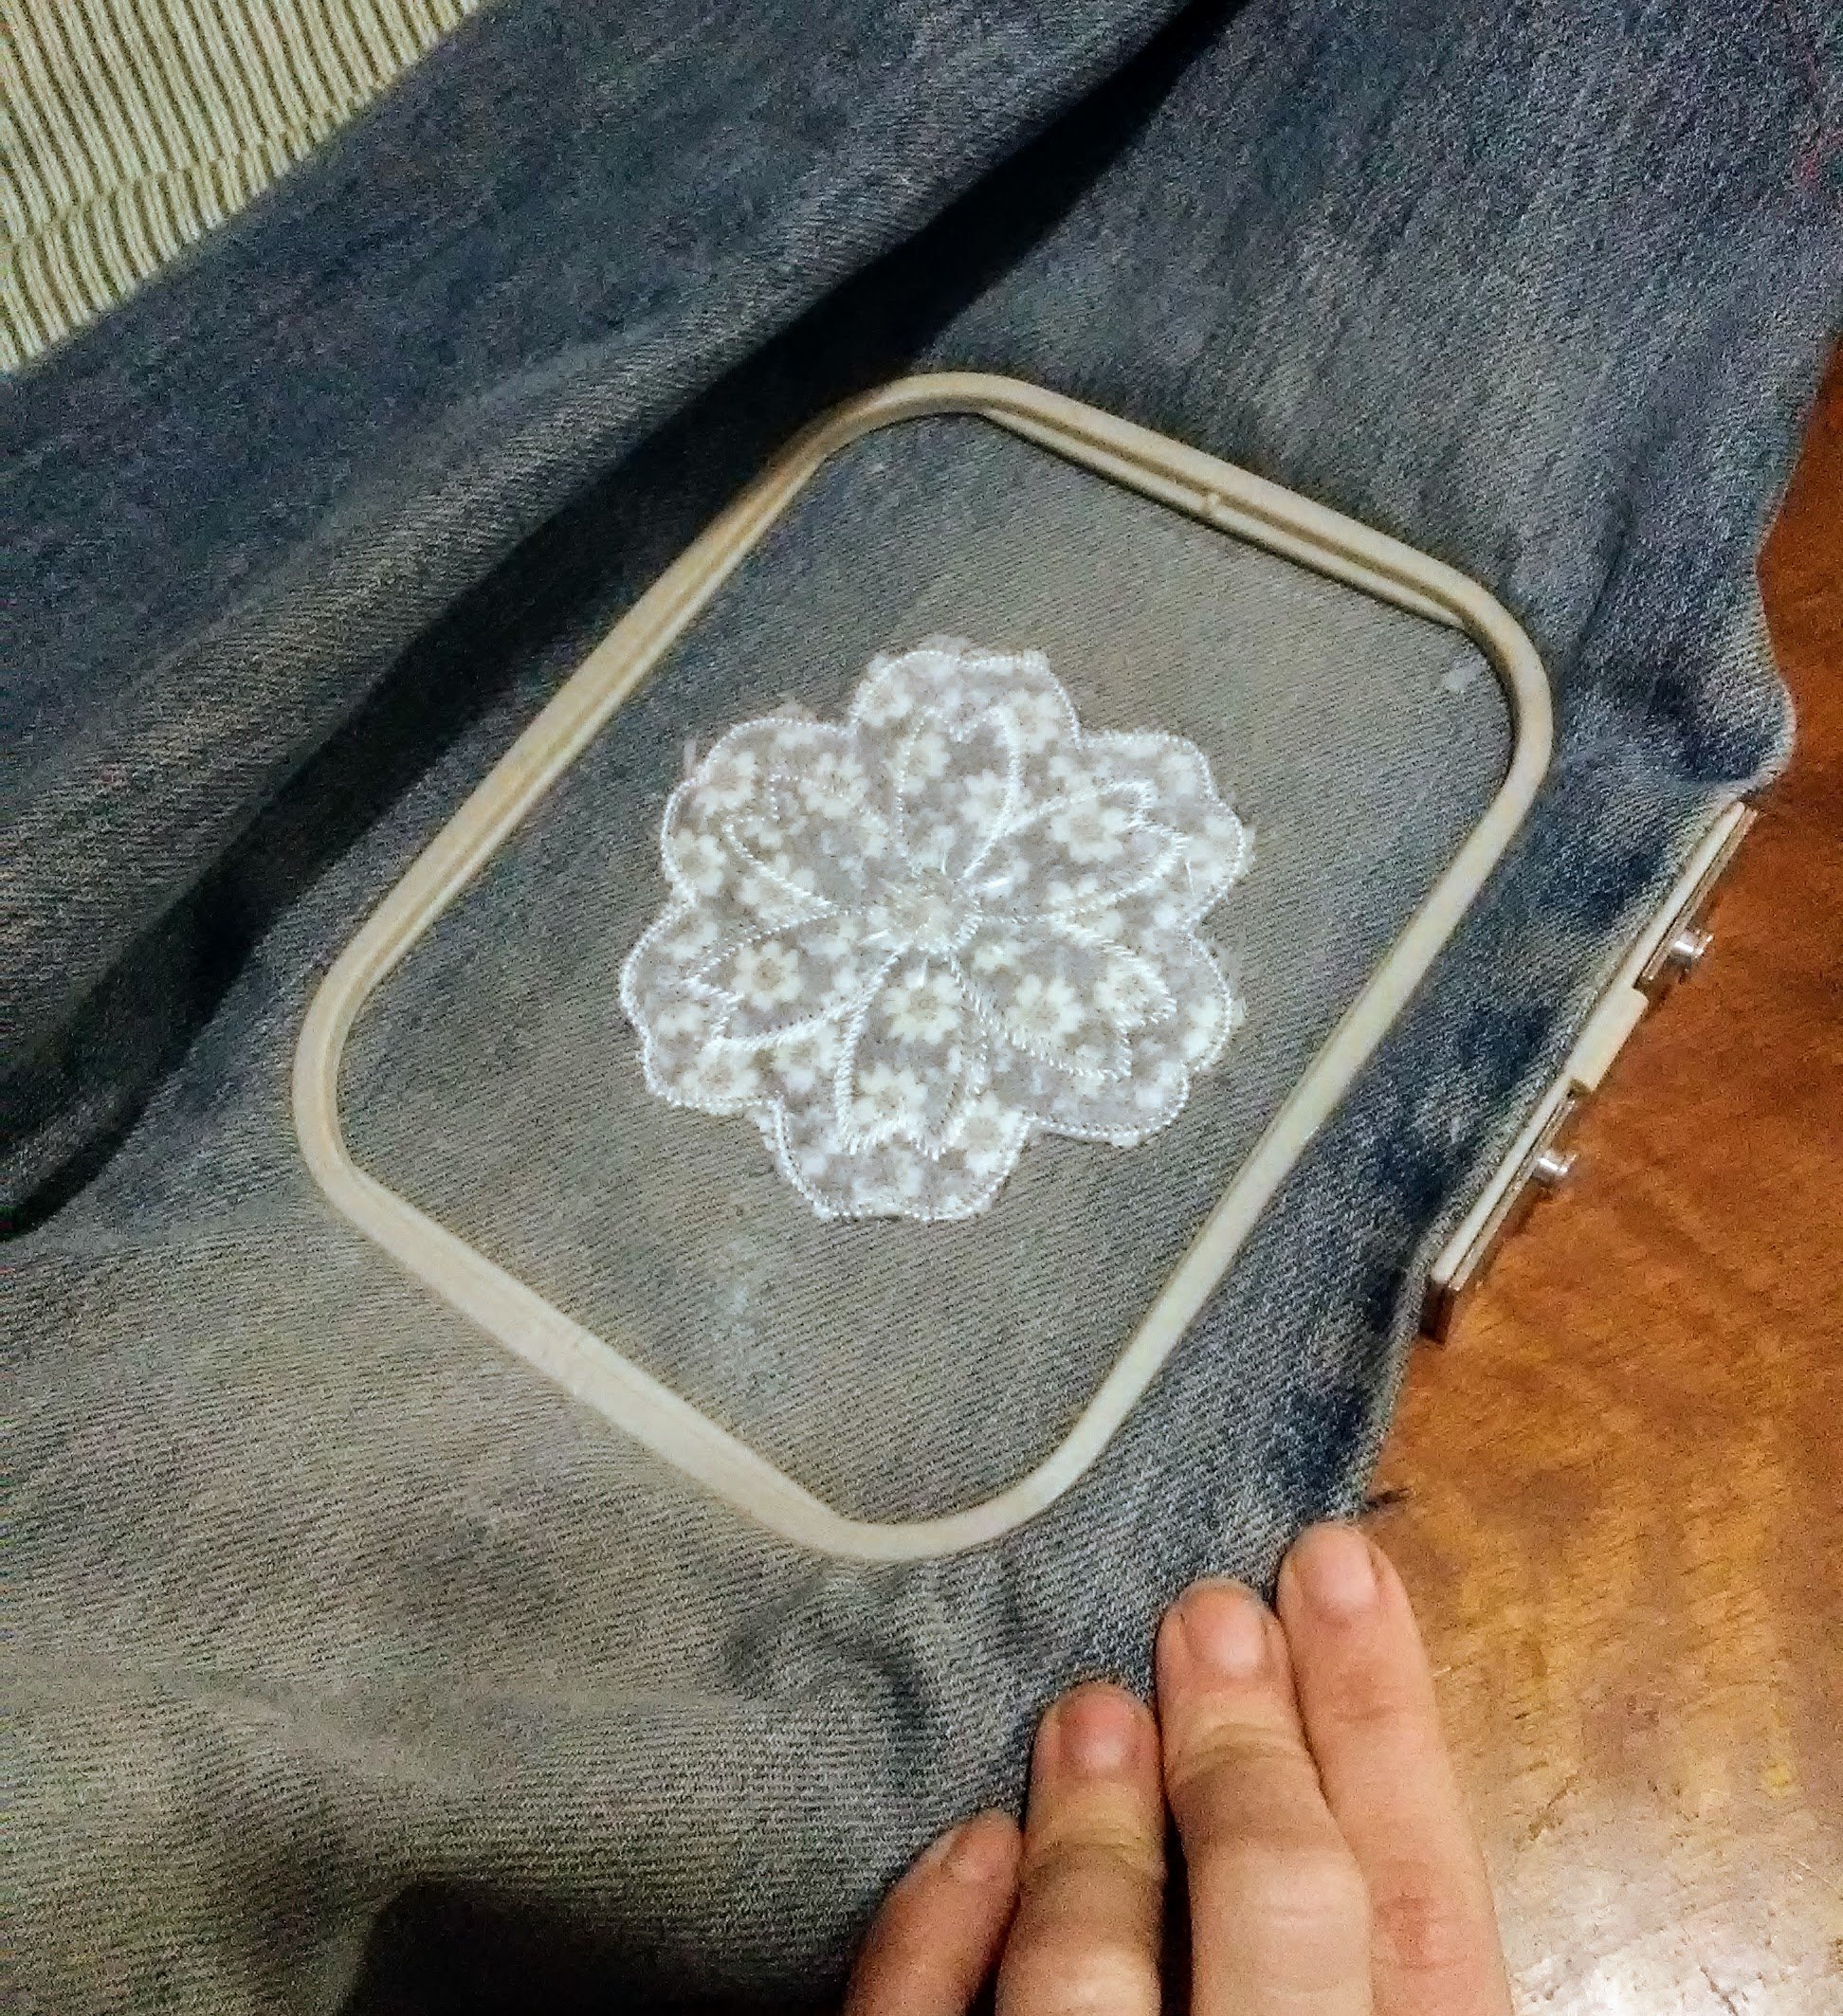
I tend to float projects and only hoop the stabilizer whenever possible. This project seemed like it would work better tightly anchored in the hoop. It took a few tries to center the rip in my hoop so that all edges would be covered by my design. My machine has a 4 in x 4 in embroidery field, so the rip just barely fit. Smaller tears will be easier to fit in my small hoop.
First attempt. Once I put it in my machine and had it circle the embroidery field, I saw it needed re-positioning.
Step 4: Embroidering the patch.
Once it’s properly hooped, it’s time to sew. On my machine, the first color stop said “Applique Material”. I haven’t done much machine applique, but the ones I am used to usually follow the sequence: placement stitch, tack down the applique (then trim excess), sew the final applique stitching. So, confused I just put the applique fabric and a water soluble stabilizer (optional) on top of the rip and pushed start.
What my machine was telling me to do was to just hoop the applique fabric so I could remove it from the hoop and cut it neatly. The second color stop was the positioning stitch. That would be stitched on my jeans and then my neatly trimmed applique could be placed in position and the stitching completed. Since I did everything at once, my applique isn’t as tidy as it could be. I will definitely listen to my machine next time.
Finished sewing.
Step 5: Remove from hoop and cut away excess stabilizer
I also steam pressed over the back of the patch to start softening the stabilizer.
Patch from the back with stabilizer trimmed.
Step 6: Sew the leg seam.
To repair the leg seam, I used a lock stitch setting on my machine. You could also sew the seam twice to reinforce it or just use really heavy thread. I then serged the raw edge. If you don’t have a serger, an overedge stitch or zig-zag stitch would also work.
Finished!
Finished patch. Next time I will use heavier thread so the embroidery shows better.
Not bad. I wish I had used heavier thread so the embroidery would show up better. Listening to my machine and cutting the applique fabric to size before I sew it on to eliminate the raw edges peeking out is another improvement for the next time I’m patching denim.
If you’d like to use this applique design, you can download the file here. You can use the design on items you make to sell as well as for personal use, but please don’t sell the design file.
Floral knee patch applique design image.
Like this tutorial? To make sure you don’t miss out on future tutorial posts, sign up for my newsletter.
Embroidery Files
Embroidery design files and freebies from SubEarthan Cottage. All designs are scaled to fit 4×4 hoops common on home embroidery machines.
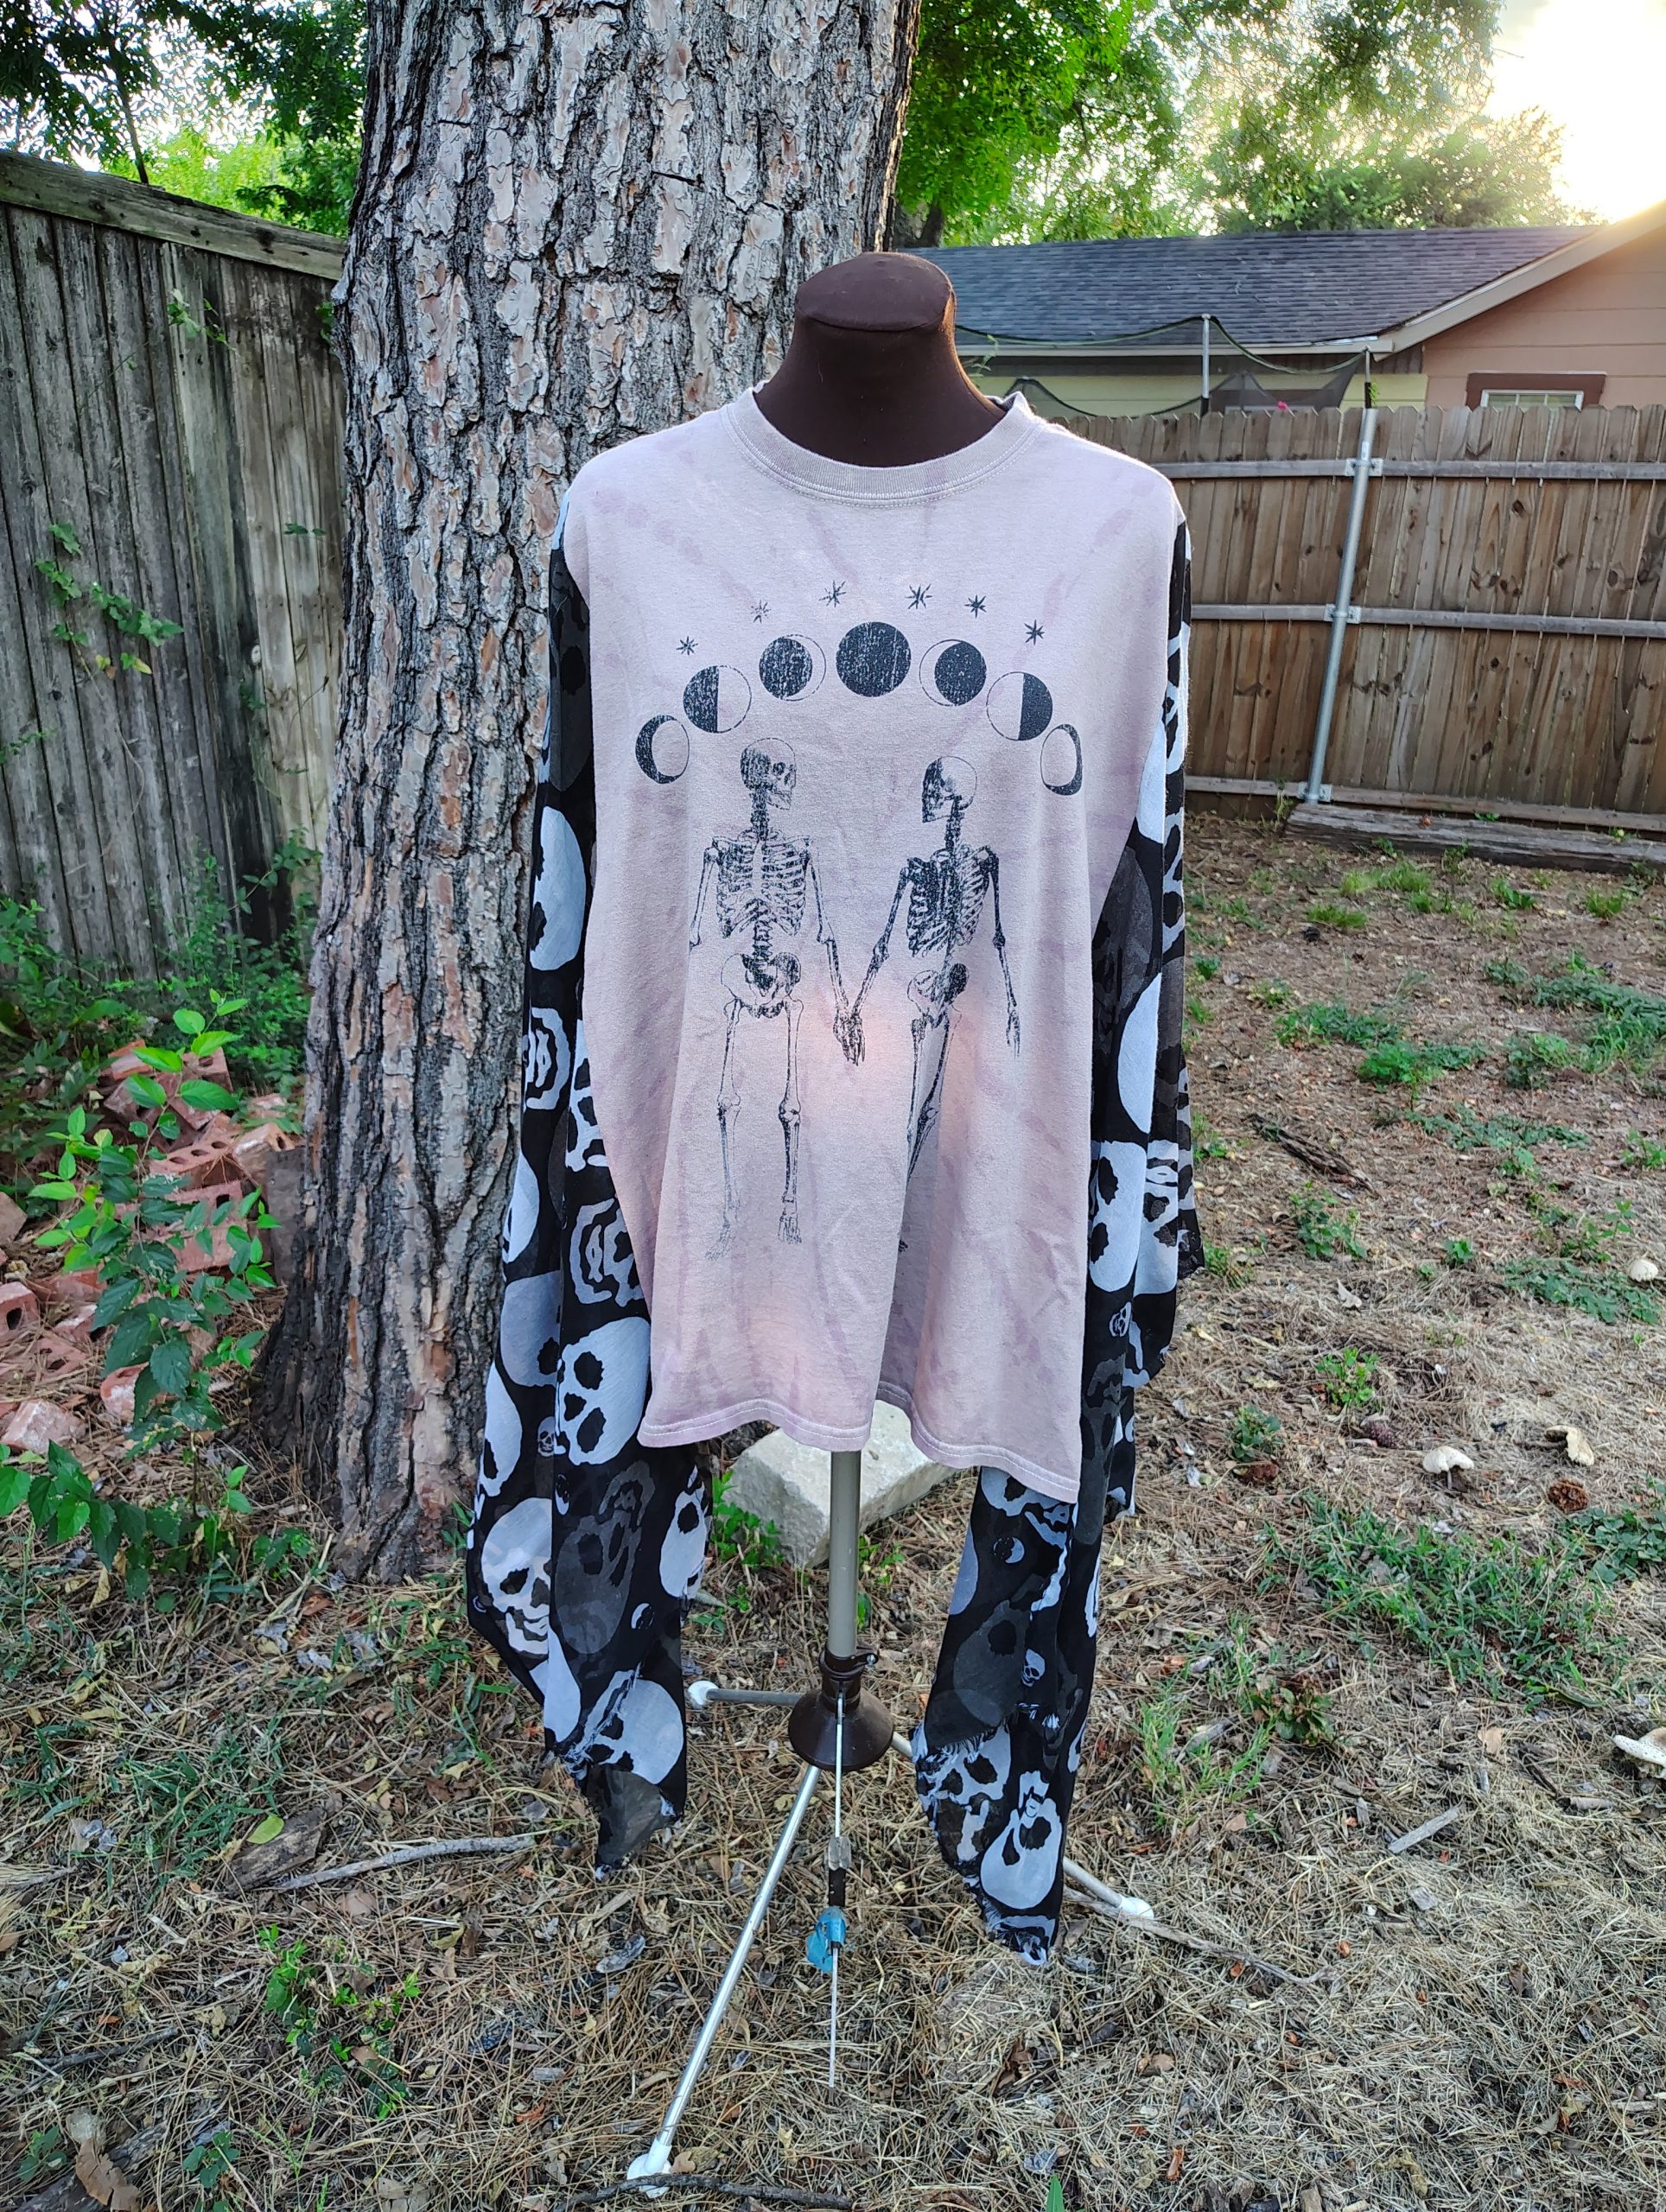
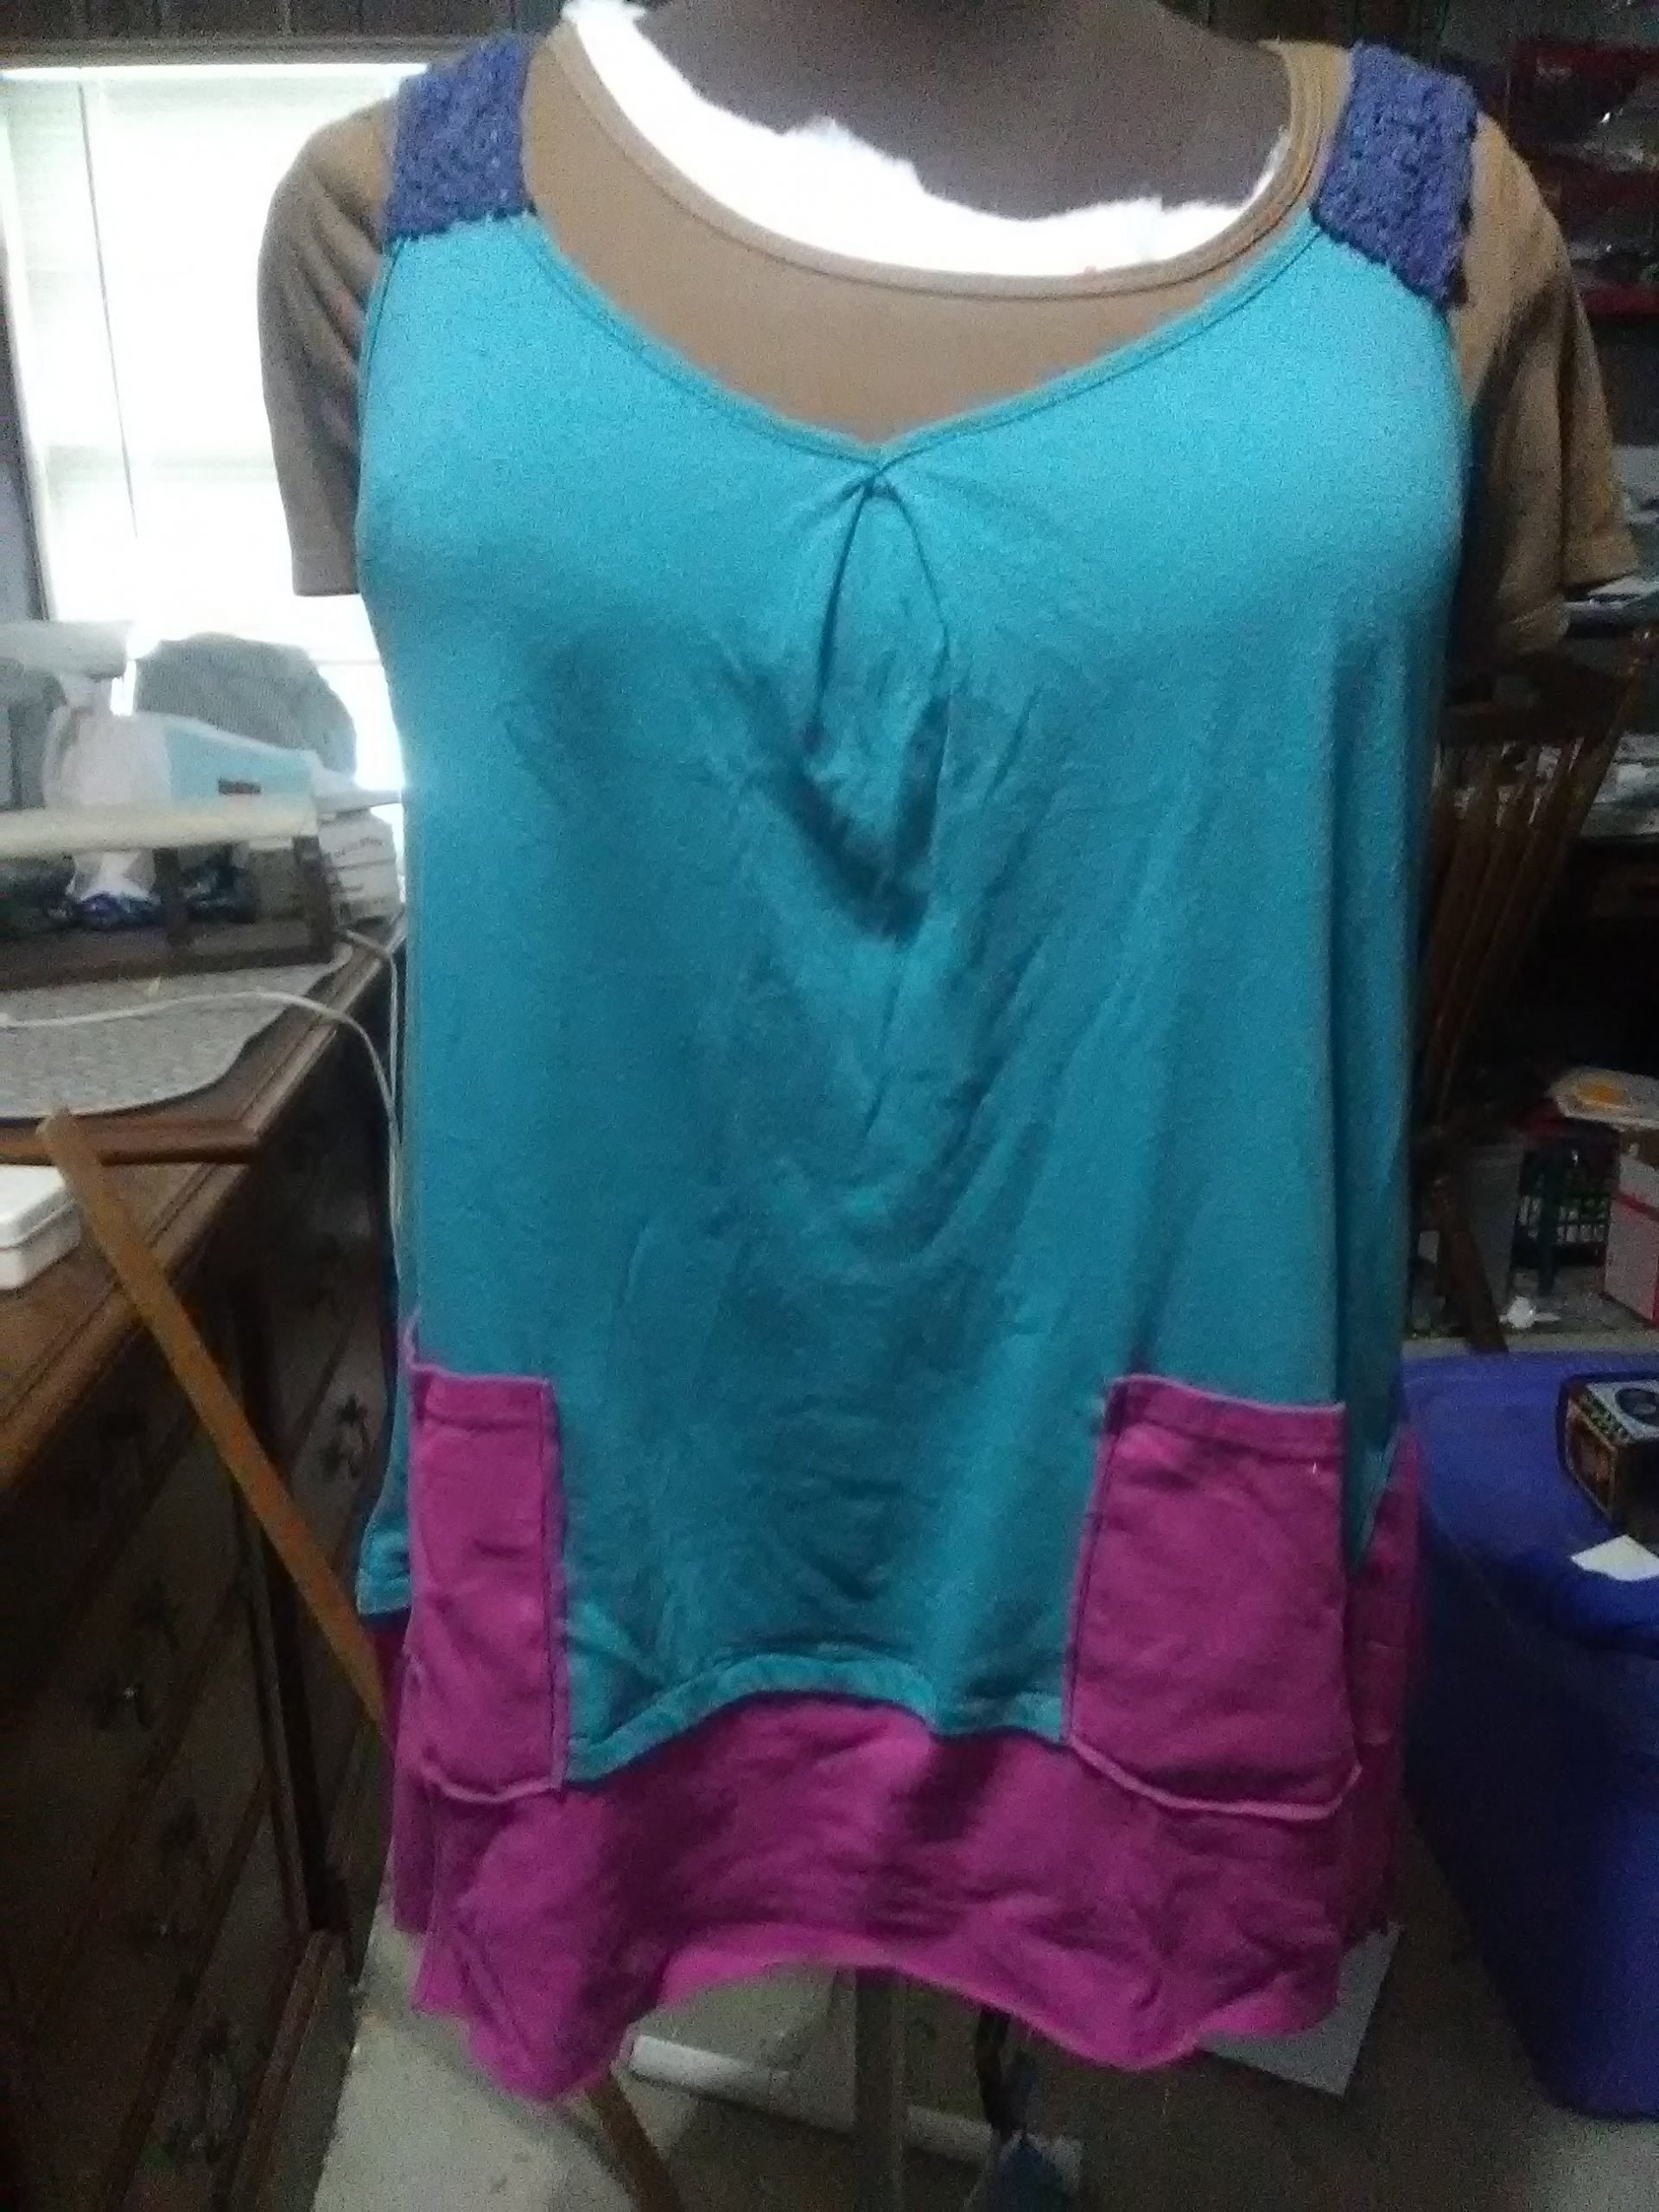
I have tons of clothes waiting for me to refashion them into something more wearable, but haven’t had much inspiration. Recently, though, I came across CreoleSha on Etsy. I love her flowy designs. Luckily, she offers classes on Teachable, so I took her free course on upcycling a sweatshirt or t-shirt into a tunic.
Almost forgot to take a before photo.
My refashion notes
It’s summer, so rather than use a sweatshirt, I started with a camisole tank that I didn’t wear much. I liked the color, but the fit was too loose to use for layering, and the skinny straps made it difficult to wear with a bra. By adapting the techniques in CreoleSha’s class, I turned it into a longer, flowing tank and then added a bit of cotton lace salvaged from an older refashion project to widen the straps.
The added material came from a t-shirt with a large logo on the front. I liked the color, but not the logo, so it was perfect and added some nice contrast.
Of course, pockets are always handy, so I added some patch pockets on the front.
Final result
It’s not perfect, but it’s something I’m more comfortable wearing now. The shirts were wrinkled from storage to the point that the wrinkles came back even after ironing. Luckily they smoothed out with laundering, so I don’t look like I just rolled out of bed when I wear it. More importantly, trying something a little on the artsy side and just jumping in has me ready to tackle more refashions.
A note on my dress form
Before working on this, I took the time to add some batting to my dressform, Athena. She’s a little less padded in some areas than I am, so the batting makes it easier to use her as a fit guide when I don’t want to try things on over and over. The brown t-shirt helps hold it all together and provides something to pin into.
Like this post? To make sure you never miss a future post, please sign up for my newsletter.
Lately Christopher and I have been talking a lot about fashion. It started as a discussion about not being able to find comfortable clothes, especially pants (trousers for British English speakers) and how hard it is to find clothing that goes against the trends. Being crafty, we explored making our own clothing. The cost of fabric, supplies, time it takes to cut and sew all highlighted how impossible it is to produce clothing ethically at the low prices charged for much ready-to-wear clothing. That doesn’t even take into account the raw materials that are used to make the fabric and problems with content, pesticides, sustainability, etc.
At the same time, like many, our budget, doesn’t allow us to spend a ton on clothes. We try to make the most of our clothing budget guilt-free by shopping thrift stores and second hand shops. That way we aren’t adding to the problem by purchasing new. Most thrift shops are charity-based, so our purchases help others. We often find better quality items than what we would otherwise be able to afford this way, too.
With thrift shopping, you’re not as limited by trends. If you’re looking for something in particular, unless it’s a common item, you’re still likely to come up empty handed. That has been our problem when it comes to comfortable men’s and boy’s pants. Both Finn and Christopher would prefer something a little roomier, like karate gi pants. Unfortunately, nothing like that has been in fashion since M.C. Hammer. That means it’s time to put my sewing machines to use.
Making a Pattern from Shorts
This summer, I started by trying to copy a pair of the cotton knit gym shorts they practically lived in, adding a gusset for comfort and mobility. I used to buy bulk bags of t-shirts from Thrift Town before they closed, so instead of using new fabric, I used some XL t-shirts I had on hand. That way, if things went horribly wrong I wouldn’t feel as bad.
If you follow me on Instagram, you might remember seeing this photo with some enticing caption like, “Working on a new project!” Then, nothing else was said. Sorry.
I have zero experience with pattern making, so this was a learning experience. Here’s a brief overview of how I did it.
I laid the shorts inside out and folded in half, front to the inside, smoothing them as flat as possible. Then I traced them, adding about an inch all around. The inch is for seam allowance and to account for the fact that it’s impossible to get finished shorts to lay flat. I always err on the side of too big, because that is much easier to fix.
At the waistband, I measured the waistband and extended the pattern by that amount plus seam allowance above the waistband. This allows it to be folded down for elastic and a drawstring casing. At the hem, I extended the lines two times the width of the hem to allow enough fabric to fold and hem. On the pattern, I drew lines straight across to show where the finished hem and waistband hit on the original shorts for reference.
Then I folded them in half , backs to the inside and repeated the above steps since the back is cut differently than the front.
Drafting the Gusset
For the gusset, I drew kind of a triangle with the top point cut off. To do this evenly, I folded a piece of paper in half, drew a half inch line perpendicular to the fold, moved over about four inches and drew another perpendicular line measuring one and a half inches. Then I drew a straight line connecting the tops of the lines. I cut along the lines and opened it up to get my gusset pattern. Sewing the gusset in with the wider part at the crotch seam and using a half inch seam allowance results the gusset tapering down to a point.
Shorts to Pants
Shorts work for summer, but I needed to come up with a pants pattern for fall and winter. Chris suggested just making the shorts pattern longer, so I did by measuring the waist to floor measurement and extending my pattern the needed amount, including seam allowances.
I did this by taping the bottom of the pattern to a big piece of paper, sketching out the needed length and side seams and cutting it out.
Final Pants Result
My pattern isn’t perfect. I think I’ve tweaked it each time I’ve used it. Since the pants are made to be loose and flowy it hides the imperfections.
These are my first attempt. I made them with a linen blend, elastic and drawstring combo waistband and no pockets. I added side-seam pockets later.
My goal is to find or draft a few more basic, customizable patterns for pants and shirts that can be made in linen or a similar material. Then I can buy a bulk amount of undyed fabric and dye it as needed.
Like this post? To make sure you never miss a future post, please sign up for my newsletter.
In keeping with my desire to be more conscientious with my clothing, I shopped my closet for clothes that aren’t bad, but need a little refashioning to make me feel comfortable in them. I’ve had this gauzy tunic top hanging in my closet for a while. It felt nice and lightweight, but I just never felt like wearing it.
Originally it was a pale, pastel blue. I thought maybe a color change would help, since I’m not big on pastels. I added it to a black Rit dye batch a few weeks ago, turning it a nice, dark grey. When I put it on yesterday morning, though, it still wasn’t quite right.
Early morning=terrible lighting
The sleeves had weird cuffs sewn on that were an awkward length and oddly tight. I decided they had to go.
See the blue thread? That was the original shirt color.
Rather than ripping out the seam, I simply cut away the cuffs as close to the seam as possible. I could have folded and hemmed the sleeves, but I planned to wear the tunic that day, so I wanted a quicker way of finishing them.
Still too dark.
Instead of hemming, I used my serger to make a rolled overcast edge where I had removed the cuffs. Not only was this quick, it gave the sleeves a light, breezy feel that, in my opinion, fits better with the overall style of the shirt. With the new color and sleeves, I can see myself getting much more wear out of this tunic shirt.
I, Charity Sloan, am a participant in the Amazon Services LLC Associates Program, an affiliate advertising program designed to provide a means for sites to earn advertising fees by advertising and linking to Amazon.com. Any purchases through those links will result in my receiving a small percentage in commission.
This only refers to Amazon links found in/on my blog pages. All products in my shop are 100% mine and not linked to Amazon.
Prices are the same whether you click an affiliate link or a non-affiliate link, so you will not be charged more. Thank you for your support!