It seems like everyone has at least a couple of promotional mugs hanging out in the back of their cupboards. If you don’t, there’s hundreds at any thrift store. On the one hand, they’re actually pretty useful, as far as promo swag goes. even if you’re not a coffee or tea drinker, they’ll hold any beverage. Or, you could use them to hold pens or random desk stuff, makeup brushes, or toothbrushes. You could even use them as little planters. (Tip: plant in a nursery pot and put that inside the mug. No need to drill holes, and the mug catches the drainage. )
The problem is that the designs usually aren’t very cute, and who really wants advertisements with their morning cuppa?

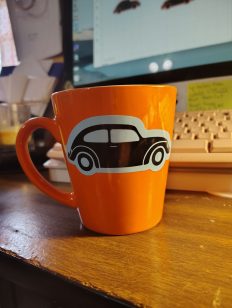
Take this mug. I like the shape. It’s a nice size and a lovely bright orange. I could use it as-is, but the orange reminds me of the orange VW my husband drove way back when, and I don’t even know what idstc is. So, I decided to cover it with vinyl.
My Mug Upcycle Method
First, I measured the height and width of the logo. Then, I used Cricut Design Space to create my design, a VW bug, of course. (If you don’t have a cutting machine, don’t worry. I have ideas for you, too.) I made sure that my Bug was a little bigger than the logo. After that, It was just cut out the design in permanent vinyl and apply. Voila!
(Or, rather, cut it out, realizing after the first cut that you had the wrong color loaded, so you end up making a set in your original color scheme and one in the inverse. Then mess up applying one side so you do one side of the mug in the original, and the other side in the inverse colors only to decide you actually like the inverse better. But you leave it as is because you don’t want to risk messing it up trying to change it. )
Other Methods
Now, if you don’t have a cutting machine, you could use a big sticker. Clear contact paper does an excellent job making them water-resistant. I did that to cover a graduation logo on a water tumbler that worked well. You could also cut a heart or other simple shape out of adhesive vinyl or contact paper. I find lots of it at thrift stores. Dollar Tree also sells vinyl as well as sticker paper.
Another option that I haven’t tried is adhesive chalkboard paper. I think it would be so cute to be able to write little notes on a coffee cup. I’m not sure how well it would hold up to moisture, though.
So far, I’ve only hand washed any of the mugs and tumblers I’ve decorated with vinyl. I don’t think putting them in the dishwasher is the best idea. I really hate handwashing dishes, though, so at some point it will probably happen. When it does, I’ll let you know how it holds up.
Share Your Upcycles
Share your upcycled mugs in the comments or on our Facebook page.
Don’t Forget!
On a different note, don’t forget my digital and printable planners are all only $0.99 through August 22, as well as all of my single machine embroidery files. I’ve also made some more of my older machine embroidery designs freebies, so be sure to check them out.

eBooks and Printables

Embroidery Files
Embroidery design files and freebies from SubEarthan Cottage. All designs are scaled to fit 4×4 hoops common on home embroidery machines.