Posted on 6 Comments

DIY Cloth Face Masks Thoughts and Information

DIY Cloth Face Masks

Several weeks ago, I got an email talking about DIY cloth face masks. It provided a link to a free pattern. Honestly, I thought it was kind of silly. From what I’d heard, N95 masks were the only masks able to do anything against COVID-19. 

A few days ago, I saw posts about people making masks and donating them to healthcare providers and nursing homes. Again, I was skeptical. If N95 masks were the only masks able to filter COVID-19, surely making cloth masks was just something that made people feel like they were doing something productive with little actual value. Still, I decided to look into it. As it turns out, cloth masks, while not as good as N95 masks, do offer some protection.

What protection can a DIY cloth face mask offer?

During my research, I frequently saw a Cambridge University study referenced. This page at smartairfilters.com gives a good overview of the study. In a nutshell, various household materials and fabrics offer protection ranging from 49%-86% against particles smaller than the coronavirus. At the top end are vacuum cleaner bags, but they are difficult to breathe through.

The more common types of materials used in DIY masks, such as cotton fabric, t-shirt blends and dish towels offer 57%-73% protection in a single layer. Using two or more layers increases the protection, but the increased protection varies by fabric.

Overall, it’s clearly not as much protection as an N95 mask, but a DIY cloth face mask does offer some protection. Any reduction in exposure will reduce your chances of getting sick, from COVID-19 or any other bugs out there. I’ve also heard that first responders and healthcare providers are using cloth masks over the N95 masks. This allows them to change the cloth mask and reuse the N95 masks longer. Different hospitals and healthcare providers have different needs and preferences, so if you decide to make some to donate, check first.

What I’m doing.

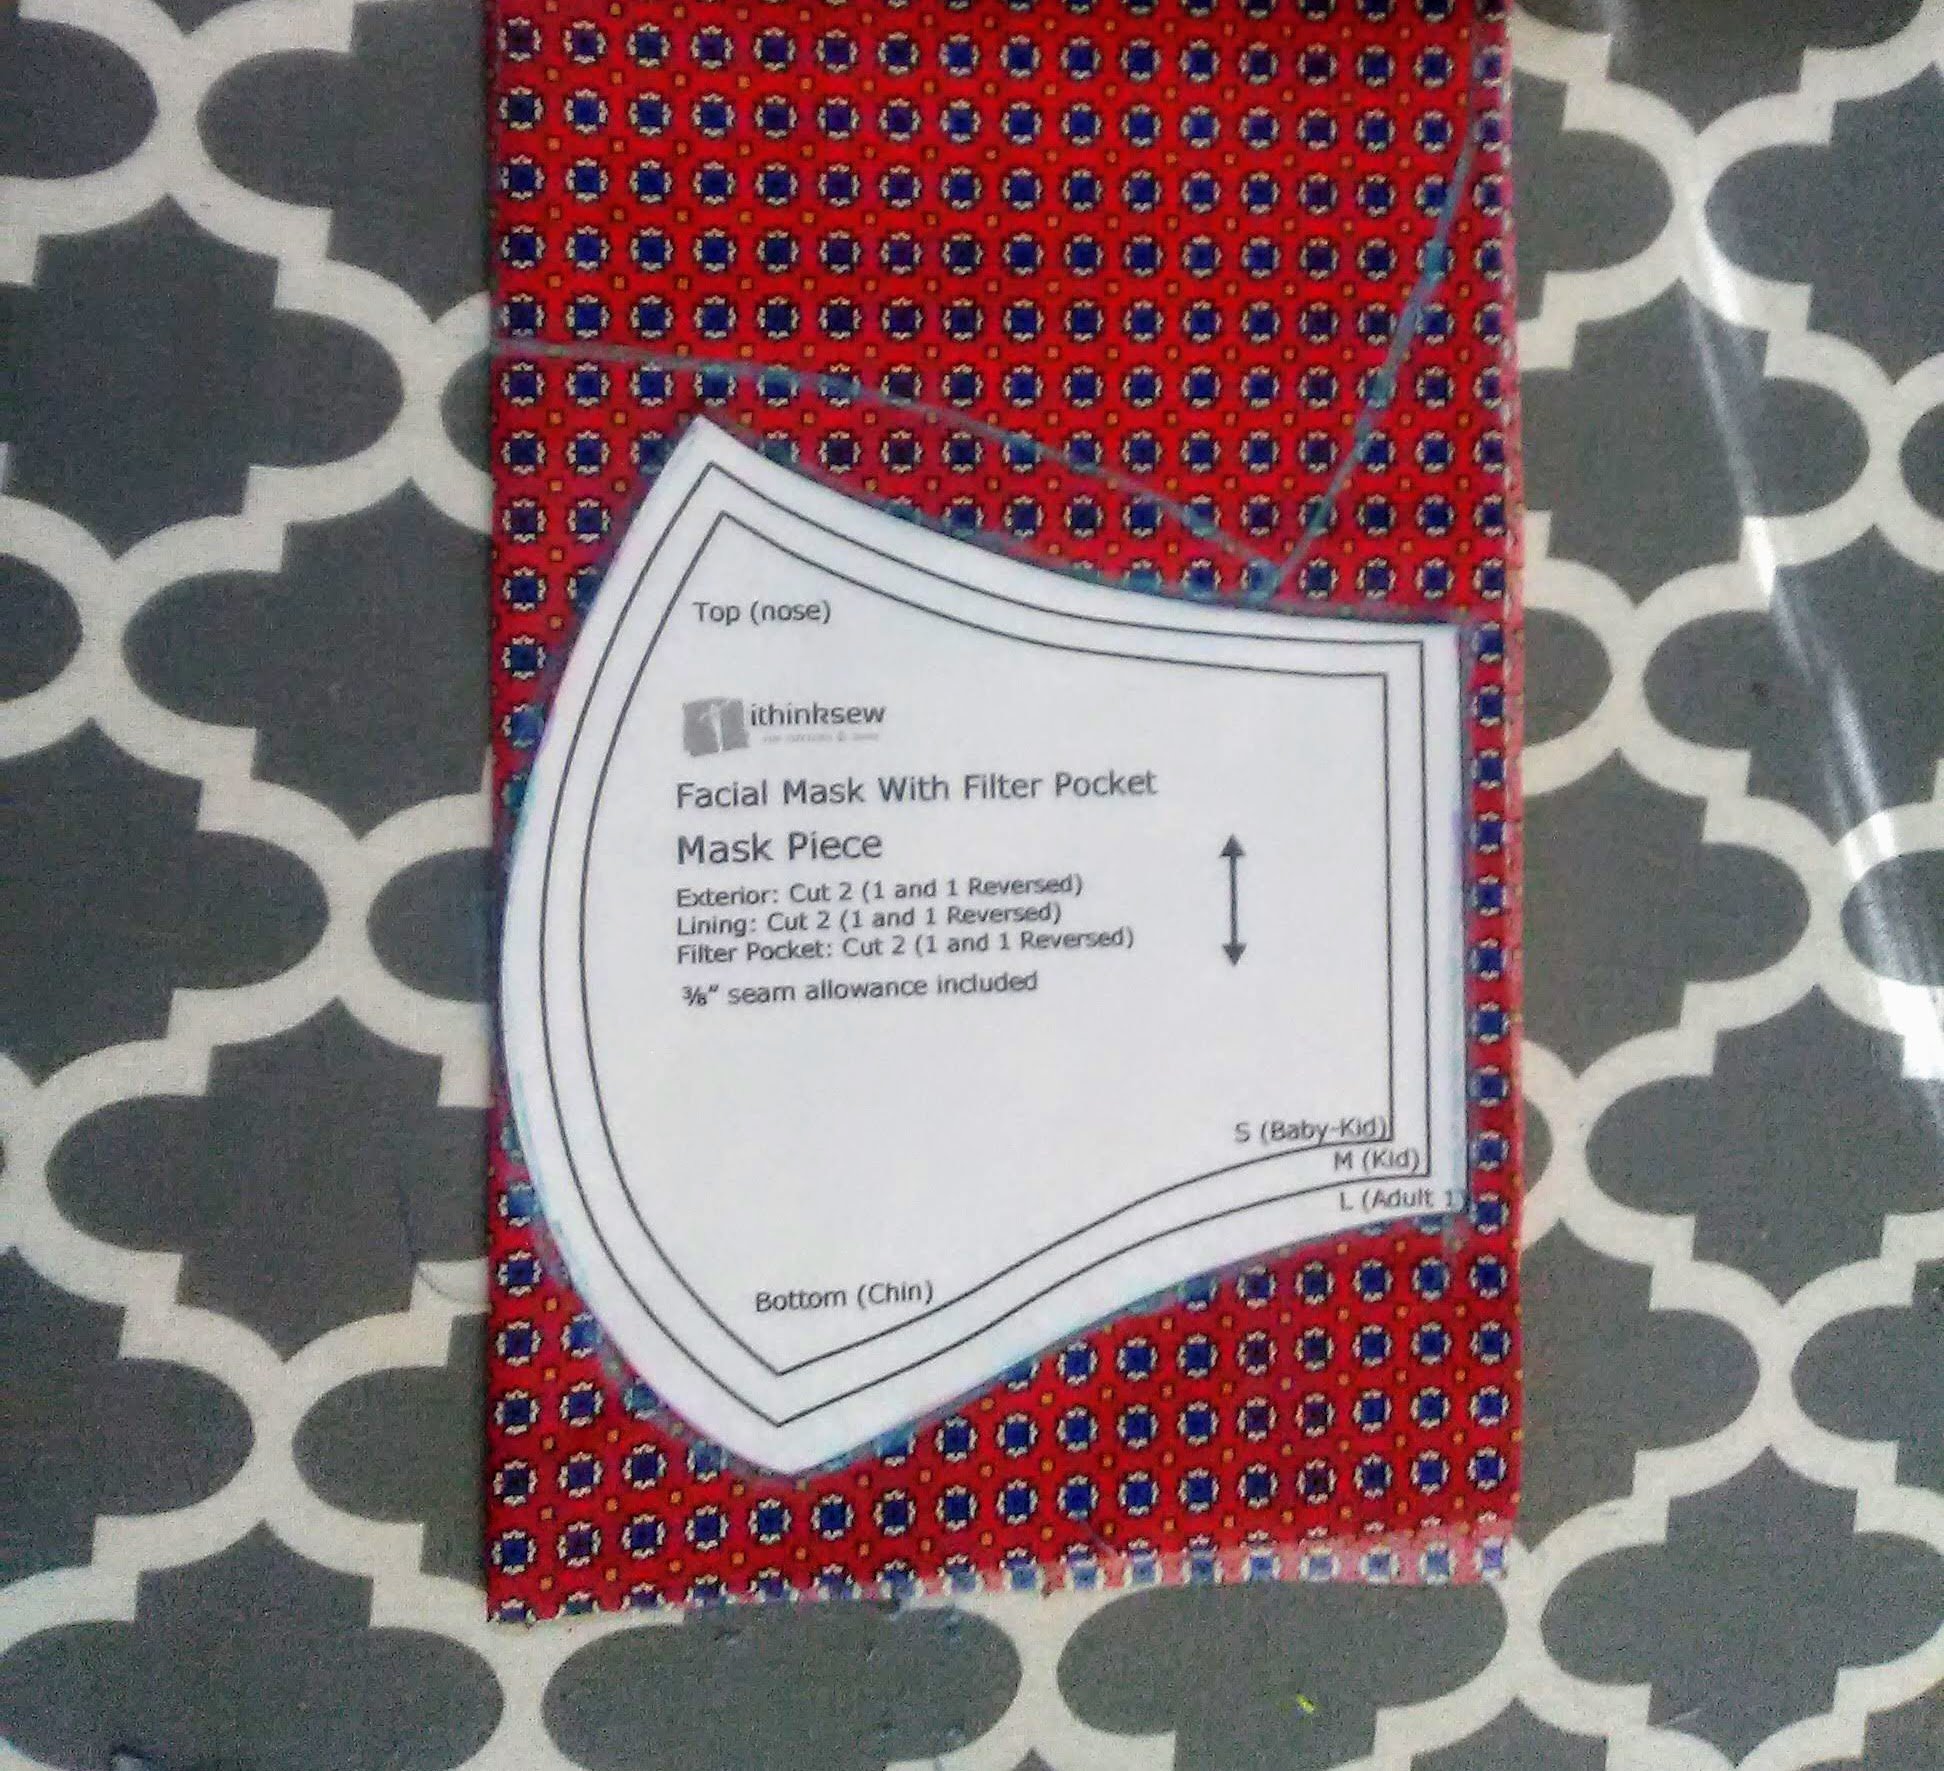
After debating and seeing interest among friends and family, I’ve decided to make a few to start. I’m using the more finished mask design from IThinkSew’s free patterns as my starting point. They also have a simplified pattern designed to be easy enough to sew by hand.

Cutting out fabric for DIY cloth face masks.

I am planning to swap the ear elastics for ties that go behind the head. I’m making that change based on seeing complaints that ear elastics are uncomfortable if used for long periods and can dislodge hearing aids. Cloth is also able to withstand higher heat than elastic, so swapping the elastic for ties allows the masks to be washed at higher temperatures. Elastic can also wear out quickly if it’s being put on, taken off and washed frequently, so cloth ties should prolong the usefulness of the mask.

The pattern I’m using has two layers and a filter pocket, making it three layers in total. Alone, it should offer some protection. For added protection, though, I’ve been looking at different filter materials. The one that seems most readily available to me is embroidery stabilizer. It has similar properties to other filter materials and is washable. There isn’t a ton of information on it as a filter substance, but I am seeing other people using it as well. It’s similar to but lighter than vacuum bags (if using cut away or tear away), and the content is the same or similar to what is used in surgical masks.

I’m not sure how many masks I’ll make. I plan to start with the people I know that have shown interest and go from there.

The IThinkSew mask patterns don’t have written instructions, but they do have fairly detailed videos for both mask designs. If you’re making masks using that pattern and having problems, please comment with your questions and I’ll try to help. I’ll try to help with other patterns, too, but I might be less helpful without my own hands-on experience.

Other sewing projects.

Knowing that so many are stuck at home right now needing distractions, I’ve decided to make all of my machine embroidery design files free until April 7. That’s the day my area’s shelter in place order expires. If it is extended, I’ll extend the embroidery design freebies, too. If you make something with one of my designs, I would love to see it.

Like this post? To make sure you never miss a future post, please sign up for my newsletter.

Posted on Leave a comment

T-Shirt to Yoga Shorts Refashion

If you’re new to refashioning or sewing clothing in general, loungewear is a great place to start. It’s less intimidating because, since you’ll only be wearing it at home, it doesn’t have to be perfect. This refashion project is perfect for a beginner because you only need two t-shirts to make it, and it’s mostly straight lines or slight curves.

I originally shared this tutorial a few years ago, before Thaddeus. The weather is beginning to warm up , so it’s a great time to sew some shorts.


I went on a little Pinterest binge a couple days ago looking for ideas to help clear my refashion stash. Saturday night I decided to make a pair of yoga pants out of a t-shirt using this tutorial. I wear a size eight on average, and used an XL adult t-shirt.

Adaptations from the original refashion project

I did make a few changes to the design. First, instead of cutting the shirt down the middle, I cut it down the sides from the middle of the underarm to the hem. This also means you’ll have an inseam and no side seams. That keeps any design on the front or back intact and moves them to the hips.

For the waistband, I cut the underarm seam from the sleeves and squared them up to be two equal rectangles, leaving the hem intact. I sewed the short sides together making a big, short tube from the sleeves. I then put the tube inside the waist of the pants with the pants right side out and the right side of the tube facing the inside of the pants. The raw edge of the tube lines up with the raw edge of the pants. I serged the top together like that. This made it so when the tube is folded down to the outside, the seam is covered.

T-shirt yoga pants refashion
IMG_4452
IMG_4459
Sorry for the awkward pictures. No one was around to take the pictures and Doctor Who was about to start.

I sewed it all on my serger. The entire refashion project took less than ten minutes. I probably should have added two minutes and switched from white to black thread. Or not.

If you don’t have a serger, you can use a zig-zag stitch to prevent breakage. Many sewing machines have specialty stitches for sewing knits, too, so check your machine to see if that is an option. This DIY T-Shirt Bag Tutorial has more information on stitch selection for knits.

Final verdict

They are a little loose at the waist. If I were planning to actually do yoga or wear them in public I should probably add some elastic at the seam. Since they will probably be used mainly for watching Doctor Who while sitting on the sofa, I probably won’t bother.

I personally don’t mind the length, but you could easily make them shorter by cutting them off to the length you prefer. Knit doesn’t unravel, so you can leave the edges raw, or turn them under and hem.

To make sure you never miss a post, please sign up for my newsletter.

T-shirt to yoga pants refashion

If you click through any of the Amazon links and make a purchase, I will receive a small commissionThere is no added cost to you.

Posted on 2 Comments

T-Shirt Market Bag Tutorial

One of my lovely nieces is learning to sew with a sewing machine. To help, I thought I would do a series of beginning sewing project tutorials. Today’s tutorial turns an old t-shirt into a market bag. I’m keeping it simple today, but in the future I’ll do a post on how to make it with and enclosed bottom seam and how to box the bottom. It’s a great way to turn t-shirts that you no longer wear into something useful. If you don’t have a sewing machine, you could even sew it by hand.

Materials:

  • T-shirt
    • T-shirts with a high cotton content and no side seams work the best.
  • Thread in your choice of color.
  • Fabric scissors
  • Sewing machine set up with appropriate needle and bobbin threaded in your color choice.
    • Note: Ball point needles are generally the best for sewing with knits. This project does fine with an all-purpose needle, though, so use what you have.

Preparing the shirt:

Lay the shirt out flat and smooth out any wrinkles. Since this one is just to add to my Aldi bag stash, I didn’t worry too much about wrinkles.

T-shirt laid flat
T-shirt. I’m not sure where I got this one. Also, forgive the grainy photos. Lighting in my craft room wasn’t great that day.

Cut off the arms including the armhole seams.

Cut off the neck about 2-3 inches below the neckband. My shirt is pretty big, so I went three inches below the neckband. With smaller shirts you can do less.

Cutting off sleeves and neck.
I like to fold it in half before cutting to keep everything even. If your scissors aren’t sharp enough to go through all the layers, cut one side and then fold it in half to use as a template for the other side.

Cut straight across the bottom of the shirt to remove the hem. The hemline is often uneven on t-shirts, so focus on keeping the shoulder seams lined up, the shirt smooth and cutting a straight line that removes all of the hem.

Cut off the bottom hem.
Bottom hem removed.

At this point, you should basically have turned the t-shirt into a tank top. Now, decide if you want your bag to look like plastic grocery sacks that have the handles at the top sides (so, your tank top with the bottom sewn closed), or if you want the handles at the top middle, like a purse or market tote.

Looks like a tank top.
Looks like a tank top. For a grocery style bag, turn it inside out and lay it back flat in this position.

For the grocery sack-style, turn your shirt inside out and lay it flat, just like a tank top again. For the purse/market tote, turn it inside out and match the shoulder seams and armholes together, then lay it flat. I’m making a market style tote, so you can see it in the photos.

Laying flat for a purse/market tote.
For a purse/market tote turn it inside out and lay it flat with the shoulder seams at the top, as shown here. I find this style easier to carry on my shoulder.

Once everything is lined up, pin along the bottom to hold it in place.

Pinned hem.
Pinned hem.

Sewing the bag:

Many sewing machines have an assortment of stitches to use with knit fabric. They are useful for keeping the thread from breaking when the fabric stretches. On my machine, they are labeled “stretch” and shown in brown. Zig-zag stitches also work well on knits.

Stitch assortment on my Kenmore sewing machine.
Normal stitches are in red. Stretch stitches are in brown.

You could use a stretch or zig-zag stitch for the bottom of the bag. Since it really shouldn’t be stretching much, I usually stick with a regular straight stitch set to a long-ish length of 3.

Regardless of the type of stitch you choose, I recommend sewing across the bottom twice to make it nice and strong.

The seam allowance, or distance between the edge of the fabric and the stitches, doesn’t really matter that much as long as you keep it the same all the way across. For this bag, I used a 5/8 inch allowance, marked on the footplate of my machine. To keep a straight line, focus on keeping the fabric lined up with the guideline for the seam allowance rather than watching the needle.

Edge of fabric lined up on 5/8 mark.

At the start , sew about 2-3 stitches then backstitch to secure the stitching before continuing to sew to the end. At the end, backstitch another 2-3 stitches, then sew to the end and cut the threads. Repeat the seam as close to the original line of sewing as possible to make it nice and strong.

Turn the bag right side out. Since knit doesn’t unravel, you could stop there and be done. I like to sew around the arm and neck holes to reinforce the t-shirts original shoulder seams and give it a more finished look.

Finishing around the t-shirt arm and neck hole handles:

I usually use a serger for this, but it’s not necessary. On a sewing machine, I do like to use either a zig-zag or stretch stitch since there is going to be more stretch on the handles so a straight stitch might break.

Zig-zag setting on my Kenmore.
Zig-zag setting.

This time, I’m using a zig-zag stitch, keeping the stitch length set at 3 and using about a 1/2 inch seam allowance. If your sewing machine has a free-arm, it can make it easier to sew around the armholes if you use it. Sew around each arm hole and the neck hole separately.

Messy zig-zag backstitching.

To start and finish the zig-zag, I backstitched like normal. It looks a little messy that way. You could leave extra thread at the beginning and end, pull the threads to the back side and tie knots to secure them if you want a cleaner look.

Finished t-shirt bag.

That’s it. You now have a purse or reusable bag from what used to be an old t-shirt. Don’t throw the t-shirt scraps away. I’ll post some creative uses for them soon! To learn how to make this bag a little more polished, read my t-shirt bag upgrades post.

If you read through the tutorial and like the concept but don’t want to diy, I still have a few left in my shop on clearance here.

Like this tutorial? To make sure you don’t miss out on future tutorial posts, sign up for my newsletter.

Posted on Leave a comment

Billboard Art

This weekend we held a rather slow garage sale. It was still fun, though, and we met some nice people, including a gentleman who shares our fondness of TBI Suburbans.

Chris took full advantage of the time to create a few billboard art pieces he’s been picturing for months.

Queen of Hearts
Queen of Hearts

I think this is my favorite. I love the weathered door.

Show Stopper
Show Stopper

This is the one everyone slowed down to see. He may decide to shorten it from the bottom to make it more manageable. As it is, though, in the right space it is impressive.

Coca Cola
Coca Cola

This one just screams Americana. We held it up to see what it looks like on the outside of our house. I loved the pop of red against our brown. I can totally see this alongside other signs in rustic decor.

Posted on Leave a comment

Key holder craft inspiration

We needed a better way to organize our keys. I thought about using hooks and scrap wood to make something, but I didn’t have any hooks on hand. I did, however have an old license plate, clothespins and hot glue, so this is what resulted.

I used hot glue because I could remove the clothespins without much, if any damage to the license plate. So far it’s holding up well, but if I were to make another, I might use something more permanent now that I know the concept works. I’d also use a ruler to line up the pins. I had “help” from the two year old this time, so I had to work fast to keep the glue gun safely away from little fingers.

Posted on Leave a comment

Quick Ironing Board Cover

My ironing board cover has seen better days. It’s not worn, but it has a few scorch marks and B thought it was a good idea to stamp it a few times with my thank-you stamp. Since it is always visible in my craft room, I wanted something more pleasant to look at, so I decided to make it a shiny new cover.

Eww.

I went with supplies I had on hand and used the ironing board itself to measure, so I don’t have exact measurements. You should be able to adapt from what I did easily, though. Keep in mind that this is just a cover and not the padding. I put mine on right over the old one. If you want to replace everything, you’ll have to find a replacement for the pad, too. (Layers of quilt batting and topped with Insul-brite maybe?)

Supplies:

Enough fabric to go over the top of your ironing board with about a 3 inch overhang on all sides.

Extra-wide double fold bias tape or blanket binding (2-3 packages)

Thin elastic. The bias tape or binding serves as a casing for the elastic, so make sure to choose an elastic thin enough to be threaded through easily.  Mine is 1/4 inch elastic.

Thread.

How to:

Cut the fabric with a 3-ish inch overhang. The easiest way to do this is to put the fabric on the floor, then the ironing board upside down on top and cut around it, eyeballing the overhang.

For this tutorial the pointy curved end is the top, the short, straight end is the bottom and the long edges are the sides. There’s going to be a gap in the bias tape/binding at the bottom, so you will want to finish it some way. If you have a serger, just serge straight across the bottom. If not, you can either zig-zag stitch over that edge or fold over 1/4 inch twice and hem. It doesn’t have to be exact, just make sure when you cut initially that you account for the hem on that end if you go that route.

Find the middle point of the bottom edge. Measure about 1.5 inches on each side of the midpoint and mark. These are your starting and ending points for the casing.

Leaving the three inch space at the bottom open, sew the bias tape/ binding on being sure to enclose the edge of the fabric. Unless you have a really long strip of binding, you’ll probably need to piece the binding together. When you get a few inches from the end of one bias strip, stop sewing and join the new strip by opening the ends flat, overlapping and sewing across. Refold and continue sewing around the edge of the fabric. Stop when you reach the end point.

What happens when you don’t have enough blanket binding on hand? This. This is what happens.

Thread the elastic through the binding all the way around leaving several inches hanging loose at the beginning and end. This works best if you attach a safety pin securely to the leading end of the elastic to help guide it through.

Fit your new cover, pretty side up onto your board and pull the elastic snug.

Tie the elastic securely, trim the ends if necessary.

Admire your new cover.

Questions? Ask in the comments and help me expand on my clear-as-mud tutorial.