Posted on Leave a comment

Genius printer hack you won’t believe

Have you ever had to print a paper or mailing label NOW and realized your black ink cartridge is out of ink? As much as I try to keep an extra on hand, sometimes I run out without a backup. Something I’ve found that works in a pinch is to simply remove the black ink cartridge. This forces the printer to use the color cartridge to print the document instead.

With and without the empty black ink cartridge removed.

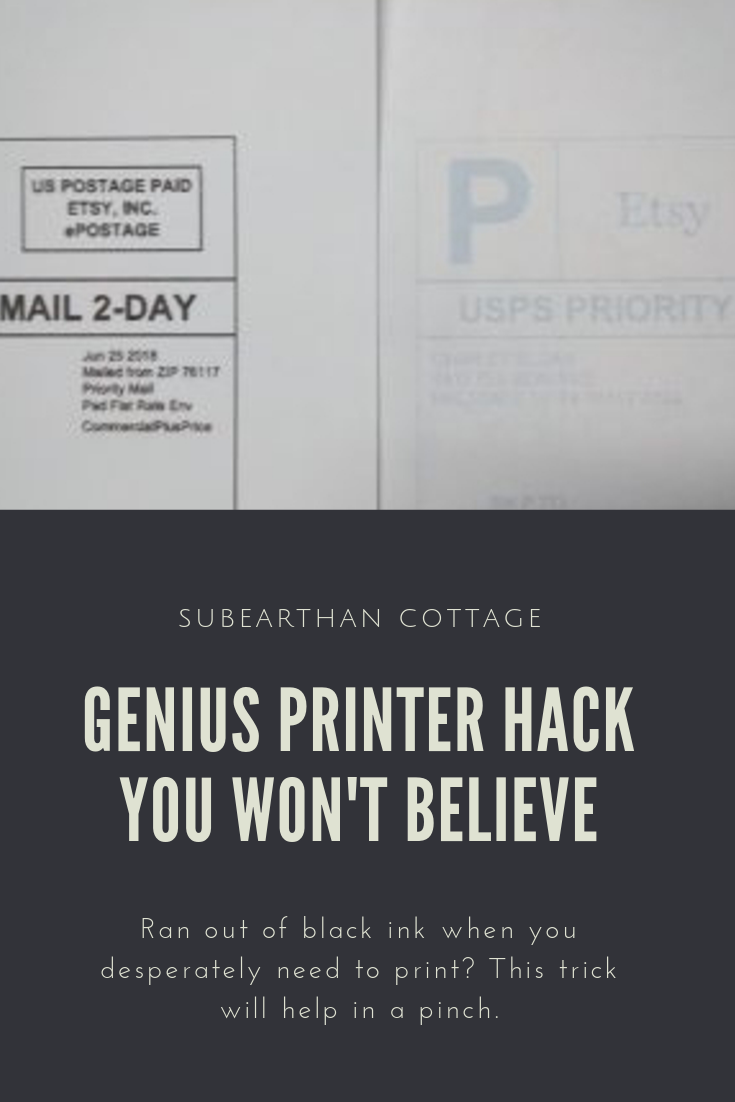
The label on the right was my first attempt at printing a mailing label before realizing that I was overdue for a new black cartridge. The label on the right was printed with the black cartridge removed.

My printer will usually print one or two jobs this way without complaining, then I may have to put the old cartridge back in for a bit then remove it again if I need to print something else. Usually by that time I have been able to get a replacement cartridge.

It’s always better to be prepared, but in a pinch this trick works like magic. It has certainly saved me a rushed trip to buy ink on more than one occasion.


Posted on Leave a comment

27 Activities for Kids at Home

Sometimes, even a rainy weekend stuck at home is difficult for kids. Now, with schools closing due to COVID-19, children and parents everywhere are off-schedule, stressed and going stir-crazy. To help out, I made a list of activities for kids at home.

Backyard Fun

  • Play Ball- Catch and kicking a ball around are always fun. Try using a laundry basket and see who can toss the ball into the basket from an increasing distance away. Or, use empty soda bottles to make bowling pins and play backyard bowling.
  • Get Dirty- Playing in the mud or digging in the dirt is fun for littles. For something more structured, save seeds from fruits and vegetables to plant and see what sprouts or tend an existing garden.
  • Picnic- On sunny days, take meals outside. If you don’t have an outdoor table, grab a tablecloth or bed sheet to spread on the ground and sit on.
  • Explore Nature- Observe insects, compare plants and leaves. You could also download a plant identification app and use it to learn about plants growing in your yard.
  • Sidewalk chalk- Patios, driveways, and sidewalks become canvases.
Backyard fun activities for kids at home

Indoor Crafts

  • Break Out the Art Supplies- Drawing, painting, cutting and pasting can be fun for all ages. If they need a little motivation, give a general theme and have awards for the most creative, detailed, colorful, etc.
  • Think Outside the Box- Old magazines, newspapers, junk mail, cereal boxes, cardboard tubes, etc. make creative art supplies. Tubes become telescopes or binoculars. Cutout pictures and letters to make collages.
  • Playdough- Use store-bought or make your own. I think it’s easier to clean up than slime, but of course, that’s an option, too.
  • Go Big- If you have any large cardboard boxes, get creative with them. Rolls of butcher paper or the plain side of wrapping paper are great for large murals or full body tracing.
Artwork activities for kids at home

Indoor Games

  • Board games- Break out the ones you have, invest in a couple of classics like Candy Land or Monopoly (Amazon means not having to leave the house), or create your own.
  • Charades– No pieces or props are needed to take turns acting out and guessing your favorite books, shows and movies.
  • Pictionary– Similar to charades, all you need is something to draw on and draw with.

Advanced Crafts

  • Share Your Skills- Do you sew, knit, or crochet? Whatever your craft, think of a beginner lesson and teach it to your children.
  • Learn Together- Do you have supplies for a project that never happened or a skill you never got around to learning? Look up tutorials or YouTube videos and learn it together.

In the Kitchen

  • Make Cookies- Or cake, or brownies. Baking introduces basic cooking skills, reading instructions and fractions. Depending on what you’re making, all of the measuring and mixing can be done without needing the stove or oven until it’s time to bake.
  • Let Them Help- Give them options and let them help with meal planning. Older kids and teens can be more hands on with meal prep. Even little ones can help with washing vegetables, setting the table, mixing and measuring.

Educational Screen Time

  • Stream Documentaries- Netflix and other streaming services have tons of documentaries available. Pick a subject your child is passionate about, or look for something fun and quirky and watch it together.
  • Khan Academy– This website has lessons on just about anything you want to learn for all ages.
  • Preschoolers- PBS Kids has games and videos for all the PBS Kids shows. Starfall.com is a fun way for kids to learn ABC’s and reading basics.
  • Google Sketchup– My kids enjoy playing around with this drafting program (website).

DIY Toys

  • Dress up- Look in the back of your closets for old clothing and accessories, or dig out old Halloween costumes. Or, make a super hero costume from an old t-shirt.
  • Blanket forts- Use blankets, pillows, couch cushions, whatever you can think of to build a hideaway for the kiddos to hang out.
  • Bath time- While not exactly a toy, playing in water is fun and calming for little ones, so if they’re getting a little stir-crazy, let them play in a bath. If older kiddos are feeling antsy or stressed, suggesting a bath or shower might help them, too.

Storytime

  • Break out old favorites- Keep a basket of books in a handy spot, like on a coffee table to make it easy to grab one and read.
  • Read aloud- Adults can read to everyone or have older children read to younger ones. Beckett doesn’t always like listening to me or reading on his own, but he sometimes enjoys reading aloud to Thaddeus.
  • Explore new books- Many public libraries give you the ability to checkout ebooks online. Project Gutenberg has over 60,000 books online for free. Or, try Kindle Unlimited to get unlimited access to tons of ebooks and audio books for a low monthly fee. Use this link to get your first month free.
  • Write your own- Take turns making up stories or turn it into a project by folding paper books and adding illustrations. Pre-k and younger can draw pictures to tell their stories.

What at home activities do you like to do with your kids? Please share your activities for kids at home in the comments.

Like this post? To make sure you never miss a future post, please sign up for my newsletter.

This post contains affiliate links. If you click through any of the Amazon links and make a purchase, I will receive a small commission. There is no added cost to you.

Posted on Leave a comment

Key holder craft inspiration

We needed a better way to organize our keys. I thought about using hooks and scrap wood to make something, but I didn’t have any hooks on hand. I did, however have an old license plate, clothespins and hot glue, so this is what resulted.

I used hot glue because I could remove the clothespins without much, if any damage to the license plate. So far it’s holding up well, but if I were to make another, I might use something more permanent now that I know the concept works. I’d also use a ruler to line up the pins. I had “help” from the two year old this time, so I had to work fast to keep the glue gun safely away from little fingers.

Posted on Leave a comment

Quick Ironing Board Cover

My ironing board cover has seen better days. It’s not worn, but it has a few scorch marks and B thought it was a good idea to stamp it a few times with my thank-you stamp. Since it is always visible in my craft room, I wanted something more pleasant to look at, so I decided to make it a shiny new cover.

Eww.

I went with supplies I had on hand and used the ironing board itself to measure, so I don’t have exact measurements. You should be able to adapt from what I did easily, though. Keep in mind that this is just a cover and not the padding. I put mine on right over the old one. If you want to replace everything, you’ll have to find a replacement for the pad, too. (Layers of quilt batting and topped with Insul-brite maybe?)

Supplies:

Enough fabric to go over the top of your ironing board with about a 3 inch overhang on all sides.

Extra-wide double fold bias tape or blanket binding (2-3 packages)

Thin elastic. The bias tape or binding serves as a casing for the elastic, so make sure to choose an elastic thin enough to be threaded through easily.  Mine is 1/4 inch elastic.

Thread.

How to:

Cut the fabric with a 3-ish inch overhang. The easiest way to do this is to put the fabric on the floor, then the ironing board upside down on top and cut around it, eyeballing the overhang.

For this tutorial the pointy curved end is the top, the short, straight end is the bottom and the long edges are the sides. There’s going to be a gap in the bias tape/binding at the bottom, so you will want to finish it some way. If you have a serger, just serge straight across the bottom. If not, you can either zig-zag stitch over that edge or fold over 1/4 inch twice and hem. It doesn’t have to be exact, just make sure when you cut initially that you account for the hem on that end if you go that route.

Find the middle point of the bottom edge. Measure about 1.5 inches on each side of the midpoint and mark. These are your starting and ending points for the casing.

Leaving the three inch space at the bottom open, sew the bias tape/ binding on being sure to enclose the edge of the fabric. Unless you have a really long strip of binding, you’ll probably need to piece the binding together. When you get a few inches from the end of one bias strip, stop sewing and join the new strip by opening the ends flat, overlapping and sewing across. Refold and continue sewing around the edge of the fabric. Stop when you reach the end point.

What happens when you don’t have enough blanket binding on hand? This. This is what happens.

Thread the elastic through the binding all the way around leaving several inches hanging loose at the beginning and end. This works best if you attach a safety pin securely to the leading end of the elastic to help guide it through.

Fit your new cover, pretty side up onto your board and pull the elastic snug.

Tie the elastic securely, trim the ends if necessary.

Admire your new cover.

Questions? Ask in the comments and help me expand on my clear-as-mud tutorial.