
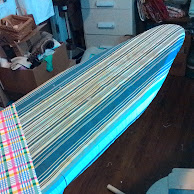
My ironing board cover has seen better days. It’s not worn, but it has a few scorch marks and B thought it was a good idea to stamp it a few times with my thank-you stamp. Since it is always visible in my craft room, I wanted something more pleasant to look at, so I decided to make it a shiny new cover.
Eww.
I went with supplies I had on hand and used the ironing board itself to measure, so I don’t have exact measurements. You should be able to adapt from what I did easily, though. Keep in mind that this is just a cover and not the padding. I put mine on right over the old one. If you want to replace everything, you’ll have to find a replacement for the pad, too. (Layers of quilt batting and topped with Insul-brite maybe?)
Supplies:
Enough fabric to go over the top of your ironing board with about a 3 inch overhang on all sides.
Extra-wide double fold bias tape or blanket binding (2-3 packages)
Thin elastic. The bias tape or binding serves as a casing for the elastic, so make sure to choose an elastic thin enough to be threaded through easily. Mine is 1/4 inch elastic.
Thread.
How to:
Cut the fabric with a 3-ish inch overhang. The easiest way to do this is to put the fabric on the floor, then the ironing board upside down on top and cut around it, eyeballing the overhang.
For this tutorial the pointy curved end is the top, the short, straight end is the bottom and the long edges are the sides. There’s going to be a gap in the bias tape/binding at the bottom, so you will want to finish it some way. If you have a serger, just serge straight across the bottom. If not, you can either zig-zag stitch over that edge or fold over 1/4 inch twice and hem. It doesn’t have to be exact, just make sure when you cut initially that you account for the hem on that end if you go that route.
Find the middle point of the bottom edge. Measure about 1.5 inches on each side of the midpoint and mark. These are your starting and ending points for the casing.
Leaving the three inch space at the bottom open, sew the bias tape/ binding on being sure to enclose the edge of the fabric. Unless you have a really long strip of binding, you’ll probably need to piece the binding together. When you get a few inches from the end of one bias strip, stop sewing and join the new strip by opening the ends flat, overlapping and sewing across. Refold and continue sewing around the edge of the fabric. Stop when you reach the end point.

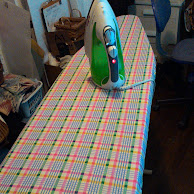
What happens when you don’t have enough blanket binding on hand? This. This is what happens.
Thread the elastic through the binding all the way around leaving several inches hanging loose at the beginning and end. This works best if you attach a safety pin securely to the leading end of the elastic to help guide it through.
Fit your new cover, pretty side up onto your board and pull the elastic snug.
Tie the elastic securely, trim the ends if necessary.
Admire your new cover.
Questions? Ask in the comments and help me expand on my clear-as-mud tutorial.