Posted on 1 Comment

Six Tips for Going Gluten Free on a Budget

Many people eat gluten free (g-free, gf), either by choice or need. For those with celiac, eliminating gluten is an absolute necessity. Others find that, for one reason or another, they feel better when they avoid it. In my case, I kind of accidentally discovered that joint pain in my hands and feet go away and I’m less brain foggy when I avoid gluten. Other family members suffer from breakouts and rashes that flare whenever they eat something with gluten. I strongly believe that if you feel bad after eating something, you should probably stop eating it, so we do our best to avoid gluten all together.

Eliminating something that is such a big part of your diet is daunting at first, but there are a few things that can make the transition easier and less expensive. These tips focus on gluten, but many will also help if you need to eliminate other foods.

1. Start with real foods

Processed foods often have hidden fillers and ingredients, and specialty gluten free foods are expensive. In contrast, fruits, vegetables, meat, nuts, beans, eggs and dairy are naturally gluten free in their pure forms. Rice is a grain that does not contain gluten. Starting from scratch with real food ingredients that you know naturally don’t have gluten is often easier and definitely cheaper than scrutinizing food labels and buying special gluten free versions of normally wheat based foods.

Image by skeeze from Pixabay

2. Go simple with seasonings

For the most part, single herbs and spices are gluten free. Certain spice blends may have gluten, though. Making your own blends is the safest bet, but if you have a spice blend you love, most manufacturer websites list whether their products contain gluten.

While not technically an herb or spice, most soy sauce contains gluten. La Choy is a major brand that is made without gluten. Bragg’s liquid aminos are another form of g-free soy sauce.

Most vinegar is g-free. Malt vinegar is not. You’ll also want to check the label on flavored vinegar to be sure.

Cooking oils don’t have gluten unless seasoned with something containing gluten.

3. Find your current gluten free staples

Look at the foods that currently stock your pantry. What things that you buy are already gluten free? For us, we usually keep a box or two of cereal around for snacking or a quick breakfast. Most cereals are made with wheat and therefore have gluten, but some that we already bought, like Honey Nut Cheerios, Lucky Charms and Rice Chex are gluten free. Knowing that, I can continue to keep a box or two of cereal we already liked on hand.

Likewise, we keep tortilla chips on hand for snacking or nachos. Most tortilla chips don’t have gluten and inexpensive. Since gluten free crackers are both hard to find and usually expensive, tortilla chips are an easy cracker substitute as well.

4. Look for the easy substitute

Like substituting tortilla chips for crackers, there are other easy swaps. Corn tortillas usually don’t have gluten and can be substituted for flour tortillas. Rice is often a good substitute for pasta, or substitute rice noodles. If you have an Asian grocery nearby, you can usually find rice noodles there for cheaper than a mainstream supermarket, as well as leafy greens and spices for cheap.

5. Make it yourself

It’s fairly easy to find gluten-free flour now, so making your own gluten free cookies, pizza crusts, pancakes, breads, etc. is a good option. I love Bob’s Red Mill 1 to 1 gluten free flour. With it, I can continue to make my favorite deserts just by substituting it for wheat flour. There are other good gluten free flours on the market, too. The most important thing is to know if it is blended to be an exact 1 to 1 substitute or if you need to add something like xanthan gum to give it the stretchiness and rise that you usually get from gluten. For example, Bob’s Red Mill has an All Purpose Gluten Free Flour that is not the 1 to 1 blend. It is a little denser and does not have xanthan gum already blended. I like blending it with tapioca flour, which adds some stretchiness. That works well for things like gluten free flour tortillas. For things that need to rise, though, like cakes or breads, I also add xanthan gum if I’m using the all purpose and not the 1 to 1 blend.

6. When buying gluten free, shop around

Sometimes you really just want to get some gluten free penne pasta or a g-free bagel. More and more grocery stores regularly stock g-free pastas, breads and desserts, but they can be pricey. If you find them on sale, stock up and freeze the extras. Alternative grocery stores sometimes offer better prices, too. Aldi has a decent selection of g-free breads, pastas, and baking mixes at a lower price than most other stores. I even found some gluten free donuts there recently.

Locally, we have a surplus/discount/closeout grocery store called Town Talk. They frequently have udi’s bread in the range of two loaves for $3.00. I periodically stop in and stock up when I can.

To make sure you never miss a post, please sign up for my newsletter.

Tips for going gluten free

If you click through any of the Amazon links and make a purchase, I will receive a small commission. There is no added cost to you.

Posted on 2 Comments

Easy fix for worn out denim jeans

Denim jeans don’t have to be tossed or cut up for crafts when they start to wear out. With a little effort, you can easily get some more wear out of your favorite jeans. For this tutorial, I’m using a pair of denim blue jeans that are still in good shape except for where my thighs touch. There they are really worn on one side and there is a hole on the other. Because of where the hole was located, I wasn’t comfortable even wearing them around the house, so I decided to try a simple fix.

Interfacing for support

First, I ironed lightweight fusible interfacing on the inside of the worn areas, making sure to completely cover all the worn out spots with the interfacing.

Reinforce with stitching

Once it fused and cooled down, I turned them right side out. Using a narrow zig-zag, I stitched back and forth over the hole and worn areas. This serves to secure the interfacing and add strength.

If you can, drop or cover the feed dogs on your sewing machine so you can move the jeans freely under the needle. The machine I used doesn’t have a way to drop them and I don’t have the special foot plate to cover them. Instead, I used a combination of repositioning and forward and reverse stitching to make it work.

Denim Jeans Fix

Depending on the location, you could use contrasting thread and decorative stitches to turn the repair into an embellishment.

Lengthening a slightly short pair of jeans

I also have a pair of jeans I love, but they needed a button sewn back on. They were also a little short, so I replaced the button and let out the hem while watching TV one evening. These heavy denim jeans are now ready for the coming colder months.

Buttons!

These have an obvious line where the hem was. They’re really cute so I don’t care.

Like this tutorial? To make sure you don’t miss out on future tutorial posts, sign up for my newsletter.

Easy denim jeans fix.
 

Posted on Leave a comment

Easy, Flexible Meal Planning Lists for Stress-free Meals

Meal planning takes away the daily stress of deciding what’s for dinner. I’ve never done well with creating weekly menus by day, though. With a set schedule, I sometimes felt like I had to make what’s on the menu, rather than finish up the leftovers first. Silly, I know. Then there were the days that ended up busier than expected and I either didn’t have time to make the planned meal or I was too tired by the time dinner rolled around and needed something simpler. 

The solution I’ve found to traditional menu-style meal planning is making meal lists. Not only does it offer day by day flexibility, it makes it easier to work in sale items, saving money at the grocery store.

For us, breakfast and lunch are usually either made from the same basic staples or leftovers, so I only use my lists for dinner. You can easily use the same method for all meals, if you like.

Meal Planning Lists

Step 1: Make a Master List

Start by writing down all your favorite meals to make. This isn’t the time to pull out cookbooks or look for recipes online. You want this to be a brain dump of your go-to meals. I would aim for at least 10-14, but a bigger list gives you more variety. If you don’t have that many to start, don’t worry. You can always add to this list later.

You can leave your master list as-is, or sort it into categories such as grouping it by the type of protein, ease of prep, cook time or type of appliance used if you have lots of Instant Pot or slow cooker meals. My list is just one big list.

You could also make note of what sides you like to serve with each dish, but I usually add them later.

Step 2: Decide what types of meals you need for the week

For this step, consider things like what you have on hand that you need to use up, what’s on sale and how busy you’ll be during the week. If you know you’ll be eating out any days, make note of that, too. I don’t usually make a list for this step, but if it’s a busy week you might want to make some notes.

Step 3: Make your meal list for the week

Consider the things from step 2 and pick 5-7 meals for the week from your master list. I like to cook things like big pots of soup or chili at least once a week, so I know leftovers will take care of one or two days, so I usually make a list of five. If your meals won’t include leftovers, you’ll want to list seven, or as many days as you’ll be eating at home.

This is where I consider sides and make note of them alongside the meals I plan to make.

If you’re looking to expand your master list or just want to try something new, you can add a new recipe as one of your meals and make note of the cookbook or other source. Once you’ve tried it, if you like it, add it to your master list.

That’s my meal list for this week.

While I don’t add these to my list, I like to keep staples for one or two really quick backup meals on hand at all times. You can read more about this here. If this is new to you, you’ll want to consider picking a backup meal or two before moving on to the next step.

Step 4: Make your shopping list

Make a shopping list from your weekly meal list, including sides and staples for your backup meal, if you don’t already have one. From your list, shop your pantry then grocery shop for everything else you need.

Step 5: Using your list

If one meal relies on lots of fresh produce or other time-sensitive food, you’ll want to make it early in the week. Likewise, if one day is busy and you have one slow cooker or really simple meal on the list, you’ll want to save it for that day. Otherwise, you know you have everything to make all the meals on your weekly list, so pick whichever one you like for now and one for next. Picking your “next” gives you time to thaw out or presoak anything needed for that meal. Every day, think about what meal you want to be next and do the necessary prep. If that day’s meal has lots of leftovers, you can use them as your “next” and push the rest of the week’s meals down.

Each meal you make gets checked off the list. At the end of the week, if there’s anything not checked off, add that meal to next week’s list.

Customize Your Meal Planning Lists

Planning one week at a time works best for me because that’s about the longest we can go without needing to restock staples. If two weeks at a time works for you, make your list 10-14 meals instead of 5-7. Repeats are fine if you want or need.

If you want to be super organized, turn your master list into index cards with one meal and all the ingredients listed on each card. You can even make them full blown recipe cards, which is helpful if someone else does some of the meal prep or it’s a new recipe. Sort them into whatever categories work best for you, then pick out your 5-7 meal cards for the week. Now your grocery list is as simple as copying the ingredients from the cards.

Background image by Goumbik from Pixabay
Posted on 4 Comments

Tips for Saving Money on Food

No matter what our budget looks like, food is always a part of it. You have to eat, right? There are many thoughts on the best way to save on food. These are the things that work for me.

Eat at home

This one is probably the most important. If you eat out, regardless of whether it’s a dine-in or fast food restaurant, you are going to spend more than if you cook and eat at home. It’s fine to splurge once in a while, but if you’re looking to save, eating at home gives you the most bang for your buck.

Buy mostly ingredients

Prepackaged foods are sometimes quicker, but they are usually more expensive per serving. If it’s a choice between eating out and eating convenience foods from the grocery, it’s still usually cheaper than eating out, so if it’s a choice between KFC or a deli rotisserie chicken, bagged salad and prepackaged dinner rolls, the deli chicken is probably the cheaper and healthier option.

There are some convenience items that I find helpful, especially when life gets hectic. Jarred sauces, bouillon and frozen potatoes in various forms are things that I like to have on hand to help me get a meal on the table quickly. When there’s not time to make the sauce from scratch or I don’t have homemade broth on hand those can make it easy to still throw something together. They’re also usually fairly inexpensive, so I feel they are budget friendly convenience choices.

Buy in bulk where it makes sense

Don’t buy a ton of perishables like fresh fruit just because it’s on sale. If you have time to prep and freeze or can the fruit, then go for it. Things like canned goods, freezer staples and shelf stable items are great for buying in bulk, if you have the room. We have a small chest freezer, so I’m able to buy fruit on sale to freeze for smoothies or desserts and an extra ham or turkey when they are on sale for under $1 per pound around the holidays.

I also buy basmati rice in 20 lb bags because we prefer it over other types of rice and it is so much cheaper that way. To keep it fresh and manageable, I keep a small container of it in the cupboard and the rest goes into the freezer.

Shop creatively

It’s easy to have one or two grocery stores or box stores where you do all of your shopping. If you have farmer’s markets, discount groceries or ethnic groceries in your area, you may find better deals on some items.

For starters, if you have an Aldi nearby and haven’t given them a try, please do. I’ve found them to have a good selection of staples and they have a good guarantee on everything they sell. You won’t find many name-brands at Aldi, but with their guarantee, it’s worth trying and seeing if you like their store brands. They also carry a lot of gluten-free options, as well as dairy-free milk alternatives and a dairy-free mozarella cheese.

I also frequently shop a local Vietnamese grocery store. They have tons of fresh greens and other produce at really good prices. I also get a lot of specialty items, like things for making pho or sushi for sometimes half the cost or less of what I would pay at Kroger or Walmart. Bulk spices and rice are also cheaper there. For gluten-free pasta, rice noodles from there are cheaper than gluten-free options from Kroger and Walmart.

Find a method of meal planning that works for you.

Some people do really well with having every meal, every day planned out to every last detail. I prefer something more flexible that allows for changes based on last minute plans or whatever is on sale that week or whatever leftovers we need to eat. Regardless of the type of meal planner you are, have some sort of game plan in place.

Meal planning is one area where I need to improve, but I do have a basic game plan for meals that I’ll post on at a later date.

While you’re planning, don’t forget lunch. Leftovers are quick and easy lunches, so if you’re planning a dinner that reheats well, make enough for lunch the next day.

Keep staples for one or two quick meals on hand always

This is important in case you forget to plan, or something doesn’t work out with your plan. Whether it’s spaghetti and premade sauce, eggs, fruit and toast or some other meal you can throw together in under thirty minutes, keep the ingredients on hand for one or two backups that you like. Having a backup option makes it easier to eat at home when you might otherwise be tempted to eat out.

Eat real food

If you have to change your eating habits due to health or personal beliefs, it’s easy to try to substitute faux or “free” foods tailored to that diet. Price-wise though, it’s better to adapt your diet with real foods. Rather than faux meat burgers, try grilling portobello mushrooms or making your own patties with chickpeas. Instead of gluten free pasta, substitute rice or potatoes. Instead of diet drinks, flavor water, tea or soda water with fruit.

If you’re really craving cheese and you’re dairy free or bread and you’re gluten free, go ahead and splurge on the dairy or gluten free options. If you’re on a plant-based diet but desperately want something like a real burger, go for one of the faux meat patties. Just try to keep those splurges to a minimum and you’ll save money.

Find recipes for soups, stews and beans that you like

Soups, stews and beans are usually cheap, filling and can be a one pot meal. Having a few recipes you like and keeping the ingredients on hand can really help save money on food. They also are easy to make in bulk and usually freeze well, so making a bunch and having it for lunch or in the freezer for nights that dinner plans don’t work out helps prevent eating out. I love crock pots or pressure cookers for making soups and stews. It’s absolutely not necessary to run out and buy a slow cooker or pressure cooker, but if it’s something you’ve been considering, I love my electric pressure cooker for so many things.

Saving money on food.
Ultimate Homemaking Bundle 2020
Posted on 4 Comments

Sewing machine repair: Hook timing

I’ve been sewing lots of masks lately. Apparently my sewing machine needed a break, so it decided to skip time again. Thankfully I’ve done it a few times now, so I should have it up and running soon.

Hook timing is a fairly common problem that sends many sewers running to the repair shop. When it happened the first time on my older Kenmore, I decided to try to repair it myself first. My thinking was, since it’s a mechanical machine with mostly metal parts, as long as I was careful, I couldn’t really hurt anything. I probably would have thought twice before attempting it on a computerized machine.

All machines are a little different, so what worked on mine may not work on yours. Something I recommend to everyone who wants to work on their own sewing machine, is getting a copy of the service manual. Honestly, I still need to do this. There’s tons of info online, but having the actual service manual is even better. You should have an owner’s manual on hand, too. It  covers basic care and maintenance. For repairs, though, the service manual will give you technical instructions and confidence. 

Hook Timing?

Before taking things apart, determine if hook timing is causing the problem. If the needle (top) thread isn’t picking up the bobbin (bottom) thread, hook timing is a prime suspect. It’s always a good idea to rule out simple problems first, though. Try swapping the needle, rethread the machine and sew on some scrap fabric. If it’s been a while since you’ve dusted the lint out of the bobbin case or you’ve been sewing on linty material, give it a good cleaning.

Once you’ve tried the easy fixes, if it still isn’t working right, look at how the needle and the bobbin hook intersect. This page, https://tv-sewingcenter.com/general/sewing-machine-timing-hook-timing, has illustrations, photos and descriptions for where they should meet on both rotary and oscillating machines. 

Taking a look at my oscillating hook.

My machine is an oscillating machine, so the hook tip should pass just above the eye of the needle. Mine was passing below the needle’s eye, so clearly the hook timing needed adjustment.

Open it up

The first and honestly the hardest step was figuring out where all the screws were that I needed to remove to take off the casing. (Actually, the first step was to turn off and unplug the machine. If you’re attempting this at home, do not skip this step!) On my Kenmore, I have to take off the side by the hand wheel, a plate on the bottom, and the front panel. 

More cleaning

While I have my machine open, I like to take the opportunity to clean it out and oil it. Oiling a linty machine, using the wrong oil or putting it in the wrong places can cause tons of problems, though, so if you’re not sure, stick to dusting only.

Find and adjust

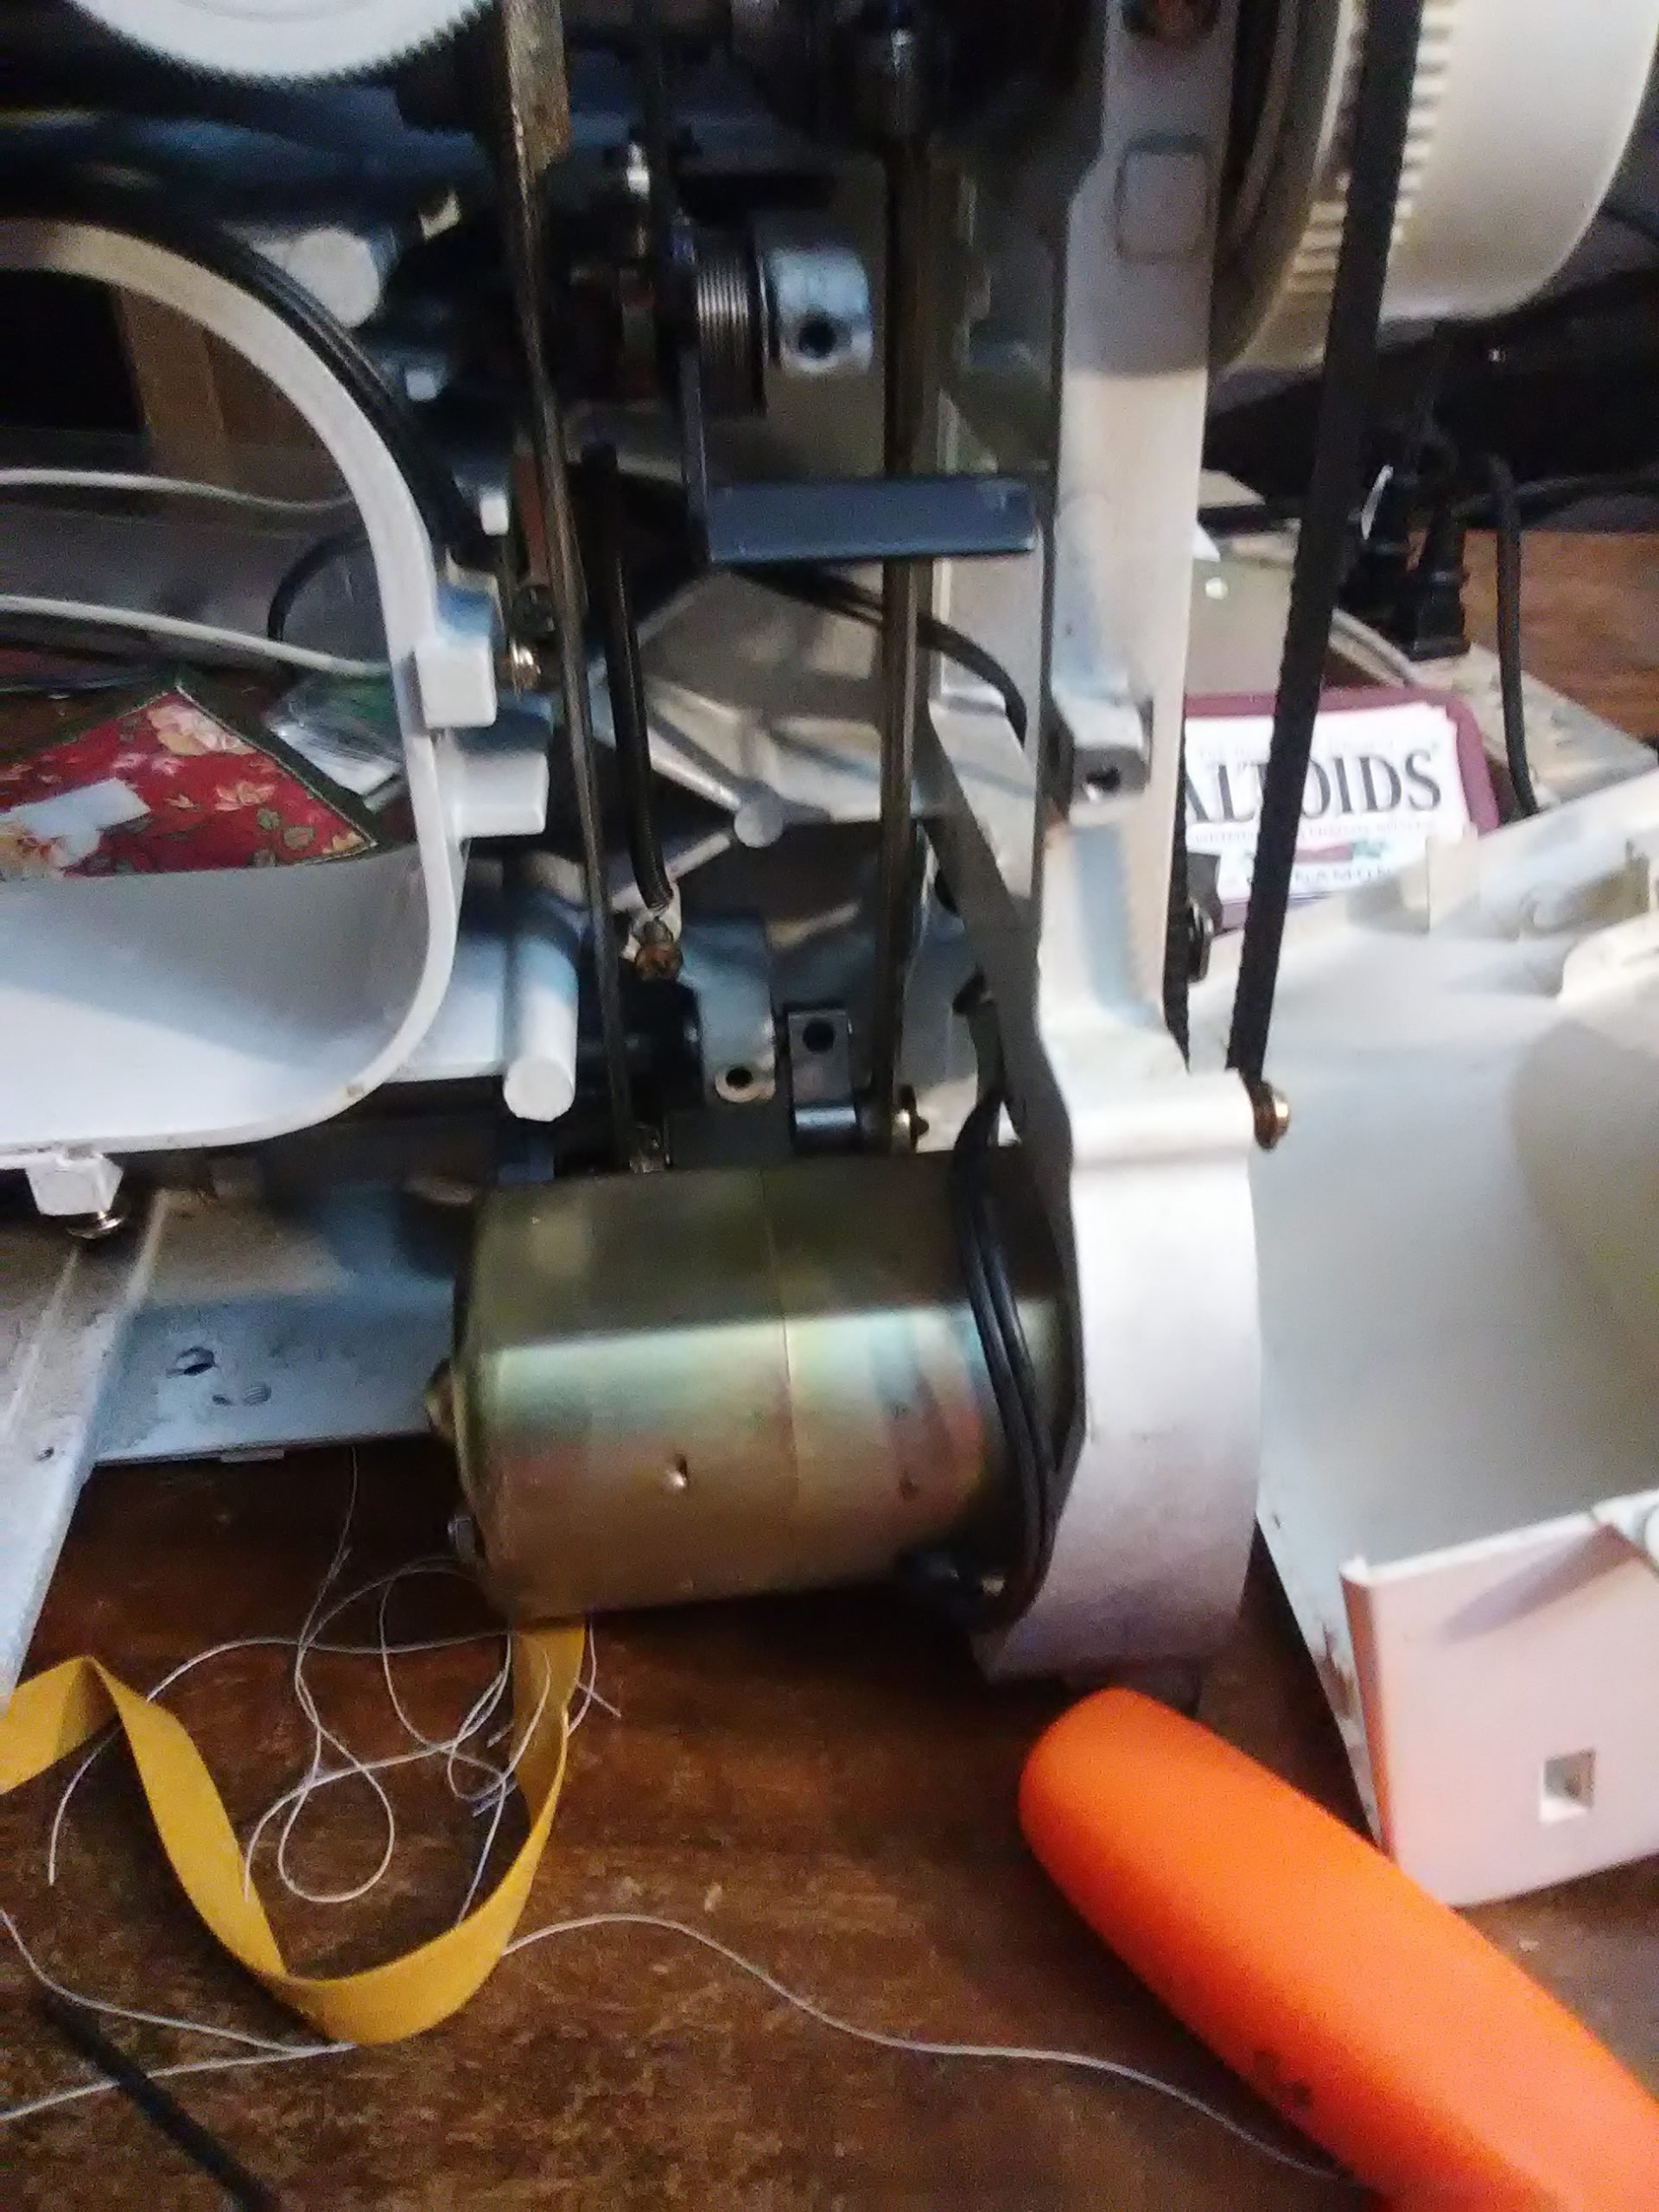
Next, I tilted the machine on to it’s back so I could get a good look at the mechanism that rotates the hook. Once I had isolated that, I found a hex head set screw. Loosening that allowed me to gently adjust the hook position so that the tip passed just above the needle’s eye.

About in the middle, just above the motor is a silver piece with a round, black screw near the top. That is the set screw I loosened to adjust the hook timing.

When I was sure I had it properly positioned, I tightened the set screw. I turned the hand wheel a few more times, making sure everything still looked good before I put the casing back. A quick test run showed everything was working properly again.

Done!

It’s so satisfying to be able to make simple repairs to my machines myself, especially when most repair shops start around $75 and go up from there, depending on what needs to be done. 

Hook timing

Posted on Leave a comment

Instant Pot Electric Pressure Cooker Recipe Roundup

My electric pressure cooker is such a lifesaver when it comes to getting fast, healthy meals ready. It’s almost like having someone else do the cooking. With so many working from home with kids right now, those minutes saved in the kitchen are valuable. Here’s five of my favorite electric pressure cooker dinner recipes.

1
honey glazed chicken and peppers
Honey Glazed Chicken for Electric Pressure Cookers like the Instant Pot
This honey glazed chicken is made in an electric pressure cooker with just minutes of prep. Sweet and juicy, it will satisfy even picky eaters.
Check out this recipe
2
Mushroom Brown Rice
Mushroom Brown Rice for Instant Pots or other Electric Pressure Cookers
Rich, earthy mushrooms in nutty brown rice make this work as a side dish or, serve with a salad to make it a meatless main course. Makes 6-8 servings.
Check out this recipe
3
Instant pot whole chicken
Electric Pressure Cooker (Instant Pot) Whole Chicken and Potatoes
This is my method for cooking a flavorful whole chicken and potatoes in an electric pressure cooker. After a little prep work, you can walk away and let the pressure cooker do it's job without having to check on it or worry about overcooking. I'm using an 8 quart electric pressure cooker. If yours is smaller, you may need to adjust the size of the chicken and other ingredients accordingly.
Check out this recipe
4
Sausage Potato Soup
Dairy and gluten free sausage potato soup inspired by Olive Garden's zuppa toscana. I prefer making it in my electric pressure cooker but it could easily be done in a slow cooker or on the stove top.
Check out this recipe
5
Instant Pot Chicken and Vegetable Quinoa
Instant Pot Chicken and Vegetable Quinoa is a quick, last minute dish that is great hot or cold. Customize it by swapping out the protein or vegetables depending on what you have on hand.
Check out this recipe

Shop update: Freebies and a sale

Knowing that so many are stuck at home right now needing distractions, I’ve decided to make all of my machine embroidery design files free until April 30. That’s the day my area’s shelter in place order expires. If it is extended, I’ll extend the embroidery design freebies, too. If you make something with one of my designs, I would love to see it.

My full shop is still open, and will be as long as everyone in my household is healthy. I’m using extra care with handwashing and using hand sanitizer before coming into contact with products and packaging as well.

All of my handmade soaps are currently on sale for 20% off. You can find them here.

Like this post? To make sure you never miss a future post, please sign up for my newsletter.

Posted on 1 Comment

Simple DIY Rainbow Cupcake Crayons

rainbow cupcake crayons

I originally shared this tutorial for rainbow cupcake crayons almost ten years ago when Finn was my little preschooler and I made rainbow cupcake crayons for him using all of our broken crayons. It’s easy, and you can get little ones to help with peeling the paper off of the broken crayons, and they get fun new crayons to play with once they have cooled.

Unfortunately my photos of our project got lost, but a quick Etsy search shows lots of examples of similar multicolored crayons in fun shapes. If you like the idea but don’t have tons of broken crayons around, consider supporting one of the shops on Etsy by purchasing from them.

rainbow cupcake crayons
Photo by Kristin Brown on Unsplash

DIY Rainbow Cupcake Crayons Tutorial

  • Line a muffin pan with foil or a double thickness of cupcake liners. (Note: The wax will likely melt through, so you probably want to use a pan that you reserve for non-food projects.)
  • Remove all the paper from your crayons.
  • Break into smaller pieces if needed. I just broke them as small as I could with my fingers. Most pieces were about an inch long or smaller.
  • Sort the pieces into the lined cups. I sorted by color, but you could also mix for super swirly crayons.
  • Fill the cups to the top but don’t overfill.
  • Melt in the oven at about 200-250 degrees F. I recommend setting a baking sheet under the muffin pan. You really don’t want to have to scrape melted crayon off your oven.
  • Check about every 10-15 minutes. I let them cook until there were just a few solid chunks in the middle. Then I gently swirled them with toothpicks to sink the chunks and blend the colors.
  • When they are sufficiently melted, turn off the oven. You can carefully remove them at this point or let them cool in the oven. I didn’t need my oven, so I let them cool in there overnight.
  • Once they’ve cooled completely you can remove the papers and color away.

Mask Update

I made a few of the fitted masks I mentioned in Wednesday’s post. Overall, I think they fit well, but they are a little tedious to make, particularly if you have lots of interruptions.

Awkward photo of me modeling a fitted mask.

I looked into it a little more and found that it seems more hospitals are asking for a more simplified mask, so I’m switching to ones made by this tutorial. With batch cutting and then sewing two or three assembly line style, I can make 3-4 in a hour, even with interruptions.

Shop update: Freebies and a sale

Knowing that so many are stuck at home right now needing distractions, I’ve decided to make all of my machine embroidery design files free until April 7. That’s the day my area’s shelter in place order expires. If it is extended, I’ll extend the embroidery design freebies, too. If you make something with one of my designs, I would love to see it.

My full shop is still open, and will be as long as everyone in my household is healthy. I’m using extra care with handwashing and using hand sanitizer before coming into contact with products and packaging as well.

All of my handmade soaps are currently on sale for 20% off. You can find them here.

Like this post? To make sure you never miss a future post, please sign up for my newsletter.