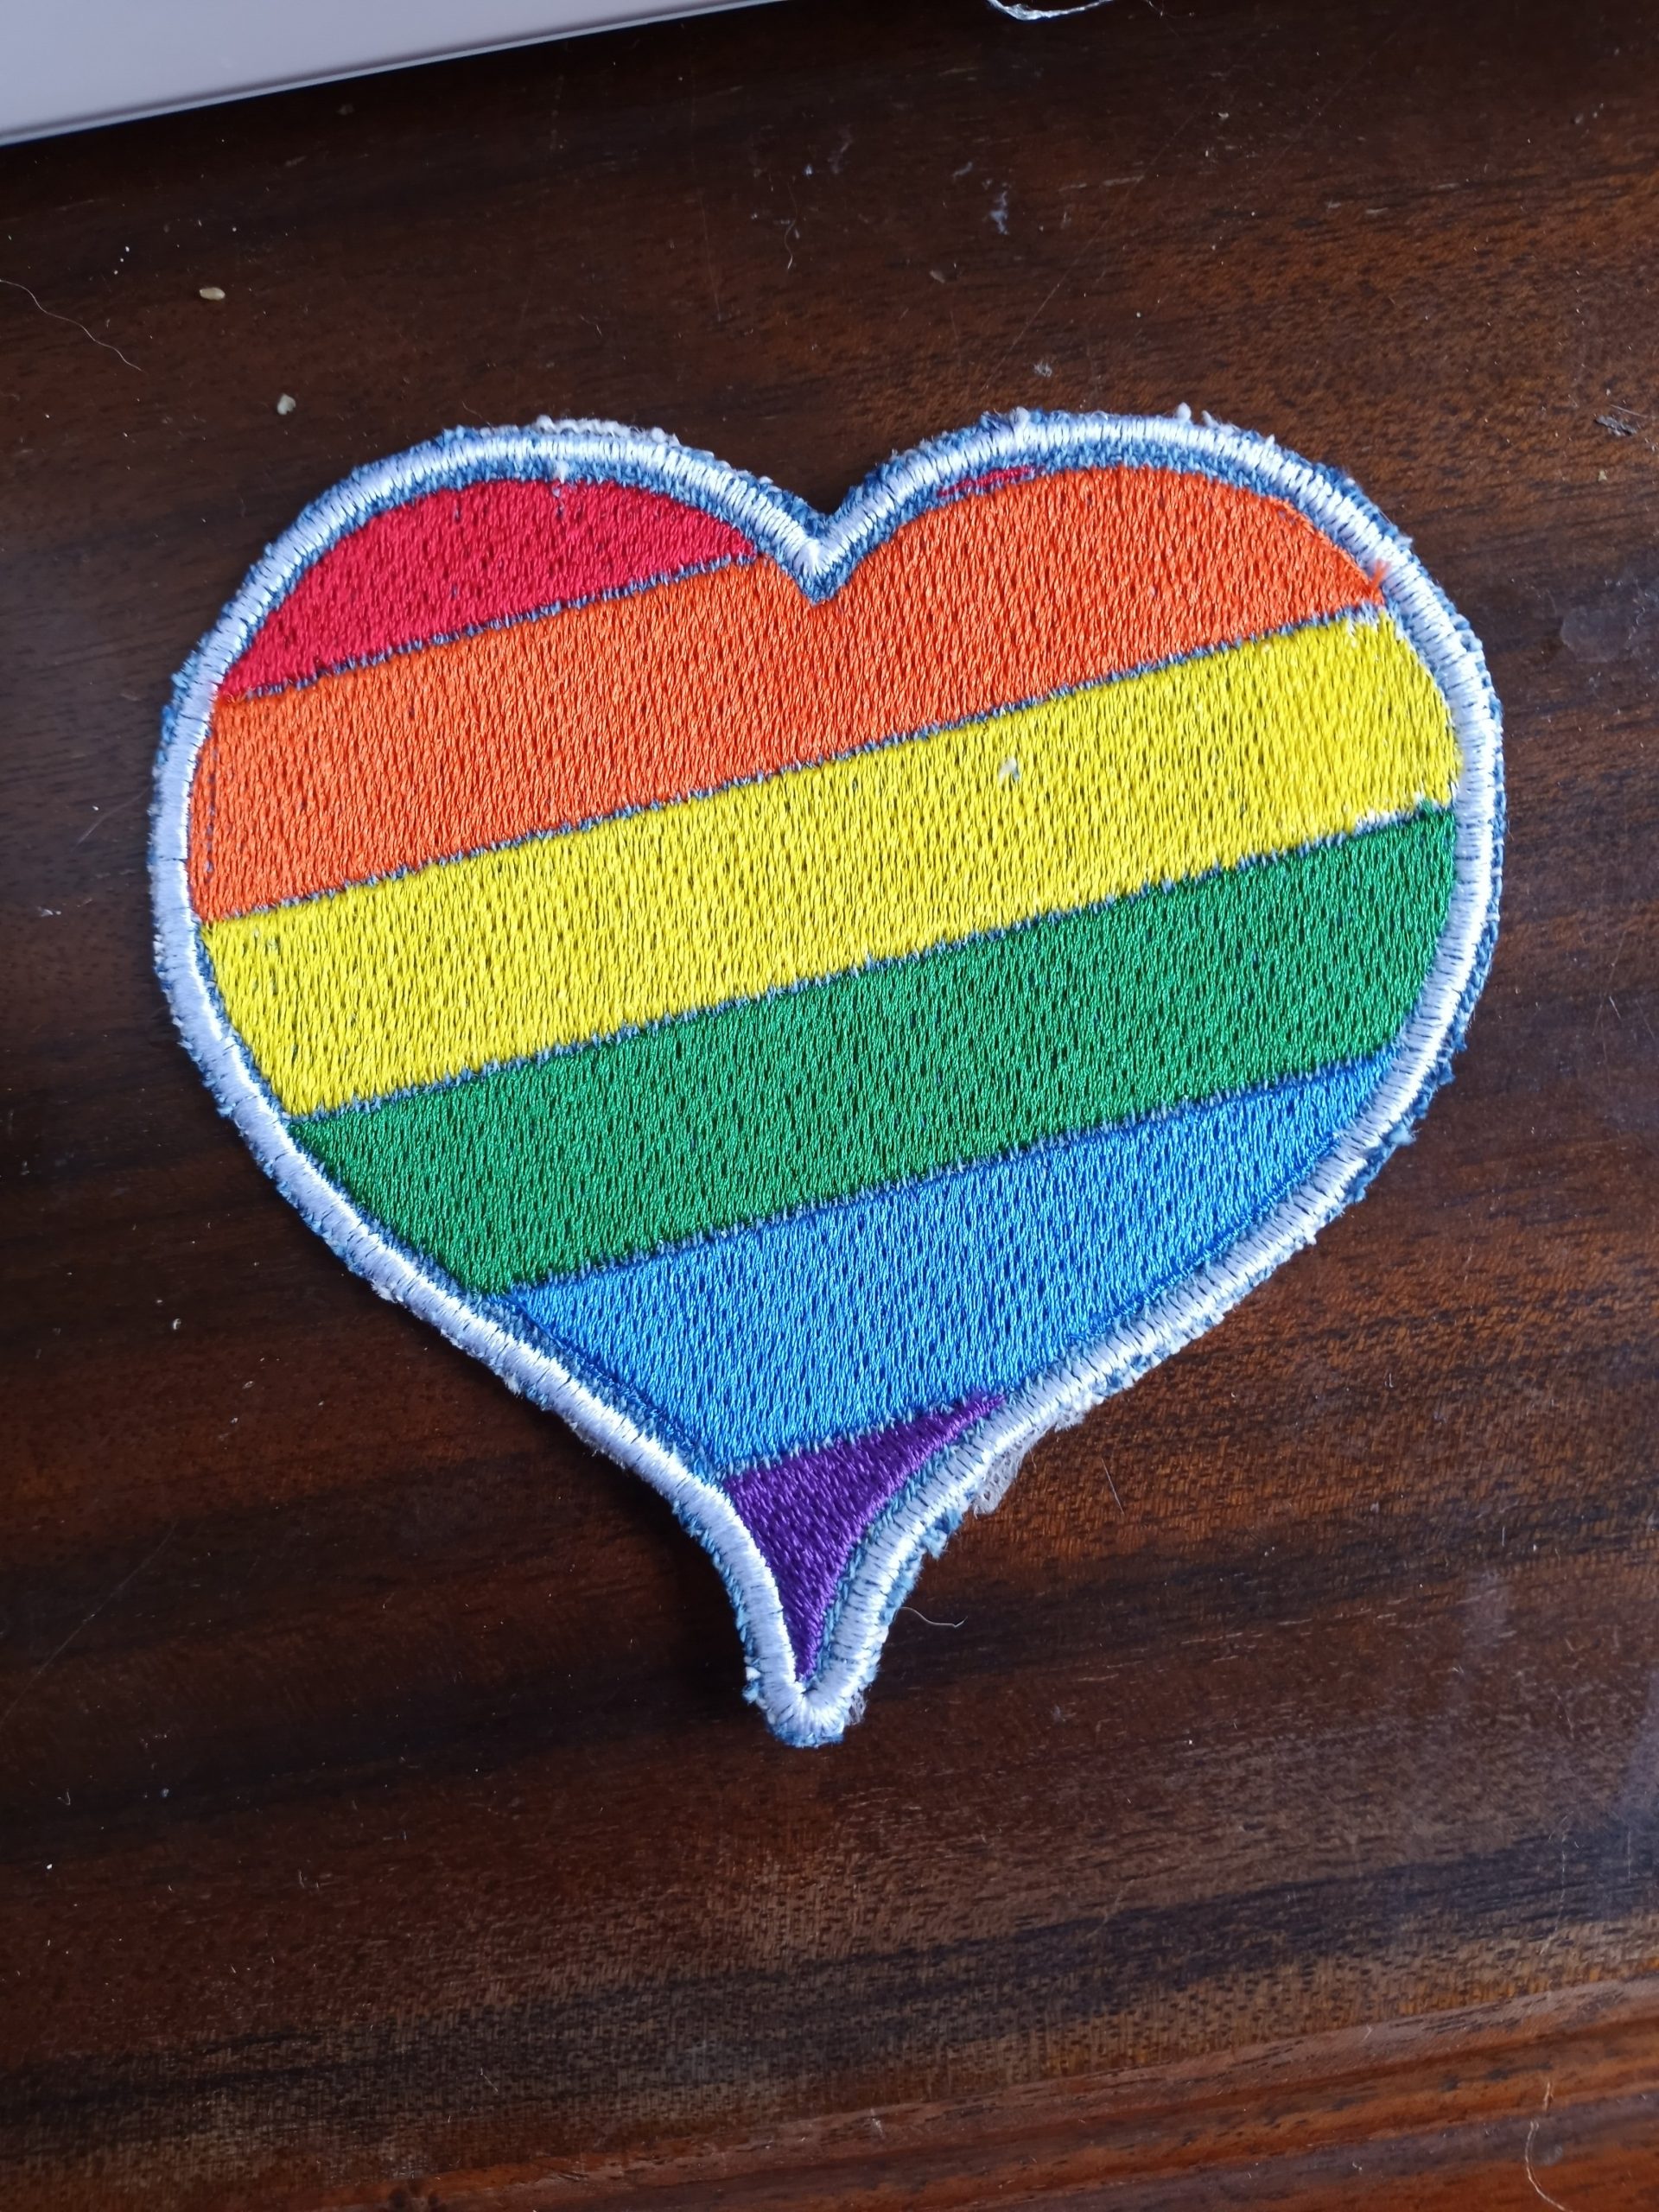
For the whole month of June, my Rainbow Heart machine embroidery design and bonus patch file are FREE! It fits 4 x 4 hoops and includes files compatible with most embroidery machines. If you don’t see your machines file type listed, let me know.
I think this Rainbow Heart would look amazing on denim. You can also play with the colors to get your preferred color combination. My embroidery designs fit the 4×4 hoops common on many beginner home embroidery machines.
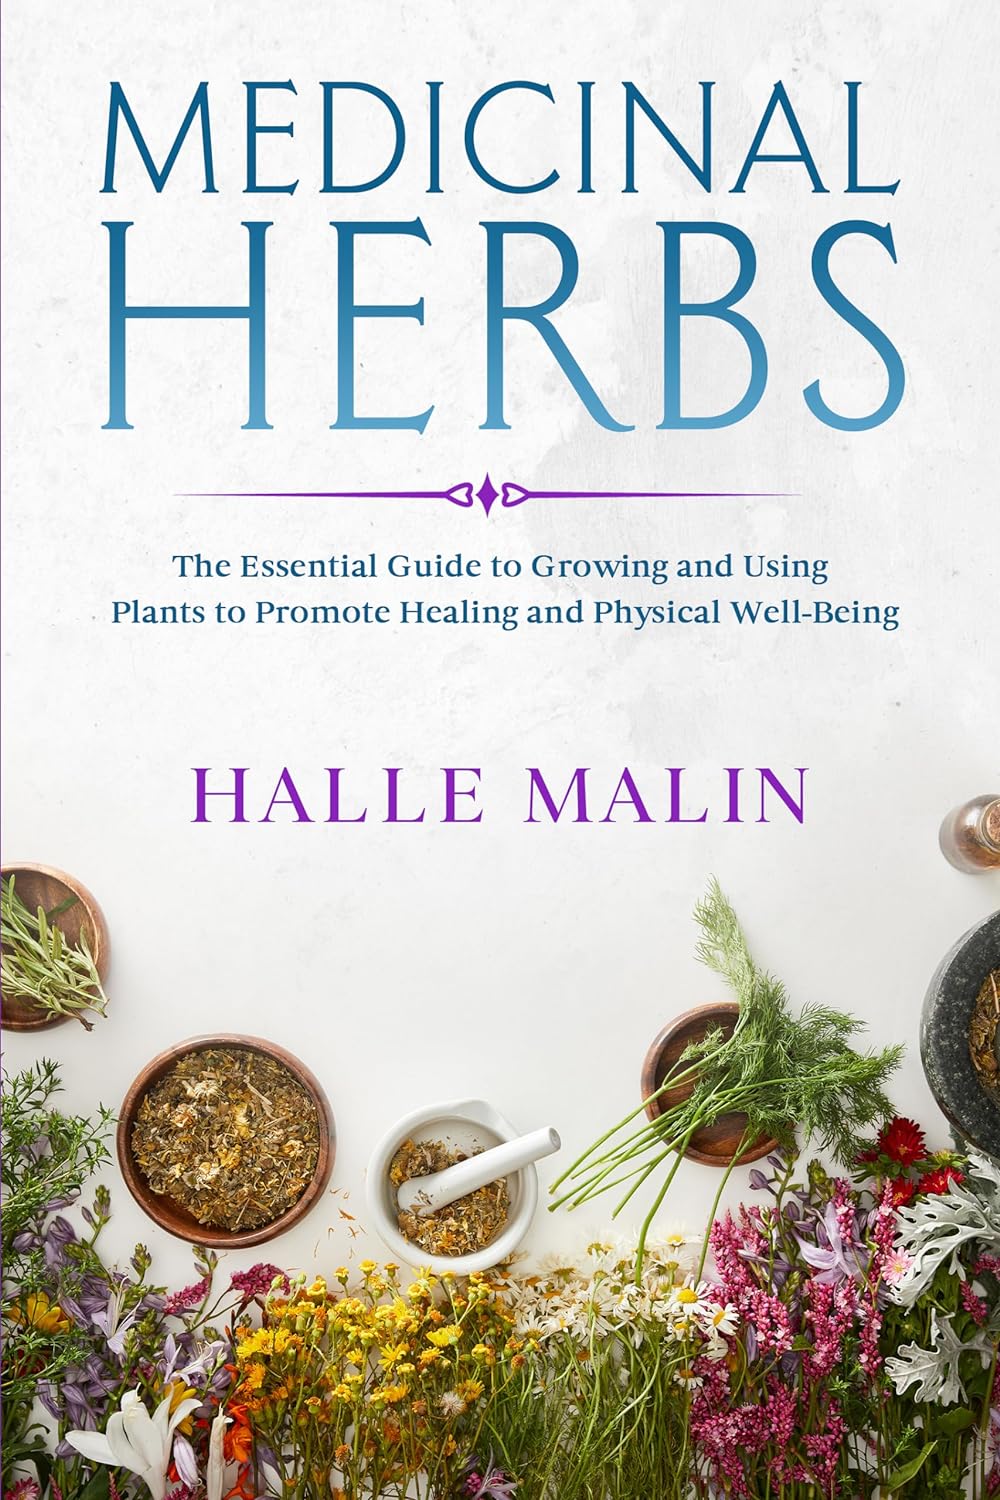
Hi! There’s a free ebook today in my Freebooksy email that I thought might interest my readers. I haven’t read it yet, but I wanted to share before it’s no longer free. The title is Medicinal Herbs: The Essential Guide to Growing and Using Plants to Promote Healing and Physical Well-Being by Halle Malin. You can get it here: https://amzn.to/3RX2qBj (Note: If you use that link and then make a purchase, I will get a small commission. This is at no extra cost to you and helps me to maintain this blog. Thanks!)
Be sure to grab it ASAP. I’m not sure how long it will be free. If you read it, let me know what you think in the comments.
Growing up, I was Belle from the Disney version of Beauty and the Beast. I always had at least one book with me at all times. Most of the time, I was actively reading one of them, regardless of what else I was doing. Surprisingly, I am no more clumsy with my nose in a book than I am fully paying attention to what I’m doing, which is to say, I’m always very clumsy.
Anyway, one of the things I love about technology is that I can bring a library’s worth of books with me everywhere in my pocket. Or purse, really, since women’s clothing doesn’t have real pockets. Don’t get me wrong. I still love my hold-in-your-hand print books with their special book smell and feel. Knowing that I will always have a book or hundred at hand to read anywhere, though, is the best for a nerd like me.
The other cool thing about ebooks is that it is easy to get a whole library for free or cheap. Here are a few of my favorite resources.
Libraries
Did you know that most libraries now have a collection of ebooks and magazines to check out. My local library uses OverDrive to check out ebooks. All you need is a library card. I usually choose Kindle format, since I have an ancient Paperwhite and I use the Kindle app on my phone.
If you’re looking for a specific book or new releases, this is your best bet. You may have to wait a bit because there’s a limited number of digital copies to check out, just like books in a library.
Yes, you can get free ebooks on Amazon. You’ll need a basic (free) Amazon account and the Kindle app, or you can read on a pc. The link above will take you to the Kindle ebook store where I’ve searched for free ebooks. That gives you about a bajillion results to weed through. You can narrow down your search to, something like, “free kindle classic books literature” or “free kindle Sherlock Holmes books” or “free kindle sewing books” and have fewer results to sort through.
If you happen to have a Prime account, there’s some ebook perks with Prime Reading and First Reads, so make sure you check those out, too.
Quick note: I am an Amazon Associate, so if you click on an Amazon link on my blog and then make a purchase on Amazon, I will receive a tiny commission. The price for you is the same either way, so if you are going to be shopping on Amazon anyway, I would appreciate it.
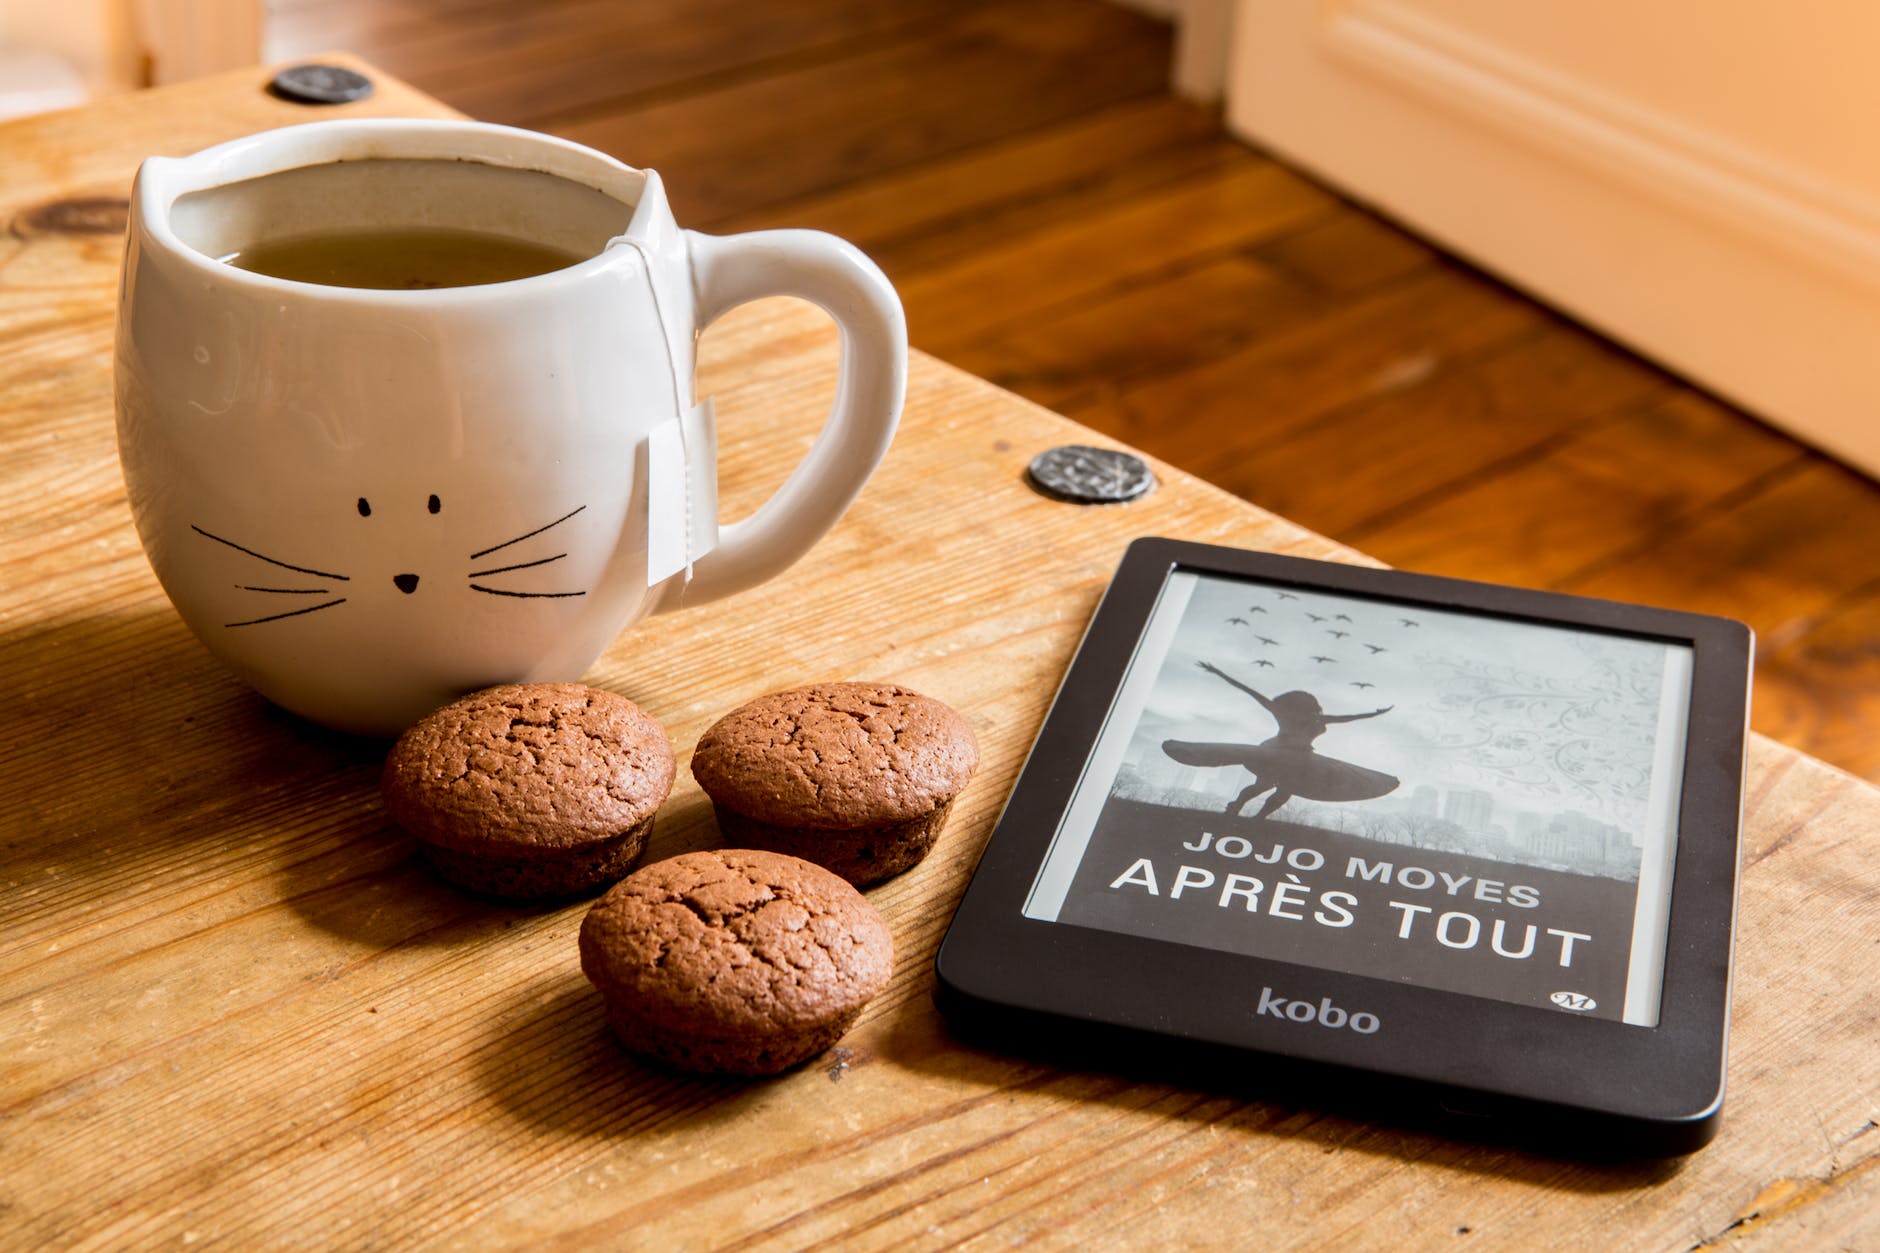
My Paperwhite ebook reader is this old. Photo by Caio on Pexels.com
Free Booksy
Free Booksy basically lets you know about free books in your chosen genres in a daily email. They’re books that are free for a limited time, so not the same things you would find in a free Amazon search. Most days there’s at least one book I want in the email. Right now, I tend to read more nonfiction, however if you like reading fiction series, Free Booksy often has the first in a new series for free, so it’s a great way to discover new authors. Sign up here. I’m not an affiliate, I just love the free books.
eBook Bundles
Occasionally you’ll find free or cheap ebook bundles online based on a theme, such as crafting or health and wellness. Ultimate Bundles is one site that offers them regularly. I’ve purchased bundles from them in the past that were very useful. Usually it’s something like $27 for hundreds of dollars worth of ebooks, courses, printables, etc. When I purchase one, I always make sure that there are at least three ebooks/resources included that I would purchase on their own, no question, AND they would cost me more than the total price of the bundle if purchased separately.
It doesn’t currently look like they’re promoting a bundle right now, but you can check out the website and see if what types of bundles they offer are of interest to you.
These are all resources I’ve personally used for free ebooks. I’m sure there’s plenty more out there. If you know of any, please share them in the comments. 🙂
To make sure you don’t miss any posts, sign up for my newsletter.
Many people eat gluten free (g-free, gf), either by choice or need. For those with celiac, eliminating gluten is an absolute necessity. Others find that, for one reason or another, they feel better when they avoid it. In my case, I kind of accidentally discovered that joint pain in my hands and feet go away and I’m less brain foggy when I avoid gluten. Other family members suffer from breakouts and rashes that flare whenever they eat something with gluten. I strongly believe that if you feel bad after eating something, you should probably stop eating it, so we do our best to avoid gluten all together.
Eliminating something that is such a big part of your diet is daunting at first, but there are a few things that can make the transition easier and less expensive. These tips focus on gluten, but many will also help if you need to eliminate other foods.
1. Start with real foods
Processed foods often have hidden fillers and ingredients, and specialty gluten free foods are expensive. In contrast, fruits, vegetables, meat, nuts, beans, eggs and dairy are naturally gluten free in their pure forms. Rice is a grain that does not contain gluten. Starting from scratch with real food ingredients that you know naturally don’t have gluten is often easier and definitely cheaper than scrutinizing food labels and buying special gluten free versions of normally wheat based foods.
For the most part, single herbs and spices are gluten free. Certain spice blends may have gluten, though. Making your own blends is the safest bet, but if you have a spice blend you love, most manufacturer websites list whether their products contain gluten.
While not technically an herb or spice, most soy sauce contains gluten. La Choy is a major brand that is made without gluten. Bragg’s liquid aminos are another form of g-free soy sauce.
Most vinegar is g-free. Malt vinegar is not. You’ll also want to check the label on flavored vinegar to be sure.
Cooking oils don’t have gluten unless seasoned with something containing gluten.
3. Find your current gluten free staples
Look at the foods that currently stock your pantry. What things that you buy are already gluten free? For us, we usually keep a box or two of cereal around for snacking or a quick breakfast. Most cereals are made with wheat and therefore have gluten, but some that we already bought, like Honey Nut Cheerios, Lucky Charms and Rice Chex are gluten free. Knowing that, I can continue to keep a box or two of cereal we already liked on hand.
Likewise, we keep tortilla chips on hand for snacking or nachos. Most tortilla chips don’t have gluten and inexpensive. Since gluten free crackers are both hard to find and usually expensive, tortilla chips are an easy cracker substitute as well.
4. Look for the easy substitute
Like substituting tortilla chips for crackers, there are other easy swaps. Corn tortillas usually don’t have gluten and can be substituted for flour tortillas. Rice is often a good substitute for pasta, or substitute rice noodles. If you have an Asian grocery nearby, you can usually find rice noodles there for cheaper than a mainstream supermarket, as well as leafy greens and spices for cheap.
5. Make it yourself
It’s fairly easy to find gluten-free flour now, so making your own gluten free cookies, pizza crusts, pancakes, breads, etc. is a good option. I love Bob’s Red Mill 1 to 1 gluten free flour. With it, I can continue to make my favorite deserts just by substituting it for wheat flour. There are other good gluten free flours on the market, too. The most important thing is to know if it is blended to be an exact 1 to 1 substitute or if you need to add something like xanthan gum to give it the stretchiness and rise that you usually get from gluten. For example, Bob’s Red Mill has an All Purpose Gluten Free Flour that is not the 1 to 1 blend. It is a little denser and does not have xanthan gum already blended. I like blending it with tapioca flour, which adds some stretchiness. That works well for things like gluten free flour tortillas. For things that need to rise, though, like cakes or breads, I also add xanthan gum if I’m using the all purpose and not the 1 to 1 blend.
6. When buying gluten free, shop around
Sometimes you really just want to get some gluten free penne pasta or a g-free bagel. More and more grocery stores regularly stock g-free pastas, breads and desserts, but they can be pricey. If you find them on sale, stock up and freeze the extras. Alternative grocery stores sometimes offer better prices, too. Aldi has a decent selection of g-free breads, pastas, and baking mixes at a lower price than most other stores. I even found some gluten free donuts there recently.
Locally, we have a surplus/discount/closeout grocery store called Town Talk. They frequently have udi’s bread in the range of two loaves for $3.00. I periodically stop in and stock up when I can.
To make sure you never miss a post, please sign up for my newsletter.
If you click through any of the Amazon links and make a purchase, I will receive a small commission. There is no added cost to you.
I love in the hoop embroidery projects. They, more than anything, are what make me wish my embroidery machine had a bigger stitch area than just 4 inches by 4 inches. Even with such a small hoop size, there’s still plenty of in the hoop projects available.
One of the easiest ITH (in the hoop) items to make are coasters. To make these peppermint coasters, all you need is fleece, one or two thread colors, stabilizer, the design file and, of course an embroidery machine. Once you see how they are made, you can easily swap out the design and colors to suit your needs. They are so simple to make, they are perfect for last minute gifts or as decor to match a party’s theme. You could also make a themed set for each month, season or holiday to decorate your home.
In the hoop peppermint coasters
Supplies to make one coaster
Two pieces of fleece cut to your machine’s hoop size
Place one piece of fleece on top of the stabilizer in the hoop. For small projects I sometimes just carefully hold it smooth while my machine stitches. You can also use a glue stick outside the stitching area to glue the fabric to the stabilizer, or pin the fabric to the stabilizer at the top and bottom, outside of the stitching area. I made the mistake of having a pin at the side, and even though it was clear of the design, it caught on my machine’s presser foot. Luckily I caught it quickly, but I will probably use a glue stick whenever possible to prevent that from happening again.
Decision Time: If you want the peppermint to show on both sides, place the other piece of the fabric under your hoop while placing it onto your machine. The bottom fabric usually stays in place on its own, but you could use a glue stick as I mentioned in the previous step. To only have the peppermint show on one side, skip to “Preparing your machine”.
Preparing your machine
If you want the peppermint on both sides, make sure the top and bobbin thread match. For a single-sided design, red or white in the bobbin is fine.
Place your hoop in your machine.
Upload the design file according to your machine’s instructions. The following steps are based on the Brother SE 400, so they may differ depending on your machine.
Resize your design, as desired. I wanted the peppermint as big as possible, so I followed the instructions for my machine to maximize the size. Mine maxed out at 7, which resulted in an overall size of about 6.5 cm. If your machine has a bigger capacity, you’ll need to decide how big you want the design .
Because I used white fleece, I chose to skip the white stitching and only stitch it in red. Again, I followed the instructions to skip to color 2, labeled red. Whatever color you choose, if you’re only sewing one color, skip to color two, because it has the outline. If you want to stitch both colors, skip this step.
Optional: Since fleece has a high loft, placing water soluble stabilizer is recommended. I’ve tried this project both ways, and I don’t see a big difference. For this tutorial, you’ll see the water soluble stabilizer in most photos.
Stitching your in the hoop coaster
Begin stitching according to your machine’s instructions.
If you are stitching both colors and want the peppermint on both sides, be sure to change the bobbin thread to match the top thread after color 1, white, is complete.
Continue stitching until the peppermint design is complete.
Stitching the border.
I like the border to match on top and bottom, so for this step I put red in the bobbin and for the top thread.
If you’re making a single-sided coaster like I did for this tutorial, now is when you add the second piece of fleece. Place it under your hoop as in the last step of “Preparing your hoop”.
On your machine, navigate to frames and select a circle frame.
Select the stitch type. I chose an over edge, blanket-type stitch.
Adjust the frame size. The frame size will determine the final size of your coaster. Make sure it is bigger than your design. Mine maxed out at 9 cm.
Stitch the border. I like a thicker look to the border, so once the border is done, I stitch it again. As long as you haven’t moved the fabric in the hoop, it will stitch directly on top of the first frame.
Finishing the coaster
Remove the project from the hoop.
Carefully remove any pins.
Trim thread tails.
Tear away the tear away stabilizer.
If you used water soluble stabilizer, cut away excess.
Cut fleece as close to the outside edge of the frame stitching as possible without cutting the stitching.
To remove remaining water soluble stabilizer, gently dab with a damp cloth or, swish it in a bowl of lukewarm water until stabilizer is gone and allow coaster to air dry flat.
Done!
I know that looks like a lot, but it’s really simple. I tried to be as detailed as possible, but if anything is confusing, please don’t hesitate to ask for clarification in the comments or through email.
If you notice, in the photo of the finished coaster, there’s a flaw in the border stitching on the left. That is where a pin caught the presser foot. Luckily that was the only damage. In the future, if I use pins, I will only pin at the very top and the very bottom. I really do prefer using washable glue sticks and keeping the glue well outside any stitching. That way my needle and machine don’t get gunked up, and I don’t risk hitting pins.
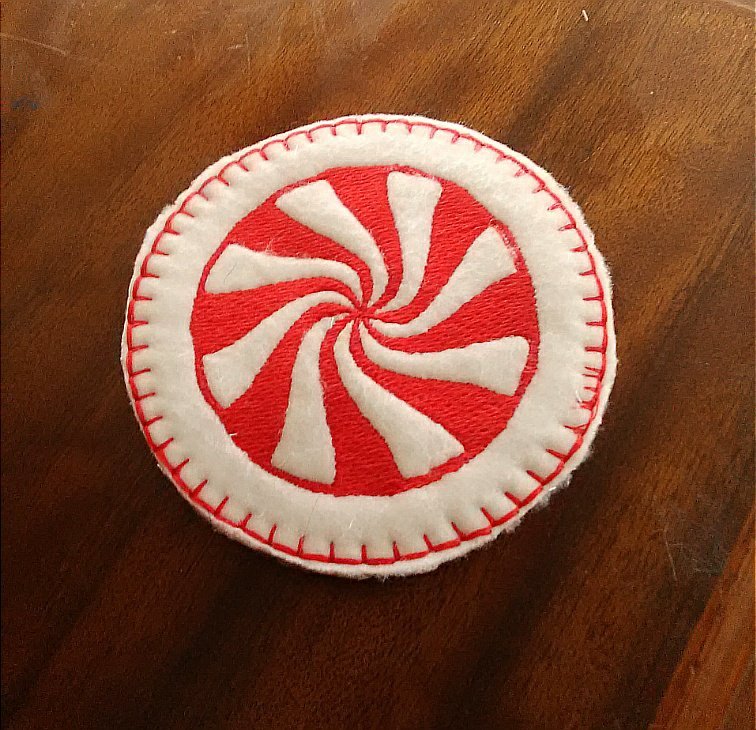
Finished Peppermint Coaster
Embroidery Files
Embroidery design files and freebies from SubEarthan Cottage. All designs are scaled to fit 4×4 hoops common on home embroidery machines.
While I love my Brother SE400, it didn’t take long for me to get bored with the built in embroidery designs. I found many cute designs online to buy. That helped, but even that was somewhat limiting as my machine only has a 4×4 hoop capability. Besides, I’m a diy, hands-on person. Of course, that all led to learning how to digitize designs myself.
The digitizing process is fun but time consuming. When I spend that much time on something, I want to share it with others. So, I am offering my embroidery designs in my shop under Embroidery Files and Freebies. Each design is scaled to fit in a 4×4 hoop and come with the .CSD, .DST, .EXP, .HUS .JEF, .PCS, .PES .SHV, .VIP, or .XXX file types to work on most embroidery machines. New designs are listed for free for a limited time.
Peppermint Candy
Floral Sugar Skull Embroidery Design File
Single Color Sugar Skull
Candy Cane
Christmas Tree 1 Embroidery Design File
Christmas Tree 1
Wreath with Red Bow Embroidery File
Gingerbread Boy Embroidery Design
You can find all of the above designs in my shop under Embroidery Files and Freebies. I would love to see what you create with the embroidery designs. If you’d like, share them here in the comments or on our social media channels. I also appreciate any feedback, especially if you have a different machine.
Tomorrow I should have a tutorial posted for using my Peppermint Candy design to create cute, in the hoop coasters. They’re an easy beginner project and make great gifts. You could also use a similar technique to create Christmas ornaments, or swap out the design in the middle to make them less seasonal.
Sneak Peak of a Peppermint Candy Coaster in progress
If you’re not familiar with the term “in the hoop” it refers to an item that is completely or almost completely made by the embroidery machine in the hoop. I like in the hoop designs for things I’m making in sets because it’s easy to get nearly identical results.
Embroidery Files
Embroidery design files and freebies from SubEarthan Cottage. All designs are scaled to fit 4×4 hoops common on home embroidery machines.
I have never been a huge fan of corn tortillas. They’re good for some things, like street tacos, but overall I love the soft, slightly chewy texture of flour tortillas. While there are flour gluten free tortillas on the market, they are pricey and hard to find. Which means that since eliminating gluten from our diets, I’ve had to stick to corn. Which is fine, because it’s better than no more tacos, but , I still miss flour.
After much searching, I finally found a recipe that mimics the soft, chewy texture of flour tortillas. They require no real prep work, so it’s easy to make them last minute, if needed. Basically, if you can make a pancake, you can make these gluten free tortillas.
You can also adjust the thickness to be more like a flatbread. I can see pairing them with curries or stews, or cut into chips , toast and serve with hummus.
Soft, chewy gluten free flour tortillas so easy you can make them last minute.
Prep Time5 minutesmins
Cook Time1 minutemin
Course: Side Dish
Ingredients
1Cup Chickpea based gluten free flourCan be straight chickpea flour, or a blend with a high amount of chickpea flour, such as Bob's Red Mill GF flour. (NOT the 1 to 1 flour)
0.5cupTapioca flour
1tspsalt
1cup water
1tspcoconut or other oilIf you use a non-stick skillet or griddle you may not need the oil.
Instructions
Mix the dry ingredients in a large bowl.
Add the water and stir until blended.
Oil a skillet or griddle as needed and heat to medium high.
Pour about 1/4 cup of the batter onto your prepared skillet or griddle.
Cook for 1-2 minutes over medium high heat.
Flip like a pancake and cook for another 1-2 minutes.
Repeat the cooking and flipping for the rest of the batter.
Notes
This recipe is very versatile. For thinner tortillas, add a little more water. For more of a flatbread, reduce the water to about 3/4 of a cup.
I, Charity Sloan, am a participant in the Amazon Services LLC Associates Program, an affiliate advertising program designed to provide a means for sites to earn advertising fees by advertising and linking to Amazon.com. Any purchases through those links will result in my receiving a small percentage in commission.
This only refers to Amazon links found in/on my blog pages. All products in my shop are 100% mine and not linked to Amazon.
Prices are the same whether you click an affiliate link or a non-affiliate link, so you will not be charged more. Thank you for your support!