Posted on 3 Comments

How I Make Soap: An overview of the hot process soapmaking method

tea tree oil soap: no more lye

Making soap is like magic. Seriously, think about it: You take stuff that makes things feel greasy, mix it with stuff that would eat your face off and, if you do it just right, the end result is a wonderful bar of non-drying, skin-loving, fluffy-lathering soap.

Soapmaking is fun, but safety is a priority when dealing with sodium hydroxide, aka lye, aka the eat-your-face-off stuff. This is just a brief overview of the soapmaking process I use. Please do not use this as a complete how to guide. If that’s something you’re interested in, please, leave a comment and I will direct you to some more thorough resources on soapmaking.

Melting the Oils

Creating soap takes two basic things: oils or fats and an alkaline solution. In order to combine the oils and alkaline solution, the oils have to all be in liquid form and uniformly mixed. So, step one is measuring and melting the oils. For precision, all measuring is done by weight. Since I use a Crockpot for my hot process soapmaking, I add all my weighed oils to the Crockpot, then melt and mix them in the pot. For soapmaking, I generally use the low setting, but if I need to jump start the melting process I will start it on high then turn it down after a few minutes. This Crockpot is similar to the one I use.

Melting the Oils
Melting the Oils

Measuring the Lye

While the oils are warming in the Crockpot, I weigh the lye. It is important to be very precise when measuring the lye. Too little and the soap will be too soft. Too much and the soap could burn your skin. This is also why you need to be very careful about the soap recipes you use. If they are not correctly formulated, the end result could be dangerous.

Before I measure the lye, I measure the water or other liquid for the lye solution, also by weight. I do that first to limit the time I have the lye out.

Weighing the Lye
Weighing the Lye. Gloves and goggles on.

Lye Safety

I make sure to measure the lye into glassware and all containers and utensils that come into contact with lye or the lye solution are reserved solely for that purpose. Once the lye is out, I never leave it unattended. Lye crystals resemble table salt, which would be a potentially deadly mix-up. That’s also why my soap production has slowed since Thaddeus was born. Until they are old enough to understand the importance of staying out of the room and can be trusted out of sight but in earshot for the time it takes to get the soap cooking, I only make it when they are either out of the house or asleep with Chris there to tend to them if they wake up during the process.

Mixing the Lye Solution

Once my lye is measured, I add the lye to the water and stir with a wooden spoon until dissolved. Lye fizzes up when mixed, so it is important to have the liquid in a container with plenty of room. The solution with also get really hot and put off fumes, so be prepared. I like to have a window open or fans and the vent a hood running. Some soap makers mix the solution outside, but I like to stay close to my work space to limit the chance of spills.

Blending the Oils and Lye Solution

For cold process soapmaking, it is important to have the oils and lye solution at about the same temperature. With the Crockpot hot process method I use, I find I can mix the lye solution into the warmed, melted oils without having to measure the temperatures first.

When you first add the lye solution to the melted oils, the color will change from clear to opaque. In order to properly combine the lye and oils, I use a handheld stick blender. You can stir by hand, but it is much harder to get everything properly blended and it takes f-o-r-e-v-e-r. I have had a stick blender die in the middle of making a batch of soap and it is a crazy long arm workout. I do not recommend it.

Adding the Lye Solution

Goal of Blending

The goal for all the hard mixing is called “trace”. Basically, I’m wanting to be able to lift my blender out of the mixture and trace a design on top. With cold process, there are various stages of trace that guide when to add any fragrance, essential oils or other add-ins. Since I use the hot process method, I add almost everything after the cook. Because of that, I can mix my batches to a full, hard trace where my traced design doesn’t melt back into the mix. This limits the possibility of a false trace, or the mix seeming to quickly come to trace when it isn’t thoroughly mixed. When that happens, it might separate or have lye heavy spots.

Hard Trace
Hard Trace

Once it is at a hard trace, I stop mixing and put the lid on the Crockpot. If the mix seems too hot, for example, I had a false trace that I had to stir through, I will either turn the Crockpot to warm or off for a few minutes. Otherwise, I make sure it is on low and busy myself with cleaning up, lining my soap molds, and preparing essential oils and other additives.

Cleanup

Any lingering lye solution or soap mixture on the blender is still a risk for lye burns, so I’m cautious with the cleanup. For the whole soapmaking process, I keep a good amount of water with vinegar and a bit of dish soap ready in the sink. The vinegar helps neutralize the lye, so anything that comes into contact with lye goes directly into the vinegar solution, and I use a similar vinegar solution to wipe down my soapmaking area, just in case.

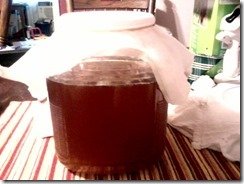
Stages of Saponification

During the cooking, the soap mix will change from an opaque, milky color to a shiny, translucent gel like texture. A pool of liquid also forms on top. that pool of liquid is glycerin, a byproduct of the saponification process. This transformation starts at the edges of the pot and happens in a wave moving towards the center. I find it really fun to watch.

Soap Waves
Soap Waves

Finishing the Batch

When the entire soap mixture is translucent and the consistency of mashed potatoes without lumps, I turn off the heat and stir the soap by hand for just a couple of minutes to let it cool. At this point, if done correctly, the mixture completely transformed to soap. I don’t want it to cool too much, or it would be hard to add the essential oils, but too hot and it will burn off the scent.

Glycerin Pool Forming in the Middle

I then add any essential oils blended in my chosen carrier oil and any other add-ins I’m using in that batch, stir thoroughly by hand, and plop it into my molds. Since it is thick, I generally have to tap my molds on my counter firmly to eliminate air pockets.

Adding the Blended Essential Oils and Carrier Oil

Curing the Final Product

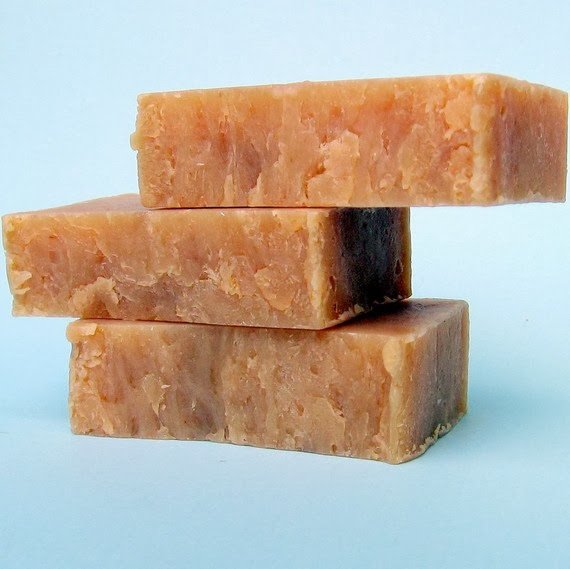
Because the saponification process is completed during the cooking, the soap is totally safe to use as soon as it is cool enough to touch. It needs to cool in the molds for 12-24 hours or so to hold it’s shape, though. Once it is firm enough to cut, I cut and wrap the bars. While not necessary, hot process bars still benefit from curing for at least a week or two to allow excess moisture to evaporate. As I discussed in my Proper Care and Feeding of Your Bar Soap post, the firmer and drier a bar of soap is, the longer it will last. That’s one of the reasons I wrap my soap in cloth rather than plastic. Cloth allows the soap to continue to harden for a longer lasting bar.

Soap Log in the Mold

The batch I photographed for this post is my Tea Tree Oil Soap. Find it and my other handmade soaps for sale here: https://subearthancottage.com/product-category/soap-bath-beauty.

Posted on Leave a comment

Kombucha Frequently Asked Questions

Here’s a few common questions about Kombucha. I’ve answered them based on my research and personal experience.

Kombucha questions

How much should I drink?

If you’ve never had Kombucha before, you’ll want to start slowly. Kombucha can have a detoxifying effect that can be unpleasant if you rush it. It is recommended to start with about an ounce per day at first and gradually increase until you reach a comfortable level for you. If you notice any ill effects cut back or stop for a few days to let your body catch up. Drinking lots of water can help, too.

Of course, you should always listen to your body. If you feel like you can’t tolerate kombucha don’t push it. There are plenty of other ways to get probiotics. Also, I’m not a doctor, and the above might not apply to everyone depending on your personal health. If you have any concerns, definitely consult your doctor.

Can I use metal utensils when making Kombucha?

Metal tea kettles for boiling the water are fine. It’s fine to stir the tea and sugar together with a metal spoon before adding the SCOBY. What you want to avoid is the SCOBY coming into contact with metal as that can damage the SCOBY. Even then, I have heard very brief contact is ok, such as when cutting up a giant SCOBY. I prefer to peel apart the layers and avoid metal touching my SCOBYs, though.

Can I use honey/stevia/coconut sugar/some other sweetener?

The sugar is food for the SCOBY and plain white sugar is recommended because it is easy for the SCOBY to digest. I have heard of some people having success with other sugars, but I haven’t tried it myself. If you want to try another form of sugar, I would start with a small batch and keep another SCOBY in a tea/white sugar brew as backup.

Stevia or other zero calorie sweeteners will not work because they don’t provide food for the SCOBY.

Can I use flavored teas?

Not for the main brew. You can use flavored teas to add flavor in a second ferment.

Can I use decaf teas?

This is another one where I’ve heard conflicting information. Most say not to use decaf tea. If you want to try decaf, as with different sugars, I would start with a small batch and keep another SCOBY in a regular tea/white sugar brew as backup.

My SCOBY looks funny. Is it bad?

Most SCOBYs look funny. They can be smooth and creamy colored or have air pockets and brown spots. The bottoms usually have brown stringy tentacle things hanging down. New SCOBYs grow on top of older ones until they look like a stack of slimy pancakes. (Eww.) All of this is normal, and there’s probably a million variations I haven’t described.

There are two main things to watch for: mold and black. If your SCOBY molds, it will look like blue-green dusty mold, just like what grows on bread. If you get mold, throw it all out and start over.

Black means the SCOBY is dead or dying. Toss it.

My Kombucha tastes like vinegar. What happened?

Kombucha is supposed to taste vinegary, but if it’s too strong you can always mix it with something like juice to make it more palatable. You can also use super-vinegary Kombucha in place of apple cider vinegar in recipes. If it’s straight vinegar with no sugariness left, you could use it as a hair rinse or for household cleaning where you would use ACV.

To make future batches less vinegary, there’s a couple of things to try.

1. Kombucha brews faster in warmer weather. If it’s been hot, try a shorter brew time and/or increasing the amount of sugar in the brew.

2. If your SCOBY is getting super thick, split off some layers. More SCOBY = shorter brew time.

My Kombucha is too sweet. What happened?

The easiest fix is to let it brew longer. If it’s cold, moving your jar to a warmer location may help. I think the ideal range is somewhere around 70-80 degrees Fahrenheit.

You should also check the condition of your SCOBY. If it is turning black, you’ll want to replace it.

Should I store my SCOBYs in the refrigerator?

No. You want to avoid extreme temperatures because they can damage the SCOBYs. The best range is between 70-80 degrees Fahrenheit.

To store your extra SCOBYs, place them in a lidded jar with at least enough Kombucha for them to float and store in a cool-ish location, such as a pantry or shelf out of direct sunlight and away from heat sources.

Find more of my kombucha posts here:  https://subearthancottage.com/search/label/Kombucha

Like this post? To make sure you never miss a future post, please sign up for my newsletter.


Posted on 1 Comment

Flavoring Your Kombucha Tea

When you get your homebrew timing right, kombucha is pretty yummy on it’s own. Sometimes you want something a little different, though. Or maybe straight kombucha just isn’t your thing but you still want the probiotic benefits. Luckily you can easily change the taste of your kombucha to make it more palatable or fix a soda craving. Here’s my tips for flavoring your Kombucha tea.


Mixing with juice


The simplest way to flavor kombucha is to mix it with juice or another beverage. This is a great way to get started drinking kombucha. To start, add 1-2 ounces of kombucha to a glass of your favorite juice. As your body and tastes adjust to drinking kombucha you can increase the kombucha to juice ratio.


I like to dilute 3-4 ounces kombucha with sparkling or still water, add a splash of lemon or lime juice and a bit of stevia. This makes a refreshing summer drink when served over ice.

Kombucha is also nice as an add in for smoothies. It can be fizzy on it’s own, though, so make sure to account for that when adding it to blended drinks. Leaving a little extra headspace in the blender is a good idea. Or, stir it in after everything else is blended.

Flavoring your Kombucha Tea
Flavored with peach and cherry teas in a second ferment.

Flavoring your Kombucha with a second ferment

You can also add flavoring in a second, shorter ferment. Basically you’ll put your flavorings in a bottle or jar (I like canning jars), fill almost to the top with your brewed kombucha and cap the jar. Leave at room temperature for 2-4 days and then refrigerate or drink.


The second ferment can increase the carbonation in your kombucha, so it’s a good idea to be cautious when opening and storing the jars. I’ve never had a jar break from the pressure, but I have had the metal disks on canning jar lids pop up in the middle. If I think too much pressure is building up, I “burp” the jars by opening them just enough to release some of the pressure and recap.

There’s a variety of things you can add for the second ferment. Really, any herbs, spices or fruits can be added. If you want to increase the carbonation, add a little bit of sugar, honey, raisins or a sweet fruit. My favorite thing to do is put enough orange peel to fill the jar halfway, add a teaspoon of sugar or honey, top with kombucha and let it sit for two days. It makes a kind of healthier orange soda and uses something that would normally have been tossed.

Flavoring your Kombucha orange and honey
Orange peel and honey Kombucha

Other flavorings I’ve tried:

  • Lemons and limes cut into wedges, sliced or just the peels. You can also use a lemon or lime half after juicing it for another recipe.
  • Fresh sliced ginger, plain or with a dash of chai spice and squirt of honey.
  • Fruit flavored herbal teas, one bag per quart jar.
  • Blueberries.

If you brew your own Kombucha tea, I would love to hear your tips for flavoring your Kombucha. Please share them in the comments below.

Next week I plan to do a FAQ/kombucha myths post. If you have any questions please share them in the comments and I’ll do my best to answer them.

Like this post? To make sure you never miss a future post, please sign up for my newsletter.


Posted on Leave a comment

Continuous Brewing Your Kombucha Tea

Making Kombucha using the continuous brewing method means you’ll always have plenty of Kombucha ready to drink or flavor in a second ferment. Here’s how to do it.

Supplies for continuous brewing

In addition to the basic Kombucha ingredients listed here, you’ll want to have a jar with a spigot. There’s some debate over the best materials for the jar and spigot. The biggest thing to watch for is something non-metallic, although I think I’ve heard stainless steel is okay. Most people like to avoid plastics to prevent any weird chemicals from leeching into the KT. I went with the cheapest, most available option of a glass sun tea pitcher with a plastic spigot.

Continuous brewing kombucha


Keep about half of the finished KT and the SCOBY in the jar and bottle the rest. Brew about half a gallon of tea. I use two black tea bags, one green tea bag and one half to one cup of sugar. Let it cool and add it to the jar with your finished KT and SCOBY. Since you replaced half of the KT, you’ll want to wait a couple of days before drinking from the new batch. After that, you can drink some fresh from the tap every day. Just replace what you drink with fresh sweet tea. Because you are only adding a small amount of fresh tea in relation to the KT, you can drink a little every day without the wait time. I like to keep a small pitcher of sweet tea in the refrigerator to replenish what gets taken out each day.

Like this post? To make sure you never miss a future post, please sign up for my newsletter.


Posted on 2 Comments

How to Batch Brew Kombucha

Kombucha batch

For those who aren’t familiar with it, Kombucha Tea is tea that is fermented with a culture of beneficial bacteria and yeast (SCOBY). There are many claimed health benefits to it, although the most widely accepted is as a probiotic. It can be a bit fizzy, so many people use it as a soda replacement. It’s becoming much easier to find in mainstream supermarkets, but usually runs about $4 for a small bottle. Yikes! It’s really not that complicated to brew your own and the way to go IMO if you want to drink it daily.

My first batch of Kombucha Tea brewing.

Ingredients to start 1 gallon of Kombucha:


3 Black tea bags
2 Green tea bags
1-2 cups Granulated white sugar
1 gallon Filtered water
1 Kombucha SCOBY (I got mine from here: https://www.etsy.com/shop/OKposeyMom)
2 cup Starter Kombucha tea (KT) or distilled vinegar

Supplies:

1 gallon glass jar (with spigot for continuous brew)
tightly woven or knit cloth or coffee filter larger than the mouth of the jar
rubber band or elastic big enough to securely fit around the mouth of the jar.
Wooden or plastic spoon (metal is fine unless you need to stir after adding the SCOBY)

Make sure all jars and utensils are clean. Rinse everything really well to be sure there’s no soap residue. For the first batch, you’ll need a full gallon of tea. I use both black and green tea with three black and two green tea bags. As long as you are using unflavored, caffeinated tea, any ratio should work. Brew the tea like normal and add the sugar. Stir to dissolve. It needs to be plain white granulated sugar to make it easy for the SCOBY to break down. The sugar can be adjusted to taste, but for the first batch I like to use a full 2 cups. I’ve also found that in warmer months the brew gets strong really fast, so I add closer to the full 2 cups then to compensate. In cooler months, I can cut back on the sugar.

When the tea is cooled to about 80 degrees, add the SCOBY and starter Kombucha Tea (KT) and/or distilled vinegar. The temperature really isn’t that important as long as it’s cool enough to not kill the SCOBY. I usually just feel the jar. When it feels no more than a little warm, I add the SCOBY. If you don’t have enough starter KT you’ll use distilled vinegar to make up the difference. Do NOT use cider vinegar. Cider vinegar contains some of it’s own culture “mother”. If you use cider vinegar you’ll end up with some sort of hybrid culture.

Cover your jar with the cloth or filter and secure with a rubber band or knotted piece of elastic. This allows it to breathe while keeping dust and ickies out. Wait. and wait. and wait. lol.
The KT usually takes about 7-10 days to develop. It brews faster in warmer weather, so keep that in mind. Starting around day seven, use a straw to siphon off a little from under the SCOBY. You want it to have a little bit of a vinegary zing to it, but other than that the taste is up to you. My first batch tasted like cider made from honey crisp apples-tart but still really sweet.

The longer it brews the less sweet and more vinegary it will taste. If you think it needs to brew longer, leave it for another day or two and taste again. If you like the taste, great! Time to bottle it and brew batch number two.

For batch brewing, you’ll basically be doing everything you did for your first batch. All but 2 cups of KT from your first batch can go in to bottles. I use Mason jars. If you want to add flavorings you’ll add them to the bottled KT. I’ll do a post about that later. The 2 cups you reserve and your SCOBY will stay in the jar to start the next batch. (Every few batches, you will want to transfer them to a non-metallic bowl so you can wash the jar. If you keep a second jar on hand, you can just switch jars every batch.)

Repeat the above steps including the wait time for each new batch.

With each new batch, you will grow a new SCOBY. Usually the new SCOBY will grow on top of the old SCOBY. Technically you can separate the new SCOBY each time to use in your new batch. I like to leave the SCOBYs alone until it gets to be about a half inch to an inch thick. After that,  I’ll separate off a few layers by pulling it apart between two layers. One SCOBY keeps brewing while the other goes into a big jar with some KT and a lid, aka a SCOBY hotel. Many SCOBYs can live in a hotel as long as you have enough KT to keep them moist. It’s always a good idea to have an extra SCOBY or two on hand in case your batch gets contaminated. You can also give your extra SCOBYs to friends so they can start their own brew.

Next week I’ll cover how to move from batch brewing to continuous brewing.

Like this post? To make sure you never miss a future post, please sign up for my newsletter.