A few days ago, I thought it would be fun to make Christmas cookies. Then I remembered that my Christmas cookie cutters had disappeared, we were out of any sort of sprinkles for the cookies and I really didn’t want to make decorator frosting or go to the store for supplies. My solution? DIY sugar sprinkles!
Ingredients
Granulated sugar
Food coloring
Supplies
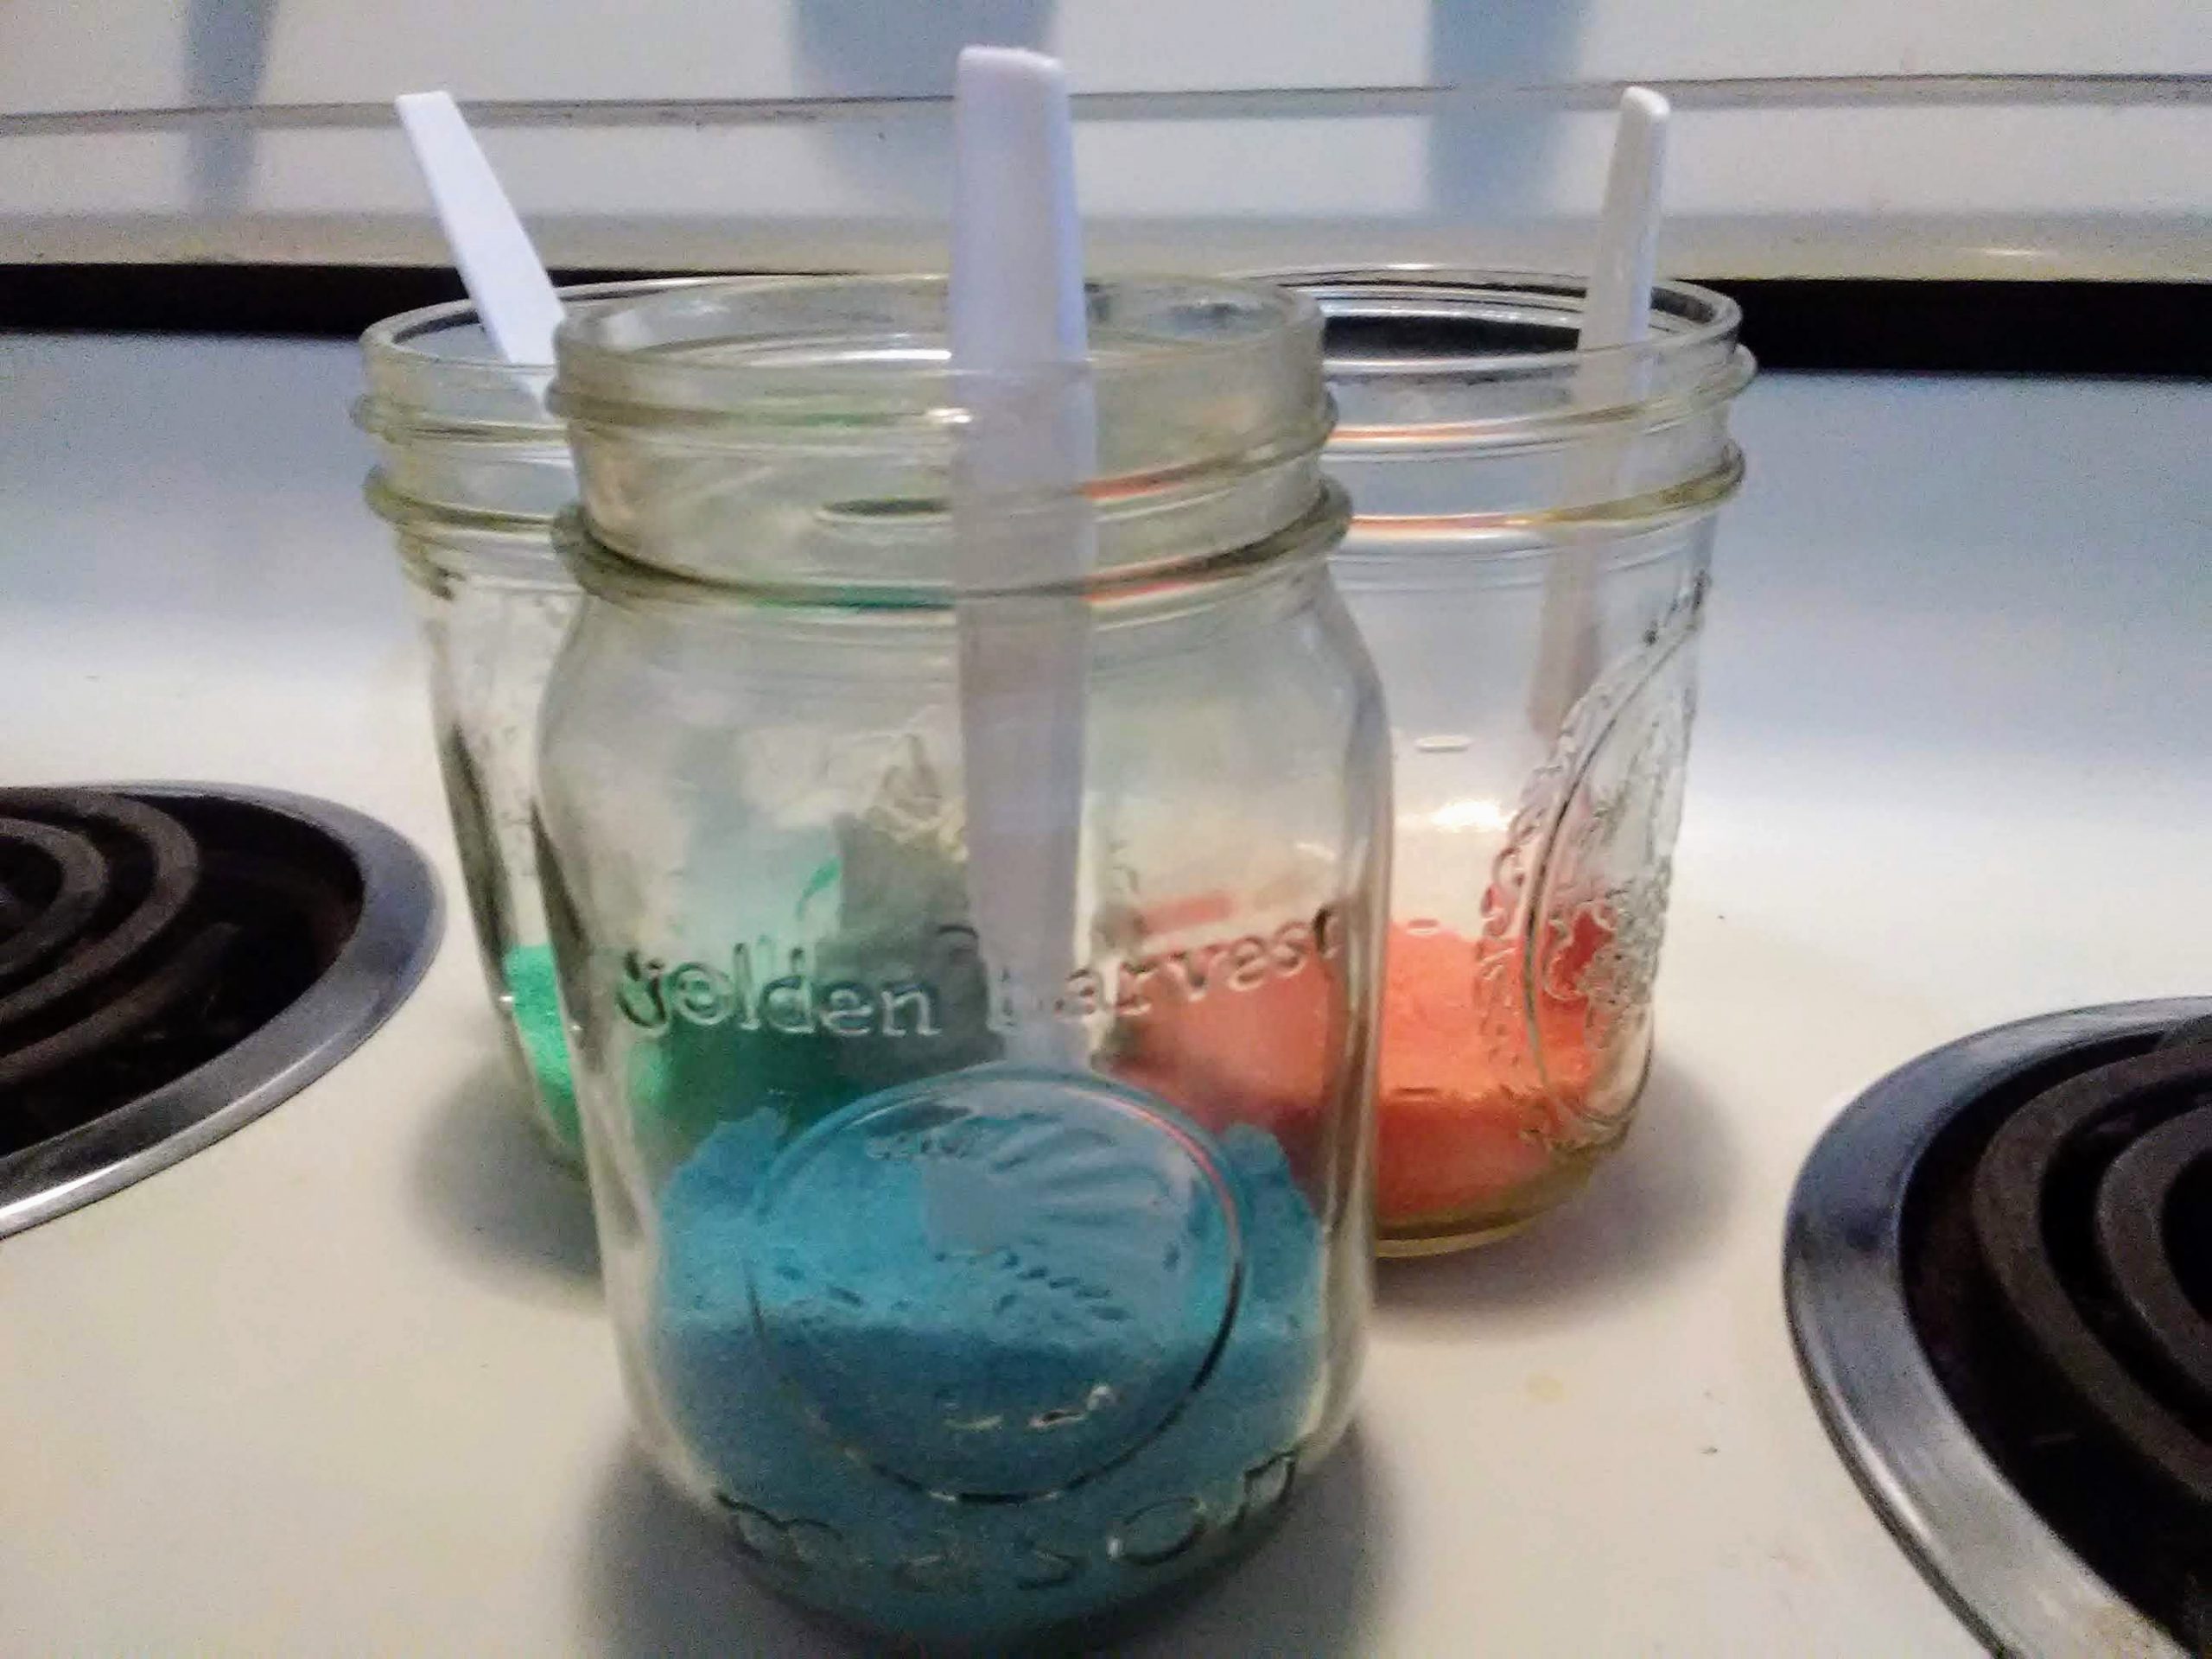
Jars, plastic containers or sandwich bags, one per color. (Ideally something with a shaker top, which I didn’t have)
Spoons or shakers
How to make the sugar sprinkles
Measure about 1/4 cup of sugar into each container.
Add 2-3 drops of food coloring to the sugar.
Shake or stir until the color is evenly distributed.
Let air dry. I just left the lids off the jars and set them on the stove while the cookies baked, stirring occasionally. If you use bags or plan to store it for a longer period of time, you may want to spread it on parchment or a cookie sheet to make sure it is super dry.
Mom tip: If your cookie decorating skills are not Pinterest-worthy, just let your kiddos do the decorating.
The recipe I used for the cookies was the sugar cookie cutout recipe from my trusty red and white Better Homes and Gardens cookbook. To make them gluten free, I substituted Bob’s Red Mill 1 to 1 gluten free flour. If you are new to gluten free baking, it is a great flour to start with. I have had lots of success making all my old recipes gluten free with just that simple substitution.
My solution for not having cookie cutters was to use a round glass to cut out “ornaments”. We dusted some of the cookies with the sprinkles prior to baking. For the rest, I made a simple icing that got dusted or caked with sprinkles, depending on who was doing the decorating.
I love wearing denim blue jeans, but chasing my boys and taking care of my small zoo, they get lots of wear and tear. One of the worst things is having to scrap a favorite pair because of one too many rips. I’ve repaired rips in a utilitarian way in the past. This time I thought I’d try patching denim using my embroidery machine. I haven’t done much applique, so I learned some things along the way.
This tutorial makes use of an embroidery machine and serger. You could also adapt it to use a sewing machine or applique by hand and embellishing with hand embroidery.
Items needed
Denim jeans or other item to repair
Interfacing
Thread in colors of choice
Seam ripper or similar tool
Scrap of fabric at least 4 in x 4 inches
Stabilizers: Cut away or tear away, water soluble optional
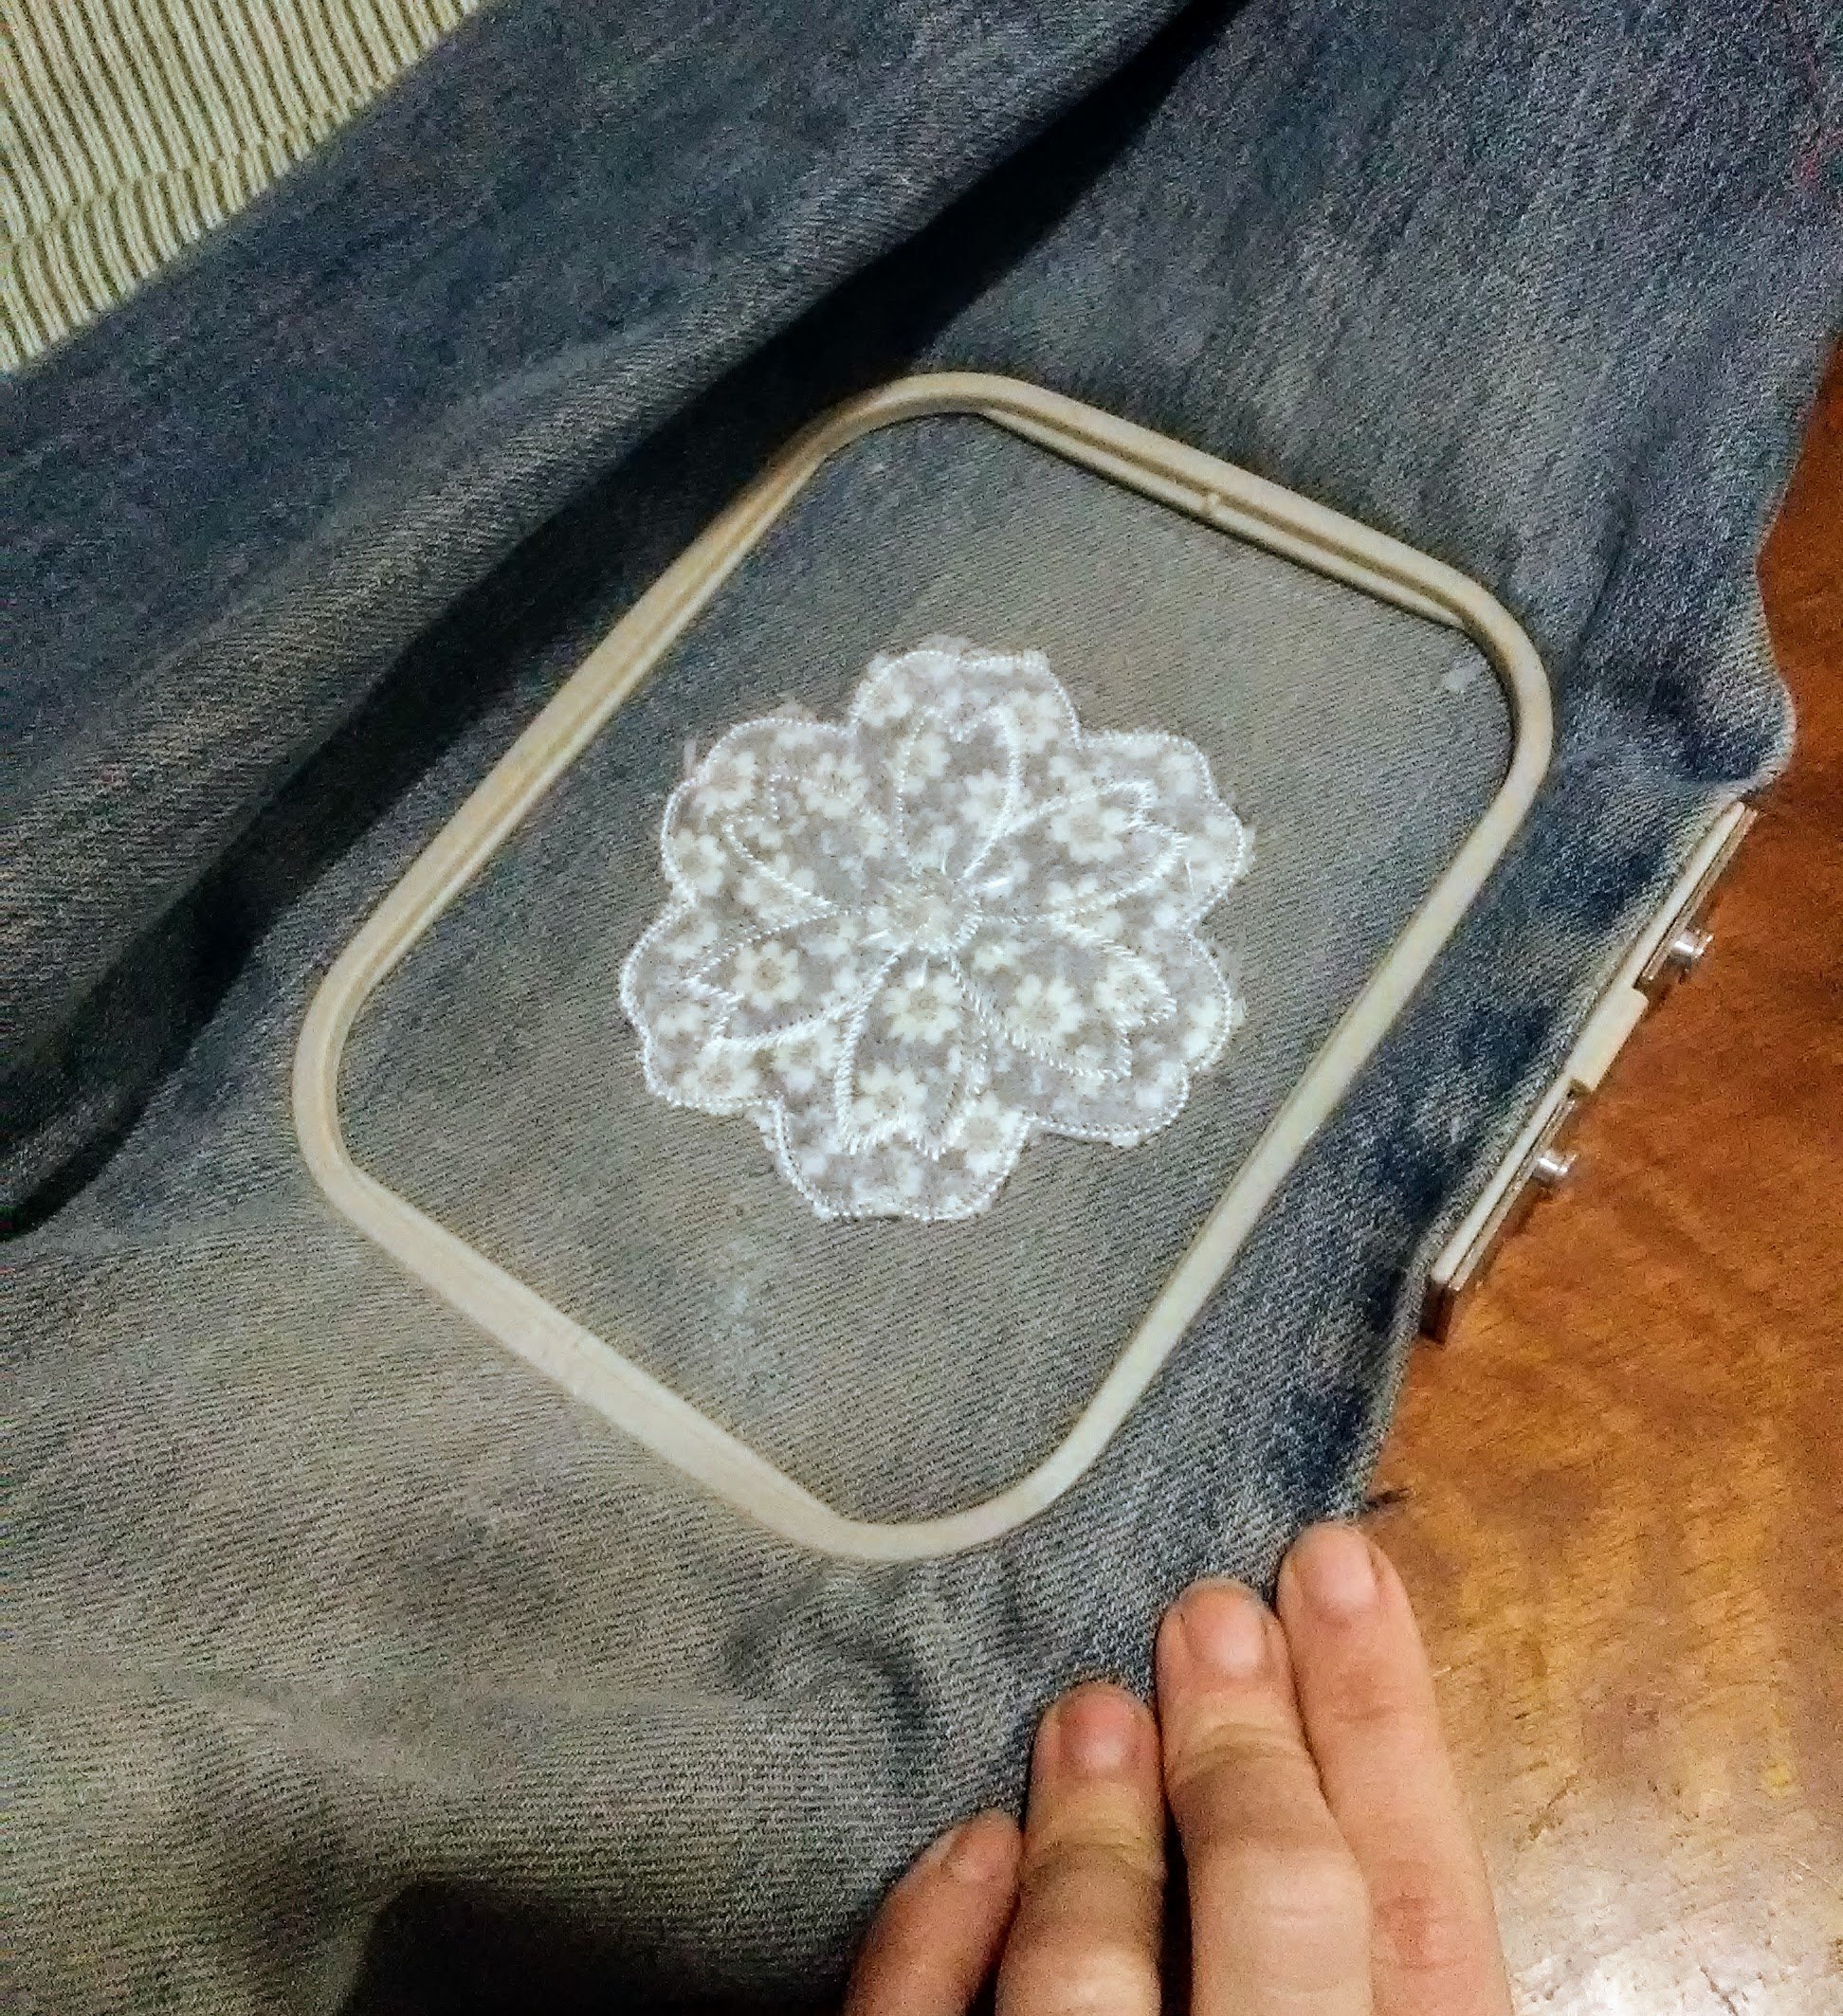
Since I’m repairing a ripped knee, I needed to take out one of the side leg seams on my jeans. Using a seam ripper made this easy, but you could use small scissors, too. I left the seam intact at the hip and ankle, only removing what was necessary to lay the ripped area flat in the hoop without risking sewing it to the back. Leaving a little intact makes it easier to resew the seam at the end.
Step 2: Prepare the rip.
Iron the area around the rip so it’s smooth and flat. If there’s a lot of loose threads around the rip, trim them. I caught this rip before it frayed too badly, so no trimming was needed.
Side seam removed and jeans ironed flat.
I wanted the embroidered area to be solid, so I applied some interfacing to the back of the rip. I used some medium weight interfacing, but any should work, since it’s job is just to hold it together while the jeans are embroidered. This is a perfect project for using whatever scraps are handy.
Back of rip with interfacing applied.
Step 3: Hooping.
For denim, tear away or cutaway stabilizer is best. I chose cutaway for the most stability. It’s stiff, but it should soften in the wash. If not, I’ll switch to tear away next time.
I tend to float projects and only hoop the stabilizer whenever possible. This project seemed like it would work better tightly anchored in the hoop. It took a few tries to center the rip in my hoop so that all edges would be covered by my design. My machine has a 4 in x 4 in embroidery field, so the rip just barely fit. Smaller tears will be easier to fit in my small hoop.
First attempt. Once I put it in my machine and had it circle the embroidery field, I saw it needed re-positioning.
Step 4: Embroidering the patch.
Once it’s properly hooped, it’s time to sew. On my machine, the first color stop said “Applique Material”. I haven’t done much machine applique, but the ones I am used to usually follow the sequence: placement stitch, tack down the applique (then trim excess), sew the final applique stitching. So, confused I just put the applique fabric and a water soluble stabilizer (optional) on top of the rip and pushed start.
What my machine was telling me to do was to just hoop the applique fabric so I could remove it from the hoop and cut it neatly. The second color stop was the positioning stitch. That would be stitched on my jeans and then my neatly trimmed applique could be placed in position and the stitching completed. Since I did everything at once, my applique isn’t as tidy as it could be. I will definitely listen to my machine next time.
Finished sewing.
Step 5: Remove from hoop and cut away excess stabilizer
I also steam pressed over the back of the patch to start softening the stabilizer.
Patch from the back with stabilizer trimmed.
Step 6: Sew the leg seam.
To repair the leg seam, I used a lock stitch setting on my machine. You could also sew the seam twice to reinforce it or just use really heavy thread. I then serged the raw edge. If you don’t have a serger, an overedge stitch or zig-zag stitch would also work.
Finished!
Finished patch. Next time I will use heavier thread so the embroidery shows better.
Not bad. I wish I had used heavier thread so the embroidery would show up better. Listening to my machine and cutting the applique fabric to size before I sew it on to eliminate the raw edges peeking out is another improvement for the next time I’m patching denim.
If you’d like to use this applique design, you can download the file here. You can use the design on items you make to sell as well as for personal use, but please don’t sell the design file.
Floral knee patch applique design image.
Like this tutorial? To make sure you don’t miss out on future tutorial posts, sign up for my newsletter.
Embroidery Files
Embroidery design files and freebies from SubEarthan Cottage. All designs are scaled to fit 4×4 hoops common on home embroidery machines.
I love in the hoop embroidery projects. They, more than anything, are what make me wish my embroidery machine had a bigger stitch area than just 4 inches by 4 inches. Even with such a small hoop size, there’s still plenty of in the hoop projects available.
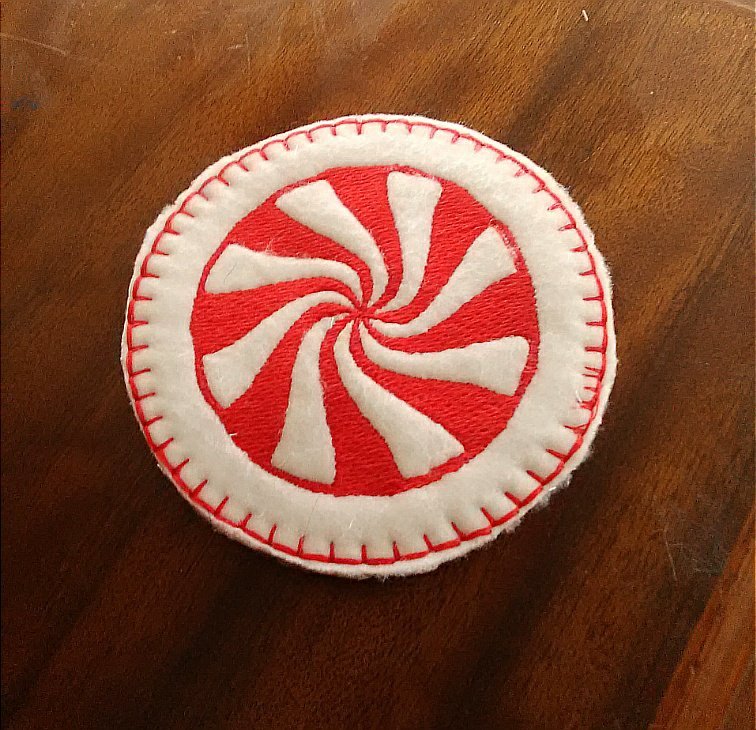
One of the easiest ITH (in the hoop) items to make are coasters. To make these peppermint coasters, all you need is fleece, one or two thread colors, stabilizer, the design file and, of course an embroidery machine. Once you see how they are made, you can easily swap out the design and colors to suit your needs. They are so simple to make, they are perfect for last minute gifts or as decor to match a party’s theme. You could also make a themed set for each month, season or holiday to decorate your home.
In the hoop peppermint coasters
Supplies to make one coaster
Two pieces of fleece cut to your machine’s hoop size
Place one piece of fleece on top of the stabilizer in the hoop. For small projects I sometimes just carefully hold it smooth while my machine stitches. You can also use a glue stick outside the stitching area to glue the fabric to the stabilizer, or pin the fabric to the stabilizer at the top and bottom, outside of the stitching area. I made the mistake of having a pin at the side, and even though it was clear of the design, it caught on my machine’s presser foot. Luckily I caught it quickly, but I will probably use a glue stick whenever possible to prevent that from happening again.
Decision Time: If you want the peppermint to show on both sides, place the other piece of the fabric under your hoop while placing it onto your machine. The bottom fabric usually stays in place on its own, but you could use a glue stick as I mentioned in the previous step. To only have the peppermint show on one side, skip to “Preparing your machine”.
Preparing your machine
If you want the peppermint on both sides, make sure the top and bobbin thread match. For a single-sided design, red or white in the bobbin is fine.
Place your hoop in your machine.
Upload the design file according to your machine’s instructions. The following steps are based on the Brother SE 400, so they may differ depending on your machine.
Resize your design, as desired. I wanted the peppermint as big as possible, so I followed the instructions for my machine to maximize the size. Mine maxed out at 7, which resulted in an overall size of about 6.5 cm. If your machine has a bigger capacity, you’ll need to decide how big you want the design .
Because I used white fleece, I chose to skip the white stitching and only stitch it in red. Again, I followed the instructions to skip to color 2, labeled red. Whatever color you choose, if you’re only sewing one color, skip to color two, because it has the outline. If you want to stitch both colors, skip this step.
Optional: Since fleece has a high loft, placing water soluble stabilizer is recommended. I’ve tried this project both ways, and I don’t see a big difference. For this tutorial, you’ll see the water soluble stabilizer in most photos.
Stitching your in the hoop coaster
Begin stitching according to your machine’s instructions.
If you are stitching both colors and want the peppermint on both sides, be sure to change the bobbin thread to match the top thread after color 1, white, is complete.
Continue stitching until the peppermint design is complete.
Stitching the border.
I like the border to match on top and bottom, so for this step I put red in the bobbin and for the top thread.
If you’re making a single-sided coaster like I did for this tutorial, now is when you add the second piece of fleece. Place it under your hoop as in the last step of “Preparing your hoop”.
On your machine, navigate to frames and select a circle frame.
Select the stitch type. I chose an over edge, blanket-type stitch.
Adjust the frame size. The frame size will determine the final size of your coaster. Make sure it is bigger than your design. Mine maxed out at 9 cm.
Stitch the border. I like a thicker look to the border, so once the border is done, I stitch it again. As long as you haven’t moved the fabric in the hoop, it will stitch directly on top of the first frame.
Finishing the coaster
Remove the project from the hoop.
Carefully remove any pins.
Trim thread tails.
Tear away the tear away stabilizer.
If you used water soluble stabilizer, cut away excess.
Cut fleece as close to the outside edge of the frame stitching as possible without cutting the stitching.
To remove remaining water soluble stabilizer, gently dab with a damp cloth or, swish it in a bowl of lukewarm water until stabilizer is gone and allow coaster to air dry flat.
Done!
I know that looks like a lot, but it’s really simple. I tried to be as detailed as possible, but if anything is confusing, please don’t hesitate to ask for clarification in the comments or through email.
If you notice, in the photo of the finished coaster, there’s a flaw in the border stitching on the left. That is where a pin caught the presser foot. Luckily that was the only damage. In the future, if I use pins, I will only pin at the very top and the very bottom. I really do prefer using washable glue sticks and keeping the glue well outside any stitching. That way my needle and machine don’t get gunked up, and I don’t risk hitting pins.
Finished Peppermint Coaster
Embroidery Files
Embroidery design files and freebies from SubEarthan Cottage. All designs are scaled to fit 4×4 hoops common on home embroidery machines.
No matter what our budget looks like, food is always a part of it. You have to eat, right? There are many thoughts on the best way to save on food. These are the things that work for me.
Eat at home
This one is probably the most important. If you eat out, regardless of whether it’s a dine-in or fast food restaurant, you are going to spend more than if you cook and eat at home. It’s fine to splurge once in a while, but if you’re looking to save, eating at home gives you the most bang for your buck.
Buy mostly ingredients
Prepackaged foods are sometimes quicker, but they are usually more expensive per serving. If it’s a choice between eating out and eating convenience foods from the grocery, it’s still usually cheaper than eating out, so if it’s a choice between KFC or a deli rotisserie chicken, bagged salad and prepackaged dinner rolls, the deli chicken is probably the cheaper and healthier option.
There are some convenience items that I find helpful, especially when life gets hectic. Jarred sauces, bouillon and frozen potatoes in various forms are things that I like to have on hand to help me get a meal on the table quickly. When there’s not time to make the sauce from scratch or I don’t have homemade broth on hand those can make it easy to still throw something together. They’re also usually fairly inexpensive, so I feel they are budget friendly convenience choices.
Buy in bulk where it makes sense
Don’t buy a ton of perishables like fresh fruit just because it’s on sale. If you have time to prep and freeze or can the fruit, then go for it. Things like canned goods, freezer staples and shelf stable items are great for buying in bulk, if you have the room. We have a small chest freezer, so I’m able to buy fruit on sale to freeze for smoothies or desserts and an extra ham or turkey when they are on sale for under $1 per pound around the holidays.
I also buy basmati rice in 20 lb bags because we prefer it over other types of rice and it is so much cheaper that way. To keep it fresh and manageable, I keep a small container of it in the cupboard and the rest goes into the freezer.
Shop creatively
It’s easy to have one or two grocery stores or box stores where you do all of your shopping. If you have farmer’s markets, discount groceries or ethnic groceries in your area, you may find better deals on some items.
For starters, if you have an Aldi nearby and haven’t given them a try, please do. I’ve found them to have a good selection of staples and they have a good guarantee on everything they sell. You won’t find many name-brands at Aldi, but with their guarantee, it’s worth trying and seeing if you like their store brands. They also carry a lot of gluten-free options, as well as dairy-free milk alternatives and a dairy-free mozarella cheese.
I also frequently shop a local Vietnamese grocery store. They have tons of fresh greens and other produce at really good prices. I also get a lot of specialty items, like things for making pho or sushi for sometimes half the cost or less of what I would pay at Kroger or Walmart. Bulk spices and rice are also cheaper there. For gluten-free pasta, rice noodles from there are cheaper than gluten-free options from Kroger and Walmart.
Find a method of meal planning that works for you.
Some people do really well with having every meal, every day planned out to every last detail. I prefer something more flexible that allows for changes based on last minute plans or whatever is on sale that week or whatever leftovers we need to eat. Regardless of the type of meal planner you are, have some sort of game plan in place.
Meal planning is one area where I need to improve, but I do have a basic game plan for meals that I’ll post on at a later date.
While you’re planning, don’t forget lunch. Leftovers are quick and easy lunches, so if you’re planning a dinner that reheats well, make enough for lunch the next day.
Keep staples for one or two quick meals on hand always
This is important in case you forget to plan, or something doesn’t work out with your plan. Whether it’s spaghetti and premade sauce, eggs, fruit and toast or some other meal you can throw together in under thirty minutes, keep the ingredients on hand for one or two backups that you like. Having a backup option makes it easier to eat at home when you might otherwise be tempted to eat out.
Eat real food
If you have to change your eating habits due to health or personal beliefs, it’s easy to try to substitute faux or “free” foods tailored to that diet. Price-wise though, it’s better to adapt your diet with real foods. Rather than faux meat burgers, try grilling portobello mushrooms or making your own patties with chickpeas. Instead of gluten free pasta, substitute rice or potatoes. Instead of diet drinks, flavor water, tea or soda water with fruit.
If you’re really craving cheese and you’re dairy free or bread and you’re gluten free, go ahead and splurge on the dairy or gluten free options. If you’re on a plant-based diet but desperately want something like a real burger, go for one of the faux meat patties. Just try to keep those splurges to a minimum and you’ll save money.
Find recipes for soups, stews and beans that you like
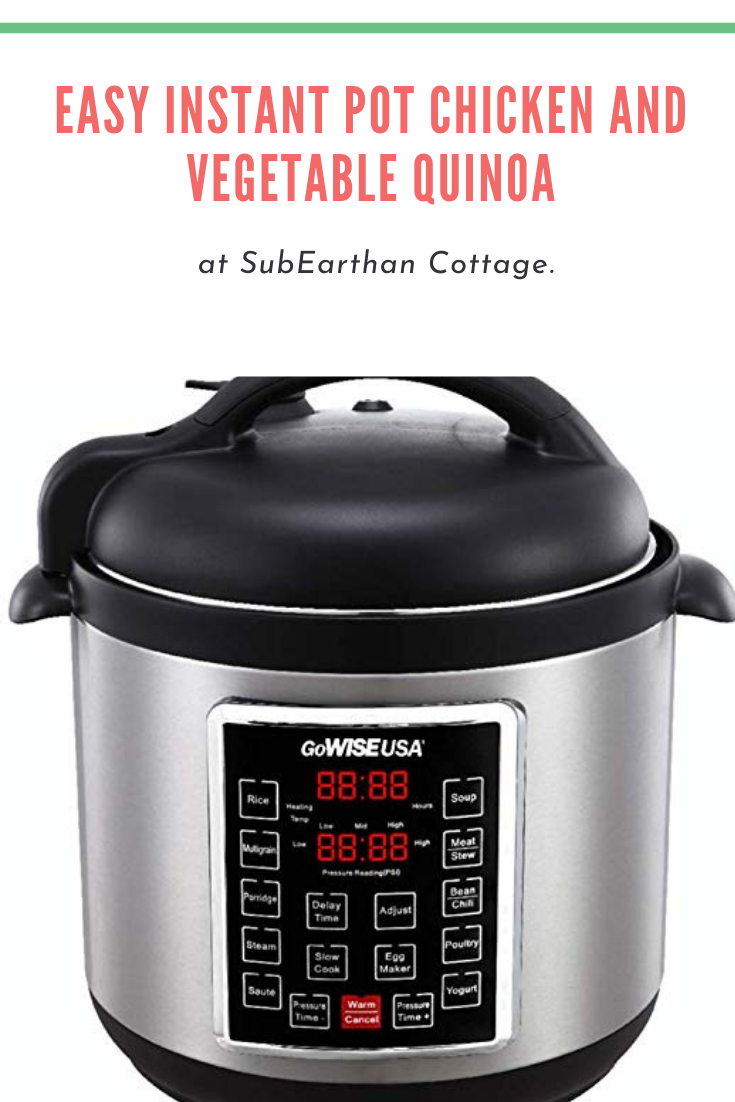
Soups, stews and beans are usually cheap, filling and can be a one pot meal. Having a few recipes you like and keeping the ingredients on hand can really help save money on food. They also are easy to make in bulk and usually freeze well, so making a bunch and having it for lunch or in the freezer for nights that dinner plans don’t work out helps prevent eating out. I love crock pots or pressure cookers for making soups and stews. It’s absolutely not necessary to run out and buy a slow cooker or pressure cooker, but if it’s something you’ve been considering, I love my electric pressure cooker for so many things.
Whether it’s a new project, work, or just daily life, sometimes it’s easy to get overwhelmed. Maybe you’re struggling to find balance while juggling work, home life and new schooling situations. Maybe a task seems too huge or unpleasant to tackle. It could be that you’re unsure of how a project will turn out, so fear keeps you from making the first move. Maybe there’s just so many other things on your plate that you find yourself too mentally or physically exhausted to tackle that one thing. Here’s a few ideas to get unstuck and moving forward again.
Overwhelmed? These 10 tips will help
Brain dump
When you’re really anxious or don’t know where to begin, doing a brain dump helps. Grab a pen and paper and just write out everything on your mind. Don’t think about it, don’t worry about complete sentences or cohesive ideas, just get everything out on paper. When your done, look it over. Is there a theme to what you wrote, some repeated word or idea or area of focus? Use that to help you determine your next move.
Making a list of what needs to be done creates focus. It also takes the pressure off of yourself to remember everything. Once it’s written down, you’re free to focus on one task at a time. Because it’s all written down, you don’t have to keep a running list of everything in your head. As you complete a task, mark it off. Focus on your list getting shorter, not how much is still left to do.
Break it down
If a task seems too big, it’s easy to get overwhelmed. Breaking it down into smaller tasks makes it more manageable. For example, if you need to clean the house for company, don’t look at the whole task of cleaning the house. Take it room by room. If that still seems too big, list specific tasks within each room. Don’t say “Clean the kitchen”, have individual tasks like wiping down counters, sweeping the floor, mopping the floor, etc. listed separately.
Prioritize
Some tasks come with a deadline or are more important than others. If there’s a deadline, make a note of that deadline on your list and mark it somehow to make it stand out. If it’s something that is high priority, regardless of a specific deadline, make note of that, too. I like to draw a star next to high priority tasks, and highlight or double star things with a deadline.
Set goals
Be realistic about what you can accomplish in a day and set goals accordingly. If there are specific tasks that have to be done first, then set your goals around those. Otherwise, your goals could be something like marking off five tasks each day. If you meet your goal, good for you! Do you have the time, energy and desire to mark off a few more? Go for it! Didn’t meet your goal? See if you need to re-evaluate your expectations so as not to get overwhelmed and discouraged. If it was simply a case of other obligations taking too much time, try again tomorrow.
Set alarms
If you have something that needs to be done at a certain time, like an appointment at noon or starting dinner at five pm, set an alarm in plenty of time to stop and get ready. When I have an appointment or event coming up later in the day, it’s hard for me to focus on other tasks, even when I have plenty of time. Knowing that I have an alarm to remind me when I need to stop makes it a little easier.
Setting a timer is useful in a few ways. First, if you find yourself completely unmotivated, pick a task and set a timer for five, ten or fifteen minutes, whatever seems manageable. You can do anything for five minutes. Pick a task and see how much you can accomplish in that time. When the timer goes off, give yourself permission to stop for a break or switch to a a different task. I often find that when the time is up, I’m so close to finishing that task that I want to keep working.
You can also use a timer to break up a bigger task into smaller chunks of time. Give yourself thirty minutes or an hour to work on a bigger job. When your time is up, stop and take a break or give yourself a five to fifteen minute window to knock out a few quick tasks. This helps you keep the little things from snowballing while you work on a big project.
Finally, setting a timer helps with time management. Everyone needs a break now and then, but it’s easy to allow a quick break to turn into an hour of getting off task. Decide how long of a break you want, set a timer and stick to it.
If timers work for you, you may want to checkout Flylady. I’ve used that method of home organization in the past and found it really helpful. It’s particularly helpful with establishing routines and taking everything in “baby steps” so you don’t get overwhelmed with the process.
Stop waiting
Do you ever find yourself doing nothing just waiting for something. Things like waiting tem minutes for dinner in the oven or sitting on hold on a phone call. Use waiting time that’s often wasted to knock easy tasks off your list.
Just do it
Sometimes there’s a task that I put off because I find it really unpleasant. Usually that leads to putting off other things, because that task is hanging over my head. Often it’s something simple like making a phone call to set up an appointment. There’s no way around getting some things done, so give yourself a minute to stress if you need and jump in. Once it’s done, you can mark it off your list and wonder why you put it off for so long. If it really was that bad, at least it’s done.
Reward yourself
Sometimes your accomplishments are their own reward, and sometimes not so much. Give yourself little incentives, even if it’s just ten minutes of playing a game, or a cup of tea and your favorite show. Knowing that something enjoyable comes after something unpleasant is motivating, especially after a “Just do it” task.
Not everything is as easy as just make a list and do it, but when you’re feeling overwhelmed, using these strategies where they do apply can help free up energy for dealing with the more difficult problems life throws at you.
Just because you might be at home more doesn’t mean you have more time to cook. Whether you’re working from home, helping virtual learners or homeschooling, it’s likely you’re just as busy as ever. I love using my electric pressure cooker for busy days. It’s like having someone cooking in the kitchen while I work on the million of other things needing done.
One of my favorite fast recipes is chicken and vegetable quinoa. It takes minutes to prepare, is super healthy and cooks fast, so it’s perfect for busy days. The basic recipe is really easy to customize, so it’s a good meal to use up odds and ends from the fridge.
Customizing your quinoa
Try it with beef, sausage, tofu, beans, eggs or skip the protein and add more vegetables. If you have leftover chicken, shred it and use it instead of raw chicken breasts.
If you have time to chop vegetables, clean out the produce drawer and use whatever you have on hand. Use up those veggies before they go bad!
Kale is another nice addition. Throw it on top before pressure cooking and stir it in at the end. Since it’s a hardier green, it holds up well to pressure cooking.
Change up the flavor by adding soy sauce, hot sauce or your favorite seasonings. For a mild dish, I like using poultry seasoning.
Don’t like quinoa? Use rice and adjust the cooking time based on your pressure cooker’s recommendations.
It’s easy to pack for lunches or take on picnics, too.
Instant Pot Chicken and Vegetable Quinoa is a quick, last minute dish that is great hot or cold. Customize it by swapping out the protein or vegetables depending on what you have on hand.
Prep Time15 minutesmins
Cook Time1 minutemin
Course: Main Course, Side Dish
Servings: 6people
Author: sophiecls418
Equipment
Electric pressure cooker, such as an Instant Pot
Ingredients
1tbspoilolive oil, coconut oil or preferred cooking oil
1 medium onion, diced
1cup chicken breast, cut into bite sized piecesCould also use pre-cooked, shredded chicken
1 cupfrozen mixed vegetables
2cupsquinoa
2cupschicken broth or water
salt and pepper to taste
Instructions
Turn the pressure cooker to "Saute" and add oil.
Add the onion and chicken if you are not using pre-cooked chicken.
Saute until the onion is translucent and chicken is browned.
Press "Cancel" to stop sauteing.
Add broth, quinoa and vegetables to pot and stir.
Add salt and pepper, if desired.
Lock the lid and set cooker to two minutes on high pressure.
Allow pressure to release naturally when done.
Fluff with fork and serve.
Notes
The great thing about this recipe is it is easy to customize. Try it with beef, sausage, tofu, or skip the protein and add more vegetables. If you have leftover chicken, shred it and use it instead of raw chicken breasts.Clean out the veggie drawer and use whatever you have on hand.Change up the flavor by adding soy sauce, hot sauce or your favorite seasonings.It’s easy to pack for lunches or take on picnics, too.
Like this post? To make sure you never miss a future post, please sign up for my newsletter.
Shop sales!
For the entire month of September, all of my handmade soaps are 20% off. Shop handmade soaps here.
My machine embroidery files are also on sale all month for just $1 each! Be sure to check out my latest Halloween designs. Shop embroidery designs here.
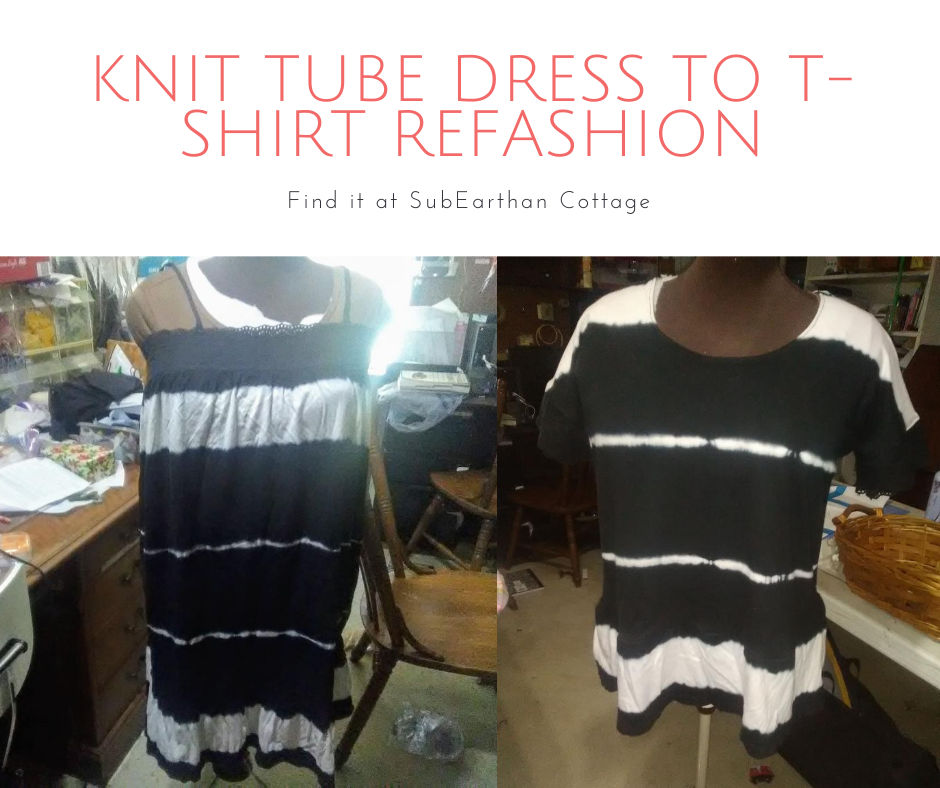
I’ve had two striped knit dresses in my refashion pile for about six months now. One black and white and one navy blue and white. The knit is soft, and I like the tie dye stripe, but the shape is basically a tube with a ruffle on the bottom. They are so unflattering, I don’t even want to wear them around the house. There’s a good amount of fabric in them, though, so I decided to try turn one of the knit tube dresses into a t-shirt.
Here’s the original shapeless dress. Excuse the background, please.
Knit tube dress to T-Shirt Refashion T shirt Process
I wasn’t sure what I would do at first, but I knew whatever it was wouldn’t need the straps, so I cut them off. I briefly considered leaving it close to as-is at that point and turning it into a skirt. It still wouldn’t have been very flattering, and I really don’t need any more casual skirts, so I moved on to other ideas.
T-shirts are always something I need, so that was my next direction. I didn’t take any process photos, so I’ll do my best to describe it. Refashioning always requires a little improvising based on what you have to work with, so consider this more as a guide than a complete how-to.
Turn the dress into fabric
I find it’s easiest to see what I have to work with when I’m looking at deconstructed pieces of fabric. Unless I think I’m going to use an element intact, I cut or rip out all seams and remove elements like buttons so that I can see how much fabric I have to use.
For this project, I cut off the black cotton eyelet band at the top and cut off the ruffle from the bottom before cutting off the side seams. I left the ruffle intact by cutting just above the seam that connected it to the dress because I thought it might come in handy. I chose to cut, rather than rip the seams, because the seams were narrow, so I wasn’t losing much fabric.
The Base Pattern
I thought about using a t-shirt as a pattern, but that doesn’t always work out as well. In my pattern files, I have a copy of the breezy tee from it’s always autumn, so I used that. I didn’t have enough fabric to make it exactly like the pattern, but it was a good starting point.
Laying it out
I squared up the main pieces of fabric and cut out the pattern. The fabric was too short for the pattern’s length, so I just focused on fitting in the top portion. I had to shorten the sleeves slightly because there wasn’t enough width.
Constructing the T-shirt
I serged (overlocked) the neckline folded it over and hemmed. I will probably regret not doing a banded neckline, because I’ve had hemmed necklines get wonky with wear. I can change it later if needed, though.
I serged the shoulder seams and then started thinking about the sleeves. The original pattern has pieces to create wide bands on the sleeves. I didn’t have enough scraps from the sides to create those bands. Instead, I decided to use the eyelet from the top of the dress. Honestly, I really wanted to use some of the ruffle to make flutter sleeves, but I figured that would be needed to add length.
I’m still not sure about this. I may remove it after wearing it a few times.
After attaching the eyelet, I serged the underarm and side seams, then straight stitched just inside the serged seam to reinforce.
The shirt was more of a crop top at that point, so I attached the ruffle to the bottom by serging and then straight stitching like I did on the side seams. Here’s the final result.
Finished, other than steaming the ruffle.
I like it, other than the eyelet on the sleeves. I’m not sure about that. It’s not tight, but it makes the sleeves snug. I’ll probably wear it a few times and decide if I just want to take it off altogether. Overall, though, it’s a cute t-shirt and definitely something more wearable than the original.
Like this post? To make sure you never miss a future post, please sign up for my newsletter.
I, Charity Sloan, am a participant in the Amazon Services LLC Associates Program, an affiliate advertising program designed to provide a means for sites to earn advertising fees by advertising and linking to Amazon.com. Any purchases through those links will result in my receiving a small percentage in commission.
This only refers to Amazon links found in/on my blog pages. All products in my shop are 100% mine and not linked to Amazon.
Prices are the same whether you click an affiliate link or a non-affiliate link, so you will not be charged more. Thank you for your support!