Posted on 3 Comments

Easy Instant Pot Chicken and Vegetable Quinoa

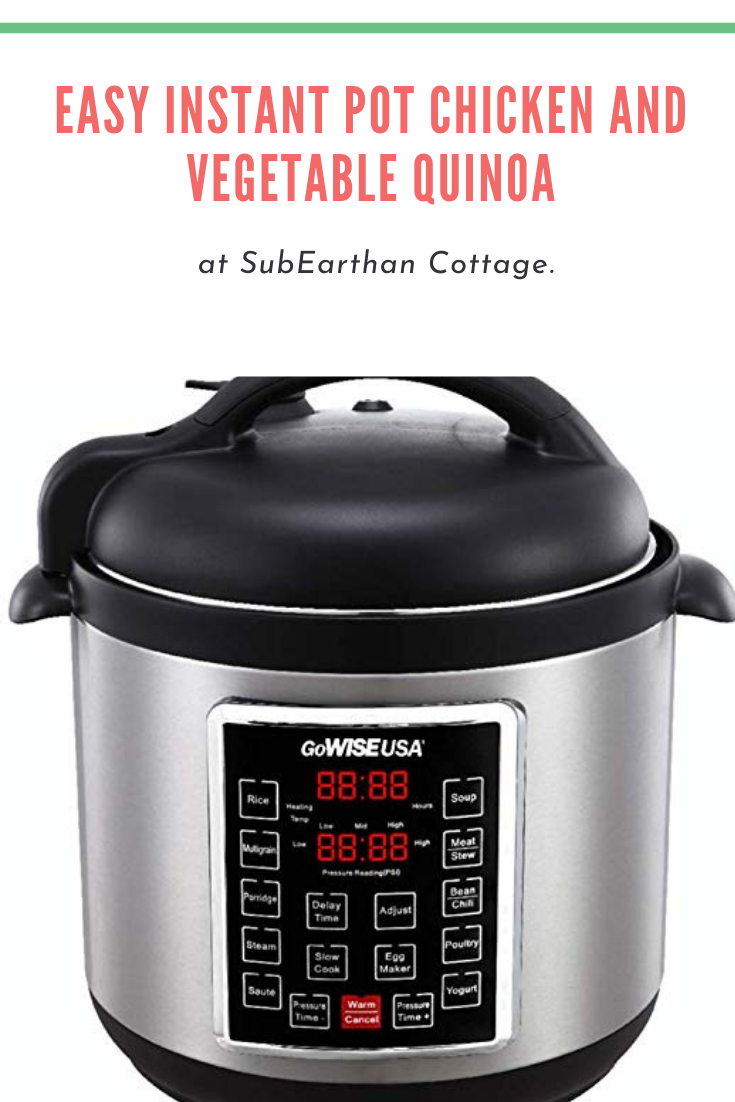
Just because you might be at home more doesn’t mean you have more time to cook. Whether you’re working from home, helping virtual learners or homeschooling, it’s likely you’re just as busy as ever. I love using my electric pressure cooker for busy days. It’s like having someone cooking in the kitchen while I work on the million of other things needing done. 

One of my favorite fast recipes is chicken and vegetable quinoa. It takes minutes to prepare, is super healthy and cooks fast, so it’s perfect for busy days. The basic recipe is really easy to customize, so it’s a good meal to use up odds and ends from the fridge.

Customizing your quinoa

  • Try it with beef, sausage, tofu, beans, eggs or skip the protein and add more vegetables. If you have leftover chicken, shred it and use it instead of raw chicken breasts.
  • If you have time to chop vegetables, clean out the produce drawer and use whatever you have on hand. Use up those veggies before they go bad!
  • Kale is another nice addition. Throw it on top before pressure cooking and stir it in at the end. Since it’s a hardier green, it holds up well to pressure cooking.
  • Change up the flavor by adding soy sauce, hot sauce or your favorite seasonings. For a mild dish, I like using poultry seasoning.
  • Don’t like quinoa? Use rice and adjust the cooking time based on your pressure cooker’s recommendations.

It’s easy to pack for lunches or take on picnics, too.

Chicken and vegetable quinoa

Instant Pot Chicken and Vegetable Quinoa

Instant Pot Chicken and Vegetable Quinoa is a quick, last minute dish that is great hot or cold. Customize it by swapping out the protein or vegetables depending on what you have on hand.
Prep Time15 minutes
Cook Time1 minute
Course: Main Course, Side Dish
Servings: 6 people
Author: Charity

Equipment

  • Electric pressure cooker, such as an Instant Pot

Ingredients

  • 1 tbsp oil olive oil, coconut oil or preferred cooking oil
  • 1 medium onion, diced
  • 1 cup chicken breast, cut into bite sized pieces Could also use pre-cooked, shredded chicken
  • 1 cup frozen mixed vegetables
  • 2 cups quinoa
  • 2 cups chicken broth or water
  • salt and pepper to taste

Instructions

  • Turn the pressure cooker to "Saute" and add oil.
  • Add the onion and chicken if you are not using pre-cooked chicken.
  • Saute until the onion is translucent and chicken is browned.
    Sauteing Chicken and Onion
  • Press "Cancel" to stop sauteing.
  • Add broth, quinoa and vegetables to pot and stir.
  • Add salt and pepper, if desired.
  • Lock the lid and set cooker to two minutes on high pressure.
  • Allow pressure to release naturally when done.
  • Fluff with fork and serve.

Notes

The great thing about this recipe is it is easy to customize. Try it with beef, sausage, tofu, or skip the protein and add more vegetables. If you have leftover chicken, shred it and use it instead of raw chicken breasts.
Clean out the veggie drawer and use whatever you have on hand.
Change up the flavor by adding soy sauce, hot sauce or your favorite seasonings.
It’s easy to pack for lunches or take on picnics, too.

Like this post? To make sure you never miss a future post, please sign up for my newsletter.

Shop sales!

For the entire month of September, all of my handmade soaps are 20% off. Shop handmade soaps here.

My machine embroidery files are also on sale all month for just $1 each! Be sure to check out my latest Halloween designs. Shop embroidery designs here.

Posted on 1 Comment

Grocery Staples for Easy Last Minute Meals

Even the best meal planners have days where things don’t go according to plan. Fast food is convenient, but usually more expensive and less healthy than what you can make at home. If you have any dietary restrictions, eating out safely can be extra challenging. For those nights, I like to keep a few staples on hand that make it easy to make a last minute meal that’s healthy and frugal.

Here’s my list of grocery staples I like to keep on hand for last minute meals, along with ideas for how to use them. Depending on your tastes, you may not find everything I use helpful. Since we eat gluten and dairy free, my list doesn’t include common staples like bread or cheese.

Grocery Staples for Last Minute Meals

Proteins

  • Flash Frozen Boneless, Skinless Chicken – I always have one or two bags of frozen chicken. Because they are individually frozen, it’s easy to separate out just what I need. The pieces don’t have to be thawed before cooking, so it’s perfect for a quick meal. I alternate between breasts, thighs and tenderloins.
  • Eggs – Eggs cook in minutes for when time is short.
  • Ground Beef – It’s easier to cook ground beef if it’s thawed, but it’s not impossible to cook it from frozen. I like using my electric pressure cooker if I need to cook it from frozen. Place it on a trivet, add about half of a cup of water to the pot and cook under high pressure for about 20 minutes. When it’s done, drain the water, remove the trivet and cook with the saute function with seasonings to remove excess moisture and finish it if it’s still a little pink in the middle.
  • Canned Beans – Dried beans are cheaper and don’t take that long with a pressure cooker, but sometimes you need something fast. Canned beans are a great plant-based protein for quick meals or for stretching left over meat in stews and chili.
  • Lentils – Dry lentils don’t have to be soaked and cook in about 20 minutes. I love this Coconut Lentil Curry from A Couple Cooks for a fast meal.

Vegetables

  • Frozen mixed vegetables – Perfect on their own as a side, or add to soups, rice dishes, scrambled eggs, curries, etc.
  • Onion – Sauteed onion adds lots of flavor to just about any meal.
  • Potatoes – Potatoes are great as an ingredient, a side or bake them and add toppings for a meal on their own.
  • Frozen greens – I like freezing chopped kale to add to soups and curries because it’s hardy and freezes well. Spinach or other greens work, too.

Grains

  • Rice – Nice to have as a side, with curry or stir-fry or to make a quick jambalaya or similar dish.
  • Quinoa – Cooks quickly in the pressure cooker and high in protein. Easy Instant Pot Chicken and Vegetable Quinoa is a quick quinoa based meal that is easy to customize and a great way to use up leftover meats and vegetables. You can also make it with rice with adjustments to the cooking time.
  • Pasta (I buy Aldi’s gluten free or Skinner brand gf at Kroger. ) – Cooks quickly and can be topped with a variety of sauces, tossed with sauteed vegetables and drizzled with olive oil or added to soups.
  • Tortillas or Taco Shells – These are especially handy because my kids love tacos. Putting anything in a taco shell increases the chances that they’ll eat it. Corn tortillas are also a cheap gluten free bread substitute.

Sauces and Seasonings

  • Simmer Sauces – These are the closest thing I use to hamburger helper. All you need is the sauce, a protein, a vegetable and rice for delicious last minute meals. Find a variety you like and turn it into an all in one meal if you have an electric pressure cooker if you’re super busy. This is one of my favorite places to use the frozen chicken. I cook it all together and cut up the chicken into bite sized pieces before serving. While it’s cooking in the pressure cooker, I’m free to catch up on housework or whatever else needs done.
  • Curry Paste – I love the flavor of curry, and adding curry paste to a dish is a way to add a ton of flavor.
  • Bouillon – Bouillon is another way to add flavor with little effort, or use it to make broth in a pinch.
  • Canned Coconut Milk – I can usually work around this ingredient with whatever milk or broth I have on hand, but I prefer it for curry.
  • Tomato Sauce and/or paste – Add to soup, stew or chili, or make a marinara sauce for pasta.
  • Salsa – serve as a condiment or add to chicken, ground beef or beans during cooking for flavor.
  • Commonly Used Herbs and Spices – My staples are salt, black pepper, chili powder, cayenne, cumin, basil, oregano, garlic powder, and poultry seasoning. There’s plenty of others I keep around as well, but those are the ones that I use almost daily.

Last Minute Meal Ideas

I’ve provided a few specific recipes above. Really, though, as long as I have one or two things from each category handy, I can combine them to come up with delicious last minute meals. Here’s a few more of my go-to combinations:

  • Season and oven bake the chicken. Serve with vegetables and rice.
  • Saute onion using whatever oil or butter I have available until translucent, then add chicken and a little broth. Simmer until the chicken is cooked through. Cut into bite sized pieces and add a spoonful of curry paste, vegetables and a can of coconut milk. Heat until the vegetables are done, being careful not to boil. Serve over rice.
  • Saute onion in a skillet and toss in a handful of frozen greens. Once the greens are thawed, add whisked eggs and scramble.
  • Brown ground beef (or pressure cook) add onion and cook until the onion is translucent. Add tomato sauce, basil, oregano, garlic and a little salt. If you like your sauce thicker, add some tomato paste. To cut the acidity, add a spoonful of brown sugar. Serve over pasta. You can also make it with chicken, canned white beans, or skip it and just have the sauce and pasta.
  • Pressure cook ground beef and season with salt, garlic powder, chili, cumin and cayenne. Make Mexican rice ( I use this recipe). Serve with canned black beans or refried beans and salsa. You can make tacos with the meat if you have tortillas or taco shells, or just have the meat on the side or atop the rice. Shredded lettuce, shredded cheese and diced onion all make it even yummier, but if you’re limited to what’s on hand, it’s still yummy without.

What are some of your favorite last minute meals? I’d love for you to share them in the comments.

Like this post? To make sure you never miss a future post, please sign up for my newsletter.

Posted on 1 Comment

Gluten Free Biscuits (Dairy Free, Too!)

Biscuits are one of the hardest things to make gluten free. Most of my gluten free biscuit attempts turn out flat, hard and dry. After much searching, I finally found a recipe that yielded something like the fluffy biscuits we’ve craved since eliminating gluten.

You can find the recipe at Mama Knows Gluten Free here. Audrey at Mama Knows Gluten Free suggests using Pilsbury gluten free flour. I haven’t found it nearby, so I used my preferred Bob’s Red Mill 1 to 1 flour. It does result in a wetter dough, so I use a little different technique for shaping the biscuits. She also gives some info on different gluten free flours and how to make ahead and freeze.

Recipe adjustments for gluten free biscuits

Single biscuit

Xanthan gum

In the original recipe, it says to only add xanthan gum if your flour doesn’t already have it. Bob’s Red Mill 1 to 1 flour does have xanthan gum. Lately, though, I’ve noticed that for fluffier types of breads, it doesn’t seem to be enough. I want light, fluffy biscuits, so I added the full amount of xanthan gum anyway.

Dairy free

The original recipe gives instructions on how to make it dairy free, so I didn’t have to make my own adjustments. I used unsweetened almond milk and vinegar in place of the buttermilk as suggested. For the butter, I used vegetable shortening. If you have a kitchen scale, one trick to making shortening easier to measure is to use weight instead of measuring and scraping out one tablespoon of shortening at a time. One tablespoon of shortening is equal to 0.42 ounces or 11.94 grams. Multiply that number by the number of tablespoons you need to get the weight amount.

Shaping the dough

In order to limit handling the dough and overworking it, I shaped my dough on the parchment paper. Since my dough was pretty wet, I generously dusted the paper and my hands with flour. Like the original directions state, I patted and folded rather than rolled out the dough.

Instead of cutting with a biscuit cutter, I just cut straight lines with a sharp knife to form square biscuits. That way, I wouldn’t have to reshape the dough to cut more biscuits. Less handling is better. I also trimmed a tiny amount from the edges so that all the edges were cut like they would be with a biscuit cutter. This allows the biscuits to rise evenly. If you do it this way, the trick is to cut with a straight up and down motion, not a sliding motion. Sliding the knife would seal the edges and prevent them from rising.

Gluten free biscuits in a big block
Double batch of gluten free biscuits before I separated them.

Baking

Rather than move the biscuits by hand to a greased pan, I slid the whole parchment paper with the biscuits onto a baking sheet. The parchment provides a nonstick surface. If you’ve cut through the dough completely, they will bake perfectly like that. I had a little healper this morning, so I can tell that we didn’t quite cut all the way through in some areas and the biscuits stayed a little doughier in those areas. To help with that, I separated them when they were almost done and baked them for a few minutes longer.

My biscuits did take a about 25 minutes to bake, so just a bit longer than the original. I’m not sure if that is because of how close together they were or just my oven. I usually set my oven a notch lower than the suggested temperature because it bakes hotter than it says. Sometimes I overcompensate, though.

All in all, these biscuits satisfy our biscuit cravings and are good enough to serve to my non-gluten free friends and family. Give it a try and let me know what you think.

Like this post? To make sure you never miss a future post, please sign up for my newsletter.

Posted on 1 Comment

Flavoring Your Kombucha Tea

When you get your homebrew timing right, kombucha is pretty yummy on it’s own. Sometimes you want something a little different, though. Or maybe straight kombucha just isn’t your thing but you still want the probiotic benefits. Luckily you can easily change the taste of your kombucha to make it more palatable or fix a soda craving. Here’s my tips for flavoring your Kombucha tea.


Mixing with juice


The simplest way to flavor kombucha is to mix it with juice or another beverage. This is a great way to get started drinking kombucha. To start, add 1-2 ounces of kombucha to a glass of your favorite juice. As your body and tastes adjust to drinking kombucha you can increase the kombucha to juice ratio.


I like to dilute 3-4 ounces kombucha with sparkling or still water, add a splash of lemon or lime juice and a bit of stevia. This makes a refreshing summer drink when served over ice.

Kombucha is also nice as an add in for smoothies. It can be fizzy on it’s own, though, so make sure to account for that when adding it to blended drinks. Leaving a little extra headspace in the blender is a good idea. Or, stir it in after everything else is blended.

Flavoring your Kombucha Tea
Flavored with peach and cherry teas in a second ferment.

Flavoring your Kombucha with a second ferment

You can also add flavoring in a second, shorter ferment. Basically you’ll put your flavorings in a bottle or jar (I like canning jars), fill almost to the top with your brewed kombucha and cap the jar. Leave at room temperature for 2-4 days and then refrigerate or drink.


The second ferment can increase the carbonation in your kombucha, so it’s a good idea to be cautious when opening and storing the jars. I’ve never had a jar break from the pressure, but I have had the metal disks on canning jar lids pop up in the middle. If I think too much pressure is building up, I “burp” the jars by opening them just enough to release some of the pressure and recap.

There’s a variety of things you can add for the second ferment. Really, any herbs, spices or fruits can be added. If you want to increase the carbonation, add a little bit of sugar, honey, raisins or a sweet fruit. My favorite thing to do is put enough orange peel to fill the jar halfway, add a teaspoon of sugar or honey, top with kombucha and let it sit for two days. It makes a kind of healthier orange soda and uses something that would normally have been tossed.

Flavoring your Kombucha orange and honey
Orange peel and honey Kombucha

Other flavorings I’ve tried:

  • Lemons and limes cut into wedges, sliced or just the peels. You can also use a lemon or lime half after juicing it for another recipe.
  • Fresh sliced ginger, plain or with a dash of chai spice and squirt of honey.
  • Fruit flavored herbal teas, one bag per quart jar.
  • Blueberries.

If you brew your own Kombucha tea, I would love to hear your tips for flavoring your Kombucha. Please share them in the comments below.

Next week I plan to do a FAQ/kombucha myths post. If you have any questions please share them in the comments and I’ll do my best to answer them.

Like this post? To make sure you never miss a future post, please sign up for my newsletter.


Posted on 1 Comment

What’s for dinner? Crock Pot Lentil Soup

Before I got my electric pressure cooker, I used my crock pot a few times a week at least. This lentil soup recipe is quick to throw together and made primarily from pantry staples. I originally shared it in 2011, but with more people needing easy, simple meals, I thought it was worth re-sharing.

I love my Crock pot. It’s almost like having someone else cooking for me. Tonight it’s making a simple, Lentil Soup. I got the basic recipe here. I doubled it to have plenty of leftovers and made a few substitutions.

Lentil Soup (makes 8-ish servings)

Ginger, ground, 2 tbsp
Turmeric, ground, 2 tsp
Cumin seed, 2 tbsp
Vegetable oil, 1 tbsp
Curry powder, 2 tsp

Lentils, 2 cups
cilantro 1.5 tbsp
Chicken bouillon, 10 cubes (or broth equivalent)
Water, 12 cups

Add the Ginger, Turmeric, Cumin, Oil and Curry to the Crock pot. Cook on high heat for a few (I did 5ish) minutes. Add everything else and cook on high for 4-5 hours or low for 6-8 hours.

Serve with a nice green salad and bread.

Shop update: Freebies and a sale

Knowing that so many are stuck at home right now needing distractions, I’ve decided to make all of my machine embroidery design files free until April 30. That’s the day my area’s shelter in place order expires. If it is extended, I’ll extend the embroidery design freebies, too. If you make something with one of my designs, I would love to see it.

Damask Rose embroidery file available here.

My full shop is still open, and will be as long as everyone in my household is healthy. I’m using extra care with handwashing and using hand sanitizer before coming into contact with products and packaging as well.

All of my handmade soaps are currently on sale for 20% off. You can find them here.

Like this post? To make sure you never miss a future post, please sign up for my newsletter.

Posted on Leave a comment

Continuous Brewing Your Kombucha Tea

Making Kombucha using the continuous brewing method means you’ll always have plenty of Kombucha ready to drink or flavor in a second ferment. Here’s how to do it.

Supplies for continuous brewing

In addition to the basic Kombucha ingredients listed here, you’ll want to have a jar with a spigot. There’s some debate over the best materials for the jar and spigot. The biggest thing to watch for is something non-metallic, although I think I’ve heard stainless steel is okay. Most people like to avoid plastics to prevent any weird chemicals from leeching into the KT. I went with the cheapest, most available option of a glass sun tea pitcher with a plastic spigot.

Continuous brewing kombucha


Keep about half of the finished KT and the SCOBY in the jar and bottle the rest. Brew about half a gallon of tea. I use two black tea bags, one green tea bag and one half to one cup of sugar. Let it cool and add it to the jar with your finished KT and SCOBY. Since you replaced half of the KT, you’ll want to wait a couple of days before drinking from the new batch. After that, you can drink some fresh from the tap every day. Just replace what you drink with fresh sweet tea. Because you are only adding a small amount of fresh tea in relation to the KT, you can drink a little every day without the wait time. I like to keep a small pitcher of sweet tea in the refrigerator to replenish what gets taken out each day.

Like this post? To make sure you never miss a future post, please sign up for my newsletter.


Posted on Leave a comment

Instant Pot Electric Pressure Cooker Recipe Roundup

My electric pressure cooker is such a lifesaver when it comes to getting fast, healthy meals ready. It’s almost like having someone else do the cooking. With so many working from home with kids right now, those minutes saved in the kitchen are valuable. Here’s five of my favorite electric pressure cooker dinner recipes.

1
honey glazed chicken and peppers
Honey Glazed Chicken for Electric Pressure Cookers like the Instant Pot
This honey glazed chicken is made in an electric pressure cooker with just minutes of prep. Sweet and juicy, it will satisfy even picky eaters.
Check out this recipe
2
Mushroom Brown Rice
Mushroom Brown Rice for Instant Pots or other Electric Pressure Cookers
Rich, earthy mushrooms in nutty brown rice make this work as a side dish or, serve with a salad to make it a meatless main course. Makes 6-8 servings.
Check out this recipe
3
Instant pot whole chicken
Electric Pressure Cooker (Instant Pot) Whole Chicken and Potatoes
This is my method for cooking a flavorful whole chicken and potatoes in an electric pressure cooker. After a little prep work, you can walk away and let the pressure cooker do it's job without having to check on it or worry about overcooking. I'm using an 8 quart electric pressure cooker. If yours is smaller, you may need to adjust the size of the chicken and other ingredients accordingly.
Check out this recipe
4
Sausage Potato Soup
Dairy and gluten free sausage potato soup inspired by Olive Garden's zuppa toscana. I prefer making it in my electric pressure cooker but it could easily be done in a slow cooker or on the stove top.
Check out this recipe
5
Instant Pot Chicken and Vegetable Quinoa
Instant Pot Chicken and Vegetable Quinoa is a quick, last minute dish that is great hot or cold. Customize it by swapping out the protein or vegetables depending on what you have on hand.
Check out this recipe

Shop update: Freebies and a sale

Knowing that so many are stuck at home right now needing distractions, I’ve decided to make all of my machine embroidery design files free until April 30. That’s the day my area’s shelter in place order expires. If it is extended, I’ll extend the embroidery design freebies, too. If you make something with one of my designs, I would love to see it.

My full shop is still open, and will be as long as everyone in my household is healthy. I’m using extra care with handwashing and using hand sanitizer before coming into contact with products and packaging as well.

All of my handmade soaps are currently on sale for 20% off. You can find them here.

Like this post? To make sure you never miss a future post, please sign up for my newsletter.