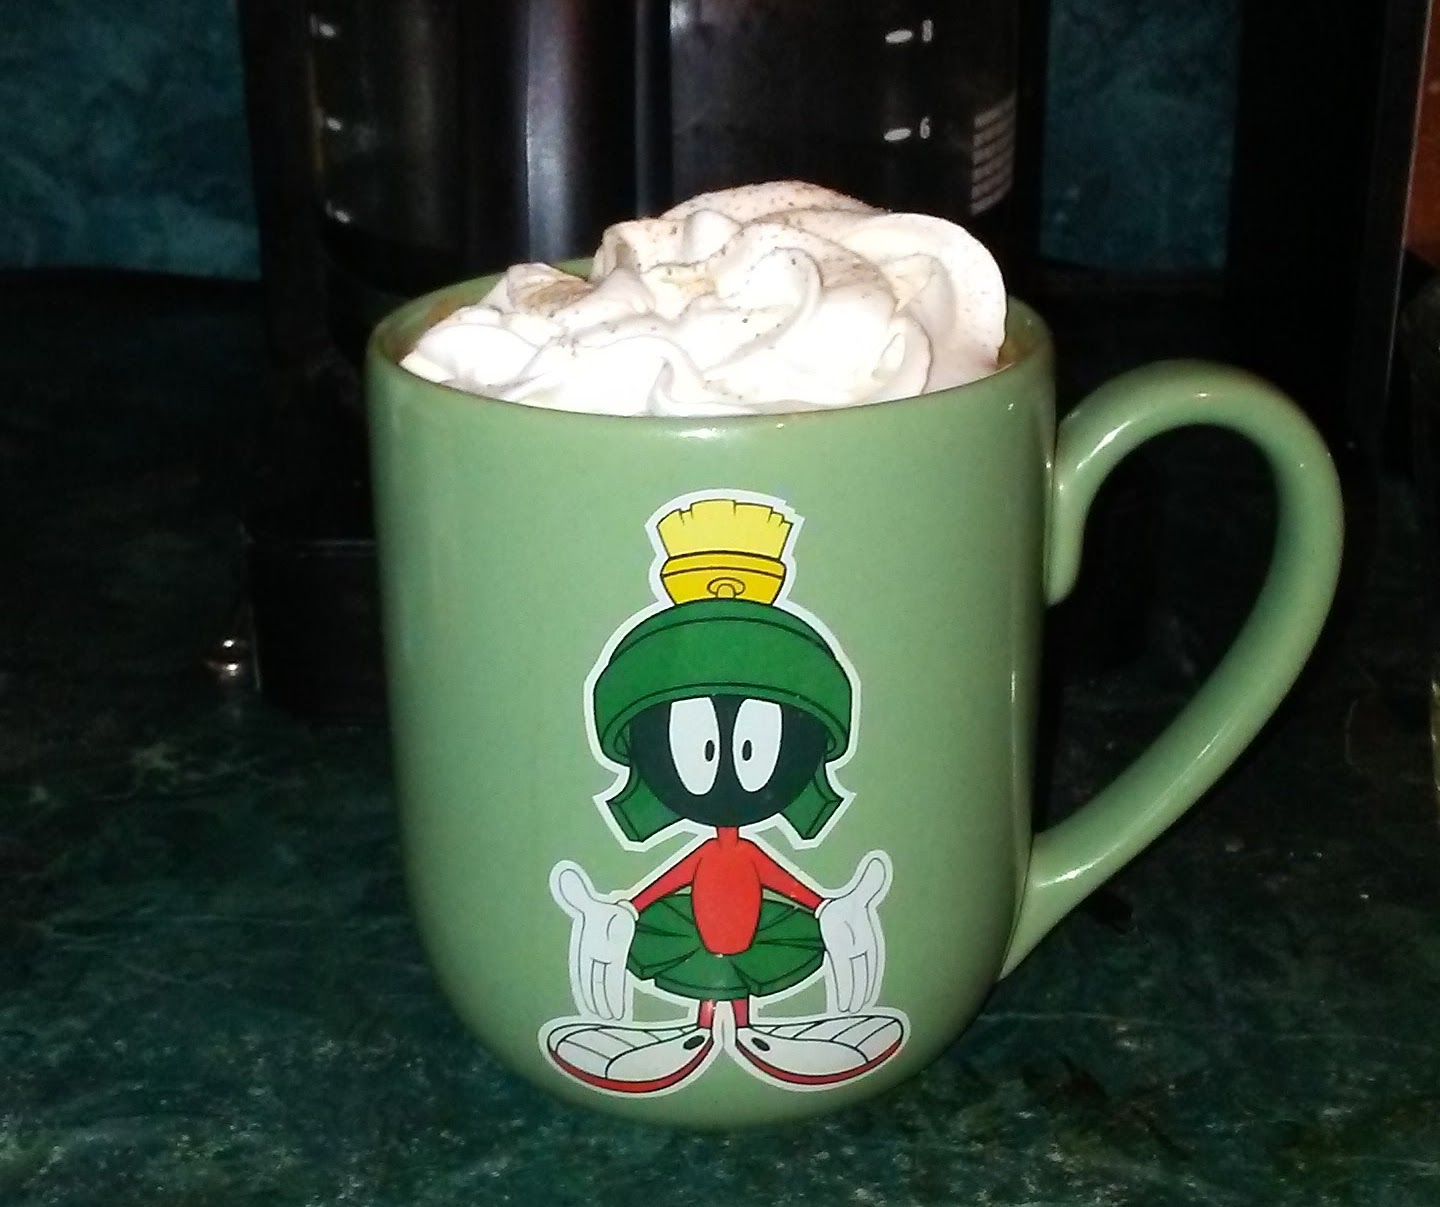
I know it’s still about a million degrees outside. I don’t care. I’m ready for cool breezes, for crunchy leaves, flannel shirts and all things pumpkin. As someone who runs off copious amounts of caffeine, my favorite way to enjoy pumpkin is a hot Pumpkin Spice Latte. Here’s my favorite recipe to make a pumpkin spice latte myself when a store-bought latte is too much of a splurge, or I just don’t want to leave the house. You can make it with tea, coffee or turn it into a smoothie for a healthy, frugal way to enjoy pumpkin spice at home.
2-3 tablespoons of milk (original recipe called for coconut. I usually use almond milk. You can use whole milk, too.)
1/3-1/2 teaspoon cinnamon
1/8 teaspoon cloves
¼ teaspoon ginger
1/8 teaspoon allspice
1/8 teaspoon nutmeg
Optional: a dash to 1/8 teaspoon of turmeric
Maple syrup, sugar or honey to taste. I like maple syrup.
To make:
Blend all ingredients together. Top with whipped cream and a dash of nutmeg. Enjoy. Repeat. 🙂
I’ve also used this basic recipe to make a pumpkin spice smoothie. All you do is swap out the coffee for the milk of your choice and add a frozen banana or a fresh banana and some ice. While it’s healthy as is, I also like to add an extra spoonful of pumpkin to up the vitamin content, as well as some chia or flax seeds. You could easily leave those out, though.
With just a few simple ingredients, you can make a yummy pumpkin spice latte inexpensively at home. I've included variations for a chai latte and smoothie, too! The recipe serves one or two, depending on how much coffee you drink. 😉
2-3Tablespoons Milk of choice.I usually use almond milk.
1/3-1/5Teaspoonground cinnamon
1/4Teaspoonground ginger
1/8Teaspoonground cloves
1/8Teaspoon ground allspice
1/8Teaspoonground nutmeg
1/8Teaspoonground tumeric (optional)
Maple syrup, sugar or honey to taste.
Whipped Cream (optional)
Instructions
Blend all ingredients together.
Top with whipped cream and a dash of nutmeg. I like the non-dairy Reddi-Wip
Enjoy.
Notes
I’ve also used this basic recipe to make a pumpkin spice smoothie. Just swap the coffee or tea for the milk of your choice and add a frozen banana or fresh banana and ice. Blend thoroughly. While it’s healthy as-is, I like to add an extra spoonful of pumpkin to up the vitamin content, as well as some chia or flax seeds. You can easily leave those out, though.
What’s your favorite way to enjoy pumpkin spice? If pumpkin spice isn’t your thing, what’s your preferred fall drink or scent? Please share it in the comments.
Like this post? To make sure you never miss a future post, please sign up for my newsletter.
Many people eat gluten free (g-free, gf), either by choice or need. For those with celiac, eliminating gluten is an absolute necessity. Others find that, for one reason or another, they feel better when they avoid it. In my case, I kind of accidentally discovered that joint pain in my hands and feet go away and I’m less brain foggy when I avoid gluten. Other family members suffer from breakouts and rashes that flare whenever they eat something with gluten. I strongly believe that if you feel bad after eating something, you should probably stop eating it, so we do our best to avoid gluten all together.
Eliminating something that is such a big part of your diet is daunting at first, but there are a few things that can make the transition easier and less expensive. These tips focus on gluten, but many will also help if you need to eliminate other foods.
1. Start with real foods
Processed foods often have hidden fillers and ingredients, and specialty gluten free foods are expensive. In contrast, fruits, vegetables, meat, nuts, beans, eggs and dairy are naturally gluten free in their pure forms. Rice is a grain that does not contain gluten. Starting from scratch with real food ingredients that you know naturally don’t have gluten is often easier and definitely cheaper than scrutinizing food labels and buying special gluten free versions of normally wheat based foods.
For the most part, single herbs and spices are gluten free. Certain spice blends may have gluten, though. Making your own blends is the safest bet, but if you have a spice blend you love, most manufacturer websites list whether their products contain gluten.
While not technically an herb or spice, most soy sauce contains gluten. La Choy is a major brand that is made without gluten. Bragg’s liquid aminos are another form of g-free soy sauce.
Most vinegar is g-free. Malt vinegar is not. You’ll also want to check the label on flavored vinegar to be sure.
Cooking oils don’t have gluten unless seasoned with something containing gluten.
3. Find your current gluten free staples
Look at the foods that currently stock your pantry. What things that you buy are already gluten free? For us, we usually keep a box or two of cereal around for snacking or a quick breakfast. Most cereals are made with wheat and therefore have gluten, but some that we already bought, like Honey Nut Cheerios, Lucky Charms and Rice Chex are gluten free. Knowing that, I can continue to keep a box or two of cereal we already liked on hand.
Likewise, we keep tortilla chips on hand for snacking or nachos. Most tortilla chips don’t have gluten and inexpensive. Since gluten free crackers are both hard to find and usually expensive, tortilla chips are an easy cracker substitute as well.
4. Look for the easy substitute
Like substituting tortilla chips for crackers, there are other easy swaps. Corn tortillas usually don’t have gluten and can be substituted for flour tortillas. Rice is often a good substitute for pasta, or substitute rice noodles. If you have an Asian grocery nearby, you can usually find rice noodles there for cheaper than a mainstream supermarket, as well as leafy greens and spices for cheap.
5. Make it yourself
It’s fairly easy to find gluten-free flour now, so making your own gluten free cookies, pizza crusts, pancakes, breads, etc. is a good option. I love Bob’s Red Mill 1 to 1 gluten free flour. With it, I can continue to make my favorite deserts just by substituting it for wheat flour. There are other good gluten free flours on the market, too. The most important thing is to know if it is blended to be an exact 1 to 1 substitute or if you need to add something like xanthan gum to give it the stretchiness and rise that you usually get from gluten. For example, Bob’s Red Mill has an All Purpose Gluten Free Flour that is not the 1 to 1 blend. It is a little denser and does not have xanthan gum already blended. I like blending it with tapioca flour, which adds some stretchiness. That works well for things like gluten free flour tortillas. For things that need to rise, though, like cakes or breads, I also add xanthan gum if I’m using the all purpose and not the 1 to 1 blend.
6. When buying gluten free, shop around
Sometimes you really just want to get some gluten free penne pasta or a g-free bagel. More and more grocery stores regularly stock g-free pastas, breads and desserts, but they can be pricey. If you find them on sale, stock up and freeze the extras. Alternative grocery stores sometimes offer better prices, too. Aldi has a decent selection of g-free breads, pastas, and baking mixes at a lower price than most other stores. I even found some gluten free donuts there recently.
Locally, we have a surplus/discount/closeout grocery store called Town Talk. They frequently have udi’s bread in the range of two loaves for $3.00. I periodically stop in and stock up when I can.
To make sure you never miss a post, please sign up for my newsletter.
If you click through any of the Amazon links and make a purchase, I will receive a small commission. There is no added cost to you.
In my Tips to Save Money on Food post, I mention buying ham on sale after the holidays. I love cooking a ham at the beginning of the week. It provides sliced ham for a few meals. Then I cook a pot of red beans or pinto beans with what’s left of the meat and the ham bone for lots of flavor and richness.
Sometimes that gets boring, though. After cooking a ham on Sunday, I wanted something to use some of the ham that was different but easy. I also needed something that used ingredients I already had on hand. A quick internet search found this delicious Potato Ham Soup shared by Sandy at Simply Happy Foodie. It’s written for one of my favorite appliances, the electric pressure cooker, and uses basic ingredients that are common kitchen staples.
Since this isn’t my recipe, I’m linking to the original at Simply Happy Foodie. I made a few changes to the original to make it gluten and dairy free. I also had to make a few adjustments to make it work with what I had on hand. Those I will share here.
Potato Ham Soup hacks
In place of milk or cream, I used coconut milk to make it dairy free. Almond or cashew would probably work well, too.
For the flour, I subbed an all-purpose gluten free flour blend. Cornstarch also works well as a gluten free thickener. I would recommend reducing the amount of cornstarch to 1-1.5 tablespoons, though, because, to me, cornstarch gives things a different flavor.
I had russet potatoes on hand, so that’s what I used.
The recipe called for thyme. I’m out, so I added poultry seasoning instead.
The original recipe suggested cheese as an add-in. To add a little cheesy flavor without dairy, I sprinkled in about a tablespoon of nutritional yeast.
That’s it. This soup is a great way to use up leftover ham. With an electric pressure cooker it’s done in under an hour, start to finish. Check it out at Simply Happy Foodie, and if you need a gluten-free or dairy-free option, use the adjustments I’ve shared here.
Like this recipe hack? Sign up for my newsletter to never miss a post.
Clearance
Clearing out to make room for new products. Everything listed here is at least 50% off the original price. If you see something you like, get it now before it sells out.
It’s my birthday on Saturday (yes, April Fool’s, I know, lol). If you use coupon code April2023 you’ll get 20% off your entire order at SubEarthan Cottage. Valid on regular and sale-priced items through April 3, 2023.
And, since birthday’s are weird without cake, here’s my favorite allergen-friendly chocolate cake recipe.
This is a simple chocolate cake recipe that is super easy. It is dairy-free, egg-free, and if you swap the wheat flour for a gluten-free flour blend, it's gluten-free, too! To make it gluten free, I like Bob's Red Mill 1 to 1 gluten free blend because it already contains xanthan gum. If you use a different gluten-free flour without xanthan gum, I would add about 1-1.5 teaspoons of xanthan gum.To top, make a simple buttercream (with shortening and non-dairy milk to keep it non-dairy) or use your favorite store bought frosting. You could also sprinkle the warm cake with dairy-free chocolate chips, let them melt a little, then spread across the top for a rich, chocolaty treat.
Prep Time10 minutesmins
Cook Time35 minutesmins
Course: Dessert
Keyword: 9 x 13, cake, chocolate, dairy free, easy, egg free, gluten free, one bowl, simple
Servings: 292×2 inch servings
Equipment
9 x 13 rectangle pan
Ingredients
3CupsFlour see recipe summary for gluten-free adjustment
1teaspoonsalt
2teaspoonsbaking soda
2cups sugar
6tablespoonscocoa powder
2tablespoonsvinegarwhite or apple cider vinegar
1cup vegetable oilany light flavored liquid vegetable oil is fine
2cups cold water
2teaspoonsvanilla
Instructions
Preheat the oven to 375 degrees Fahrenheit
Grease the 9 x 13 inch pan, either with shortening, butter, or cooking spray
Combine the first five (dry) ingredients in a large mixing bowl and mix until evenly blended. Alternatively, sift them together into the bowl.
Add the remaining (wet) ingredients and mix until thoroughly blended. You can use a spoon or an electric mixer.
Pour the batter into the greased 9 x 13 inch pan.
Bake at 375 degrees Fahrenheit for 35 minutes or until a toothpick inserted near the middle comes out clean.
Notes
I frosted this cake with buttercream tinted blue, then used gel food coloring to paint the faces. I then piped buttercream for the eyes, facial features, outlines, writing and trim. I clearly am not a trained cake decorator, so I can’t really say which tips I used or any other details.
Like this post? To make sure you never miss a future post, please sign up for my newsletter.
With freezing temperatures and possible snow in the forecast, it seemed like the perfect time to revisit this delicious sausage potato soup recipe.
I love the slightly spicy, creamy Zuppa Toscana soup from Olive Garden. Since going gluten-free and dairy-free, Zuppa Toscana and pretty much anything Olive Garden are out of the question. With the cold weather, though, I really crave soups. I made some potato soup a few days ago that was yummy, but just not the same. Today I realized I happened to have everything I needed to attempt a sausage and potato soup very much like Zuppa Toscana.
It doesn’t have quite the same creaminess due to substituting almond milk. Cashew milk is a creamier substitute, but I didn’t have any on hand. For a first dairy-free attempt, it turned out pretty darn close.
I made my sausage potato soup in my electric pressure cooker. You could easily make it in a slow cooker or on the stove top, but I like how the pressure cooker really develops the flavors, similar to cooking in a slow cooker but without the long cook time. I also love that I can use the saute function on my pressure cooker to brown the sausage. This prevents having to dirty a skillet, like I would if I used a slow cooker.
Dairy and gluten free sausage potato soup inspired by Olive Garden's zuppa toscana. I prefer making it in my electric pressure cooker but it could easily be done in a slow cooker or on the stove top.
Electric Pressure Cooker, unless cooking on stove top or slow cooker.
Ingredients
1lb Ground Sausage
3-4 Largish potatoes, sliced
1medium Onion, dicedWhite or yellow.
2-3 cups Kale, torn or chopped.Could substitute spinach or other greens.
6-8 cups Chicken broth (gluten-free if desired)You want enough to cover the rest of the ingredients in the pot without too much over.
2cups Almond or Cashew milk
Salt to taste
Crushed red pepper to taste
1tbspolive oil
Instructions
Select the "Saute" function on the pressure cooker.
Add the olive oil and brown the sausage.
Add the onion a few minutes before the sausage finishes browning to soften.
When the sausage is browned, turn off the "Saute" function.
Add the potatoes, kale, broth and seasonings. Do not add the almond or cashew milk yet.
Lock the pressure cooker's lid in place and select the "Soup" function. I used the 30 minute function.
After the cooking is complete, either wait for pressure to naturally release or CAREFULLY do a manual release. Soups spray and spatter if you immediately try to release the pressure, so I recommend waiting at least ten minutes if you are going to manually release the pressure.
Add the almond/cashew milk and stir. The soup should be hot enough to heat the milk addition without additional cooking.
Enjoy!
Notes
I don’t really measure recipes like this, so most measurements are approximate.The stove top instructions are basically the same. Brown the sausage in a big soup pot, add the ingredients except the milk and simmer for around thirty minutes. Add the milk and serve. For the slow cooker, brown the meat on the stove, add everything but the milk to the slow cooker and cook on low for 4-6 hours. Add the milk and serve.
Please leave a comment if you try this and let me know how it turns out. If any of my instructions need clarification, don’t hesitate to ask in the comments, too.
For more electric pressure cooker recipes and tips, click here. To stay up to date on SubEarthan Cottage happenings, please sign up for my newsletter.
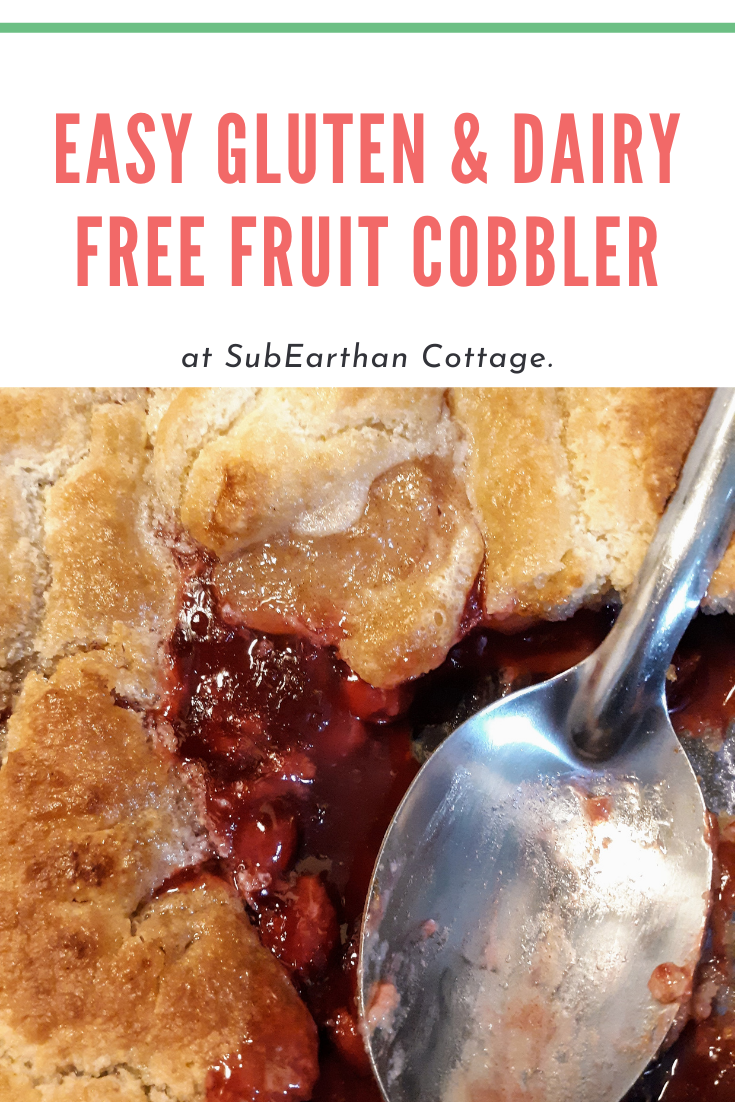
This fruit cobbler is easy to make and uses mostly pantry staples. From start to finish, you’ll have a delicious cobbler in under an hour. If you aren’t gluten or dairy free, I’ve included the ingredients for that, too!
Bob’s Red Mill 1 to 1 Gluten Free flour blend* is my favorite for baking, but I’ve used others with success, too. If you use a blend that doesn’t have xanthan gum or something similar, I do recommend adding probably about 1/4 of a teaspoon of xanthan gum as well.
The assembly and not stirring part seems a little weird, but trust the process. My oven runs hot, so I start checking it after about 40 minutes. Sometimes different flour blends can make a difference, too, so the first time you make it, I recommend checking it early. When the top is golden and just starting to brown around the edges, it’s done. Enjoy!
This fruit cobbler is easy to make and uses mostly pantry staples. From start to finish, you'll have a delicious cobbler in under an hour. If you aren't gluten or dairy free, I've included the ingredients for that, too!
0.25cupcoconut oilOr your preferred butter substitute, or just butter if you eat dairy.
1cup gluten free flour blend I like Bob's Red Mill 1 to 1 Gluten Free flour blend. Use regular flour if you're not gluten free.
1cupalmond milkOr your preferred plant milk, or just milk if you eat dairy.
1tspbaking powderI accidentally used a tablespoon once and it came out a little fluffier. I haven't decided which I prefer, so experiment and see what you like.
1 cup sugar
1canfruit pie filling (20 oz)Cherry is my favorite, but apple and blueberry are really good, too.
1 tspvanilla extractOptional, but I add vanilla to just about everything sweet.
Instructions
Heat oven to 350 degrees F.
Add coconut oil or substitute to a 2 quart baking dish and place in the oven to melt. I do this even if the oil is already liquid to warm it up.
Meanwhile, combine the dry ingredients in a mixing bowl.
Add the milk and vanilla (if using) to the dry ingredients and mix thoroughly.
When the oil or butter is melted, add the batter to the baking dish. DO NOT STIR.
Pour the fruit pie filling on top of the batter. Again, DO NOT STIR.
Bake for about 50 minutes at 350 degrees.
Notes
The assembly and not stirring part seems a little weird, but trust the process. My oven runs hot, so I start checking it after about 40 minutes. Sometimes different flour blends can make a difference, too, so the first time you make it, I recommend checking it early. When the top is golden and just starting to brown around the edges, it’s done. Enjoy!
Like this post? To make sure you never miss a future post, please sign up for my newsletter.
*Note: If you make a purchase through this Amazon link, I will receive a small commission. It doesn’t change the cost to you.
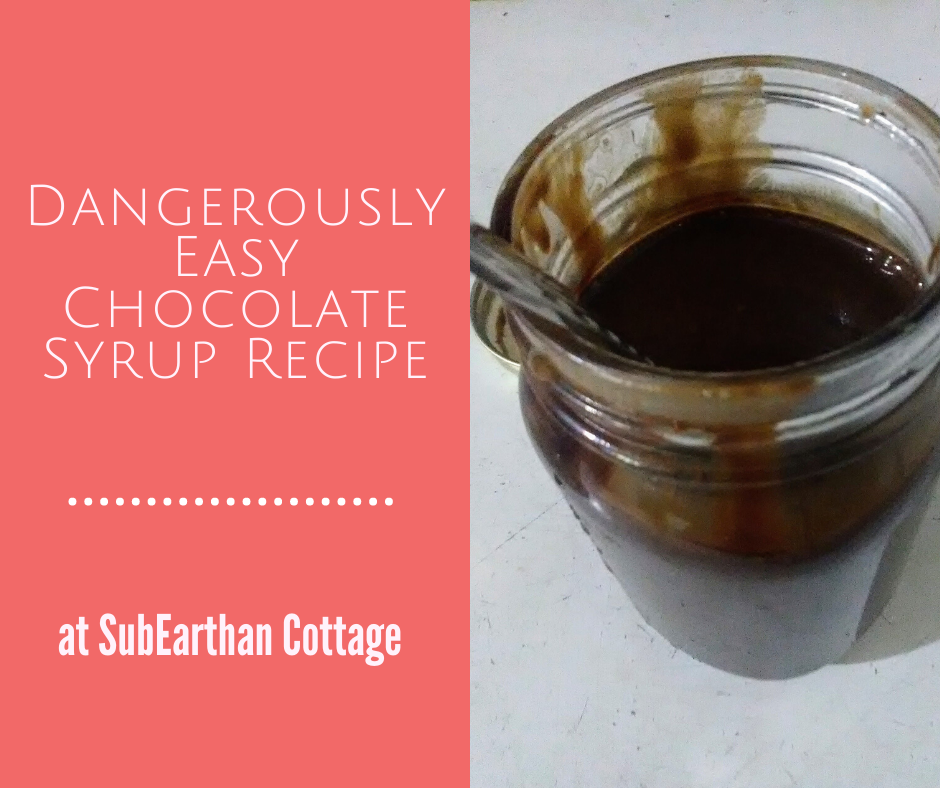
Chocolate syrup is deliciously versatile. Stir it in hot or cold milk or coffee for a treat or pour over ice cream to make it even more decadent. Then there’s old fashioned sodas and baked goods made with chocolate syrup. With this chocolate syrup recipe, you can make delicious chocolate syrup with just a few basic pantry staples whenever you need it.
Sure, it’s easy to pick up a bottle from the supermarket, but with this easy chocolate syrup recipe, you can make it for a fraction of the cost and without a trip to the store. By making it, you also have control over the ingredients. Use your favorite cocoa powder, experiment with the type and amount of sugar or swap out the vanilla extract for something a little more creative to make it your own. I can totally see using peppermint extract to mimic the flavor of Andes mints. Or, if you’re a fan of Terry’s Chocolate Orange chocolates, add orange extract.
Like most of my recipes, this chocolate syrup is gluten free and dairy free.
This chocolate syrup recipe is so easy and delicious. With only a few pantry-staple ingredients needed, you'll never have an excuse not to make it. Should be good for at least a month when stored properly. I usually find plenty of ways to use it up before then.
Prep Time2 minutesmins
Cook Time5 minutesmins
Course: Dessert
Ingredients
1cup cocoa powder
1 cup sugar
1 cupwater
1/2teaspoonsaltor to taste
1teaspoon vanilla extractor to taste
Instructions
Mix the sugar and cocoa together in a saucepan until thoroughly combined.
Add the water and half of the salt (1/4 teaspoon). Bring to a boil over medium heat, stirring constantly.
Continue to boil while constantly stirring until the mixture thickens a little. (It will thicken more as it cools) This should take around 3 or 4 minutes.
Carefully taste and add the rest of the salt, if desired.
Remove from heat and add vanilla extract.
Cool and store in an airtight container in the refrigerator. I like using a glass jar.
Notes
The vanilla extract and salt amount can be adjusted according to taste. I can also see swapping out the vanilla for peppermint or orange extract.
While I try to write recipes as clearly as possible, it’s easy to miss a step or make assumptions. If anything is confusing, please don’t hesitate to comment with your questions. If you make this recipe, please let me know what you think.
Like this post? To make sure you never miss a future post, please sign up for my newsletter.
This post contains affiliate links. If you click through any of the Amazon links and make a purchase, I will receive a small commission. There is no added cost to you.
I, Charity Sloan, am a participant in the Amazon Services LLC Associates Program, an affiliate advertising program designed to provide a means for sites to earn advertising fees by advertising and linking to Amazon.com. Any purchases through those links will result in my receiving a small percentage in commission.
This only refers to Amazon links found in/on my blog pages. All products in my shop are 100% mine and not linked to Amazon.
Prices are the same whether you click an affiliate link or a non-affiliate link, so you will not be charged more. Thank you for your support!