Posted on 1 Comment

Patching Denim with an Embroidery Machine

Finished sewing

I love wearing denim blue jeans, but chasing my boys and taking care of my small zoo, they get lots of wear and tear. One of the worst things is having to scrap a favorite pair because of one too many rips. I’ve repaired rips in a utilitarian way in the past. This time I thought I’d try patching denim using my embroidery machine. I haven’t done much applique, so I learned some things along the way.

This tutorial makes use of an embroidery machine and serger. You could also adapt it to use a sewing machine or applique by hand and embellishing with hand embroidery.

Items needed

  • Denim jeans or other item to repair
  • Interfacing
  • Thread in colors of choice
  • Seam ripper or similar tool
  • Scrap of fabric at least 4 in x 4 inches
  • Stabilizers: Cut away or tear away, water soluble optional
  • Floral denim patch applique design file

Step 1: Open the side seam.

Since I’m repairing a ripped knee, I needed to take out one of the side leg seams on my jeans. Using a seam ripper made this easy, but you could use small scissors, too. I left the seam intact at the hip and ankle, only removing what was necessary to lay the ripped area flat in the hoop without risking sewing it to the back. Leaving a little intact makes it easier to resew the seam at the end.

Step 2: Prepare the rip.

Iron the area around the rip so it’s smooth and flat. If there’s a lot of loose threads around the rip, trim them. I caught this rip before it frayed too badly, so no trimming was needed.

Before photo patching denim
Side seam removed and jeans ironed flat.

I wanted the embroidered area to be solid, so I applied some interfacing to the back of the rip. I used some medium weight interfacing, but any should work, since it’s job is just to hold it together while the jeans are embroidered. This is a perfect project for using whatever scraps are handy.

Interfaced rip
Back of rip with interfacing applied.

Step 3: Hooping.

For denim, tear away or cutaway stabilizer is best. I chose cutaway for the most stability. It’s stiff, but it should soften in the wash. If not, I’ll switch to tear away next time.

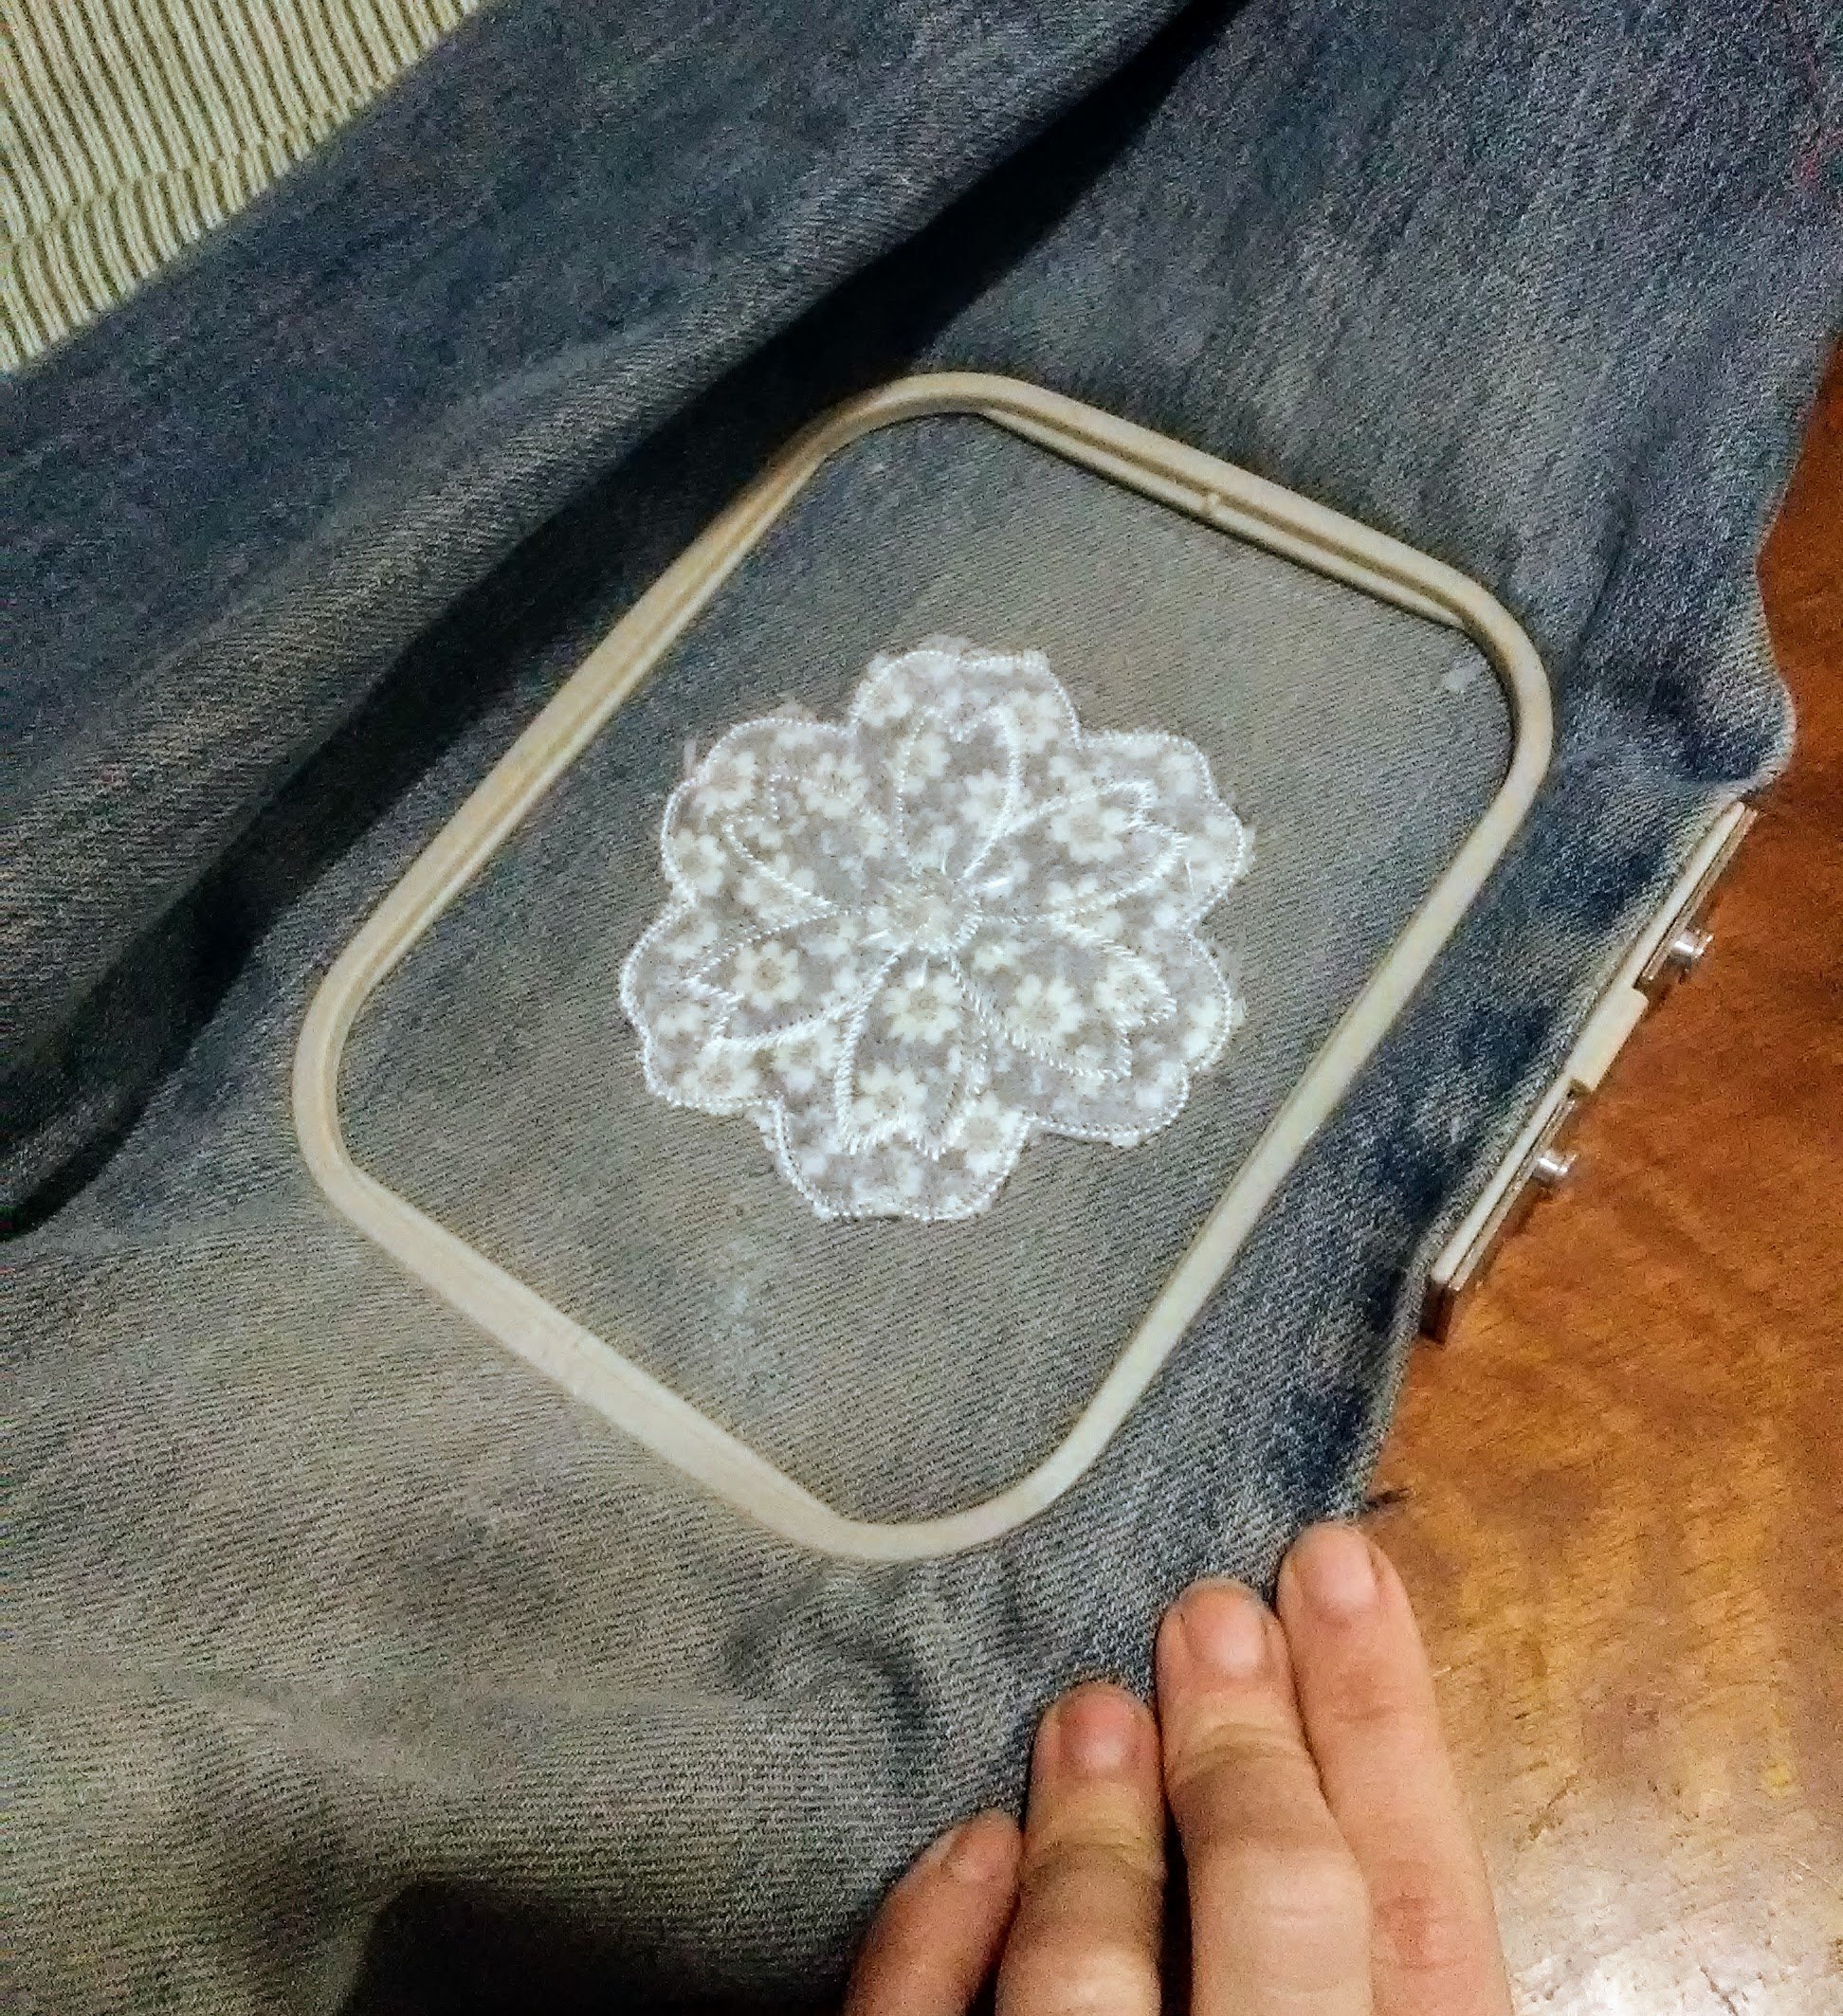
I tend to float projects and only hoop the stabilizer whenever possible. This project seemed like it would work better tightly anchored in the hoop. It took a few tries to center the rip in my hoop so that all edges would be covered by my design. My machine has a 4 in x 4 in embroidery field, so the rip just barely fit. Smaller tears will be easier to fit in my small hoop.

Hooped denim
First attempt. Once I put it in my machine and had it circle the embroidery field, I saw it needed re-positioning.

Step 4: Embroidering the patch.

Once it’s properly hooped, it’s time to sew. On my machine, the first color stop said “Applique Material”. I haven’t done much machine applique, but the ones I am used to usually follow the sequence: placement stitch, tack down the applique (then trim excess), sew the final applique stitching. So, confused I just put the applique fabric and a water soluble stabilizer (optional) on top of the rip and pushed start.

stitching denim patch

What my machine was telling me to do was to just hoop the applique fabric so I could remove it from the hoop and cut it neatly. The second color stop was the positioning stitch. That would be stitched on my jeans and then my neatly trimmed applique could be placed in position and the stitching completed. Since I did everything at once, my applique isn’t as tidy as it could be. I will definitely listen to my machine next time.

Finished sewing, but still has water soluble stabilizer on top.
Finished sewing.

Step 5: Remove from hoop and cut away excess stabilizer

I also steam pressed over the back of the patch to start softening the stabilizer.

Patch from the back.
Patch from the back with stabilizer trimmed.

Step 6: Sew the leg seam.

To repair the leg seam, I used a lock stitch setting on my machine. You could also sew the seam twice to reinforce it or just use really heavy thread. I then serged the raw edge. If you don’t have a serger, an overedge stitch or zig-zag stitch would also work.

Finished!

Finished patching denim
Finished patch. Next time I will use heavier thread so the embroidery shows better.

Not bad. I wish I had used heavier thread so the embroidery would show up better. Listening to my machine and cutting the applique fabric to size before I sew it on to eliminate the raw edges peeking out is another improvement for the next time I’m patching denim.

If you’d like to use this applique design, you can download the file here. You can use the design on items you make to sell as well as for personal use, but please don’t sell the design file.

Floral knee patch applique
Floral knee patch applique design image.

Like this tutorial? To make sure you don’t miss out on future tutorial posts, sign up for my newsletter.

Posted on 1 Comment

Peppermint Coasters in the Hoop Tutorial

I love in the hoop embroidery projects. They, more than anything, are what make me wish my embroidery machine had a bigger stitch area than just 4 inches by 4 inches. Even with such a small hoop size, there’s still plenty of in the hoop projects available.

One of the easiest ITH (in the hoop) items to make are coasters. To make these peppermint coasters, all you need is fleece, one or two thread colors, stabilizer, the design file and, of course an embroidery machine. Once you see how they are made, you can easily swap out the design and colors to suit your needs. They are so simple to make, they are perfect for last minute gifts or as decor to match a party’s theme. You could also make a themed set for each month, season or holiday to decorate your home.

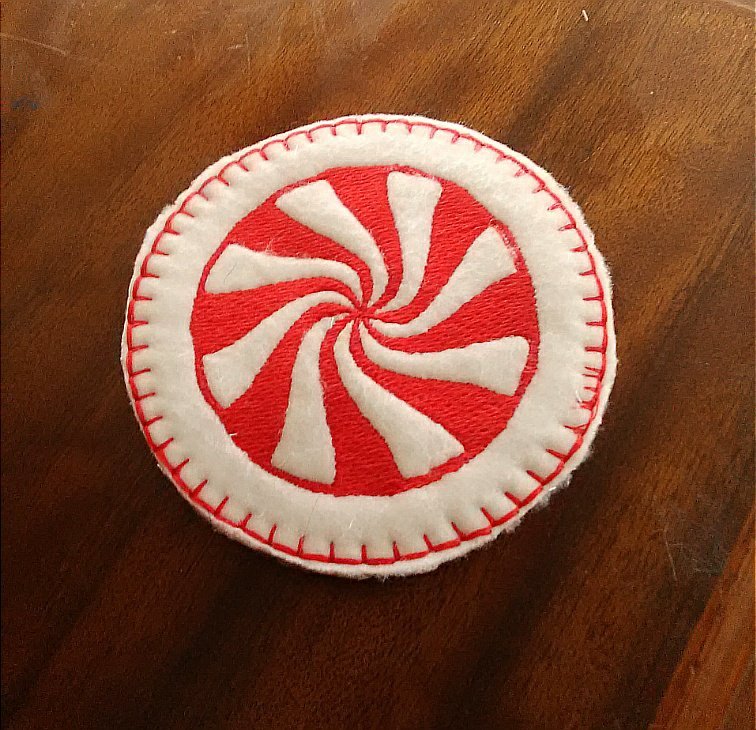
In the hoop peppermint coasters

Supplies to make one coaster

  • Two pieces of fleece cut to your machine’s hoop size
  • Red thread
  • White thread (optional)
  • Tear away stabilizer to fit your hoop size
  • Water soluble stabilizer (optional)
  • Peppermint Candy Design File

Prepare your hoop

  • Hoop the tear away stabilizer Hooped Stabilizer
  • Place one piece of fleece on top of the stabilizer in the hoop. For small projects I sometimes just carefully hold it smooth while my machine stitches. You can also use a glue stick outside the stitching area to glue the fabric to the stabilizer, or pin the fabric to the stabilizer at the top and bottom, outside of the stitching area. I made the mistake of having a pin at the side, and even though it was clear of the design, it caught on my machine’s presser foot. Luckily I caught it quickly, but I will probably use a glue stick whenever possible to prevent that from happening again.Fabric pinned to stabilizer
  • Decision Time: If you want the peppermint to show on both sides, place the other piece of the fabric under your hoop while placing it onto your machine. The bottom fabric usually stays in place on its own, but you could use a glue stick as I mentioned in the previous step. To only have the peppermint show on one side, skip to “Preparing your machine”.Backing fleece.

Preparing your machine

  • If you want the peppermint on both sides, make sure the top and bobbin thread match. For a single-sided design, red or white in the bobbin is fine.
  • Place your hoop in your machine.
  • Upload the design file according to your machine’s instructions. The following steps are based on the Brother SE 400, so they may differ depending on your machine.
  • Resize your design, as desired. I wanted the peppermint as big as possible, so I followed the instructions for my machine to maximize the size. Mine maxed out at 7, which resulted in an overall size of about 6.5 cm. If your machine has a bigger capacity, you’ll need to decide how big you want the design .
  • Because I used white fleece, I chose to skip the white stitching and only stitch it in red. Again, I followed the instructions to skip to color 2, labeled red. Whatever color you choose, if you’re only sewing one color, skip to color two, because it has the outline. If you want to stitch both colors, skip this step.
  • Optional: Since fleece has a high loft, placing water soluble stabilizer is recommended. I’ve tried this project both ways, and I don’t see a big difference. For this tutorial, you’ll see the water soluble stabilizer in most photos.

Stitching your in the hoop coaster

  • Begin stitching according to your machine’s instructions.
  • If you are stitching both colors and want the peppermint on both sides, be sure to change the bobbin thread to match the top thread after color 1, white, is complete.
  • Continue stitching until the peppermint design is complete.Ready for the border

Stitching the border.

  • I like the border to match on top and bottom, so for this step I put red in the bobbin and for the top thread.
  • If you’re making a single-sided coaster like I did for this tutorial, now is when you add the second piece of fleece. Place it under your hoop as in the last step of “Preparing your hoop”.
  • On your machine, navigate to frames and select a circle frame.
  • Select the stitch type. I chose an over edge, blanket-type stitch.
  • Adjust the frame size. The frame size will determine the final size of your coaster. Make sure it is bigger than your design. Mine maxed out at 9 cm.
  • Stitch the border. I like a thicker look to the border, so once the border is done, I stitch it again. As long as you haven’t moved the fabric in the hoop, it will stitch directly on top of the first frame.In the hoop peppermint coaster stitching the border

Finishing the coaster

  • Remove the project from the hoop.Out of the hoop
  • Carefully remove any pins.
  • Trim thread tails.
  • Tear away the tear away stabilizer.
  • If you used water soluble stabilizer, cut away excess.
  • Cut fleece as close to the outside edge of the frame stitching as possible without cutting the stitching.
  • To remove remaining water soluble stabilizer, gently dab with a damp cloth or, swish it in a bowl of lukewarm water until stabilizer is gone and allow coaster to air dry flat.
  • Done!

I know that looks like a lot, but it’s really simple. I tried to be as detailed as possible, but if anything is confusing, please don’t hesitate to ask for clarification in the comments or through email.

If you notice, in the photo of the finished coaster, there’s a flaw in the border stitching on the left. That is where a pin caught the presser foot. Luckily that was the only damage. In the future, if I use pins, I will only pin at the very top and the very bottom. I really do prefer using washable glue sticks and keeping the glue well outside any stitching. That way my needle and machine don’t get gunked up, and I don’t risk hitting pins.

Finished Peppermint Coaster
Posted on 2 Comments

T-Shirt Market Bag Tutorial

One of my lovely nieces is learning to sew with a sewing machine. To help, I thought I would do a series of beginning sewing project tutorials. Today’s tutorial turns an old t-shirt into a market bag. I’m keeping it simple today, but in the future I’ll do a post on how to make it with and enclosed bottom seam and how to box the bottom. It’s a great way to turn t-shirts that you no longer wear into something useful. If you don’t have a sewing machine, you could even sew it by hand.

Materials:

  • T-shirt
    • T-shirts with a high cotton content and no side seams work the best.
  • Thread in your choice of color.
  • Fabric scissors
  • Sewing machine set up with appropriate needle and bobbin threaded in your color choice.
    • Note: Ball point needles are generally the best for sewing with knits. This project does fine with an all-purpose needle, though, so use what you have.

Preparing the shirt:

Lay the shirt out flat and smooth out any wrinkles. Since this one is just to add to my Aldi bag stash, I didn’t worry too much about wrinkles.

T-shirt laid flat
T-shirt. I’m not sure where I got this one. Also, forgive the grainy photos. Lighting in my craft room wasn’t great that day.

Cut off the arms including the armhole seams.

Cut off the neck about 2-3 inches below the neckband. My shirt is pretty big, so I went three inches below the neckband. With smaller shirts you can do less.

Cutting off sleeves and neck.
I like to fold it in half before cutting to keep everything even. If your scissors aren’t sharp enough to go through all the layers, cut one side and then fold it in half to use as a template for the other side.

Cut straight across the bottom of the shirt to remove the hem. The hemline is often uneven on t-shirts, so focus on keeping the shoulder seams lined up, the shirt smooth and cutting a straight line that removes all of the hem.

Cut off the bottom hem.
Bottom hem removed.

At this point, you should basically have turned the t-shirt into a tank top. Now, decide if you want your bag to look like plastic grocery sacks that have the handles at the top sides (so, your tank top with the bottom sewn closed), or if you want the handles at the top middle, like a purse or market tote.

Looks like a tank top.
Looks like a tank top. For a grocery style bag, turn it inside out and lay it back flat in this position.

For the grocery sack-style, turn your shirt inside out and lay it flat, just like a tank top again. For the purse/market tote, turn it inside out and match the shoulder seams and armholes together, then lay it flat. I’m making a market style tote, so you can see it in the photos.

Laying flat for a purse/market tote.
For a purse/market tote turn it inside out and lay it flat with the shoulder seams at the top, as shown here. I find this style easier to carry on my shoulder.

Once everything is lined up, pin along the bottom to hold it in place.

Pinned hem.
Pinned hem.

Sewing the bag:

Many sewing machines have an assortment of stitches to use with knit fabric. They are useful for keeping the thread from breaking when the fabric stretches. On my machine, they are labeled “stretch” and shown in brown. Zig-zag stitches also work well on knits.

Stitch assortment on my Kenmore sewing machine.
Normal stitches are in red. Stretch stitches are in brown.

You could use a stretch or zig-zag stitch for the bottom of the bag. Since it really shouldn’t be stretching much, I usually stick with a regular straight stitch set to a long-ish length of 3.

Regardless of the type of stitch you choose, I recommend sewing across the bottom twice to make it nice and strong.

The seam allowance, or distance between the edge of the fabric and the stitches, doesn’t really matter that much as long as you keep it the same all the way across. For this bag, I used a 5/8 inch allowance, marked on the footplate of my machine. To keep a straight line, focus on keeping the fabric lined up with the guideline for the seam allowance rather than watching the needle.

Edge of fabric lined up on 5/8 mark.

At the start , sew about 2-3 stitches then backstitch to secure the stitching before continuing to sew to the end. At the end, backstitch another 2-3 stitches, then sew to the end and cut the threads. Repeat the seam as close to the original line of sewing as possible to make it nice and strong.

Turn the bag right side out. Since knit doesn’t unravel, you could stop there and be done. I like to sew around the arm and neck holes to reinforce the t-shirts original shoulder seams and give it a more finished look.

Finishing around the t-shirt arm and neck hole handles:

I usually use a serger for this, but it’s not necessary. On a sewing machine, I do like to use either a zig-zag or stretch stitch since there is going to be more stretch on the handles so a straight stitch might break.

Zig-zag setting on my Kenmore.
Zig-zag setting.

This time, I’m using a zig-zag stitch, keeping the stitch length set at 3 and using about a 1/2 inch seam allowance. If your sewing machine has a free-arm, it can make it easier to sew around the armholes if you use it. Sew around each arm hole and the neck hole separately.

Messy zig-zag backstitching.

To start and finish the zig-zag, I backstitched like normal. It looks a little messy that way. You could leave extra thread at the beginning and end, pull the threads to the back side and tie knots to secure them if you want a cleaner look.

Finished t-shirt bag.

That’s it. You now have a purse or reusable bag from what used to be an old t-shirt. Don’t throw the t-shirt scraps away. I’ll post some creative uses for them soon! To learn how to make this bag a little more polished, read my t-shirt bag upgrades post.

If you read through the tutorial and like the concept but don’t want to diy, I still have a few left in my shop on clearance here.

Like this tutorial? To make sure you don’t miss out on future tutorial posts, sign up for my newsletter.