Before I got my electric pressure cooker, I used my crock pot a few times a week at least. This lentil soup recipe is quick to throw together and made primarily from pantry staples. I originally shared it in 2011, but with more people needing easy, simple meals, I thought it was worth re-sharing.
I love my Crock pot. It’s almost like having someone else cooking for me. Tonight it’s making a simple, Lentil Soup. I got the basic recipe here. I doubled it to have plenty of leftovers and made a few substitutions.
Add the Ginger, Turmeric, Cumin, Oil and Curry to the Crock pot. Cook on high heat for a few (I did 5ish) minutes. Add everything else and cook on high for 4-5 hours or low for 6-8 hours.
Serve with a nice green salad and bread.
Shop update: Freebies and a sale
Knowing that so many are stuck at home right now needing distractions, I’ve decided to make all of my machine embroidery design files free until April 30. That’s the day my area’s shelter in place order expires. If it is extended, I’ll extend the embroidery design freebies, too. If you make something with one of my designs, I would love to see it.
My full shop is still open, and will be as long as everyone in my household is healthy. I’m using extra care with handwashing and using hand sanitizer before coming into contact with products and packaging as well.
All of my handmade soaps are currently on sale for 20% off. You can find them here.
Like this post? To make sure you never miss a future post, please sign up for my newsletter.
Making Kombucha using the continuous brewing method means you’ll always have plenty of Kombucha ready to drink or flavor in a second ferment. Here’s how to do it.
Supplies for continuous brewing
In addition to the basic Kombucha ingredients listed here, you’ll want to have a jar with a spigot. There’s some debate over the best materials for the jar and spigot. The biggest thing to watch for is something non-metallic, although I think I’ve heard stainless steel is okay. Most people like to avoid plastics to prevent any weird chemicals from leeching into the KT. I went with the cheapest, most available option of a glass sun tea pitcher with a plastic spigot.
Keep about half of the finished KT and the SCOBY in the jar and bottle the rest. Brew about half a gallon of tea. I use two black tea bags, one green tea bag and one half to one cup of sugar. Let it cool and add it to the jar with your finished KT and SCOBY. Since you replaced half of the KT, you’ll want to wait a couple of days before drinking from the new batch. After that, you can drink some fresh from the tap every day. Just replace what you drink with fresh sweet tea. Because you are only adding a small amount of fresh tea in relation to the KT, you can drink a little every day without the wait time. I like to keep a small pitcher of sweet tea in the refrigerator to replenish what gets taken out each day.
Like this post? To make sure you never miss a future post, please sign up for my newsletter.
For those who aren’t familiar with it, Kombucha Tea is tea that is fermented with a culture of beneficial bacteria and yeast (SCOBY). There are many claimed health benefits to it, although the most widely accepted is as a probiotic. It can be a bit fizzy, so many people use it as a soda replacement. It’s becoming much easier to find in mainstream supermarkets, but usually runs about $4 for a small bottle. Yikes! It’s really not that complicated to brew your own and the way to go IMO if you want to drink it daily.
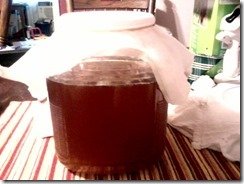
My first batch of Kombucha Tea brewing.
Ingredients to start 1 gallon of Kombucha:
3 Black tea bags 2 Green tea bags 1-2 cups Granulated white sugar 1 gallon Filtered water 1 Kombucha SCOBY (I got mine from here: https://www.etsy.com/shop/OKposeyMom) 2 cup Starter Kombucha tea (KT) or distilled vinegar
Supplies:
1 gallon glass jar (with spigot for continuous brew) tightly woven or knit cloth or coffee filter larger than the mouth of the jar rubber band or elastic big enough to securely fit around the mouth of the jar. Wooden or plastic spoon (metal is fine unless you need to stir after adding the SCOBY)
Make sure all jars and utensils are clean. Rinse everything really well to be sure there’s no soap residue. For the first batch, you’ll need a full gallon of tea. I use both black and green tea with three black and two green tea bags. As long as you are using unflavored, caffeinated tea, any ratio should work. Brew the tea like normal and add the sugar. Stir to dissolve. It needs to be plain white granulated sugar to make it easy for the SCOBY to break down. The sugar can be adjusted to taste, but for the first batch I like to use a full 2 cups. I’ve also found that in warmer months the brew gets strong really fast, so I add closer to the full 2 cups then to compensate. In cooler months, I can cut back on the sugar.
When the tea is cooled to about 80 degrees, add the SCOBY and starter Kombucha Tea (KT) and/or distilled vinegar. The temperature really isn’t that important as long as it’s cool enough to not kill the SCOBY. I usually just feel the jar. When it feels no more than a little warm, I add the SCOBY. If you don’t have enough starter KT you’ll use distilled vinegar to make up the difference. Do NOT use cider vinegar. Cider vinegar contains some of it’s own culture “mother”. If you use cider vinegar you’ll end up with some sort of hybrid culture.
Cover your jar with the cloth or filter and secure with a rubber band or knotted piece of elastic. This allows it to breathe while keeping dust and ickies out. Wait. and wait. and wait. lol. The KT usually takes about 7-10 days to develop. It brews faster in warmer weather, so keep that in mind. Starting around day seven, use a straw to siphon off a little from under the SCOBY. You want it to have a little bit of a vinegary zing to it, but other than that the taste is up to you. My first batch tasted like cider made from honey crisp apples-tart but still really sweet.
The longer it brews the less sweet and more vinegary it will taste. If you think it needs to brew longer, leave it for another day or two and taste again. If you like the taste, great! Time to bottle it and brew batch number two.
For batch brewing, you’ll basically be doing everything you did for your first batch. All but 2 cups of KT from your first batch can go in to bottles. I use Mason jars. If you want to add flavorings you’ll add them to the bottled KT. I’ll do a post about that later. The 2 cups you reserve and your SCOBY will stay in the jar to start the next batch. (Every few batches, you will want to transfer them to a non-metallic bowl so you can wash the jar. If you keep a second jar on hand, you can just switch jars every batch.)
Repeat the above steps including the wait time for each new batch.
With each new batch, you will grow a new SCOBY. Usually the new SCOBY will grow on top of the old SCOBY. Technically you can separate the new SCOBY each time to use in your new batch. I like to leave the SCOBYs alone until it gets to be about a half inch to an inch thick. After that, I’ll separate off a few layers by pulling it apart between two layers. One SCOBY keeps brewing while the other goes into a big jar with some KT and a lid, aka a SCOBY hotel. Many SCOBYs can live in a hotel as long as you have enough KT to keep them moist. It’s always a good idea to have an extra SCOBY or two on hand in case your batch gets contaminated. You can also give your extra SCOBYs to friends so they can start their own brew.
Next week I’ll cover how to move from batch brewing to continuous brewing.
Like this post? To make sure you never miss a future post, please sign up for my newsletter.
I finally got my Kenmore 385 sewing machine’s hook timing adjusted and working properly again. This time, I figured out that there is a plate on the bottom of my machine that allows me to access the necessary set screw without taking the case off. I do think it’s a little more difficult to see what I’m doing that way, but it’s much less scary.
This time, once I got it adjusted, I decided to make a quick (awkward, one handed) video while I still had it open. Hopefully the video and my previous post will help others tackle this simple sewing machine repair.
Adjusting the Hook Timing on a Kenmore 385 Sewing Machine
Shop update: Freebies and a sale
Knowing that so many are stuck at home right now needing distractions, I’ve decided to make all of my machine embroidery design files free until April 30. That’s the day my area’s shelter in place order expires. If it is extended, I’ll extend the embroidery design freebies, too. If you make something with one of my designs, I would love to see it.
My full shop is still open, and will be as long as everyone in my household is healthy. I’m using extra care with handwashing and using hand sanitizer before coming into contact with products and packaging as well.
All of my handmade soaps are currently on sale for 20% off. You can find them here.
Like this post? To make sure you never miss a future post, please sign up for my newsletter.
I’ve been sewing lots of masks lately. Apparently my sewing machine needed a break, so it decided to skip time again. Thankfully I’ve done it a few times now, so I should have it up and running soon.
Hook timing is a fairly common problem that sends many sewers running to the repair shop. When it happened the first time on my older Kenmore, I decided to try to repair it myself first. My thinking was, since it’s a mechanical machine with mostly metal parts, as long as I was careful, I couldn’t really hurt anything. I probably would have thought twice before attempting it on a computerized machine.
All machines are a little different, so what worked on mine may not work on yours. Something I recommend to everyone who wants to work on their own sewing machine, is getting a copy of the service manual. Honestly, I still need to do this. There’s tons of info online, but having the actual service manual is even better. You should have an owner’s manual on hand, too. It covers basic care and maintenance. For repairs, though, the service manual will give you technical instructions and confidence.
Once you’ve tried the easy fixes, if it still isn’t working right, look at how the needle and the bobbin hook intersect. This page, https://tv-sewingcenter.com/general/sewing-machine-timing-hook-timing, has illustrations, photos and descriptions for where they should meet on both rotary and oscillating machines.
Taking a look at my oscillating hook.
My machine is an oscillating machine, so the hook tip should pass just above the eye of the needle. Mine was passing below the needle’s eye, so clearly the hook timing needed adjustment.
Open it up
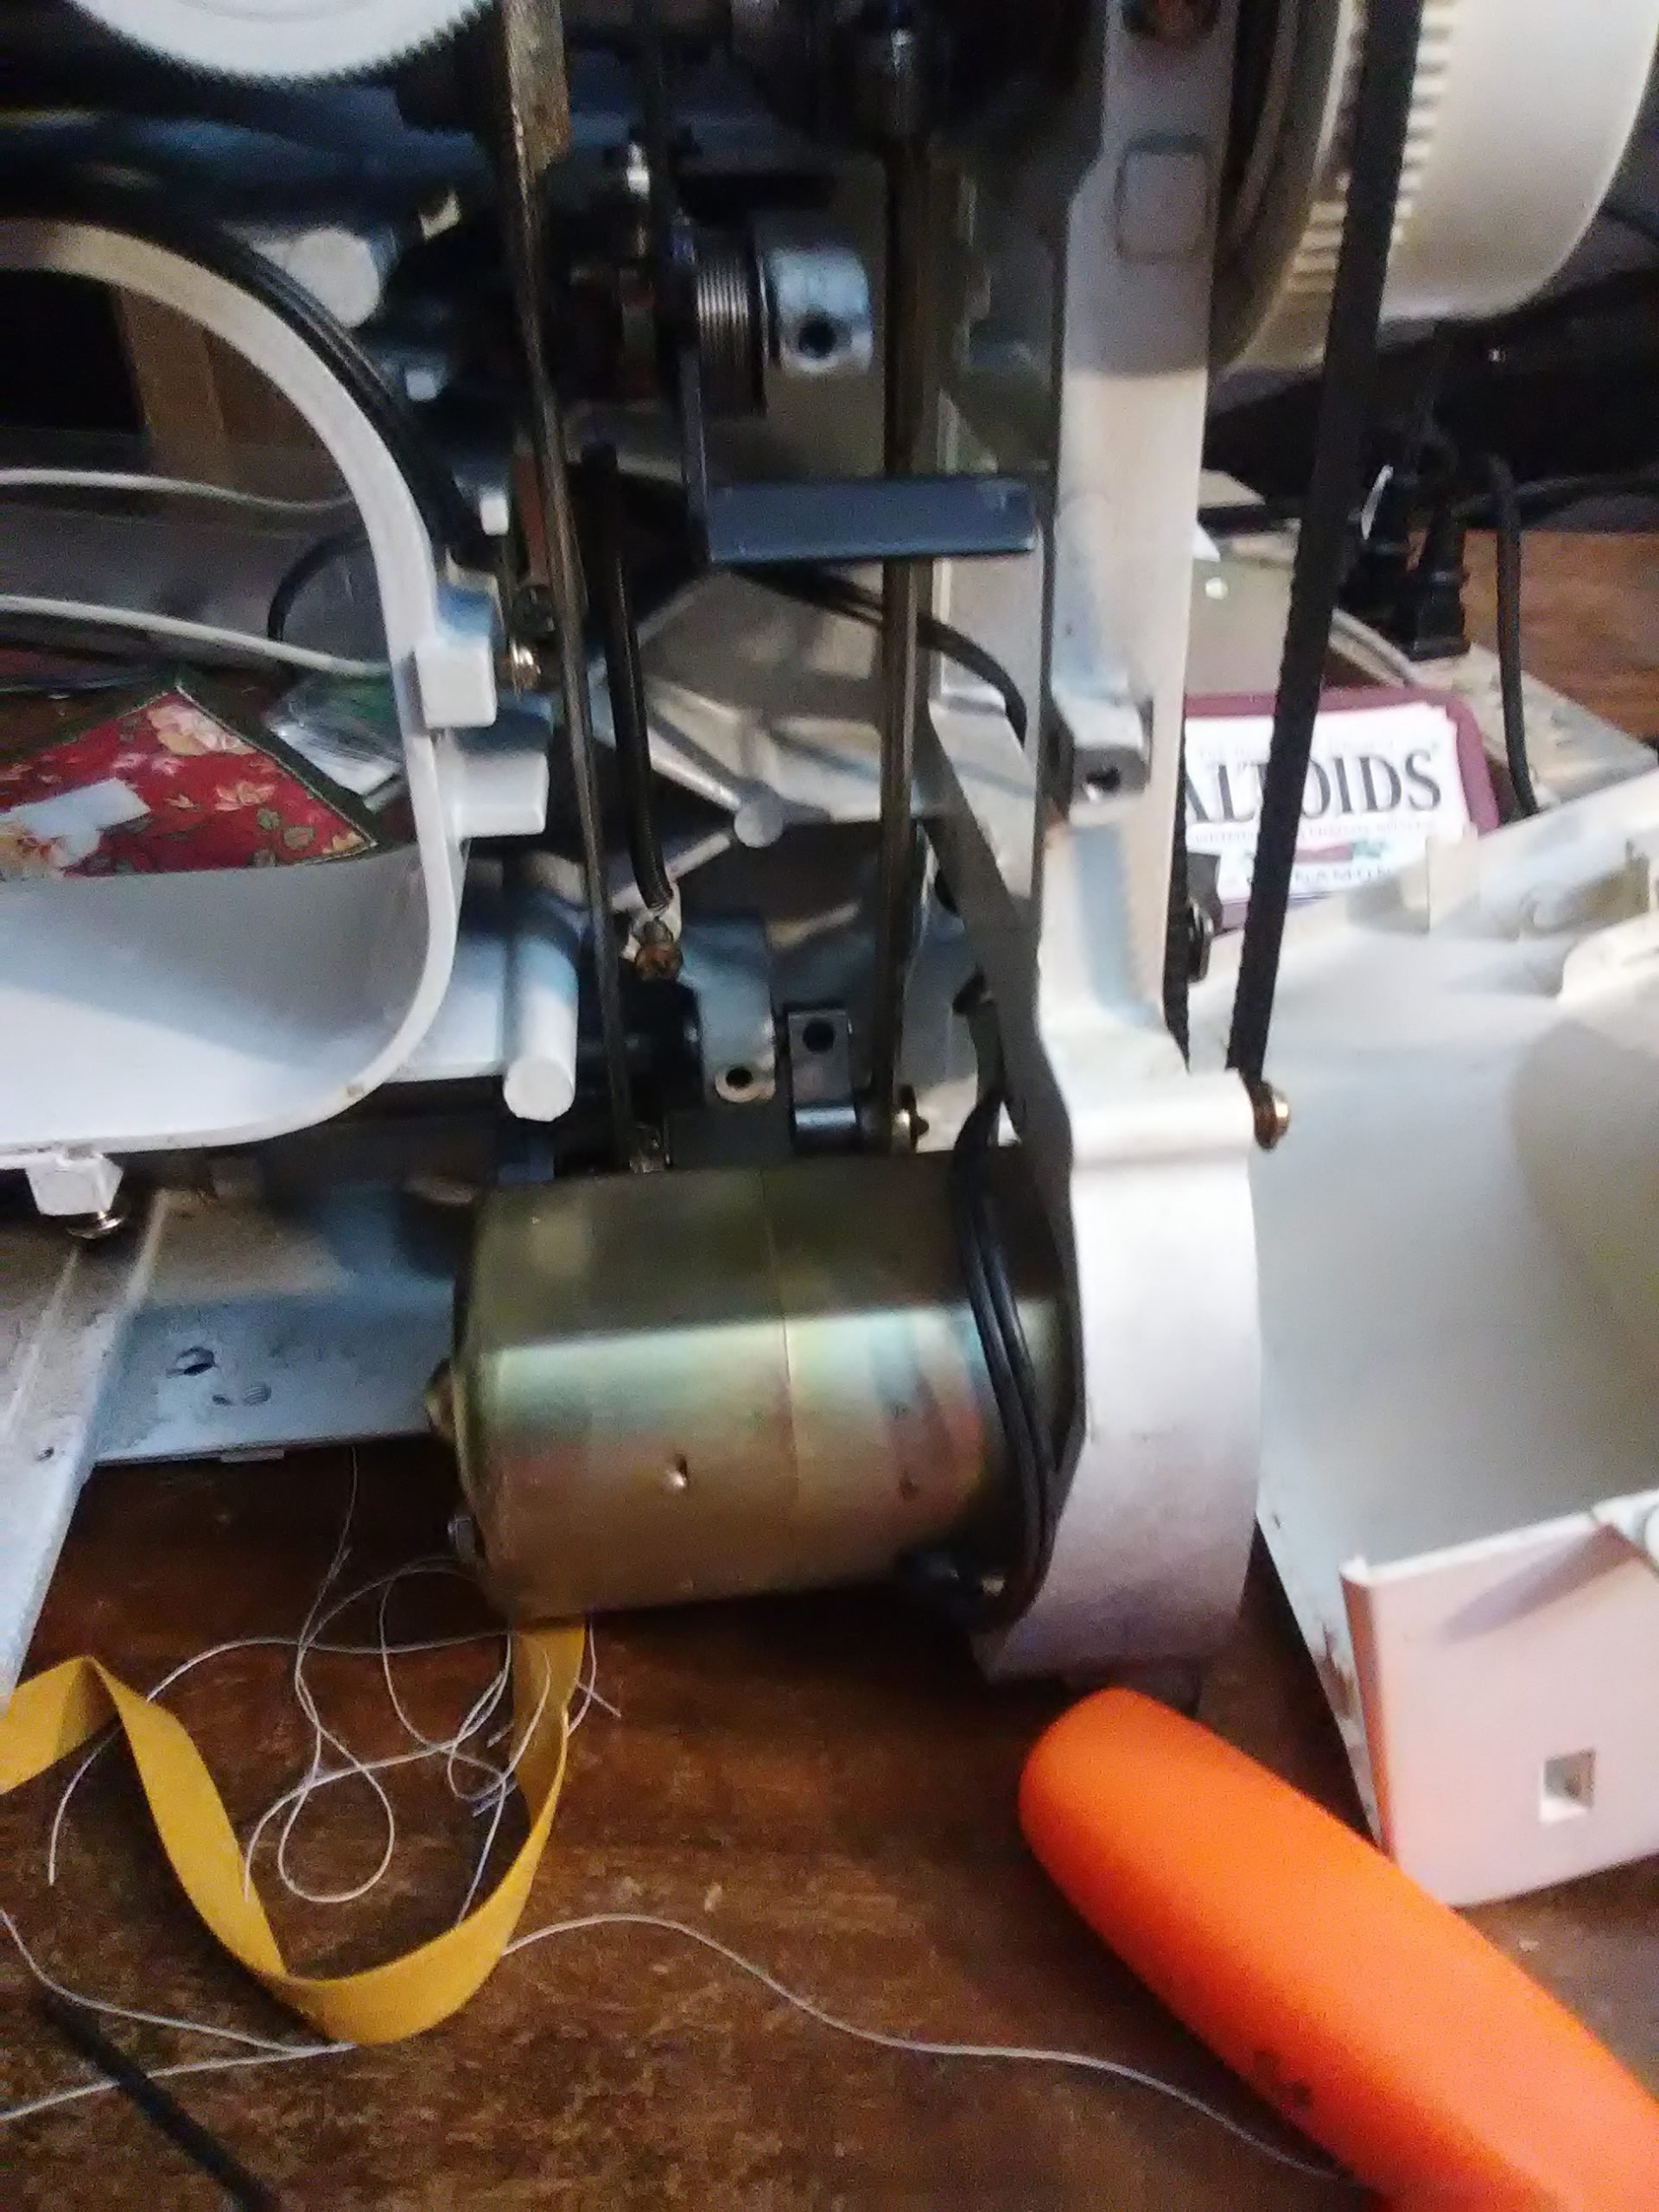
The first and honestly the hardest step was figuring out where all the screws were that I needed to remove to take off the casing. (Actually, the first step was to turn off and unplug the machine. If you’re attempting this at home, do not skip this step!) On my Kenmore, I have to take off the side by the hand wheel, a plate on the bottom, and the front panel.
More cleaning
While I have my machine open, I like to take the opportunity to clean it out and oil it. Oiling a linty machine, using the wrong oil or putting it in the wrong places can cause tons of problems, though, so if you’re not sure, stick to dusting only.
Find and adjust
Next, I tilted the machine on to it’s back so I could get a good look at the mechanism that rotates the hook. Once I had isolated that, I found a hex head set screw. Loosening that allowed me to gently adjust the hook position so that the tip passed just above the needle’s eye.
About in the middle, just above the motor is a silver piece with a round, black screw near the top. That is the set screw I loosened to adjust the hook timing.
When I was sure I had it properly positioned, I tightened the set screw. I turned the hand wheel a few more times, making sure everything still looked good before I put the casing back. A quick test run showed everything was working properly again.
Done!
It’s so satisfying to be able to make simple repairs to my machines myself, especially when most repair shops start around $75 and go up from there, depending on what needs to be done.
My electric pressure cooker is such a lifesaver when it comes to getting fast, healthy meals ready. It’s almost like having someone else do the cooking. With so many working from home with kids right now, those minutes saved in the kitchen are valuable. Here’s five of my favorite electric pressure cooker dinner recipes.
1
Honey Glazed Chicken for Electric Pressure Cookers like the Instant Pot
This honey glazed chicken is made in an electric pressure cooker with just minutes of prep. Sweet and juicy, it will satisfy even picky eaters.
Electric Pressure Cooker (Instant Pot) Whole Chicken and Potatoes
This is my method for cooking a flavorful whole chicken and potatoes in an electric pressure cooker. After a little prep work, you can walk away and let the pressure cooker do it's job without having to check on it or worry about overcooking. I'm using an 8 quart electric pressure cooker. If yours is smaller, you may need to adjust the size of the chicken and other ingredients accordingly.
Dairy and gluten free sausage potato soup inspired by Olive Garden's zuppa toscana. I prefer making it in my electric pressure cooker but it could easily be done in a slow cooker or on the stove top.
Instant Pot Chicken and Vegetable Quinoa is a quick, last minute dish that is great hot or cold. Customize it by swapping out the protein or vegetables depending on what you have on hand.
Knowing that so many are stuck at home right now needing distractions, I’ve decided to make all of my machine embroidery design files free until April 30. That’s the day my area’s shelter in place order expires. If it is extended, I’ll extend the embroidery design freebies, too. If you make something with one of my designs, I would love to see it.
My full shop is still open, and will be as long as everyone in my household is healthy. I’m using extra care with handwashing and using hand sanitizer before coming into contact with products and packaging as well.
All of my handmade soaps are currently on sale for 20% off. You can find them here.
Like this post? To make sure you never miss a future post, please sign up for my newsletter.
Today’s post is short and sweet because I’m celebrating my 40th birthday at home with my family. Birthday’s mean cake, so here is my favorite chocolate cake recipe to make from scratch. It’s dairy-free, egg-free and easy to make gluten-free as well. Enjoy!
This is a simple chocolate cake recipe that is super easy. It is dairy-free, egg-free, and if you swap the wheat flour for a gluten-free flour blend, it's gluten-free, too! To make it gluten free, I like Bob's Red Mill 1 to 1 gluten free blend because it already contains xanthan gum. If you use a different gluten-free flour without xanthan gum, I would add about 1-1.5 teaspoons of xanthan gum.To top, make a simple buttercream (with shortening and non-dairy milk to keep it non-dairy) or use your favorite store bought frosting. You could also sprinkle the warm cake with dairy-free chocolate chips, let them melt a little, then spread across the top for a rich, chocolaty treat.
Prep Time10 minutesmins
Cook Time35 minutesmins
Course: Dessert
Keyword: 9 x 13, cake, chocolate, dairy free, easy, egg free, gluten free, one bowl, simple
Servings: 292×2 inch servings
Equipment
9 x 13 rectangle pan
Ingredients
3CupsFlour see recipe summary for gluten-free adjustment
1teaspoonsalt
2teaspoonsbaking soda
2cups sugar
6tablespoonscocoa powder
2tablespoonsvinegarwhite or apple cider vinegar
1cup vegetable oilany light flavored liquid vegetable oil is fine
2cups cold water
2teaspoonsvanilla
Instructions
Preheat the oven to 375 degrees Fahrenheit
Grease the 9 x 13 inch pan, either with shortening, butter, or cooking spray
Combine the first five (dry) ingredients in a large mixing bowl and mix until evenly blended. Alternatively, sift them together into the bowl.
Add the remaining (wet) ingredients and mix until thoroughly blended. You can use a spoon or an electric mixer.
Pour the batter into the greased 9 x 13 inch pan.
Bake at 375 degrees Fahrenheit for 35 minutes or until a toothpick inserted near the middle comes out clean.
Notes
I frosted this cake with buttercream tinted blue, then used gel food coloring to paint the faces. I then piped buttercream for the eyes, facial features, outlines, writing and trim. I clearly am not a trained cake decorator, so I can’t really say which tips I used or any other details.
Like this post? To make sure you never miss a future post, please sign up for my newsletter.
I, Charity Sloan, am a participant in the Amazon Services LLC Associates Program, an affiliate advertising program designed to provide a means for sites to earn advertising fees by advertising and linking to Amazon.com. Any purchases through those links will result in my receiving a small percentage in commission.
This only refers to Amazon links found in/on my blog pages. All products in my shop are 100% mine and not linked to Amazon.
Prices are the same whether you click an affiliate link or a non-affiliate link, so you will not be charged more. Thank you for your support!