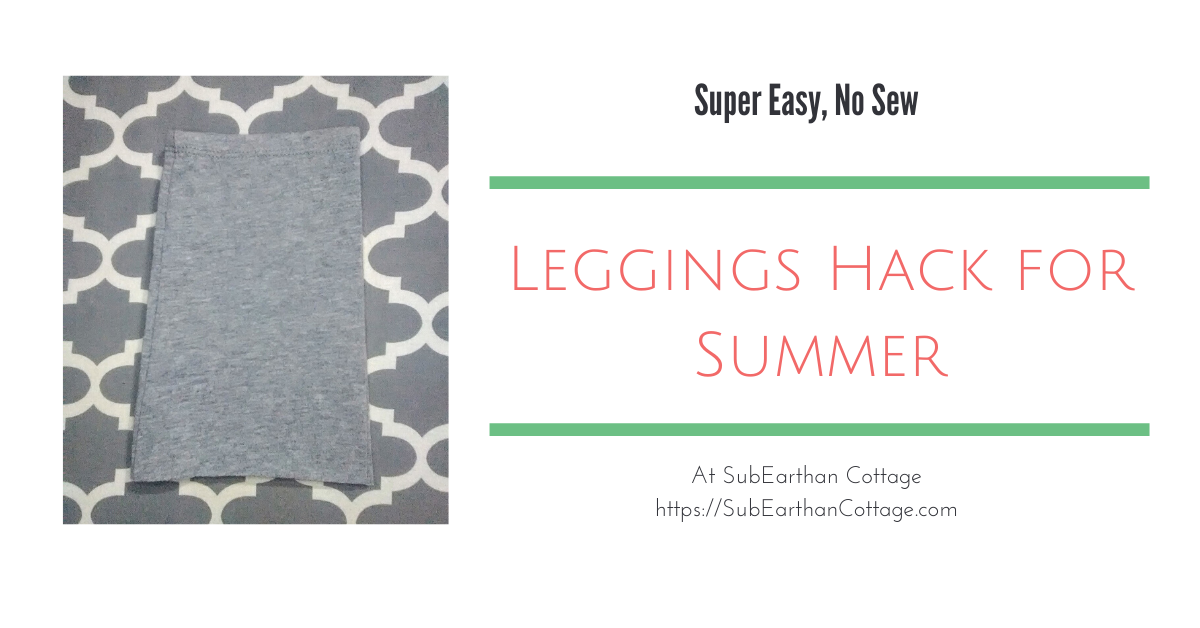
Posted on 1 Comment

Another Cloth Mask Pattern Post

Over the last few weeks, I’ve made many cloth face masks using a variety of patterns. Here’s a rundown on the different mask styles I’ve tried, and the one I find overall the most useful.

Contoured masks

The first are heavily contoured, shown here. If they fit they work well, although even without an added filter they make it hard to breathe. The downside to them being contoured, though, is that, if they don’t fit just right, they gap worse than the pleated-styles of masks I’ve tried.

Pleated mask with pockets

Another style of mask I made is a simple pleated mask with two layers of cotton fabric. One piece of the cotton was interfaced and had a wire in the top to shape around the wearer’s nose. Interfacing offers some added filtration on its own. The two layers were left open at the top to form a filter pocket. You can find the complete tutorial for this style here.

I’ve worn this style for the past few weeks on my weekly grocery shopping trips without an added filter. I’m generally healthy and don’t have any breathing problems, but I find these masks difficult to breathe through. Some discomfort is tolerable for safety, but every time I’ve worn one, I’ve had moments where I wasn’t sure if I’d be able to finish shopping while wearing it. On one occasion, I felt sick from it and actually had to stop and briefly remove it to get a few deep breaths.

Basic pleated mask

The final mask design I’ve tried is a simple, pleated mask. I use the pattern provided by Deaconess Hospital. They have variations for using elastic or fabric ties. In addition to the pdf instructions, Deaconess filmed a video tutorial that is easy to follow.

Mickey Mouse mask from the Deaconess pattern.
Masks made with the basic Deaconess pattern.

There are a few downsides to this pattern. Depending on the wearer, these may gap. On some, I added a small dart at the nose and chin. This helps provide a better fit. They also lack a filter pocket or interfacing. Even so, this is my preferred mask pattern for the following reasons.

They are easy to make.

This simplicity makes it easy to make multiples in a short amount of time. Once I have my fabric cut, it takes me about 15-20 minutes to make two in assembly line style. Having several means you’re more likely to wash them after every single use. It also means you can keep a backup in your car or bag so that you always have one to use.

They are easy to customize.

If you want to add a layer of interfacing, or nose and chin darts, you can without much additional effort. Searching Deaconess mask plus nose wire or filter pocket yields options for those as well.

They offer some protection while being more breathable.

Depending on your fabric selection, even a simple two fabric layer mask like these can offer up to 79% filtration, according to testing. Breathability also means you’re more likely to wear them and less likely to remove them during use.

Have you made masks lately? What is your preferred pattern? Please share in the comments.

Like this post? To make sure you never miss a future post, please sign up for my newsletter. Current newsletter subscribers:There’s been a glitch with my sender. If you signed up before May 5, 2020, I will need you to sign up again to continue to receive my weekly newsletter. I apologize for the inconvenience.

Posted on Leave a comment

Kombucha Frequently Asked Questions

Here’s a few common questions about Kombucha. I’ve answered them based on my research and personal experience.

Kombucha questions

How much should I drink?

If you’ve never had Kombucha before, you’ll want to start slowly. Kombucha can have a detoxifying effect that can be unpleasant if you rush it. It is recommended to start with about an ounce per day at first and gradually increase until you reach a comfortable level for you. If you notice any ill effects cut back or stop for a few days to let your body catch up. Drinking lots of water can help, too.

Of course, you should always listen to your body. If you feel like you can’t tolerate kombucha don’t push it. There are plenty of other ways to get probiotics. Also, I’m not a doctor, and the above might not apply to everyone depending on your personal health. If you have any concerns, definitely consult your doctor.

Can I use metal utensils when making Kombucha?

Metal tea kettles for boiling the water are fine. It’s fine to stir the tea and sugar together with a metal spoon before adding the SCOBY. What you want to avoid is the SCOBY coming into contact with metal as that can damage the SCOBY. Even then, I have heard very brief contact is ok, such as when cutting up a giant SCOBY. I prefer to peel apart the layers and avoid metal touching my SCOBYs, though.

Can I use honey/stevia/coconut sugar/some other sweetener?

The sugar is food for the SCOBY and plain white sugar is recommended because it is easy for the SCOBY to digest. I have heard of some people having success with other sugars, but I haven’t tried it myself. If you want to try another form of sugar, I would start with a small batch and keep another SCOBY in a tea/white sugar brew as backup.

Stevia or other zero calorie sweeteners will not work because they don’t provide food for the SCOBY.

Can I use flavored teas?

Not for the main brew. You can use flavored teas to add flavor in a second ferment.

Can I use decaf teas?

This is another one where I’ve heard conflicting information. Most say not to use decaf tea. If you want to try decaf, as with different sugars, I would start with a small batch and keep another SCOBY in a regular tea/white sugar brew as backup.

My SCOBY looks funny. Is it bad?

Most SCOBYs look funny. They can be smooth and creamy colored or have air pockets and brown spots. The bottoms usually have brown stringy tentacle things hanging down. New SCOBYs grow on top of older ones until they look like a stack of slimy pancakes. (Eww.) All of this is normal, and there’s probably a million variations I haven’t described.

There are two main things to watch for: mold and black. If your SCOBY molds, it will look like blue-green dusty mold, just like what grows on bread. If you get mold, throw it all out and start over.

Black means the SCOBY is dead or dying. Toss it.

My Kombucha tastes like vinegar. What happened?

Kombucha is supposed to taste vinegary, but if it’s too strong you can always mix it with something like juice to make it more palatable. You can also use super-vinegary Kombucha in place of apple cider vinegar in recipes. If it’s straight vinegar with no sugariness left, you could use it as a hair rinse or for household cleaning where you would use ACV.

To make future batches less vinegary, there’s a couple of things to try.

1. Kombucha brews faster in warmer weather. If it’s been hot, try a shorter brew time and/or increasing the amount of sugar in the brew.

2. If your SCOBY is getting super thick, split off some layers. More SCOBY = shorter brew time.

My Kombucha is too sweet. What happened?

The easiest fix is to let it brew longer. If it’s cold, moving your jar to a warmer location may help. I think the ideal range is somewhere around 70-80 degrees Fahrenheit.

You should also check the condition of your SCOBY. If it is turning black, you’ll want to replace it.

Should I store my SCOBYs in the refrigerator?

No. You want to avoid extreme temperatures because they can damage the SCOBYs. The best range is between 70-80 degrees Fahrenheit.

To store your extra SCOBYs, place them in a lidded jar with at least enough Kombucha for them to float and store in a cool-ish location, such as a pantry or shelf out of direct sunlight and away from heat sources.

Find more of my kombucha posts here:  https://subearthancottage.com/search/label/Kombucha

Like this post? To make sure you never miss a future post, please sign up for my newsletter.


Posted on 1 Comment

Flavoring Your Kombucha Tea

When you get your homebrew timing right, kombucha is pretty yummy on it’s own. Sometimes you want something a little different, though. Or maybe straight kombucha just isn’t your thing but you still want the probiotic benefits. Luckily you can easily change the taste of your kombucha to make it more palatable or fix a soda craving. Here’s my tips for flavoring your Kombucha tea.


Mixing with juice


The simplest way to flavor kombucha is to mix it with juice or another beverage. This is a great way to get started drinking kombucha. To start, add 1-2 ounces of kombucha to a glass of your favorite juice. As your body and tastes adjust to drinking kombucha you can increase the kombucha to juice ratio.


I like to dilute 3-4 ounces kombucha with sparkling or still water, add a splash of lemon or lime juice and a bit of stevia. This makes a refreshing summer drink when served over ice.

Kombucha is also nice as an add in for smoothies. It can be fizzy on it’s own, though, so make sure to account for that when adding it to blended drinks. Leaving a little extra headspace in the blender is a good idea. Or, stir it in after everything else is blended.

Flavoring your Kombucha Tea
Flavored with peach and cherry teas in a second ferment.

Flavoring your Kombucha with a second ferment

You can also add flavoring in a second, shorter ferment. Basically you’ll put your flavorings in a bottle or jar (I like canning jars), fill almost to the top with your brewed kombucha and cap the jar. Leave at room temperature for 2-4 days and then refrigerate or drink.


The second ferment can increase the carbonation in your kombucha, so it’s a good idea to be cautious when opening and storing the jars. I’ve never had a jar break from the pressure, but I have had the metal disks on canning jar lids pop up in the middle. If I think too much pressure is building up, I “burp” the jars by opening them just enough to release some of the pressure and recap.

There’s a variety of things you can add for the second ferment. Really, any herbs, spices or fruits can be added. If you want to increase the carbonation, add a little bit of sugar, honey, raisins or a sweet fruit. My favorite thing to do is put enough orange peel to fill the jar halfway, add a teaspoon of sugar or honey, top with kombucha and let it sit for two days. It makes a kind of healthier orange soda and uses something that would normally have been tossed.

Flavoring your Kombucha orange and honey
Orange peel and honey Kombucha

Other flavorings I’ve tried:

  • Lemons and limes cut into wedges, sliced or just the peels. You can also use a lemon or lime half after juicing it for another recipe.
  • Fresh sliced ginger, plain or with a dash of chai spice and squirt of honey.
  • Fruit flavored herbal teas, one bag per quart jar.
  • Blueberries.

If you brew your own Kombucha tea, I would love to hear your tips for flavoring your Kombucha. Please share them in the comments below.

Next week I plan to do a FAQ/kombucha myths post. If you have any questions please share them in the comments and I’ll do my best to answer them.

Like this post? To make sure you never miss a future post, please sign up for my newsletter.


Posted on Leave a comment

Continuous Brewing Your Kombucha Tea

Making Kombucha using the continuous brewing method means you’ll always have plenty of Kombucha ready to drink or flavor in a second ferment. Here’s how to do it.

Supplies for continuous brewing

In addition to the basic Kombucha ingredients listed here, you’ll want to have a jar with a spigot. There’s some debate over the best materials for the jar and spigot. The biggest thing to watch for is something non-metallic, although I think I’ve heard stainless steel is okay. Most people like to avoid plastics to prevent any weird chemicals from leeching into the KT. I went with the cheapest, most available option of a glass sun tea pitcher with a plastic spigot.

Continuous brewing kombucha


Keep about half of the finished KT and the SCOBY in the jar and bottle the rest. Brew about half a gallon of tea. I use two black tea bags, one green tea bag and one half to one cup of sugar. Let it cool and add it to the jar with your finished KT and SCOBY. Since you replaced half of the KT, you’ll want to wait a couple of days before drinking from the new batch. After that, you can drink some fresh from the tap every day. Just replace what you drink with fresh sweet tea. Because you are only adding a small amount of fresh tea in relation to the KT, you can drink a little every day without the wait time. I like to keep a small pitcher of sweet tea in the refrigerator to replenish what gets taken out each day.

Like this post? To make sure you never miss a future post, please sign up for my newsletter.


Posted on 2 Comments

How to Batch Brew Kombucha

Kombucha batch

For those who aren’t familiar with it, Kombucha Tea is tea that is fermented with a culture of beneficial bacteria and yeast (SCOBY). There are many claimed health benefits to it, although the most widely accepted is as a probiotic. It can be a bit fizzy, so many people use it as a soda replacement. It’s becoming much easier to find in mainstream supermarkets, but usually runs about $4 for a small bottle. Yikes! It’s really not that complicated to brew your own and the way to go IMO if you want to drink it daily.

My first batch of Kombucha Tea brewing.

Ingredients to start 1 gallon of Kombucha:


3 Black tea bags
2 Green tea bags
1-2 cups Granulated white sugar
1 gallon Filtered water
1 Kombucha SCOBY (I got mine from here: https://www.etsy.com/shop/OKposeyMom)
2 cup Starter Kombucha tea (KT) or distilled vinegar

Supplies:

1 gallon glass jar (with spigot for continuous brew)
tightly woven or knit cloth or coffee filter larger than the mouth of the jar
rubber band or elastic big enough to securely fit around the mouth of the jar.
Wooden or plastic spoon (metal is fine unless you need to stir after adding the SCOBY)

Make sure all jars and utensils are clean. Rinse everything really well to be sure there’s no soap residue. For the first batch, you’ll need a full gallon of tea. I use both black and green tea with three black and two green tea bags. As long as you are using unflavored, caffeinated tea, any ratio should work. Brew the tea like normal and add the sugar. Stir to dissolve. It needs to be plain white granulated sugar to make it easy for the SCOBY to break down. The sugar can be adjusted to taste, but for the first batch I like to use a full 2 cups. I’ve also found that in warmer months the brew gets strong really fast, so I add closer to the full 2 cups then to compensate. In cooler months, I can cut back on the sugar.

When the tea is cooled to about 80 degrees, add the SCOBY and starter Kombucha Tea (KT) and/or distilled vinegar. The temperature really isn’t that important as long as it’s cool enough to not kill the SCOBY. I usually just feel the jar. When it feels no more than a little warm, I add the SCOBY. If you don’t have enough starter KT you’ll use distilled vinegar to make up the difference. Do NOT use cider vinegar. Cider vinegar contains some of it’s own culture “mother”. If you use cider vinegar you’ll end up with some sort of hybrid culture.

Cover your jar with the cloth or filter and secure with a rubber band or knotted piece of elastic. This allows it to breathe while keeping dust and ickies out. Wait. and wait. and wait. lol.
The KT usually takes about 7-10 days to develop. It brews faster in warmer weather, so keep that in mind. Starting around day seven, use a straw to siphon off a little from under the SCOBY. You want it to have a little bit of a vinegary zing to it, but other than that the taste is up to you. My first batch tasted like cider made from honey crisp apples-tart but still really sweet.

The longer it brews the less sweet and more vinegary it will taste. If you think it needs to brew longer, leave it for another day or two and taste again. If you like the taste, great! Time to bottle it and brew batch number two.

For batch brewing, you’ll basically be doing everything you did for your first batch. All but 2 cups of KT from your first batch can go in to bottles. I use Mason jars. If you want to add flavorings you’ll add them to the bottled KT. I’ll do a post about that later. The 2 cups you reserve and your SCOBY will stay in the jar to start the next batch. (Every few batches, you will want to transfer them to a non-metallic bowl so you can wash the jar. If you keep a second jar on hand, you can just switch jars every batch.)

Repeat the above steps including the wait time for each new batch.

With each new batch, you will grow a new SCOBY. Usually the new SCOBY will grow on top of the old SCOBY. Technically you can separate the new SCOBY each time to use in your new batch. I like to leave the SCOBYs alone until it gets to be about a half inch to an inch thick. After that,  I’ll separate off a few layers by pulling it apart between two layers. One SCOBY keeps brewing while the other goes into a big jar with some KT and a lid, aka a SCOBY hotel. Many SCOBYs can live in a hotel as long as you have enough KT to keep them moist. It’s always a good idea to have an extra SCOBY or two on hand in case your batch gets contaminated. You can also give your extra SCOBYs to friends so they can start their own brew.

Next week I’ll cover how to move from batch brewing to continuous brewing.

Like this post? To make sure you never miss a future post, please sign up for my newsletter.


Posted on 3 Comments

Kenmore 385 Sewing Machine Hook Timing Part 2 with Video

I finally got my Kenmore 385 sewing machine’s hook timing adjusted and working properly again. This time, I figured out that there is a plate on the bottom of my machine that allows me to access the necessary set screw without taking the case off. I do think it’s a little more difficult to see what I’m doing that way, but it’s much less scary.

This time, once I got it adjusted, I decided to make a quick (awkward, one handed) video while I still had it open. Hopefully the video and my previous post will help others tackle this simple sewing machine repair.

Adjusting the Hook Timing on a Kenmore 385 Sewing Machine

Shop update: Freebies and a sale

Knowing that so many are stuck at home right now needing distractions, I’ve decided to make all of my machine embroidery design files free until April 30. That’s the day my area’s shelter in place order expires. If it is extended, I’ll extend the embroidery design freebies, too. If you make something with one of my designs, I would love to see it.

My full shop is still open, and will be as long as everyone in my household is healthy. I’m using extra care with handwashing and using hand sanitizer before coming into contact with products and packaging as well.

All of my handmade soaps are currently on sale for 20% off. You can find them here.

Like this post? To make sure you never miss a future post, please sign up for my newsletter.

Kenmore 385 Sewing Machine Hook Timing Part 2 with Video
Posted on 4 Comments

Sewing machine repair: Hook timing

I’ve been sewing lots of masks lately. Apparently my sewing machine needed a break, so it decided to skip time again. Thankfully I’ve done it a few times now, so I should have it up and running soon.

Hook timing is a fairly common problem that sends many sewers running to the repair shop. When it happened the first time on my older Kenmore, I decided to try to repair it myself first. My thinking was, since it’s a mechanical machine with mostly metal parts, as long as I was careful, I couldn’t really hurt anything. I probably would have thought twice before attempting it on a computerized machine.

All machines are a little different, so what worked on mine may not work on yours. Something I recommend to everyone who wants to work on their own sewing machine, is getting a copy of the service manual. Honestly, I still need to do this. There’s tons of info online, but having the actual service manual is even better. You should have an owner’s manual on hand, too. It  covers basic care and maintenance. For repairs, though, the service manual will give you technical instructions and confidence. 

Hook Timing?

Before taking things apart, determine if hook timing is causing the problem. If the needle (top) thread isn’t picking up the bobbin (bottom) thread, hook timing is a prime suspect. It’s always a good idea to rule out simple problems first, though. Try swapping the needle, rethread the machine and sew on some scrap fabric. If it’s been a while since you’ve dusted the lint out of the bobbin case or you’ve been sewing on linty material, give it a good cleaning.

Once you’ve tried the easy fixes, if it still isn’t working right, look at how the needle and the bobbin hook intersect. This page, https://tv-sewingcenter.com/general/sewing-machine-timing-hook-timing, has illustrations, photos and descriptions for where they should meet on both rotary and oscillating machines. 

Taking a look at my oscillating hook.

My machine is an oscillating machine, so the hook tip should pass just above the eye of the needle. Mine was passing below the needle’s eye, so clearly the hook timing needed adjustment.

Open it up

The first and honestly the hardest step was figuring out where all the screws were that I needed to remove to take off the casing. (Actually, the first step was to turn off and unplug the machine. If you’re attempting this at home, do not skip this step!) On my Kenmore, I have to take off the side by the hand wheel, a plate on the bottom, and the front panel. 

More cleaning

While I have my machine open, I like to take the opportunity to clean it out and oil it. Oiling a linty machine, using the wrong oil or putting it in the wrong places can cause tons of problems, though, so if you’re not sure, stick to dusting only.

Find and adjust

Next, I tilted the machine on to it’s back so I could get a good look at the mechanism that rotates the hook. Once I had isolated that, I found a hex head set screw. Loosening that allowed me to gently adjust the hook position so that the tip passed just above the needle’s eye.

About in the middle, just above the motor is a silver piece with a round, black screw near the top. That is the set screw I loosened to adjust the hook timing.

When I was sure I had it properly positioned, I tightened the set screw. I turned the hand wheel a few more times, making sure everything still looked good before I put the casing back. A quick test run showed everything was working properly again.

Done!

It’s so satisfying to be able to make simple repairs to my machines myself, especially when most repair shops start around $75 and go up from there, depending on what needs to be done. 

Hook timing