Posted on 3 Comments

How I Patched My Denim Jeans And Added an Embroidery Embellishment

Another way to patch denim jeans

My mom gave me several pairs of worn out denim jeans for me to play with several months ago.  A few just happened to be my favorite style from Old Navy and in my size. Rather than cut them up for other projects, I decided to make them cute with patches and a little embroidery. Here’s the method I used for patching denim jeans.

Another way to patch denim jeans
First, the knees.

Patching the knees

Prepping the denim jeans

In order to sew at the knees, you have to carefully rip out the stitches along one leg seam. You don’t have to rip out the entire seam, but you need to give yourself plenty of room above and below the knee to work. One seam is usually top-stitched. To make it easier all around, do NOT rip out the top-stitched seam.

After ripping out the seam, press the denim as smooth as possible with an iron.

Prepping the fabric

To patch the denim jeans, I chose to go underneath the rips and leave the torn edges visible. For the patches, I used cotton quilting material left over from sewing masks . I cut the fabric into squares a few inches bigger than I needed to patch. In the future, I will probably interface the fabric at this time. I knew I planned to interface everything at a later step, though, so I didn’t.

I pinned the fabric to the inside of the denim jeans.

Sewing the patches

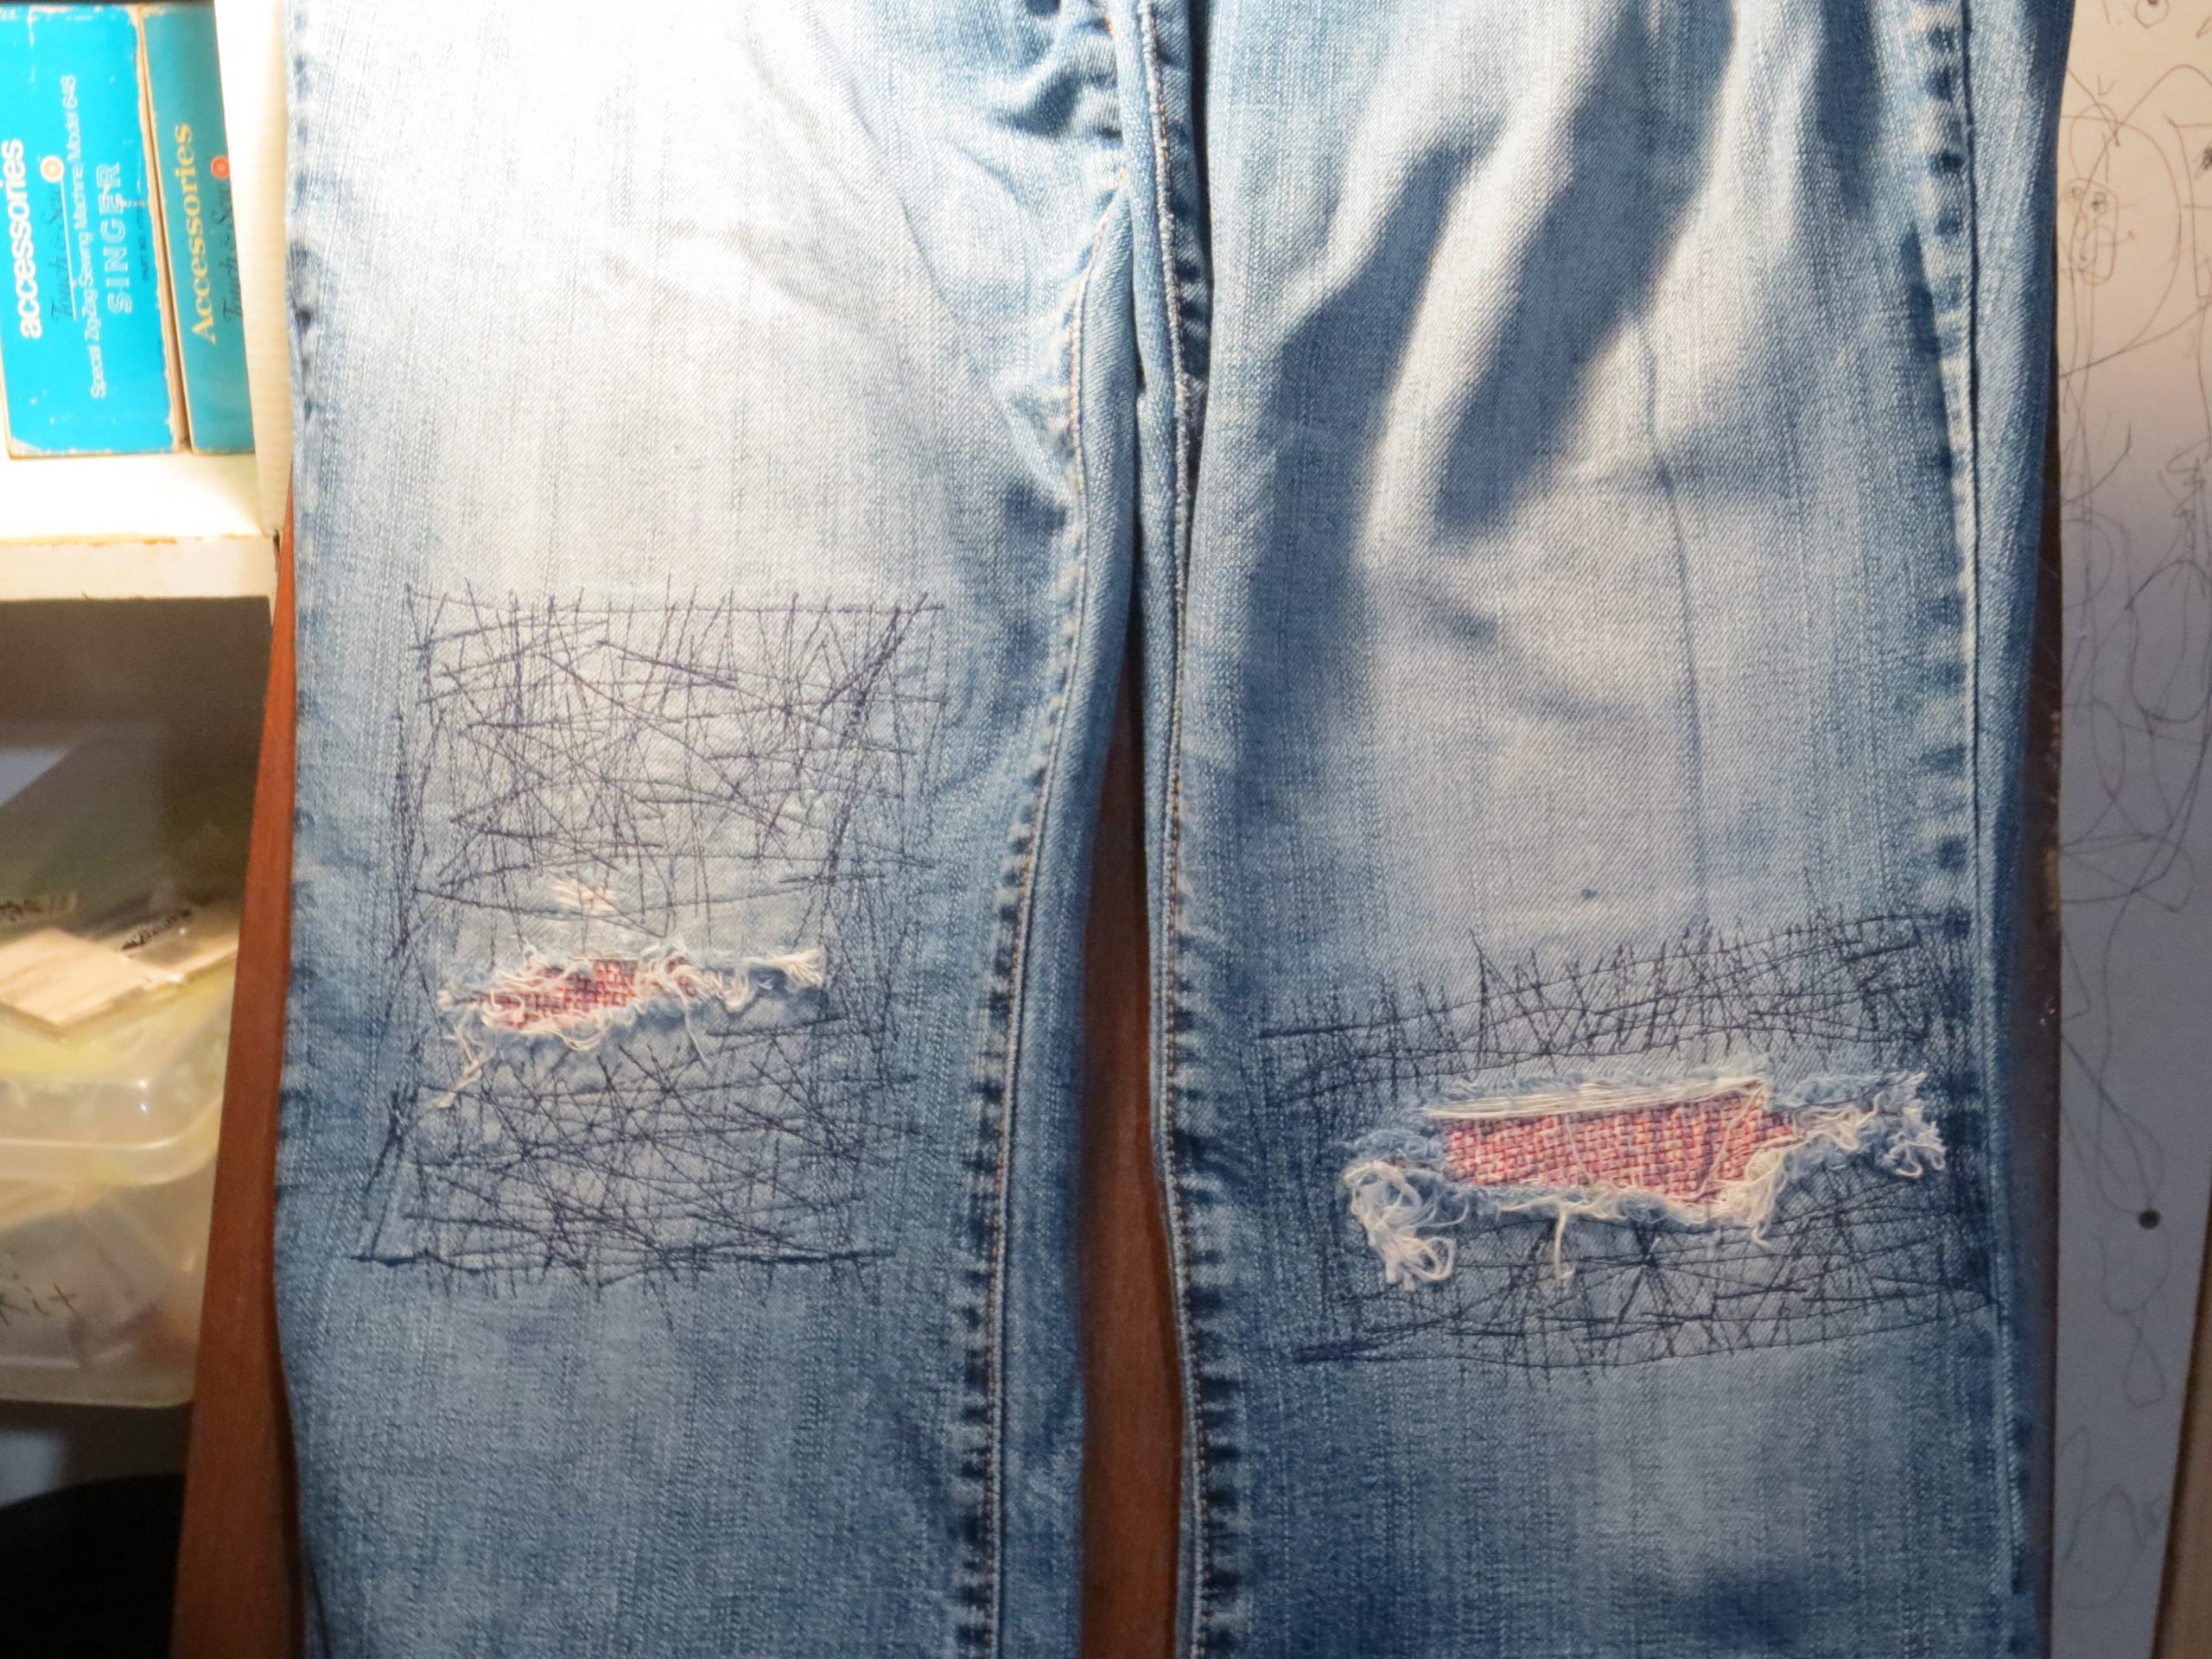
Before sewing the crazy stitches shown in the photos, I sewed a single line of stitching all around the patch about a quarter of an inch inside the edge of the quilting fabric. This kept it in place while I did the crazy reinforcing stitches. After it was secure, I stitched in all different directions between the edge of the tear and slightly overlapping the first single line of stitching.

This side was more worn out, so it got more reinforcement stitching.

When jeans rip, usually the material around the tear is worn thin as well. In the past, I often left too much of the worn area without reinforcement. This results in new rips soon after the first repair. This time I reinforced at least an inch and a half around the tears.

Reinforcing the patched denim jeans with interfacing

After I was done stitching, I ironed interfacing to the inside. I did the interfacing last to act as a soft layer between my knees and the stitching. In retrospect, I probably should have interfaced the quilting cotton first, and then interfaced again at this step if I felt it was necessary. So far my jeans are holding up with the way I did it, though.

Sew it up

With the patches done, all that’s left is resewing the side seams. I just pinned it closed and sewed it back along the original stitching line. For the overcasting to finish the raw edges, I was lazy and used the overedge stitch on my sewing machine instead of switching to my serger. Zig-zag stitching along the edge to finish it would also work.

Embroidering the pocket

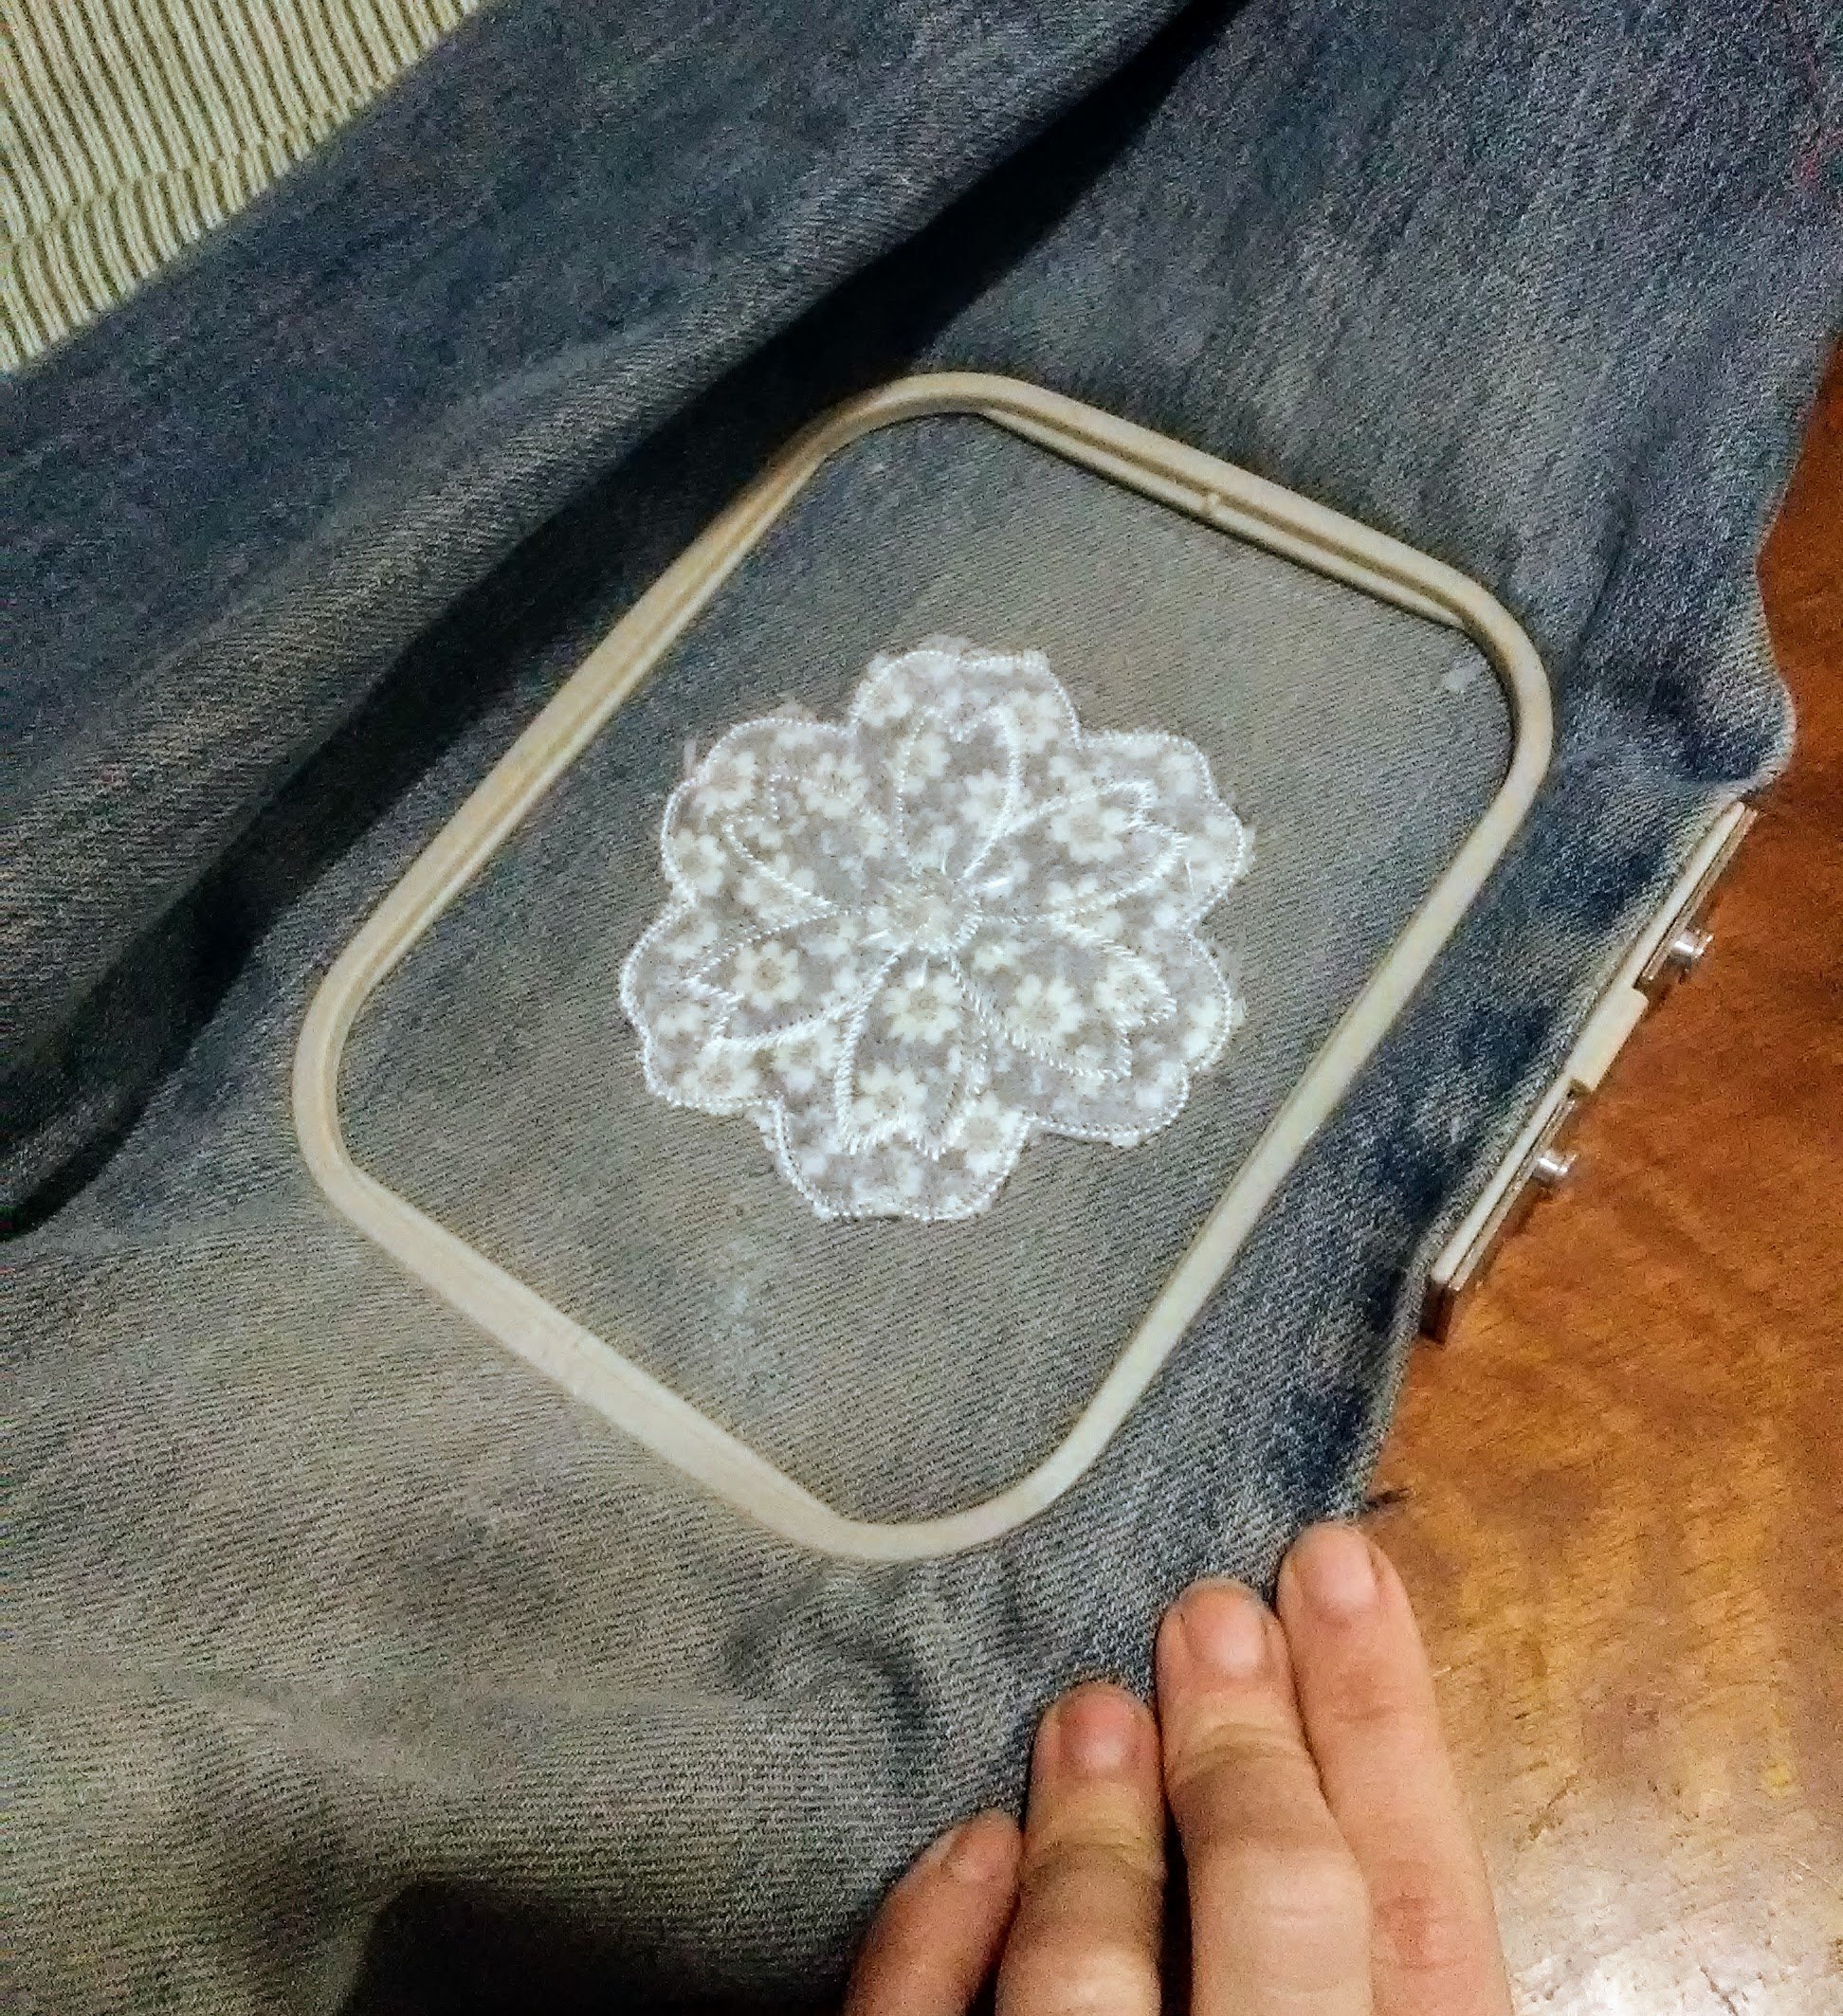
To embroider the pocket, I first removed the pocket from my jeans. Since it’s too small to hoop, I hooped tear away stabilizer alone and secured the pocket to the stabilizer with a glue stick. I used my Damask Rose embroidery pattern for the embellishment.

After the embroidery machine was done working its magic, I removed the stabilizer and replaced the pocket on my jeans using a heavy denim thread in a close shade to the original thread.

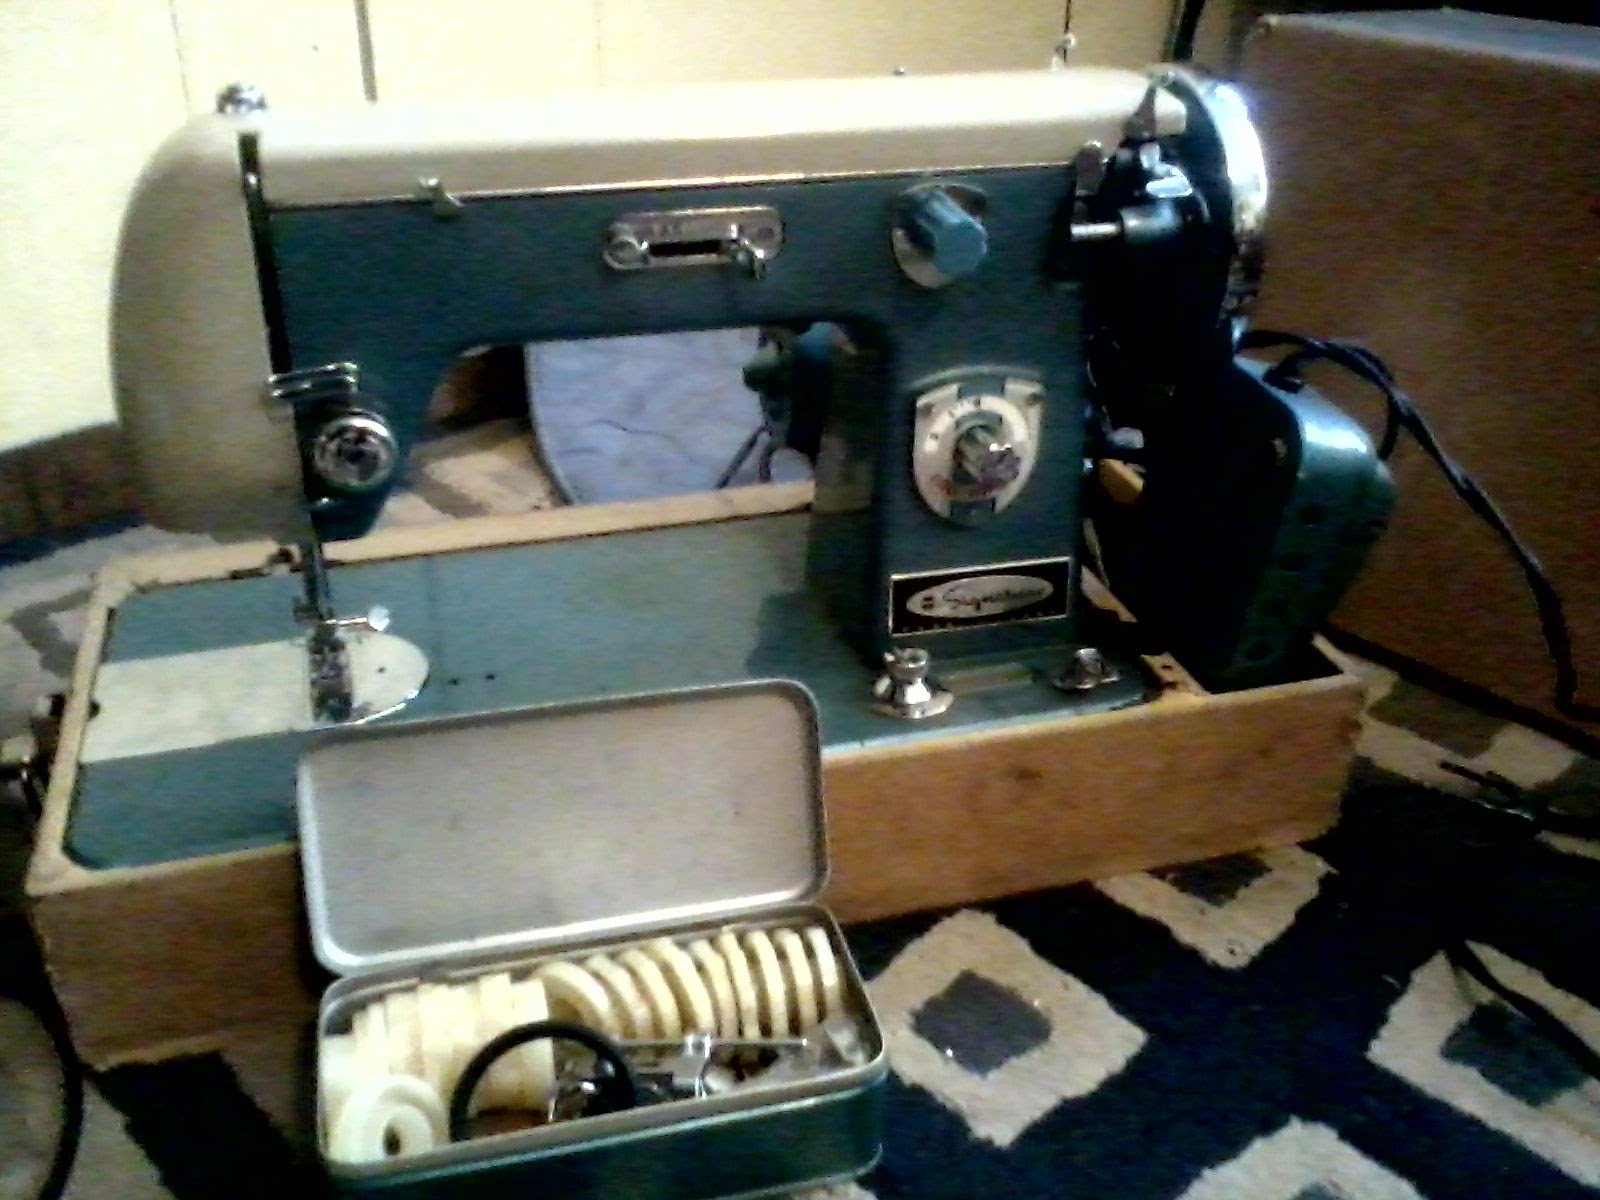
Simple, right? Actually, I tried to do that, messed up the hook timing on my Kenmore sewing machine AGAIN within the first few stitches and had to move to my backup vintage Montgomery Ward Signature machine. It took a few minutes of fiddling with the settings, but once I got it set up correctly it sewed through the heavy denim layers like butter.

In all fairness to my Kenmore, I did probably deserve it this time, between the crazy reinforcement stitches and then trying to sew through multiple layers of denim with thick thread. At least this time it let me reset the hook timing without much fuss.

Have you gotten more acquainted with your sewing machine lately? I’d love to see your projects in the comments.

Like this post? To make sure you never miss a future post, please sign up for my newsletter.

Posted on 1 Comment

Simple Way to Patch the Back Pocket of Denim Jeans

The back pockets of denim jeans are prone to wearing out at the top corners with use. If that’s where you carry your phone or wallet, you’ll almost certainly develop holes at those stress points long before the rest of the jeans are worn out. Luckily, repairing a back pocket is a pretty simple fix.

Pocket with hole

These are my husband’s work jeans. You can see the inside corner of the right pocket has a small hole and another one is forming on the inside corner of the left pocket. These are the steps I used to repair and reinforce the pockets.

Choosing your patch material

The first thing you’ll want to do is add material to patch the hole. The material should extend past the edges of the hole, overlapping onto the good fabric by about a centimeter or so. I like to use the iron-on denim patches, but fusible webbing or strong interfacing works, too. This product is similar to the one I used. You can also just use a scrap of fabric a bit larger than the hole, but I prefer the added strength of an iron-on product. An iron-on product is also easier in that it won’t shift while you sew it in.

Iron-on patch
denim iron-on patch for pocket repair
Wrong side of iron-on patch

Securing the patch to the pocket

If you’re using an iron-on product, iron it on to cover the hole from the inside according to the manufacturer’s instructions. For sewn-in patches, baste in patch to keep it from shifting.

Ironed on patches
Patches ironed in place on the inside of the jeans.

Reinforce the patch

Regardless of whether you chose an iron-on or sew-in patch, you need to reinforce the patch by sewing a strong row of stitches around the edges. For a less visible patch, I like to sew a square of stitching around the hole, making sure to include the corner of the pocket in the square. I sew over the square a few times to reinforce. Choosing a thread that matches the denim or is slightly darker makes the patch less noticeable.

Reinforcement stitching from the inside.

For the actual hole, I like to sew back and forth over the hole in a matching thread. This secures the area to the patch, hides the frayed edges and prevents further ripping.

For a more visible patch, you can get creative with the patch material and choose a contrasting thread. You can also crazy stitch over the area, similar to what I did here.

Preventing the problem

Whenever I patch one pocket rip, I take the time to reinforce all the corners with iron-on patches and a square of reinforced stitching. It doesn’t take much extra time, and keeps the rest of the corners from needing repair in the near future. You could even do this to new jeans as a preventative measure if you have this problem frequently.

Final result

Here’s the finished patches. I’m pretty satisfied with the results. The work isn’t that noticeable and matches the variations in blue on the rest of the jeans. It’s definitely better than holes that will continue to rip in a revealing location.

Like this post? To make sure you never miss a future post, please sign up for my newsletter.

Shop sales!

For the entire month of September, all of my handmade soaps are 20% off. Shop handmade soaps here.

My machine embroidery files are also on sale all month for just $1 each! Be sure to check out my latest Halloween designs. Shop embroidery designs here.

Posted on 2 Comments

Easy fix for worn out denim jeans

Denim jeans don’t have to be tossed or cut up for crafts when they start to wear out. With a little effort, you can easily get some more wear out of your favorite jeans. For this tutorial, I’m using a pair of denim blue jeans that are still in good shape except for where my thighs touch. There they are really worn on one side and there is a hole on the other. Because of where the hole was located, I wasn’t comfortable even wearing them around the house, so I decided to try a simple fix.

Interfacing for support

First, I ironed lightweight fusible interfacing on the inside of the worn areas, making sure to completely cover all the worn out spots with the interfacing.

Reinforce with stitching

Once it fused and cooled down, I turned them right side out. Using a narrow zig-zag, I stitched back and forth over the hole and worn areas. This serves to secure the interfacing and add strength.

If you can, drop or cover the feed dogs on your sewing machine so you can move the jeans freely under the needle. The machine I used doesn’t have a way to drop them and I don’t have the special foot plate to cover them. Instead, I used a combination of repositioning and forward and reverse stitching to make it work.

Denim Jeans Fix

Depending on the location, you could use contrasting thread and decorative stitches to turn the repair into an embellishment.

Lengthening a slightly short pair of jeans

I also have a pair of jeans I love, but they needed a button sewn back on. They were also a little short, so I replaced the button and let out the hem while watching TV one evening. These heavy denim jeans are now ready for the coming colder months.

Buttons!

These have an obvious line where the hem was. They’re really cute so I don’t care.

Like this tutorial? To make sure you don’t miss out on future tutorial posts, sign up for my newsletter.

Easy denim jeans fix.
 

Posted on 1 Comment

Patching Denim with an Embroidery Machine

Finished sewing

I love wearing denim blue jeans, but chasing my boys and taking care of my small zoo, they get lots of wear and tear. One of the worst things is having to scrap a favorite pair because of one too many rips. I’ve repaired rips in a utilitarian way in the past. This time I thought I’d try patching denim using my embroidery machine. I haven’t done much applique, so I learned some things along the way.

This tutorial makes use of an embroidery machine and serger. You could also adapt it to use a sewing machine or applique by hand and embellishing with hand embroidery.

Items needed

  • Denim jeans or other item to repair
  • Interfacing
  • Thread in colors of choice
  • Seam ripper or similar tool
  • Scrap of fabric at least 4 in x 4 inches
  • Stabilizers: Cut away or tear away, water soluble optional
  • Floral denim patch applique design file

Step 1: Open the side seam.

Since I’m repairing a ripped knee, I needed to take out one of the side leg seams on my jeans. Using a seam ripper made this easy, but you could use small scissors, too. I left the seam intact at the hip and ankle, only removing what was necessary to lay the ripped area flat in the hoop without risking sewing it to the back. Leaving a little intact makes it easier to resew the seam at the end.

Step 2: Prepare the rip.

Iron the area around the rip so it’s smooth and flat. If there’s a lot of loose threads around the rip, trim them. I caught this rip before it frayed too badly, so no trimming was needed.

Before photo patching denim
Side seam removed and jeans ironed flat.

I wanted the embroidered area to be solid, so I applied some interfacing to the back of the rip. I used some medium weight interfacing, but any should work, since it’s job is just to hold it together while the jeans are embroidered. This is a perfect project for using whatever scraps are handy.

Interfaced rip
Back of rip with interfacing applied.

Step 3: Hooping.

For denim, tear away or cutaway stabilizer is best. I chose cutaway for the most stability. It’s stiff, but it should soften in the wash. If not, I’ll switch to tear away next time.

I tend to float projects and only hoop the stabilizer whenever possible. This project seemed like it would work better tightly anchored in the hoop. It took a few tries to center the rip in my hoop so that all edges would be covered by my design. My machine has a 4 in x 4 in embroidery field, so the rip just barely fit. Smaller tears will be easier to fit in my small hoop.

Hooped denim
First attempt. Once I put it in my machine and had it circle the embroidery field, I saw it needed re-positioning.

Step 4: Embroidering the patch.

Once it’s properly hooped, it’s time to sew. On my machine, the first color stop said “Applique Material”. I haven’t done much machine applique, but the ones I am used to usually follow the sequence: placement stitch, tack down the applique (then trim excess), sew the final applique stitching. So, confused I just put the applique fabric and a water soluble stabilizer (optional) on top of the rip and pushed start.

stitching denim patch

What my machine was telling me to do was to just hoop the applique fabric so I could remove it from the hoop and cut it neatly. The second color stop was the positioning stitch. That would be stitched on my jeans and then my neatly trimmed applique could be placed in position and the stitching completed. Since I did everything at once, my applique isn’t as tidy as it could be. I will definitely listen to my machine next time.

Finished sewing, but still has water soluble stabilizer on top.
Finished sewing.

Step 5: Remove from hoop and cut away excess stabilizer

I also steam pressed over the back of the patch to start softening the stabilizer.

Patch from the back.
Patch from the back with stabilizer trimmed.

Step 6: Sew the leg seam.

To repair the leg seam, I used a lock stitch setting on my machine. You could also sew the seam twice to reinforce it or just use really heavy thread. I then serged the raw edge. If you don’t have a serger, an overedge stitch or zig-zag stitch would also work.

Finished!

Finished patching denim
Finished patch. Next time I will use heavier thread so the embroidery shows better.

Not bad. I wish I had used heavier thread so the embroidery would show up better. Listening to my machine and cutting the applique fabric to size before I sew it on to eliminate the raw edges peeking out is another improvement for the next time I’m patching denim.

If you’d like to use this applique design, you can download the file here. You can use the design on items you make to sell as well as for personal use, but please don’t sell the design file.

Floral knee patch applique
Floral knee patch applique design image.

Like this tutorial? To make sure you don’t miss out on future tutorial posts, sign up for my newsletter.

Posted on 5 Comments

Sewing Machines

I’m a bit of a sewing machine hoarder. If you don’t count the one that is Finn’s, I have four sewing machines. That includes my sewing and embroidery machine combo, but not my two sergers. Also not including the knitting machine, because it knits.

While I’m certainly not an expert, I do have my preferences. I would take a well-built, old metal machine over a new machine any day. Mainly because when they break, I tend to do this:

Sewing Machines- Beige Vintage Montgomery Ward Signature.

That is my first sewing machine. It is a Montgomery Ward’s Signature sewing machine from the 60s, I think. I got it from my mom who got it from my grandma. I can’t remember what was wrong with it that time, but it sews nicely now.

The Signatures at that time were made by a Japanese company that specialized in industrial machines, I think for sewing feed sacks. That translates to a heavy duty, domestic sewing machine that will sew through anything. It also has a set of cams. Cams are interchangeable disks that allow it to sew pretty embroidery stitches.

My next sewing machine is another, slightly older Montgomery Ward’s Signature. This one was rescued from a lot of machines that were destined for the junk heap.

Sewing Machines- Blue Vintage Montgomery Ward Signature.

I love the blue color! It reminds me of cars from that era.

Like the other Signature, it uses cams. You can see them in the little accessory box. I actually like this one a little better than the other. It sews the prettiest straight stitch out of all my machines and has a cam that stitches a row of teeny tiny hearts!

I’ve never actually made anything on it, though. Unlike the other, this one is in a portable case, which is hilarious. I lift my 40+ pound four year old all the time and lifting that machine is still a struggle. Since I don’t have a dedicated place for it, I don’t have the motivation to lug it out.

My workhorse is a 90s model Kenmore, made by Janome. The case is plastic, but all the internal workings are metal. I know, because I’ve had to open it up a few times now to fix the hook timing. (Posts on that here and here.)

That is the best photo I could find of it not undergoing repairs. I love that machine because it isn’t as quirky as the Signatures. It also tells me how to thread it right on the machine, and when it comes to sewing machines, threading is half the battle.

My final machine is the Brother SE400 embroidery combo. I keep it set up as an embroidery machine because I have three other sewing machines. Also, it scares me, so I want to risk messing it up as little as possible. I haven’t had it opened up beyond the bobbin area, but I’m guessing there’s some plastic, and I know there are scary electronic components. With the other machines, I am freer to play because I know that if something happens, it’s not likely to be catastrophic. With this, something like a timing issue would definitely mean a big repair bill.

But, it makes pretty embroidery, has loads of decorative and utility stitches as a sewing machine, and has the most awesome needle threader I have ever seen. Seriously. Finn’s machine has a needle threader that I will never use, because it is complicated and I stabbed myself with it one time. Brother’s needle threader is like magic. It is especially handy when embroidering with multiple colors. Color changes take mere seconds.

Just to show I’m not as much of a hoarder as I could be, here is a photo of the White machine I couldn’t get working and sold on craigslist.

Sewing machines - White Rotary

Then, while I was waiting for the buyers to show up, I decided to play with it a bit and figured out what was wrong. I hope they love it, or at least open it up to look at from time to time. Sigh.

Like this post? To make sure you never miss a future post, please sign up for my newsletter.


Posted on 4 Comments

Sewing machine repair: Hook timing

I’ve been sewing lots of masks lately. Apparently my sewing machine needed a break, so it decided to skip time again. Thankfully I’ve done it a few times now, so I should have it up and running soon.

Hook timing is a fairly common problem that sends many sewers running to the repair shop. When it happened the first time on my older Kenmore, I decided to try to repair it myself first. My thinking was, since it’s a mechanical machine with mostly metal parts, as long as I was careful, I couldn’t really hurt anything. I probably would have thought twice before attempting it on a computerized machine.

All machines are a little different, so what worked on mine may not work on yours. Something I recommend to everyone who wants to work on their own sewing machine, is getting a copy of the service manual. Honestly, I still need to do this. There’s tons of info online, but having the actual service manual is even better. You should have an owner’s manual on hand, too. It  covers basic care and maintenance. For repairs, though, the service manual will give you technical instructions and confidence. 

Hook Timing?

Before taking things apart, determine if hook timing is causing the problem. If the needle (top) thread isn’t picking up the bobbin (bottom) thread, hook timing is a prime suspect. It’s always a good idea to rule out simple problems first, though. Try swapping the needle, rethread the machine and sew on some scrap fabric. If it’s been a while since you’ve dusted the lint out of the bobbin case or you’ve been sewing on linty material, give it a good cleaning.

Once you’ve tried the easy fixes, if it still isn’t working right, look at how the needle and the bobbin hook intersect. This page, https://tv-sewingcenter.com/general/sewing-machine-timing-hook-timing, has illustrations, photos and descriptions for where they should meet on both rotary and oscillating machines. 

Taking a look at my oscillating hook.

My machine is an oscillating machine, so the hook tip should pass just above the eye of the needle. Mine was passing below the needle’s eye, so clearly the hook timing needed adjustment.

Open it up

The first and honestly the hardest step was figuring out where all the screws were that I needed to remove to take off the casing. (Actually, the first step was to turn off and unplug the machine. If you’re attempting this at home, do not skip this step!) On my Kenmore, I have to take off the side by the hand wheel, a plate on the bottom, and the front panel. 

More cleaning

While I have my machine open, I like to take the opportunity to clean it out and oil it. Oiling a linty machine, using the wrong oil or putting it in the wrong places can cause tons of problems, though, so if you’re not sure, stick to dusting only.

Find and adjust

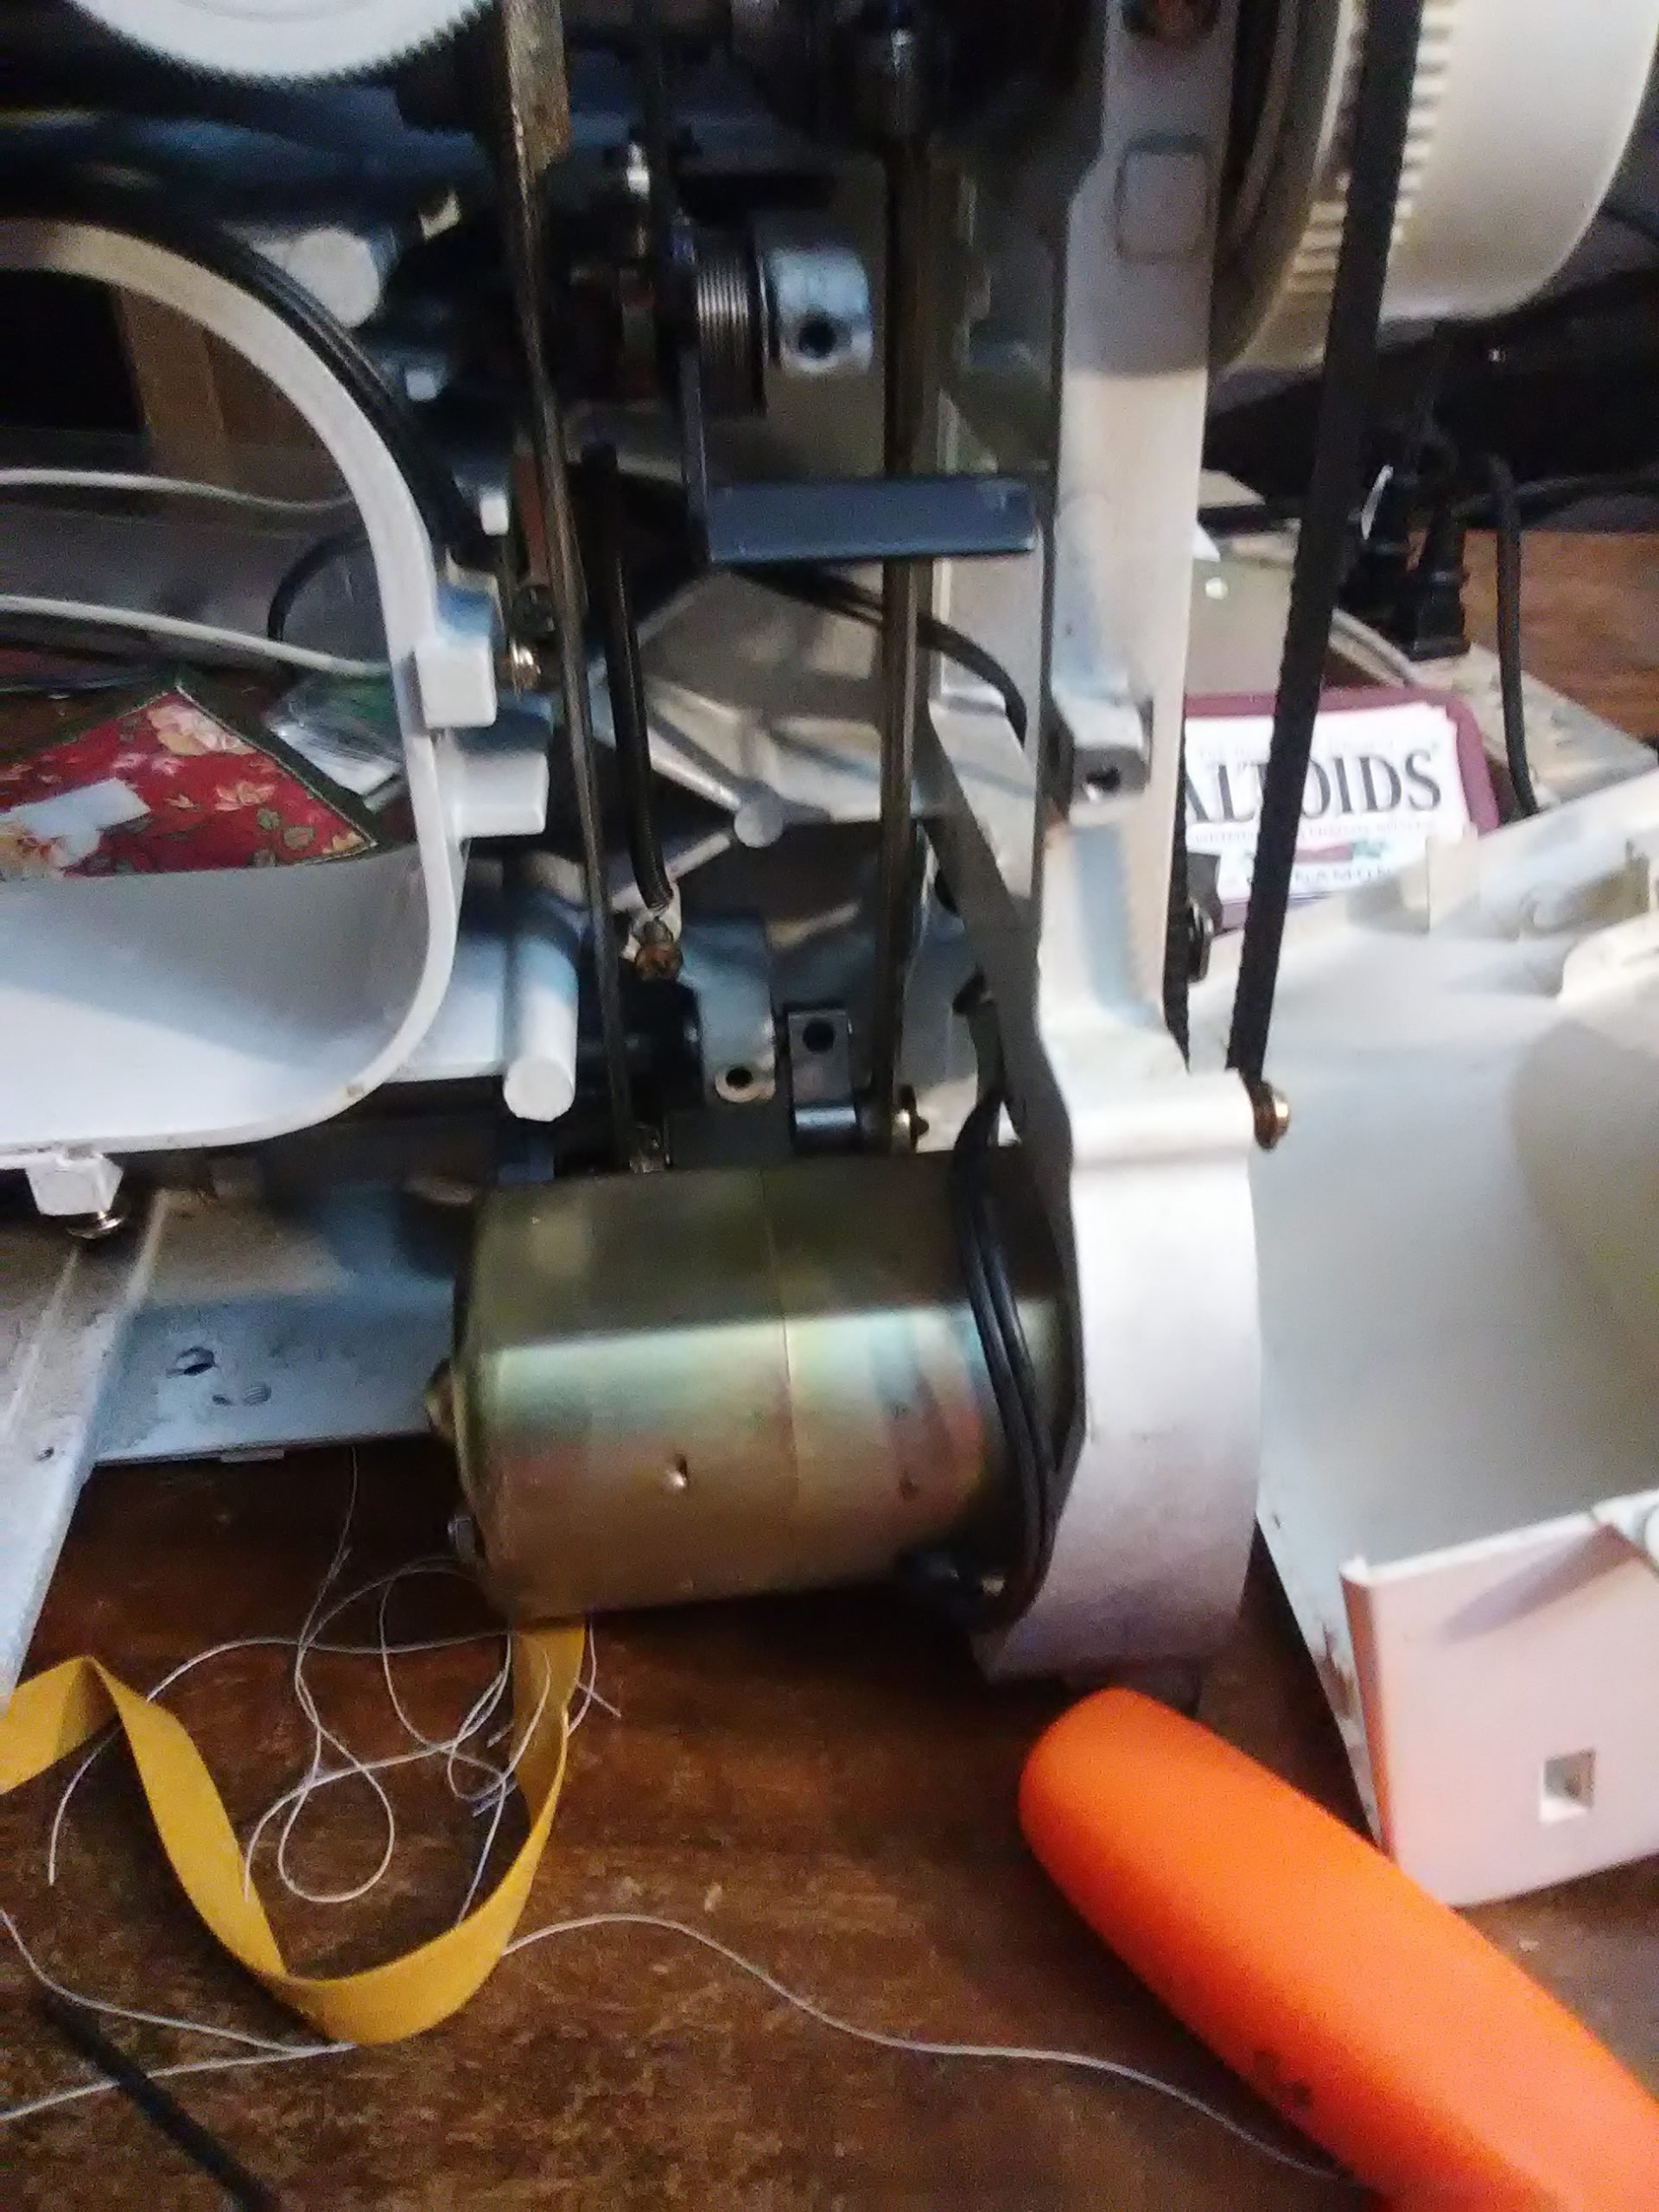
Next, I tilted the machine on to it’s back so I could get a good look at the mechanism that rotates the hook. Once I had isolated that, I found a hex head set screw. Loosening that allowed me to gently adjust the hook position so that the tip passed just above the needle’s eye.

About in the middle, just above the motor is a silver piece with a round, black screw near the top. That is the set screw I loosened to adjust the hook timing.

When I was sure I had it properly positioned, I tightened the set screw. I turned the hand wheel a few more times, making sure everything still looked good before I put the casing back. A quick test run showed everything was working properly again.

Done!

It’s so satisfying to be able to make simple repairs to my machines myself, especially when most repair shops start around $75 and go up from there, depending on what needs to be done. 

Hook timing

Posted on 1 Comment

Sunbeam Mixmaster Update

Last Thanksgiving I bought a Sunbeam Mixmaster to help with all the gluten free baking. This Thanksgiving, I broke my Sunbeam Mixmaster by sticking a plastic spatula between the beaters while it was mixing blueberry muffins. Broke as in pieces fell out of the machine and the beaters stopped spinning. It’s probably a good idea to turn off a mixer before scraping the bowl.

A quick internet search told me I probably broke the plastic drive gears, and the remedy for that was a dumpster burial. At that point, I figured it wasn’t going to get worse, so I had nothing to lose by taking it apart and seeing for myself if it was reparable.

When I finally figured out how to open it, everything looked fine. No sign of anything broken, and the plastic gear that turns everything had minimal wear. The part that latches the beaters in place looked fine. I couldn’t find anything that looked like it was missing the tiny broken pieces. Little pieces that, after thinking more about it, looked oddly like the little tabs on the beaters…

At that point I grabbed the the beaters and compared them to the rarely used dough hooks. Sure enough, the tabs were missing from the beaters but not the dough hooks. Yay! Replacing beaters is cheap and easy. The only problem was now my mixer looked like this:

Luckily I reassembled the mixer without breaking anything. I tested it with a loaf of banana bread mixed with the dough hooks, and it worked fine. Amazon had replacement beaters for about $10, so it should be fully functional in about a week.

My guess is that those tabs are designed to break under pressure if something gets caught in between. While the drive gear is plastic, it’s pretty thick. Even with my mistake and a year of using it almost weekly, it looks to be in good shape. It makes me wonder if some of the people who thought they stripped the drive gear actually just needed to replace the beaters.

In the long run, if money allows, a mixer with an all-metal drive would be better. From my year of use and seeing how little wear there is on the inside, I do think this Sunbeam Mixmaster is a good budget-priced stand mixer. It has mixed everything I’ve thrown at it, including a double batch of banana bread and a meatloaf (separately, of course) with no trouble. Everything, that is, except for spatulas.
Don’t forget: this holiday season, take 30% your SubEarthan Cottage order with coupon code “ShopSmall18”. Valid through December 10, 2018.