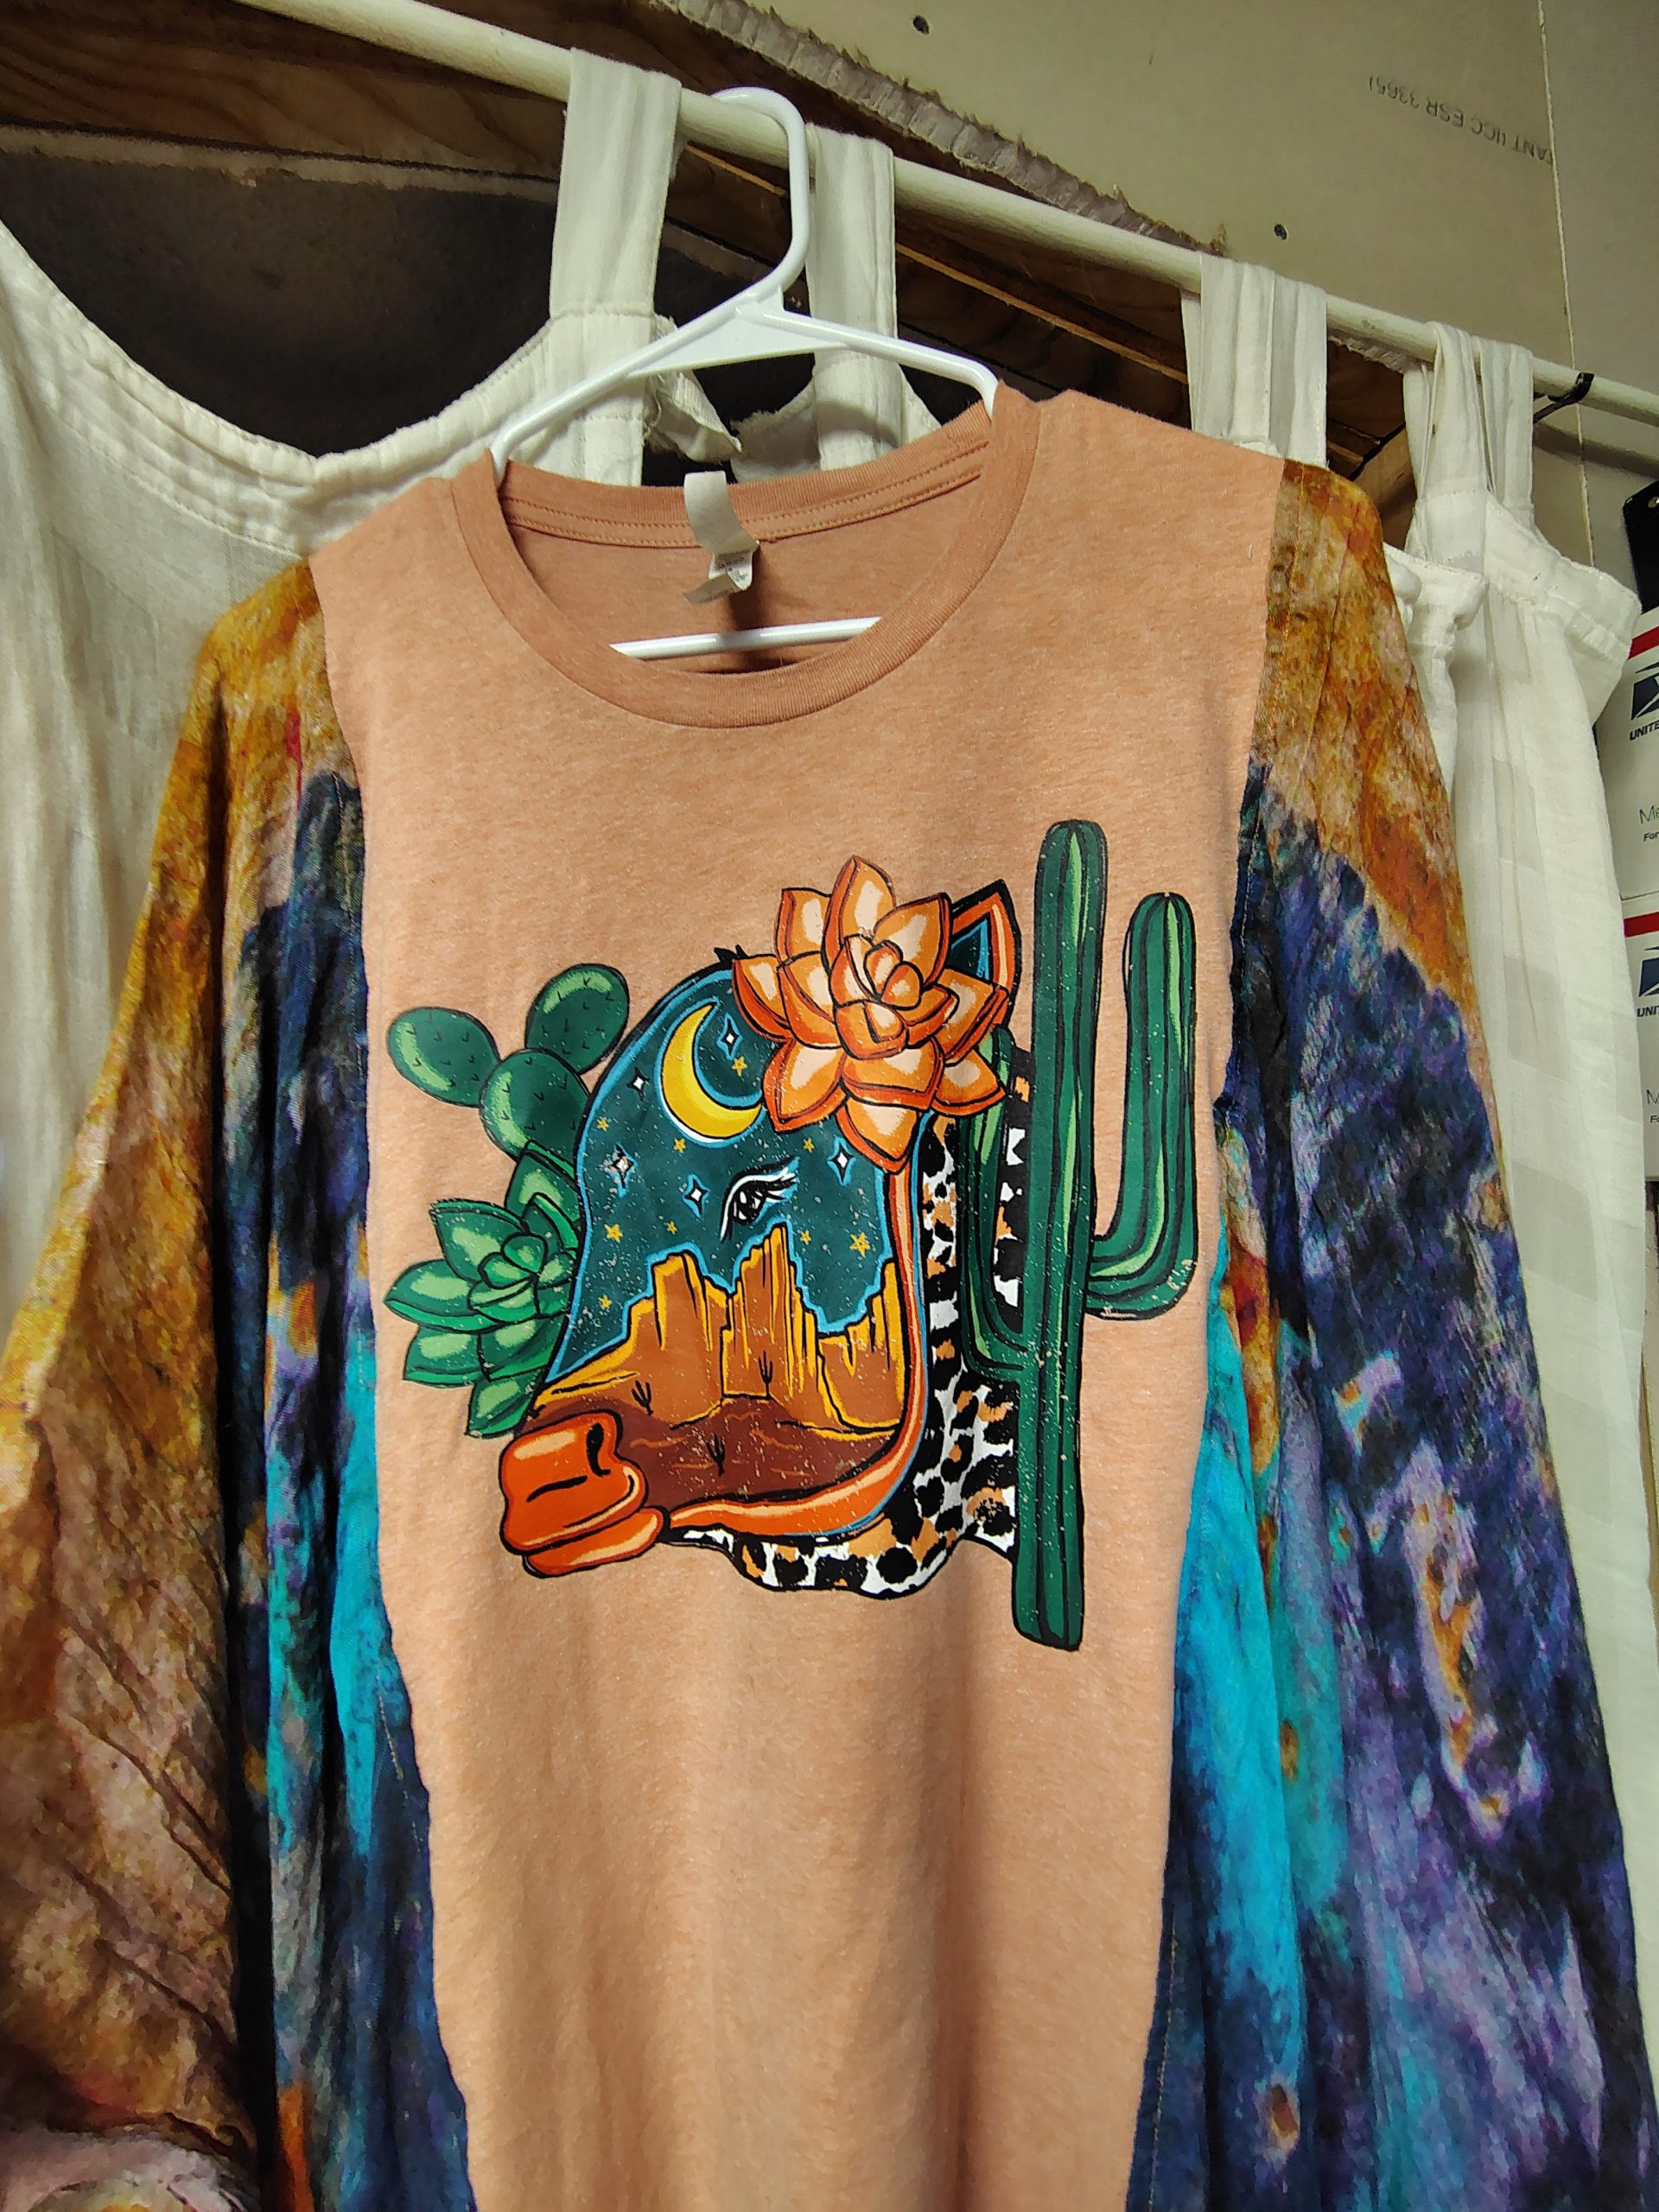
Better photos are coming soon, but I really wanted to show this one off and answer a few questions about my poncho shirts.
Sizing. My goal with these shirts is to make them so drapey and roomy that they will fit the most body types through just about everything. If you gain 15 pounds because hormones or pizza, this shirt has your back. If you get pregnant and gain 50+ pounds like I did every single time, it’s still going to be loose and drapey, although probably a little shorter. If you have that baby and choose to nurse them, it’s got you covered. Literally. If you like a little coverage while feeding your baby, this shirt will provide.
I list the measurements of these shirts flat on my website. This one is 42 inches from side seam to side seam flat. That means it has an 84 inch circumference.
The length is determined by the length of the original T-shirt and scarves. While they look adorable layered over a cami or with a little belly showing, I know not everyone likes that. I can totally add a coordinating piece of T-shirt to lengthen the middle front and back of one if you’d like.
Or, let me know your preferred length and colors and I will scour the thrift stores for a suitable shirt and scarf combo for you.
Or, and this option does make me a bit nervous, I can make a poncho shirt out of a t-shirt you send me. It only makes me nervous because WHAT IF MY WELL BEHAVED SEWING MACHINE DECIDES TO EAT SOMEONE’S SHIRT!!! I’m probably being a little paranoid. Also, I can do customs just because, not only for sizing issues.
Those custom options will only cost more if the material costs are significantly higher. That’s really only going to happen if I have to buy a brand new T-shirt or a fancy-pants brand T-shirt.
Finally, as I’ve previously mentioned, I do source my materials from local thrift stores. That makes every shirt unique and keeps clothing out of landfills. If that’s not your thing, you do you. 😘
Find all my upcycled clothing here: https://subearthancottage.com/product-category/upcycled-clothing/
If you’re interested in something like this shirt that I haven’t listed yet, please contact me about it.
It seems like everyone has at least a couple of promotional mugs hanging out in the back of their cupboards. If you don’t, there’s hundreds at any thrift store. On the one hand, they’re actually pretty useful, as far as promo swag goes. even if you’re not a coffee or tea drinker, they’ll hold any beverage. Or, you could use them to hold pens or random desk stuff, makeup brushes, or toothbrushes. You could even use them as little planters. (Tip: plant in a nursery pot and put that inside the mug. No need to drill holes, and the mug catches the drainage. )
The problem is that the designs usually aren’t very cute, and who really wants advertisements with their morning cuppa?
Take this mug. I like the shape. It’s a nice size and a lovely bright orange. I could use it as-is, but the orange reminds me of the orange VW my husband drove way back when, and I don’t even know what idstc is. So, I decided to cover it with vinyl.
My Mug Upcycle Method
First, I measured the height and width of the logo. Then, I used Cricut Design Space to create my design, a VW bug, of course. (If you don’t have a cutting machine, don’t worry. I have ideas for you, too.) I made sure that my Bug was a little bigger than the logo. After that, It was just cut out the design in permanent vinyl and apply. Voila!
(Or, rather, cut it out, realizing after the first cut that you had the wrong color loaded, so you end up making a set in your original color scheme and one in the inverse. Then mess up applying one side so you do one side of the mug in the original, and the other side in the inverse colors only to decide you actually like the inverse better. But you leave it as is because you don’t want to risk messing it up trying to change it. )
One layer cut and weeded.The design I planned…The accidental one I like better.It’s still cute though.
Other Methods
Now, if you don’t have a cutting machine, you could use a big sticker. Clear contact paper does an excellent job making them water-resistant. I did that to cover a graduation logo on a water tumbler that worked well. You could also cut a heart or other simple shape out of adhesive vinyl or contact paper. I find lots of it at thrift stores. Dollar Tree also sells vinyl as well as sticker paper.
Another option that I haven’t tried is adhesive chalkboard paper. I think it would be so cute to be able to write little notes on a coffee cup. I’m not sure how well it would hold up to moisture, though.
So far, I’ve only hand washed any of the mugs and tumblers I’ve decorated with vinyl. I don’t think putting them in the dishwasher is the best idea. I really hate handwashing dishes, though, so at some point it will probably happen. When it does, I’ll let you know how it holds up.
Share Your Upcycles
Share your upcycled mugs in the comments or on our Facebook page.
Don’t Forget!
On a different note, don’t forget my digital and printable planners are all only $0.99 through August 22, as well as all of my single machine embroidery files. I’ve also made some more of my older machine embroidery designs freebies, so be sure to check them out.
In today’s economy, saving money at home isn’t just a smart move—it’s essential. Whether you’re looking to build an emergency fund, reduce debt, or simply need more funds for food or rent, mastering the art of frugality can make a significant difference. Here, we’ll explore ten easy ways to cut costs and boost your savings without sacrificing comfort or quality of life.
1. Embrace Meal Planning
Meal planning is a simple yet effective way to streamline your grocery shopping and reduce food waste and unnecessary purchases. By planning your meals for the week, you can avoid impulse purchases and ensure you’re using ingredients efficiently.
How to get started:
Set aside time each week to plan meals.
Create a shopping list based on your plan and stick to it.
Incorporate leftovers into your meal plan to maximize usage.
If you need a little help, I have a Meal Planner in my shop. It’s in PDF format, so you’ll get it instantly, and you can either print the pages you need or use them digitally. It’s on sale for a limited time for only $0.99, so get it now.
2. DIY Home Maintenance
Handling minor home repairs and maintenance yourself can save you a ton of money. You can find tutorials for just about anything online for free. I usually watch or read a few before starting to really know what I’m getting into, and different people have different tips and tricks.
How to get started:
Start with simple tasks like fixing leaky faucets or painting walls.
Use online tutorials and guides to learn new skills.
Invest in a basic toolkit for home repairs. For bigger tools, see if there’s a place to rent them or if a friend has one you can borrow until you know it’s worth purchasing.
With streaming services for everything, cutting the cord on traditional cable can lead to big savings on your monthly entertainment bill. It’s easy to subscribe to so many that you end up not using them often enough to justify the cost.
How to get started:
Evaluate your current cable and/or streaming usage and identify unnecessary channels.
See what streaming services you’ll realistically use this month. You can always pause or cancel and resubscribe in a month or two to lesser used ones. I try to only have one or two active subscriptions at a time.
Don’t forget about free streaming channels, YouTube and antenna TV as well.
Look for bundles that offer internet and streaming services together.
4. Optimize Energy Efficiency
Improving your home’s energy efficiency can greatly reduce utility bills and contribute to environmental sustainability.
How to get started:
Replace incandescent bulbs with energy-efficient LEDs.
Seal drafts around windows and doors.
Use a programmable thermostat to optimize heating and cooling.
Unplug or turn off things when not in use.
Take advantage of sunlight and nice outside temperatures by opening windows and turning off the AC.
Dress efficiently for the temps. Add or subtract layers before reaching for the thermostat.
5. Practice Mindful Consumption
Being mindful about what you buy and consume leads to smarter financial decisions and reduces clutter in your home. (Bonus: Less clutter means less to clean!)
How to get started:
Ask yourself if a purchase is a need or a want before buying. It’s okay to splurge on a “want”, but it’s important to know the difference with mindful spending.
Declutter regularly to understand what items are truly worth it. If you didn’t use something similar the first time, you probably don’t need it.
Practice gratitude for what you have, reducing the urge to buy more.
Be creative! Do you already own something that could work instead? Can you easily make it?
6. Grow Your Own Food
Starting a small garden can provide fresh fruits, herbs and vegetables while reducing grocery expenses.
How to get started:
Start with easy-to-grow vegetables like tomatoes, lettuce, and herbs.
Use vertical space or try container gardening if space is limited. (Container gardens are a good way to reuse plastic containers, too!)
Learn about composting to enrich your garden’s soil.
Green bell peppers
7. Make Use of Public Libraries
I love the library! Public libraries offer a wealth of free resources, from books, ebooks and movies to workshops and events. One of my local libraries now offers kits for things like baking, exercise, self-care and gardening that you can check out. I’ve even heard of libraries offering seed-sharing catalogs.
How to get started:
Sign up for a library card and explore the available resources. If you’re in a metro area, there’s a good chance you have access to more than one library.
Make friends with your librarians. They’ll let you know about new books and resources that are of interest to you.
Check out digital offerings, such as e-books and audiobooks.
Attend free workshops and community events.
8. Embrace Second-Hand Shopping
Everyone knows I love thrifting. There’s not much in my home that I bought new. Buying second-hand items can save money and keep things out of the landfill.
How to get started:
Explore thrift stores, consignment shops, and online marketplaces.
Look for quality items that are gently used or easy to mend or repurpose.
Attend garage sales for unique finds. Garage sales are usually cheaper than thrift stores but can take more hunting to find what you need.
Don’t forget about free second-hand shopping. Look for local buy nothing groups, “come and get it” postings, and good, usable stuff people are throwing away. One (wo)man’s trash is another (wo)man’s treasure, just make sure it was actually intended as trash, and familiarize yourself with local dumpster diving laws if you’re going that route.
9. Cancel Unused Subscriptions
Unused subscriptions can quietly drain your finances. Cancelling them can free up extra cash.
How to get started:
Check your bank statements for recurring charges.
Evaluate each subscription. Are you actually using it? Is there a free option that can fill it’s place?
Cancel those that are not used or necessary, or pause them if you know you’ll need them in a few months.
10. Implement a No-Spend Challenge
It’s easy to get into spending habits. A no-spend challenge involves refraining from non-essential purchases for a set period of time. This helps make it easier to identify non-essential and impulse purchases, saving you money during and after the no-spend challenge.
How to get started:
Choose a timeframe (week, month) and define what counts as non-essential.
Focus on using what you have and finding free activities.
Reflect on the challenge to identify spending triggers.
Brainstorm other ways to handle triggers and make do with what you have.
Conclusion
Adopting creative strategies to save money at home is not just about not spending—it’s about making mindful, intentional choices that lead to better financial health and sustainability. Not all of these tips will work for everyone, but implementing even a few can help with your financial burden. What other tips can you share? Please, comment down below.
Meal Planner PDF Printable or Digital Use
Stay organized and take the stress out of meal planning with our versatile PDF Meal Planner! Whether you prefer to jot down your ideas by hand or manage everything digitally, this meal planner is the perfect tool to keep your meals on track.
Features:
Printable Design: Print the planner to create a tangible guide for y…
$5.00Original price was: $5.00.$0.99Current price is: $0.99.
Back in February of 2020 I posted a price comparison between Walmart and Kroger to see who had the cheapest prices on groceries. As much as I’d rather not compare today’s prices to those from five years ago (ouch!) I thought it would be a good time to see if Kroger is still the winner.
Kroger vs. Walmart: The Plan
As I did last time, I created a grocery pickup list for each store. While our dietary needs have changed a bit over the past five years, for simplicity’s sake I kept the same list. It’s still pretty accurate representation of staples I regularly purchase. As much as possible, I matched brands at each store or chose the store brand at both. I used the normal price rather than the sale price where applicable. Due to previously being strictly gluten and dairy free, things like bread and milk that most people regularly purchase won’t be on my list.
The Food and Price Comparison
Coffee: Kroger Select Blend Medium Roast, 30.5 oz, $9.99. Walmart Great Value Classic Roast Medium Ground Coffee, 30.5 oz. $10.93. Winner: Walmart Kroger (Also, this one HURT. If you’re a big coffee drinker, too, you may not want to revisit the 2020 prices.)
Frozen Mixed Vegetables: Kroger Store Brand, 32 oz, $2.99. Walmart Great Value Brand, 32 oz, $2.48. Winner: Walmart
Bath Tissue: Kroger 1000 Sheets per Roll Bath Tissue, 12 rolls, $9.29, $0.77 per roll. Walmart Great Value 1000 Bath Tissue Rolls, 16 rolls, $11.62, $0.72 per roll. Winner: Tie Walmart
Walmart is the winner this time around by $4.79. Depending on your budget, that’s significant. If I had gone by the sale price and used digital coupons at Kroger, I would have saved $3. Still not enough to overtake Walmart, but it would bring it close enough in my opinion to choose which store to go to based off convenience or preference.
My Take
Even before this side-by-side comparison, I’ve tended towards shopping at the Walmart Neighborhood Market closest to my house. It’s about a mile closer than Kroger, and it has a fuel center. There are some things I still find to be better quality at Kroger, though, and I prefer Kroger overall, so I will probably continue to pick based off of what I’m needing and if I know something is on sale at one of the locations.
I’ve also been going to Aldi more. They’re great for staples, the produce at mine is usually good quality, and they’re closer to me than the other two stores. If you’d like me to do a price rundown of a similar list from Aldi, let me know in the comments.
Like I said earlier, my shopping list may look nothing like your shopping list. With more and more stores offering online shopping for pickup or delivery, it’s worth it to periodically do a price comparison between your local stores. It’s so easy to do online, and you may learn ways to adjust your shopping habits and save money.
If you click through any of the Amazon links and make a purchase, I will receive a small commission. There is no added cost to you.
If you like this post, please share and join my mailing list so you don’t miss future posts.
I love candles and wax melts, but I hate it when there’s a little left in the bottom of a jar or the wax has lost it’s scent. I don’t want to just throw the wax away. If it’s a jar candle, I won’t throw it a way, so it ends up taking up space waiting for me to find a new use for it.
I’ve always been interested in candle making, but I honestly don’t know much about the correct way to do it. This is just my, for me, kind of chaotic, fun way of using up the leftover wax scraps and jars. If you try to join in my chaos, always take care with the melting, pouring and burning, make sure everything you use is safe for this usage and never leave anything burning or melting unattended.
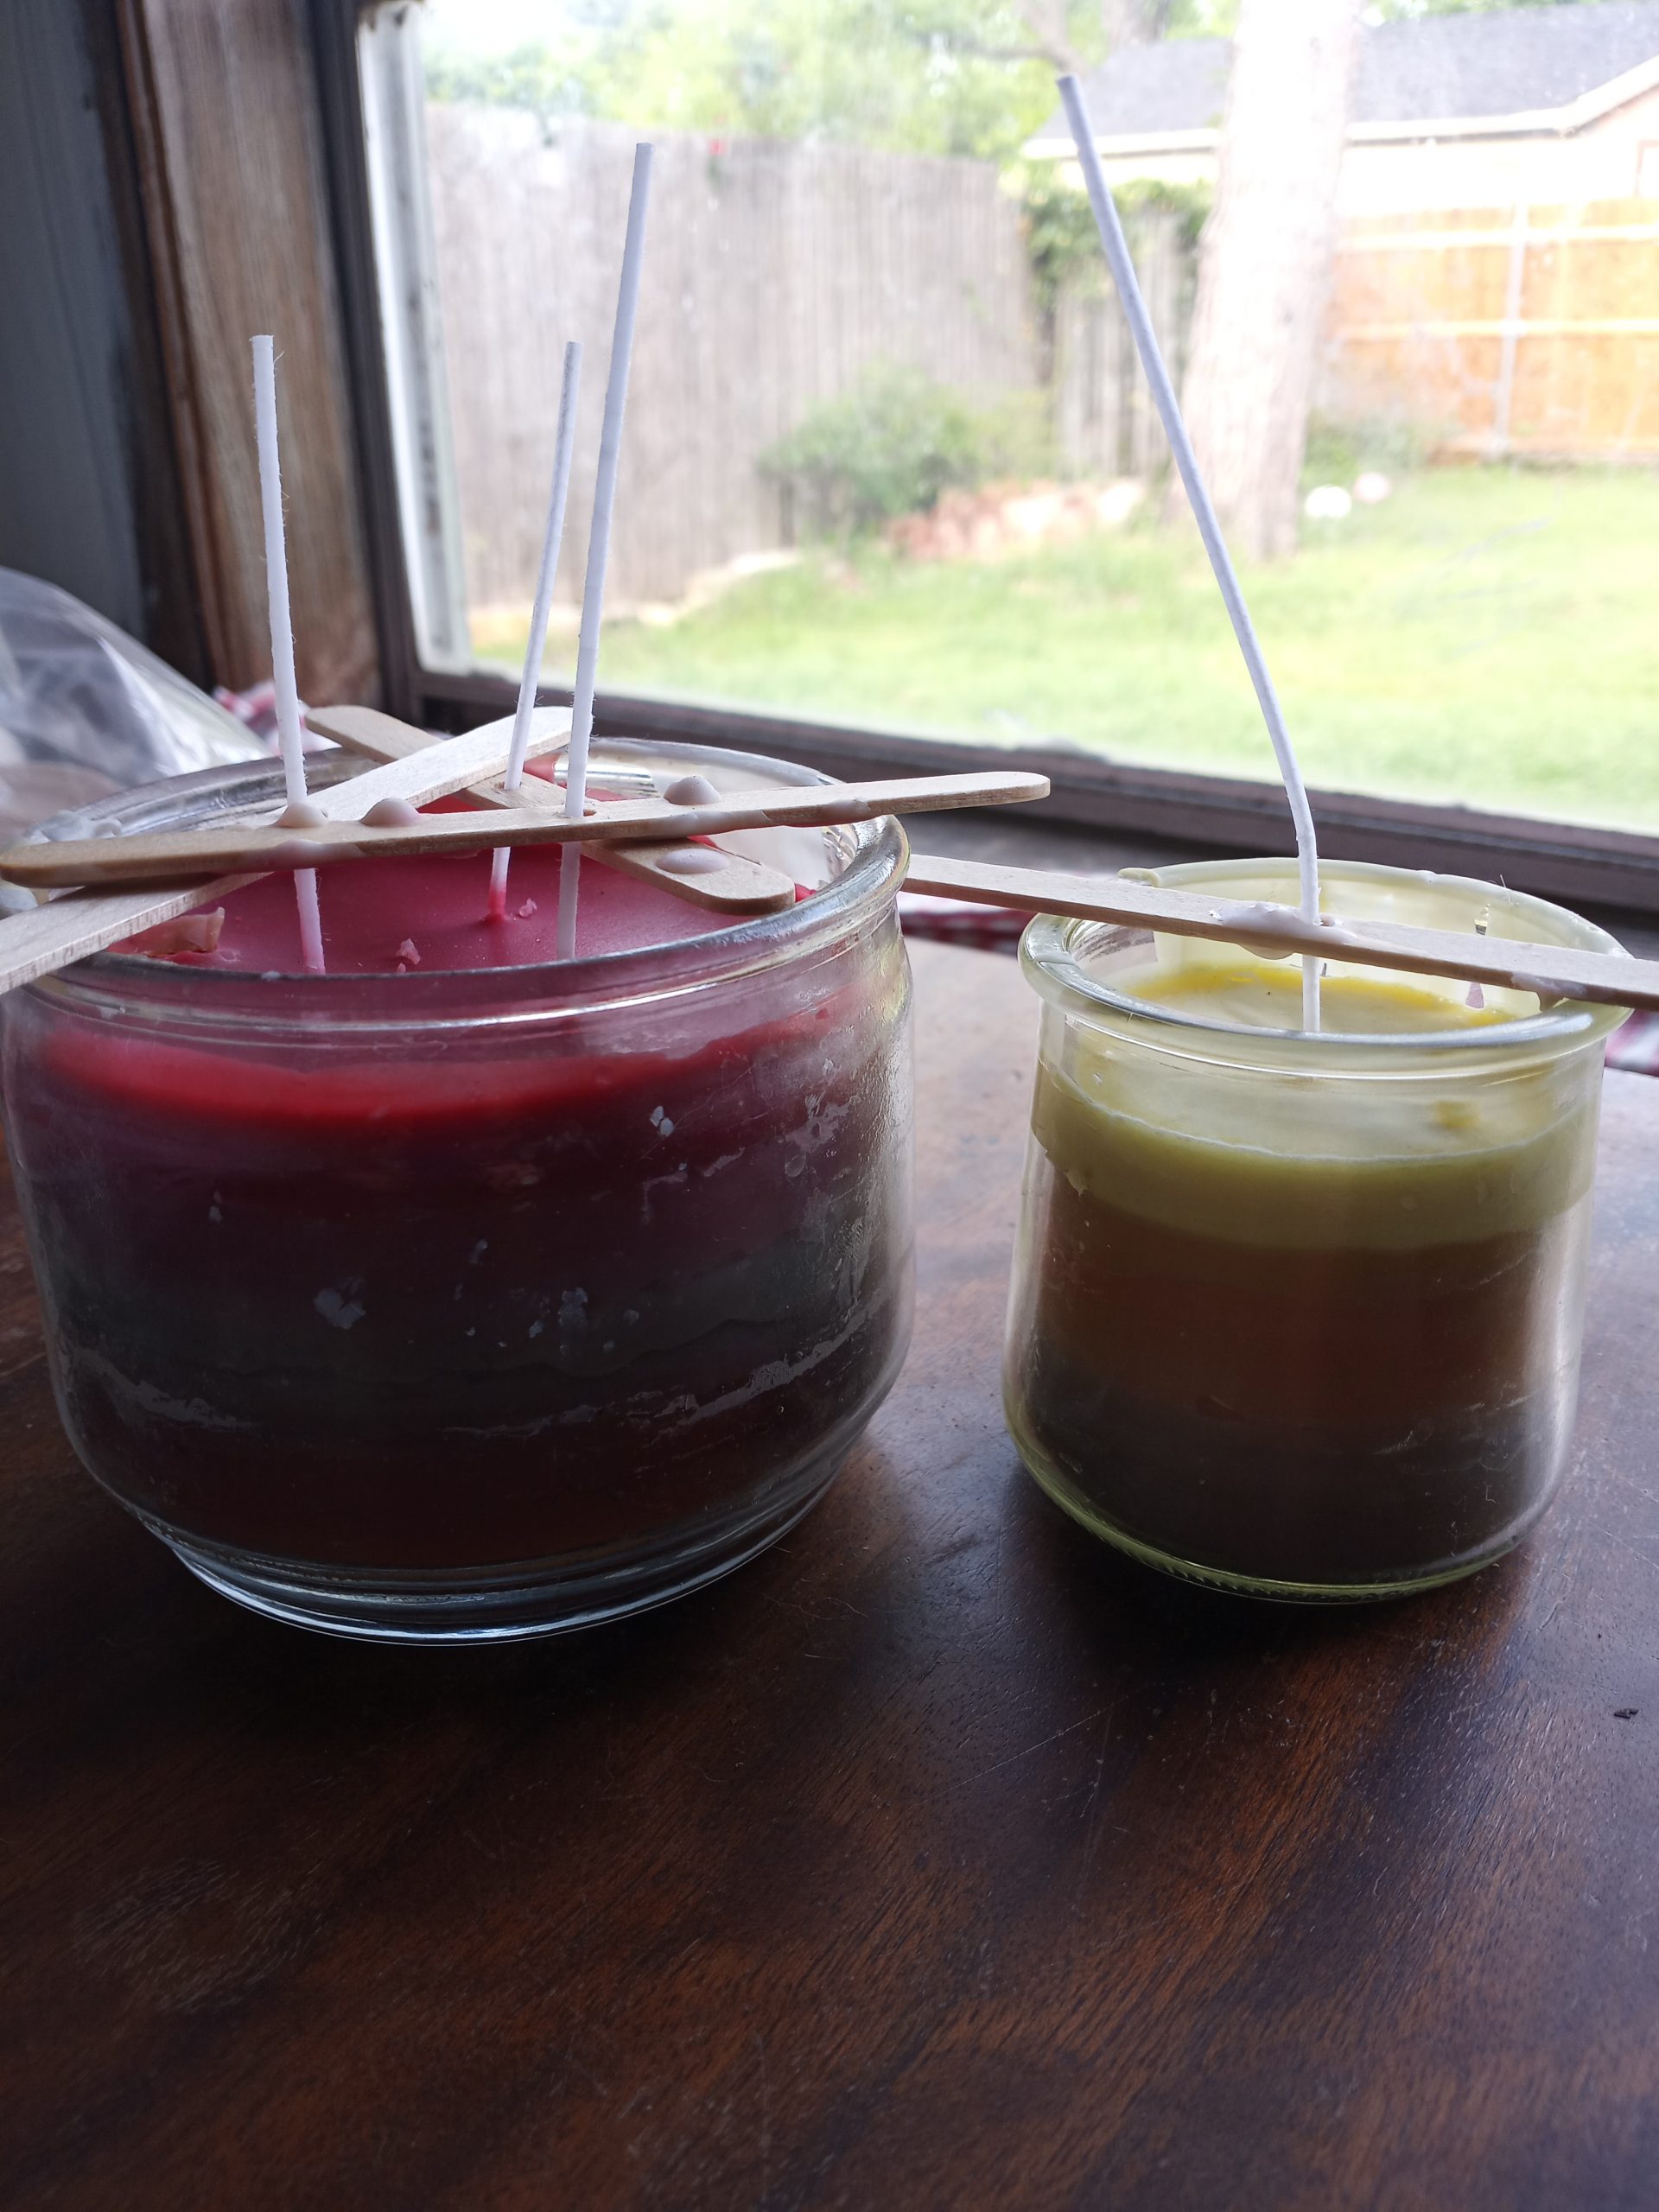
My solution is to melt down the wax and make my own candles in the old jars. I bought this wick set for the wicks. I start by picking the jar I want to use and then putting in the same number of wicks that were originally in the jar.
My candles still need a haircut. 😀
For the candles in the above photo, the one on the left was originally a three wick candle, so it got three wicks. The one on the right was a yogurt jar, so I just guessed and went with one wick.
After the wicks are in place, I melt down any scrap wax I have and pour it in. Usually, I do this a little at a time as I finish other candles, rather than all at once. That gives it the cool sand art layered look.
With jar candles, to get the last bit of wax out, if I don’t pour it while it’s still melted from the last time I burned the candle, I set the jar on my coffee warmer (do not leave it unattended!). Wax melts just get melted as usual and poured into the jar.
Coffee warmer- Not just for coffee.
I do try to keep the candles mostly the same type of wax. In the photo, the big candle on the left is made from candle wax ends. The yogurt jar candle is made of soy wax melts with a little of the tea light wax remnants added.
My one tea light warmer.
For scent, most of the candles I burn are in the same spicy or vanilla scent family. Since the leftover candle wax usually has a good bit of scent left, I don’t worry about adding my own. With the wax melts, I either just leave them as they are and have a mild to unscented candle, or I add a drop or two of an essential or fragrance oil to each layer as I pour it.
I don’t know if my chaos candle making method will help anyone else, but I have fun with it, and the resulting candles are pretty. It’s also a way to reduce waste and save money.
This post does contain an Amazon affiliate link. If you click on the link and make a purchase, I will receive a small commission at no additional cost to you.
To make sure you never miss a post, please sign up for my newsletter.
Many people eat gluten free (g-free, gf), either by choice or need. For those with celiac, eliminating gluten is an absolute necessity. Others find that, for one reason or another, they feel better when they avoid it. In my case, I kind of accidentally discovered that joint pain in my hands and feet go away and I’m less brain foggy when I avoid gluten. Other family members suffer from breakouts and rashes that flare whenever they eat something with gluten. I strongly believe that if you feel bad after eating something, you should probably stop eating it, so we do our best to avoid gluten all together.
Eliminating something that is such a big part of your diet is daunting at first, but there are a few things that can make the transition easier and less expensive. These tips focus on gluten, but many will also help if you need to eliminate other foods.
1. Start with real foods
Processed foods often have hidden fillers and ingredients, and specialty gluten free foods are expensive. In contrast, fruits, vegetables, meat, nuts, beans, eggs and dairy are naturally gluten free in their pure forms. Rice is a grain that does not contain gluten. Starting from scratch with real food ingredients that you know naturally don’t have gluten is often easier and definitely cheaper than scrutinizing food labels and buying special gluten free versions of normally wheat based foods.
For the most part, single herbs and spices are gluten free. Certain spice blends may have gluten, though. Making your own blends is the safest bet, but if you have a spice blend you love, most manufacturer websites list whether their products contain gluten.
While not technically an herb or spice, most soy sauce contains gluten. La Choy is a major brand that is made without gluten. Bragg’s liquid aminos are another form of g-free soy sauce.
Most vinegar is g-free. Malt vinegar is not. You’ll also want to check the label on flavored vinegar to be sure.
Cooking oils don’t have gluten unless seasoned with something containing gluten.
3. Find your current gluten free staples
Look at the foods that currently stock your pantry. What things that you buy are already gluten free? For us, we usually keep a box or two of cereal around for snacking or a quick breakfast. Most cereals are made with wheat and therefore have gluten, but some that we already bought, like Honey Nut Cheerios, Lucky Charms and Rice Chex are gluten free. Knowing that, I can continue to keep a box or two of cereal we already liked on hand.
Likewise, we keep tortilla chips on hand for snacking or nachos. Most tortilla chips don’t have gluten and inexpensive. Since gluten free crackers are both hard to find and usually expensive, tortilla chips are an easy cracker substitute as well.
4. Look for the easy substitute
Like substituting tortilla chips for crackers, there are other easy swaps. Corn tortillas usually don’t have gluten and can be substituted for flour tortillas. Rice is often a good substitute for pasta, or substitute rice noodles. If you have an Asian grocery nearby, you can usually find rice noodles there for cheaper than a mainstream supermarket, as well as leafy greens and spices for cheap.
5. Make it yourself
It’s fairly easy to find gluten-free flour now, so making your own gluten free cookies, pizza crusts, pancakes, breads, etc. is a good option. I love Bob’s Red Mill 1 to 1 gluten free flour. With it, I can continue to make my favorite deserts just by substituting it for wheat flour. There are other good gluten free flours on the market, too. The most important thing is to know if it is blended to be an exact 1 to 1 substitute or if you need to add something like xanthan gum to give it the stretchiness and rise that you usually get from gluten. For example, Bob’s Red Mill has an All Purpose Gluten Free Flour that is not the 1 to 1 blend. It is a little denser and does not have xanthan gum already blended. I like blending it with tapioca flour, which adds some stretchiness. That works well for things like gluten free flour tortillas. For things that need to rise, though, like cakes or breads, I also add xanthan gum if I’m using the all purpose and not the 1 to 1 blend.
6. When buying gluten free, shop around
Sometimes you really just want to get some gluten free penne pasta or a g-free bagel. More and more grocery stores regularly stock g-free pastas, breads and desserts, but they can be pricey. If you find them on sale, stock up and freeze the extras. Alternative grocery stores sometimes offer better prices, too. Aldi has a decent selection of g-free breads, pastas, and baking mixes at a lower price than most other stores. I even found some gluten free donuts there recently.
Locally, we have a surplus/discount/closeout grocery store called Town Talk. They frequently have udi’s bread in the range of two loaves for $3.00. I periodically stop in and stock up when I can.
To make sure you never miss a post, please sign up for my newsletter.
If you click through any of the Amazon links and make a purchase, I will receive a small commission. There is no added cost to you.
Meal planning takes away the daily stress of deciding what’s for dinner. I’ve never done well with creating weekly menus by day, though. With a set schedule, I sometimes felt like I had to make what’s on the menu, rather than finish up the leftovers first. Silly, I know. Then there were the days that ended up busier than expected and I either didn’t have time to make the planned meal or I was too tired by the time dinner rolled around and needed something simpler.
The solution I’ve found to traditional menu-style meal planning is making meal lists. Not only does it offer day by day flexibility, it makes it easier to work in sale items, saving money at the grocery store.
For us, breakfast and lunch are usually either made from the same basic staples or leftovers, so I only use my lists for dinner. You can easily use the same method for all meals, if you like.
Meal Planning Lists
Step 1: Make a Master List
Start by writing down all your favorite meals to make. This isn’t the time to pull out cookbooks or look for recipes online. You want this to be a brain dump of your go-to meals. I would aim for at least 10-14, but a bigger list gives you more variety. If you don’t have that many to start, don’t worry. You can always add to this list later.
You can leave your master list as-is, or sort it into categories such as grouping it by the type of protein, ease of prep, cook time or type of appliance used if you have lots of Instant Pot or slow cooker meals. My list is just one big list.
You could also make note of what sides you like to serve with each dish, but I usually add them later.
Step 2: Decide what types of meals you need for the week
For this step, consider things like what you have on hand that you need to use up, what’s on sale and how busy you’ll be during the week. If you know you’ll be eating out any days, make note of that, too. I don’t usually make a list for this step, but if it’s a busy week you might want to make some notes.
Step 3: Make your meal list for the week
Consider the things from step 2 and pick 5-7 meals for the week from your master list. I like to cook things like big pots of soup or chili at least once a week, so I know leftovers will take care of one or two days, so I usually make a list of five. If your meals won’t include leftovers, you’ll want to list seven, or as many days as you’ll be eating at home.
This is where I consider sides and make note of them alongside the meals I plan to make.
If you’re looking to expand your master list or just want to try something new, you can add a new recipe as one of your meals and make note of the cookbook or other source. Once you’ve tried it, if you like it, add it to your master list.
That’s my meal list for this week.
While I don’t add these to my list, I like to keep staples for one or two really quick backup meals on hand at all times. You can read more about this here. If this is new to you, you’ll want to consider picking a backup meal or two before moving on to the next step.
Step 4: Make your shopping list
Make a shopping list from your weekly meal list, including sides and staples for your backup meal, if you don’t already have one. From your list, shop your pantry then grocery shop for everything else you need.
Step 5: Using your list
If one meal relies on lots of fresh produce or other time-sensitive food, you’ll want to make it early in the week. Likewise, if one day is busy and you have one slow cooker or really simple meal on the list, you’ll want to save it for that day. Otherwise, you know you have everything to make all the meals on your weekly list, so pick whichever one you like for now and one for next. Picking your “next” gives you time to thaw out or presoak anything needed for that meal. Every day, think about what meal you want to be next and do the necessary prep. If that day’s meal has lots of leftovers, you can use them as your “next” and push the rest of the week’s meals down.
Each meal you make gets checked off the list. At the end of the week, if there’s anything not checked off, add that meal to next week’s list.
Customize Your Meal Planning Lists
Planning one week at a time works best for me because that’s about the longest we can go without needing to restock staples. If two weeks at a time works for you, make your list 10-14 meals instead of 5-7. Repeats are fine if you want or need.
If you want to be super organized, turn your master list into index cards with one meal and all the ingredients listed on each card. You can even make them full blown recipe cards, which is helpful if someone else does some of the meal prep or it’s a new recipe. Sort them into whatever categories work best for you, then pick out your 5-7 meal cards for the week. Now your grocery list is as simple as copying the ingredients from the cards.
I, Charity Sloan, am a participant in the Amazon Services LLC Associates Program, an affiliate advertising program designed to provide a means for sites to earn advertising fees by advertising and linking to Amazon.com. Any purchases through those links will result in my receiving a small percentage in commission.
This only refers to Amazon links found in/on my blog pages. All products in my shop are 100% mine and not linked to Amazon.
Prices are the same whether you click an affiliate link or a non-affiliate link, so you will not be charged more. Thank you for your support!