Posted on Leave a comment

Frumpy Knit Tube Dress to Cute T-Shirt Refashion

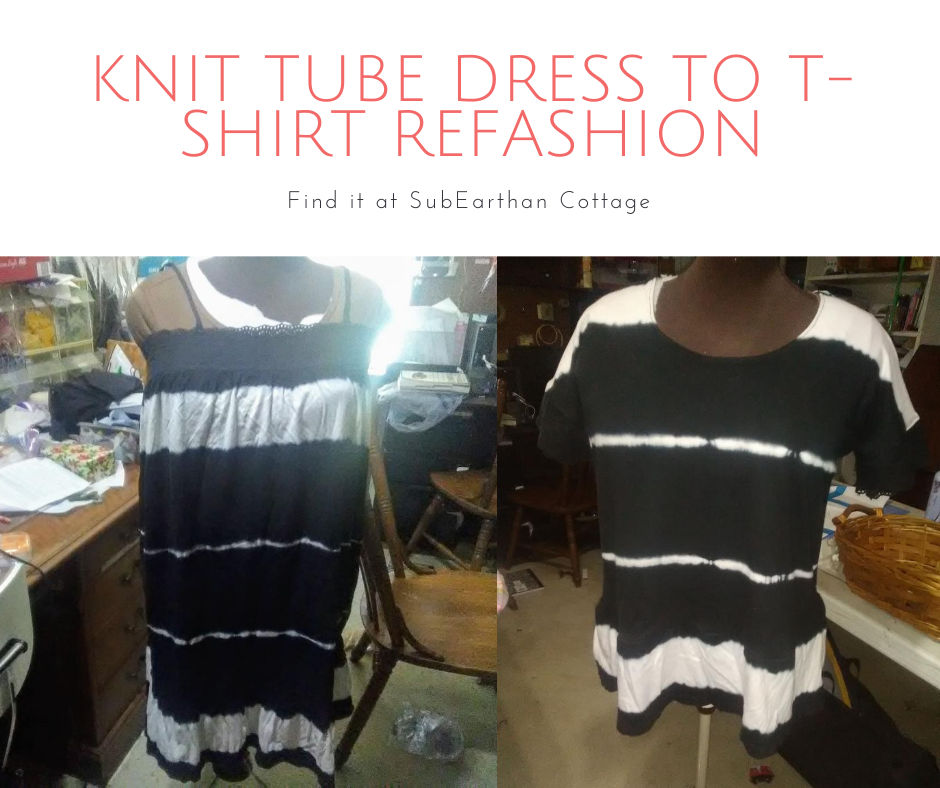
I’ve had two striped knit dresses in my refashion pile for about six months now. One black and white and one navy blue and white. The knit is soft, and I like the tie dye stripe, but the shape is basically a tube with a ruffle on the bottom. They are so unflattering, I don’t even want to wear them around the house. There’s a good amount of fabric in them, though, so I decided to try turn one of the knit tube dresses into a t-shirt.

Knit Tube Dress
Here’s the original shapeless dress. Excuse the background, please.

Knit tube dress to T-Shirt Refashion T shirt Process

I wasn’t sure what I would do at first, but I knew whatever it was wouldn’t need the straps, so I cut them off. I briefly considered leaving it close to as-is at that point and turning it into a skirt. It still wouldn’t have been very flattering, and I really don’t need any more casual skirts, so I moved on to other ideas.

T-shirts are always something I need, so that was my next direction. I didn’t take any process photos, so I’ll do my best to describe it. Refashioning always requires a little improvising based on what you have to work with, so consider this more as a guide than a complete how-to.

Turn the dress into fabric

I find it’s easiest to see what I have to work with when I’m looking at deconstructed pieces of fabric. Unless I think I’m going to use an element intact, I cut or rip out all seams and remove elements like buttons so that I can see how much fabric I have to use.

For this project, I cut off the black cotton eyelet band at the top and cut off the ruffle from the bottom before cutting off the side seams. I left the ruffle intact by cutting just above the seam that connected it to the dress because I thought it might come in handy. I chose to cut, rather than rip the seams, because the seams were narrow, so I wasn’t losing much fabric.

The Base Pattern

I thought about using a t-shirt as a pattern, but that doesn’t always work out as well. In my pattern files, I have a copy of the breezy tee from it’s always autumn, so I used that. I didn’t have enough fabric to make it exactly like the pattern, but it was a good starting point.

Laying it out

I squared up the main pieces of fabric and cut out the pattern. The fabric was too short for the pattern’s length, so I just focused on fitting in the top portion. I had to shorten the sleeves slightly because there wasn’t enough width.

Constructing the T-shirt

I serged (overlocked) the neckline folded it over and hemmed. I will probably regret not doing a banded neckline, because I’ve had hemmed necklines get wonky with wear. I can change it later if needed, though.

I serged the shoulder seams and then started thinking about the sleeves. The original pattern has pieces to create wide bands on the sleeves. I didn’t have enough scraps from the sides to create those bands. Instead, I decided to use the eyelet from the top of the dress. Honestly, I really wanted to use some of the ruffle to make flutter sleeves, but I figured that would be needed to add length.

Knit tube dress to T Shirt Refashion T shirt Eyelet Sleeve Band Closeup.
I’m still not sure about this. I may remove it after wearing it a few times.

After attaching the eyelet, I serged the underarm and side seams, then straight stitched just inside the serged seam to reinforce.

The shirt was more of a crop top at that point, so I attached the ruffle to the bottom by serging and then straight stitching like I did on the side seams. Here’s the final result.

Knit tube dress to T Shirt Refashion T shirt Finished Product.
Finished, other than steaming the ruffle.

I like it, other than the eyelet on the sleeves. I’m not sure about that. It’s not tight, but it makes the sleeves snug. I’ll probably wear it a few times and decide if I just want to take it off altogether. Overall, though, it’s a cute t-shirt and definitely something more wearable than the original.

Like this post? To make sure you never miss a future post, please sign up for my newsletter.

Posted on Leave a comment

Simple Striped Sundress Refashion

If you search for refashioning ideas online, you’ll find tons of amazing examples of outdated styles being turned into trendy pieces that bear little resemblance to the original. (https://refashionista.net/ is one of my favorite refashion blogs to browse for inspiration.) It’s easy to get overwhelmed with ideas, especially if you’re new to sewing. The main goal of refashioning is to take a piece that is unflattering or unwearable and turning it into something that will be worn again. Sometimes a few simple tweaks are all that is needed to accomplish that goal.

The Dress

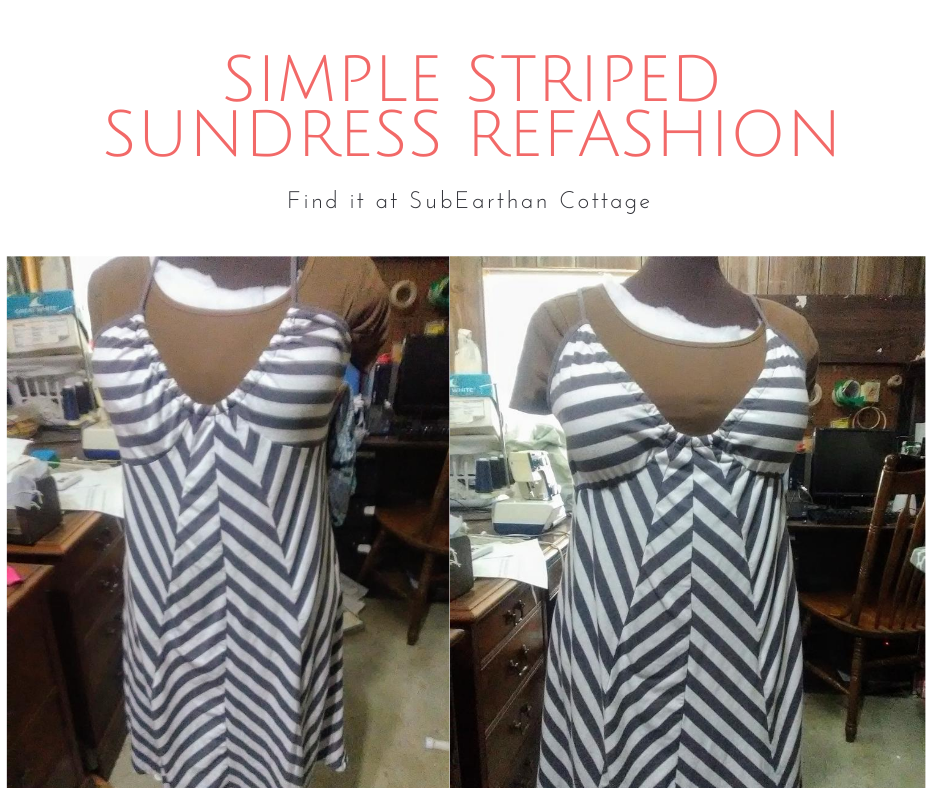
Before

This sundress is a perfect example. In it’s original form, it was breezy and comfortable for summer, except that it required a strapless bra to be flattering. Strapless bras tend to be uncomfortable in general. When it’s August in Texas hot, they’re almost unbearable. Having to wear one took away from the comfort of this dress, leaving it regulated to the back of my closet most of the time.

The refashion Fix

In order to fix the problem, I needed to add coverage and a little support to keep the cups in place.

First, I sewed elastic into the seams under the bust. I sewed it onto the seam allowance to keep my stitches invisible from the outside.

I cut the elastic a little shorter than the length of the seam and stretched it to gather it slightly. When worn, it doesn’t look gathered, but it keeps the cups in place.

For coverage, I took the cup inserts from a soft seamless bra and hand stitched them in place. I never use them in the bras, so I have several sets sitting around. By hand stitching, I was able to keep my stitches from showing on the right side of the fabric. Rather than sew all around the cups, I strategically tacked them to keep them secure but invisible from the front.

The result

After

Those two simple tweaks only took about twenty minutes. The final result is a smoother, more flattering fit that doesn’t sacrifice comfort.

What simple refashions have you done that made a huge impact on wear-ability? I’d love to hear about them in the comments.

Like this post? To make sure you never miss a future post, please sign up for my newsletter.

Posted on Leave a comment

Want to be Featured?

Want to be featured

Want to be featured?

In the past, I often featured handmade or vintage shops on Fridays. Over the years, the world of crafting and blogging has changed dramatically. I would love to resume Feature Fridays, but with a broader scope.

Handmade shop and websites are still welcome. I also want to feature guest writers sharing tutorials, tips, advice, recipes, etc. Categories that I feel are a good fit for this blog are crafting, sewing, sustainability, refashioning, healthy living, parenting, hair and beauty tips for busy moms, homeschooling and homesteading. I am open to other topics as well, so if you are interested but don’t quite fit into one of the above categories, please contact me anyway with your idea.

Guest posts will be promoted across my social media sites frequently throughout the week they are published and then periodically after.

Handmade shop/website features

For handmade shop/website features, answer the questions in the following list and email them to csloan@s696056323.onlinehome.us. I will contact you before your shop is featured and if any clarification is needed. You can give as much or a little info for each section as you are comfortable with sharing. Be sure to include links to your shop, web page and blog, if you have them. If you sell your products in a brick and mortar store and would like to include that info, you may include that as well.

I also choose a favorite item from your shop on the week that you’re featured and briefly tell why I like it. The first image from your shop for both your favorite item and my favorite item will be included in the blog.

  • Name and Business Name
  • Tell us a little about yourself and your business.
  • What made you get started in your business?
  • Anything else you’d like to share?
  • Tell us about your favorite item listed in your shop.
  • Links to your shop, website, blog, etc.
  • Email address (This will NOT be published)

Guest posts, tutorials and everything else

Please contact me at csloan@s696056323.onlinehome.us with your idea. If you already blog, a link to your blog or site where your writings are published is also helpful. Newbies are welcome, too. I’m also not opposed to reposts if they are a good fit and your own work.

If I think your idea is a good fit for SubEarthan Cottage, I will let you know and we will work out the details from there.

Matisse Creativity Mug Mugs featured
Posted on Leave a comment

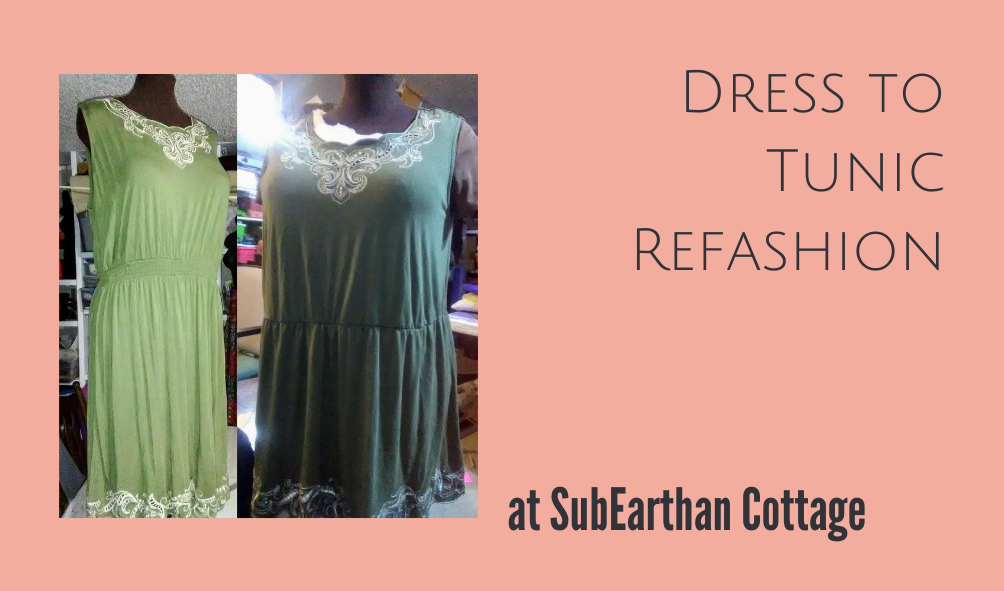
Dress to Tunic Refashion

I finally got around to refashioning the green knit dress that I found at Goodwill over a year ago.

Green Knit Dress
Green knit dress

What I did to the dress

I decided to shorten it to mid-thigh and take in the top for a better fit. In order to keep the pretty stitching at the bottom, I took the excess length from the middle.

I took the top in a little at the sides, but not enough to make it too fitted. It’s hot, so loose and breezy isn’t a bad thing.

To join the two parts, I added elastic to the waist of the skirt and then reattached it to the top.

Refashioned green knit dress.

End result

Here’s the result. In retrospect, I wish I had made the elastic fit a bit tighter. Right now, it just hangs fairly straight. I may go back and redo that some other time.

As it is, it’s comfortable to wear over leggings, so perfect for hanging out at home with the kiddos.

A note for homeschoolers

I’ve been cleaning the office and getting our homeschooling supplies ready for our official start to the school year. If you’re new to homeschooling, or just looking for new ideas, I’ll post photos of our setup, as well as other homeschooling tips next week.

Like this post? To make sure you never miss a future post, please sign up for my newsletter.
Posted on 1 Comment

Refashion a Camisole into a Tunic Tank Top

I have tons of clothes waiting for me to refashion them into something more wearable, but haven’t had much inspiration. Recently, though, I came across CreoleSha on Etsy. I love her flowy designs. Luckily, she offers classes on Teachable, so I took her free course on upcycling a sweatshirt or t-shirt into a tunic.

Refashion Camisole Tunic Tank 1
Almost forgot to take a before photo.

My refashion notes

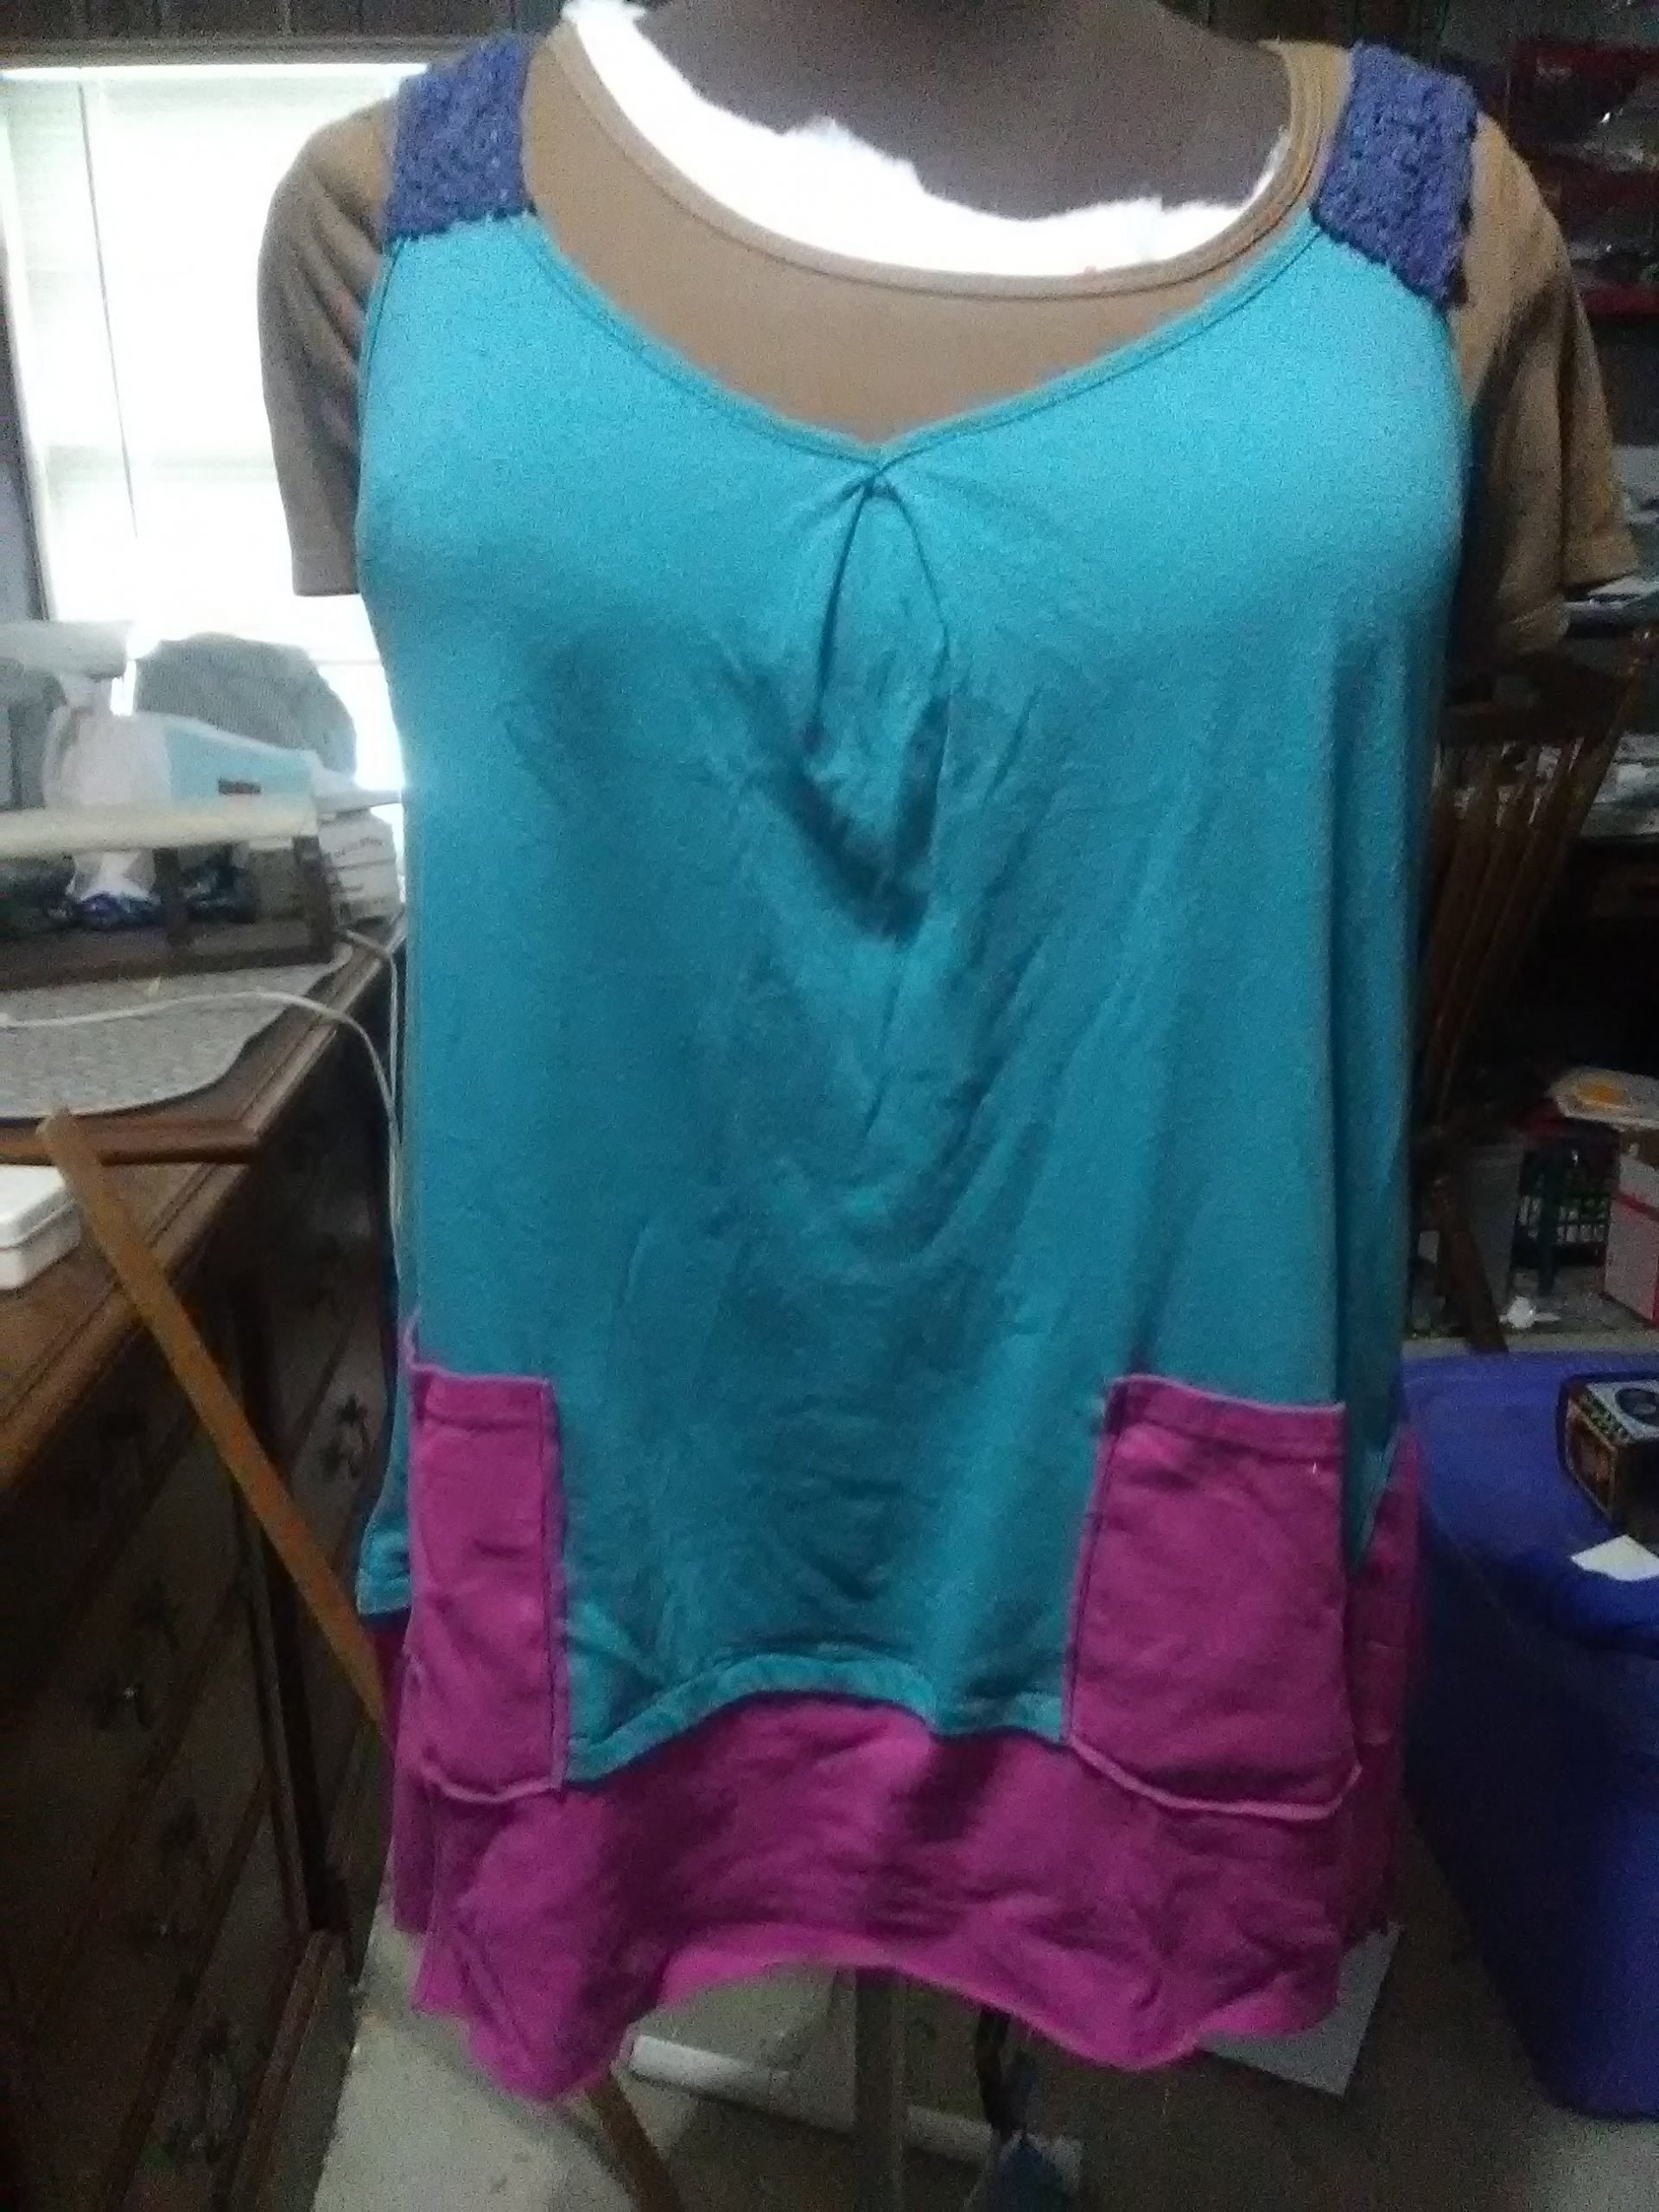
It’s summer, so rather than use a sweatshirt, I started with a camisole tank that I didn’t wear much. I liked the color, but the fit was too loose to use for layering, and the skinny straps made it difficult to wear with a bra. By adapting the techniques in CreoleSha’s class, I turned it into a longer, flowing tank and then added a bit of cotton lace salvaged from an older refashion project to widen the straps.

The added material came from a t-shirt with a large logo on the front. I liked the color, but not the logo, so it was perfect and added some nice contrast.

Of course, pockets are always handy, so I added some patch pockets on the front.

Final result

It’s not perfect, but it’s something I’m more comfortable wearing now. The shirts were wrinkled from storage to the point that the wrinkles came back even after ironing. Luckily they smoothed out with laundering, so I don’t look like I just rolled out of bed when I wear it. More importantly, trying something a little on the artsy side and just jumping in has me ready to tackle more refashions.

A note on my dress form

Before working on this, I took the time to add some batting to my dressform, Athena. She’s a little less padded in some areas than I am, so the batting makes it easier to use her as a fit guide when I don’t want to try things on over and over. The brown t-shirt helps hold it all together and provides something to pin into.

Like this post? To make sure you never miss a future post, please sign up for my newsletter.

Posted on 1 Comment

Easy Leggings Hack for Summer

If you or your kiddos wear leggings, you’ll love this easy leggings hack for summer. While you can use any leggings, it’s perfect for turning leggings that have worn out at the knees or ended up being a little too see-through into something usable, especially when the weather turns hot. This hack is so simple, I feel a bit silly making a post about it. It’s really one of those “Why didn’t I think of that?” things.

How to do it.

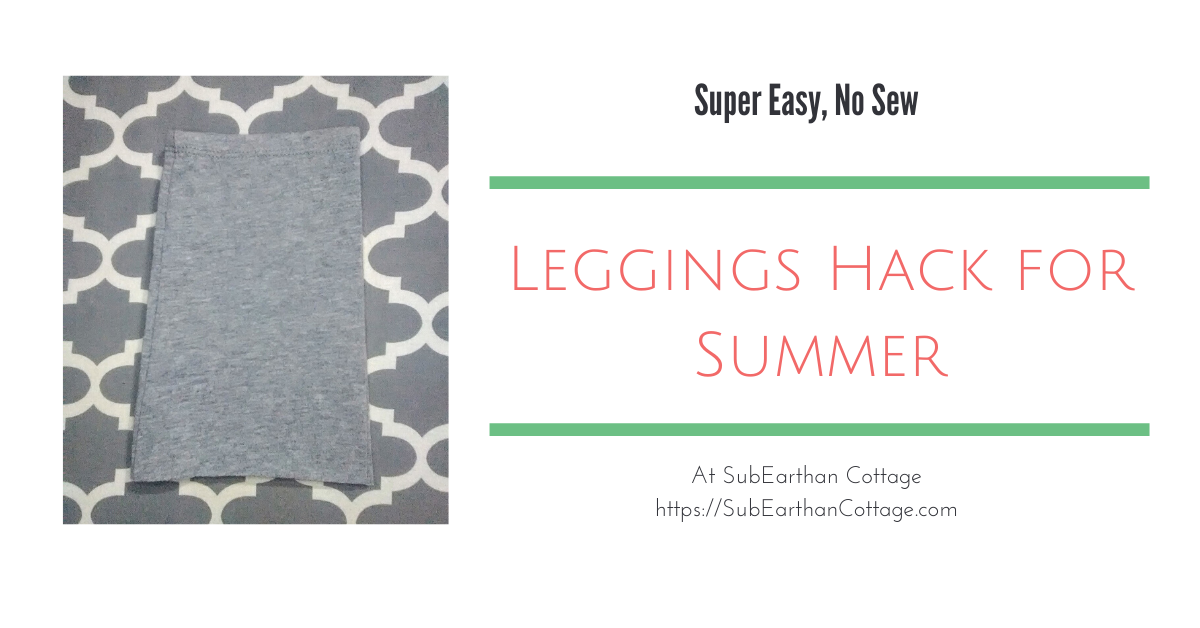
All you need is a pair of leggings you want to make shorter and some good scissors. Fold them in half so that the legs lay on top of each other. Make sure the fabric is smooth and the legs match up at the hem. Decide how much shorter you want them and cut them at that length, keeping the line parallel to the hem. My scissors cut through both legs easily, but you can always cut one and use it as a guide to cut the other.

Here’s what I cut off. I like leaving mine either just above or just below the knee.

Because knit doesn’t fray, you don’t have to hem the raw edge. When stretched, the edge will roll a tiny bit and hide the edge. You may want to seal the seam that you cut through with a little fabric glue or a few stitches. I have some I cut last summer without doing anything to the seams and they’ve held up through many wearings and washings without coming apart.

How I like to wear my shortened leggings

I like wearing dresses or skirts in the summer because Texas is hot, lol. With little kids, though, I’m constantly up and down or bending to pick things up off the floor. Cropped leggings underneath give me enough coverage to make dresses practical for everyday. Leggings under my dresses also prevents uncomfortable chafing from being a bit, um, curvy in the thighs. For this purpose, I really like using this hack for leggings that I wouldn’t feel comfortable wearing without a long tunic or dress. Instead of taking up space at the back of my closet, they get used and make my other clothes more wearable.

Ways to repurpose the cut off section

The cut off sections can be repurposed, too. A really simple thing to do is make hair bands by cutting them in one inch strips parallel to the hem. Be sure to keep the seam intact so they’re a circle.

You can also make a pocket for your leggings out of the cut off section. Decide how big you want your pocket to be and add a half inch or so seam allowance to each side and the bottom. Use the existing hem as the top of your pocket to save time. Fold the seam allowance under and stitch in place on your leggings where you want the pocket. You’ll want to use a narrow zig-zag or stretch stitch to prevent the thread from breaking. A ball point needle is ideal for sewing knits, so if you have one, use it.

Leggings hack pocket
Here’s one pocket I’ve added.

Like this post? To make sure you never miss a future post, please sign up for my newsletter.

Posted on 5 Comments

Sewing Machines

I’m a bit of a sewing machine hoarder. If you don’t count the one that is Finn’s, I have four sewing machines. That includes my sewing and embroidery machine combo, but not my two sergers. Also not including the knitting machine, because it knits.

While I’m certainly not an expert, I do have my preferences. I would take a well-built, old metal machine over a new machine any day. Mainly because when they break, I tend to do this:

Sewing Machines- Beige Vintage Montgomery Ward Signature.

That is my first sewing machine. It is a Montgomery Ward’s Signature sewing machine from the 60s, I think. I got it from my mom who got it from my grandma. I can’t remember what was wrong with it that time, but it sews nicely now.

The Signatures at that time were made by a Japanese company that specialized in industrial machines, I think for sewing feed sacks. That translates to a heavy duty, domestic sewing machine that will sew through anything. It also has a set of cams. Cams are interchangeable disks that allow it to sew pretty embroidery stitches.

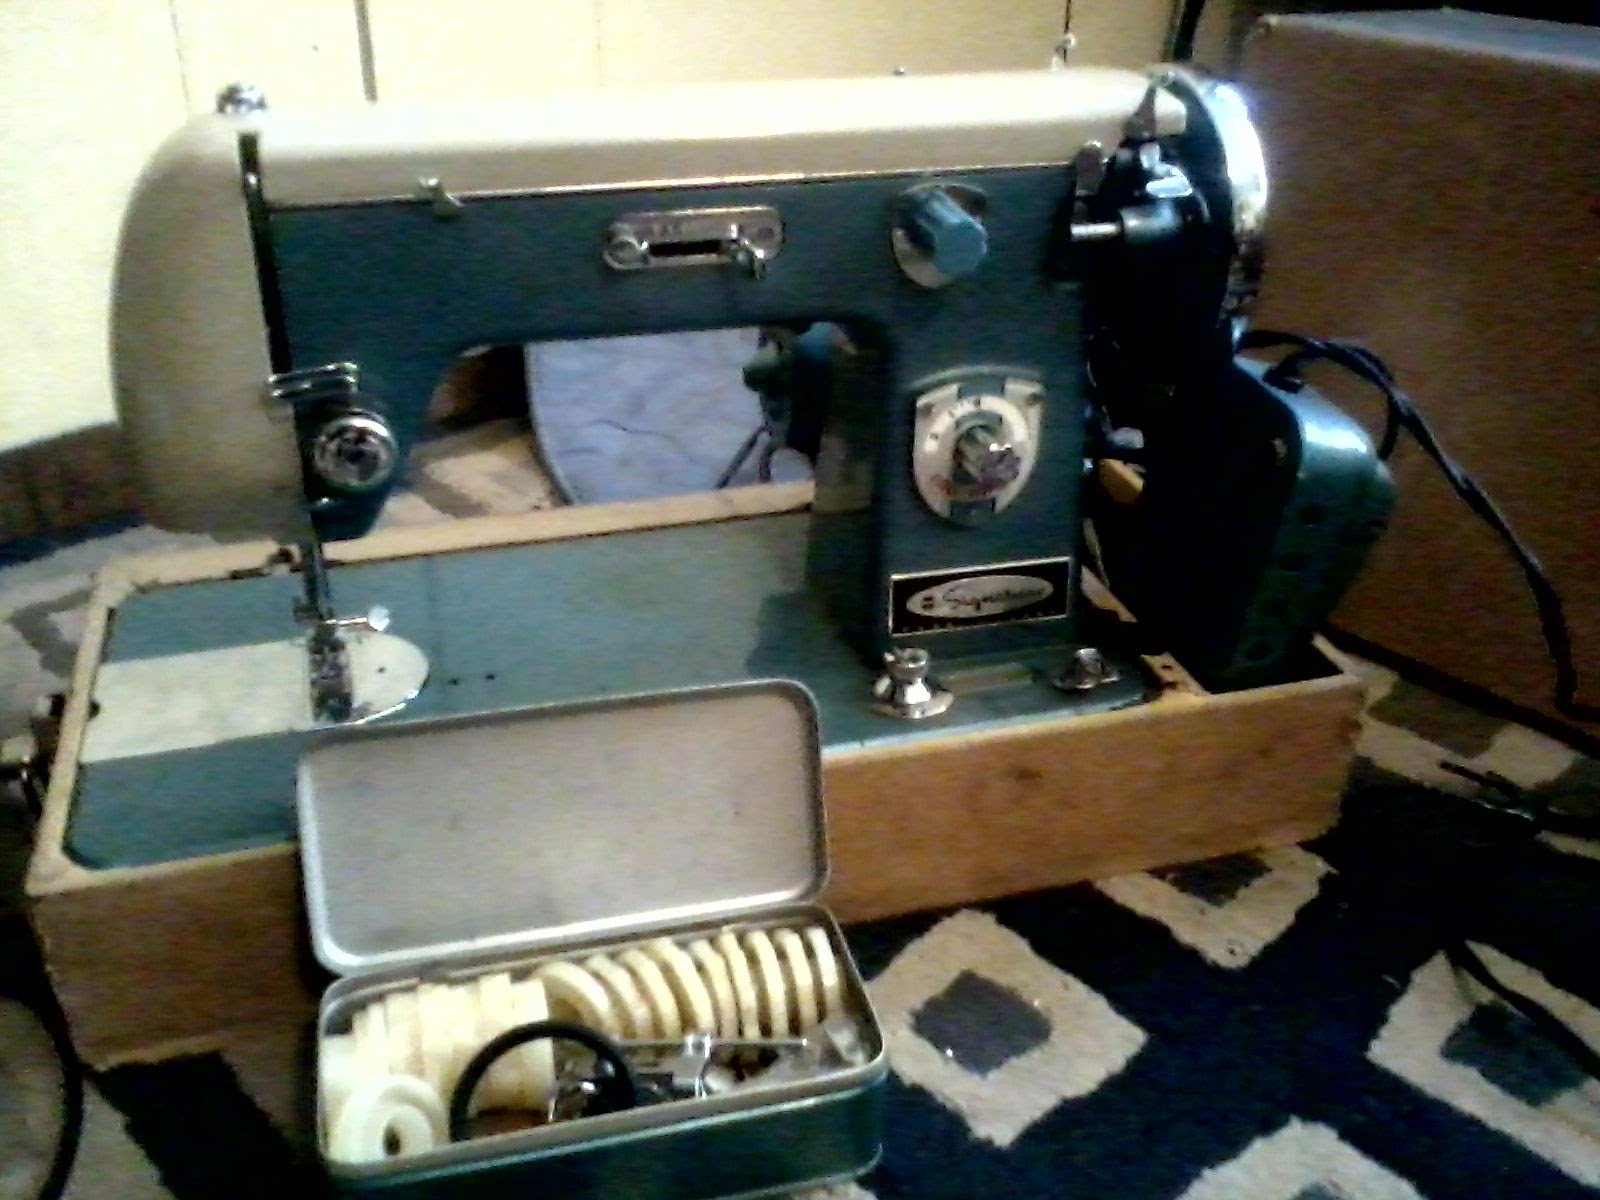
My next sewing machine is another, slightly older Montgomery Ward’s Signature. This one was rescued from a lot of machines that were destined for the junk heap.

Sewing Machines- Blue Vintage Montgomery Ward Signature.

I love the blue color! It reminds me of cars from that era.

Like the other Signature, it uses cams. You can see them in the little accessory box. I actually like this one a little better than the other. It sews the prettiest straight stitch out of all my machines and has a cam that stitches a row of teeny tiny hearts!

I’ve never actually made anything on it, though. Unlike the other, this one is in a portable case, which is hilarious. I lift my 40+ pound four year old all the time and lifting that machine is still a struggle. Since I don’t have a dedicated place for it, I don’t have the motivation to lug it out.

My workhorse is a 90s model Kenmore, made by Janome. The case is plastic, but all the internal workings are metal. I know, because I’ve had to open it up a few times now to fix the hook timing. (Posts on that here and here.)

That is the best photo I could find of it not undergoing repairs. I love that machine because it isn’t as quirky as the Signatures. It also tells me how to thread it right on the machine, and when it comes to sewing machines, threading is half the battle.

My final machine is the Brother SE400 embroidery combo. I keep it set up as an embroidery machine because I have three other sewing machines. Also, it scares me, so I want to risk messing it up as little as possible. I haven’t had it opened up beyond the bobbin area, but I’m guessing there’s some plastic, and I know there are scary electronic components. With the other machines, I am freer to play because I know that if something happens, it’s not likely to be catastrophic. With this, something like a timing issue would definitely mean a big repair bill.

But, it makes pretty embroidery, has loads of decorative and utility stitches as a sewing machine, and has the most awesome needle threader I have ever seen. Seriously. Finn’s machine has a needle threader that I will never use, because it is complicated and I stabbed myself with it one time. Brother’s needle threader is like magic. It is especially handy when embroidering with multiple colors. Color changes take mere seconds.

Just to show I’m not as much of a hoarder as I could be, here is a photo of the White machine I couldn’t get working and sold on craigslist.

Sewing machines - White Rotary

Then, while I was waiting for the buyers to show up, I decided to play with it a bit and figured out what was wrong. I hope they love it, or at least open it up to look at from time to time. Sigh.

Like this post? To make sure you never miss a future post, please sign up for my newsletter.