If you search for refashioning ideas online, you’ll find tons of amazing examples of outdated styles being turned into trendy pieces that bear little resemblance to the original. (https://refashionista.net/ is one of my favorite refashion blogs to browse for inspiration.) It’s easy to get overwhelmed with ideas, especially if you’re new to sewing. The main goal of refashioning is to take a piece that is unflattering or unwearable and turning it into something that will be worn again. Sometimes a few simple tweaks are all that is needed to accomplish that goal.
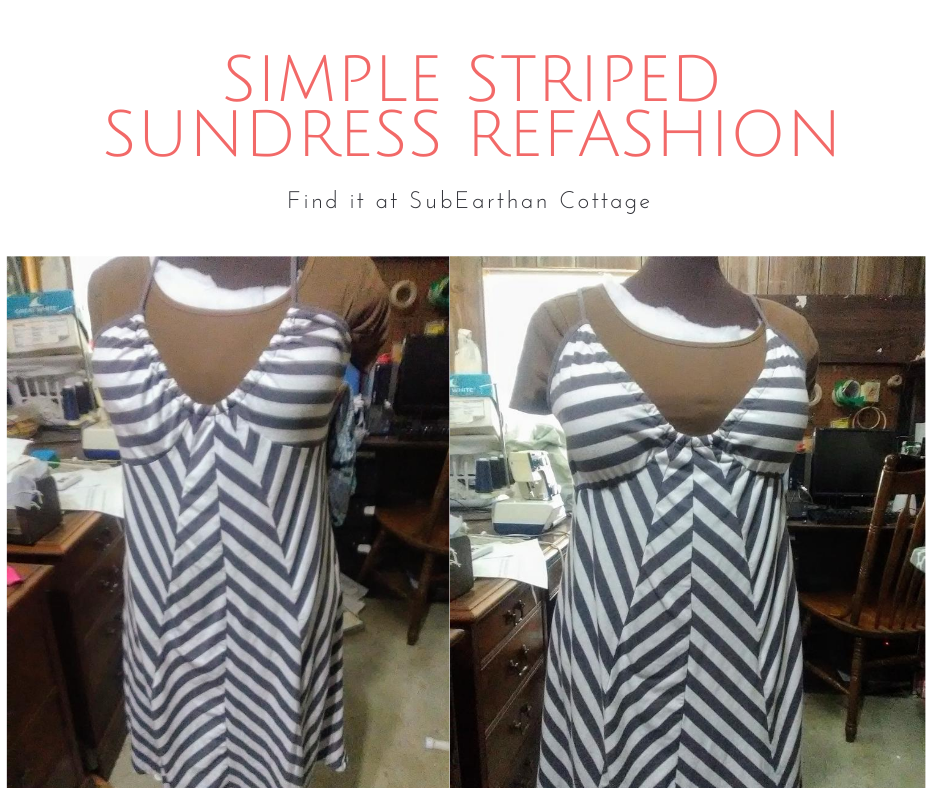
The Dress
Before
This sundress is a perfect example. In it’s original form, it was breezy and comfortable for summer, except that it required a strapless bra to be flattering. Strapless bras tend to be uncomfortable in general. When it’s August in Texas hot, they’re almost unbearable. Having to wear one took away from the comfort of this dress, leaving it regulated to the back of my closet most of the time.
The refashion Fix
In order to fix the problem, I needed to add coverage and a little support to keep the cups in place.
First, I sewed elastic into the seams under the bust. I sewed it onto the seam allowance to keep my stitches invisible from the outside.
I cut the elastic a little shorter than the length of the seam and stretched it to gather it slightly. When worn, it doesn’t look gathered, but it keeps the cups in place.
For coverage, I took the cup inserts from a soft seamless bra and hand stitched them in place. I never use them in the bras, so I have several sets sitting around. By hand stitching, I was able to keep my stitches from showing on the right side of the fabric. Rather than sew all around the cups, I strategically tacked them to keep them secure but invisible from the front.
The result
After
Those two simple tweaks only took about twenty minutes. The final result is a smoother, more flattering fit that doesn’t sacrifice comfort.
What simple refashions have you done that made a huge impact on wear-ability? I’d love to hear about them in the comments.
Like this post? To make sure you never miss a future post, please sign up for my newsletter.
In the past, I often featured handmade or vintage shops on Fridays. Over the years, the world of crafting and blogging has changed dramatically. I would love to resume Feature Fridays, but with a broader scope.
Handmade shop and websites are still welcome. I also want to feature guest writers sharing tutorials, tips, advice, recipes, etc. Categories that I feel are a good fit for this blog are crafting, sewing, sustainability, refashioning, healthy living, parenting, hair and beauty tips for busy moms, homeschooling and homesteading. I am open to other topics as well, so if you are interested but don’t quite fit into one of the above categories, please contact me anyway with your idea.
Guest posts will be promoted across my social media sites frequently throughout the week they are published and then periodically after.
Handmade shop/website features
For handmade shop/website features, answer the questions in the following list and email them to csloan@subearthancottage.com. I will contact you before your shop is featured and if any clarification is needed. You can give as much or a little info for each section as you are comfortable with sharing. Be sure to include links to your shop, web page and blog, if you have them. If you sell your products in a brick and mortar store and would like to include that info, you may include that as well.
I also choose a favorite item from your shop on the week that you’re featured and briefly tell why I like it. The first image from your shop for both your favorite item and my favorite item will be included in the blog.
Name and Business Name
Tell us a little about yourself and your business.
What made you get started in your business?
Anything else you’d like to share?
Tell us about your favorite item listed in your shop.
Links to your shop, website, blog, etc.
Email address (This will NOT be published)
Guest posts, tutorials and everything else
Please contact me at csloan@subearthancottage.com with your idea. If you already blog, a link to your blog or site where your writings are published is also helpful. Newbies are welcome, too. I’m also not opposed to reposts if they are a good fit and your own work.
If I think your idea is a good fit for SubEarthan Cottage, I will let you know and we will work out the details from there.
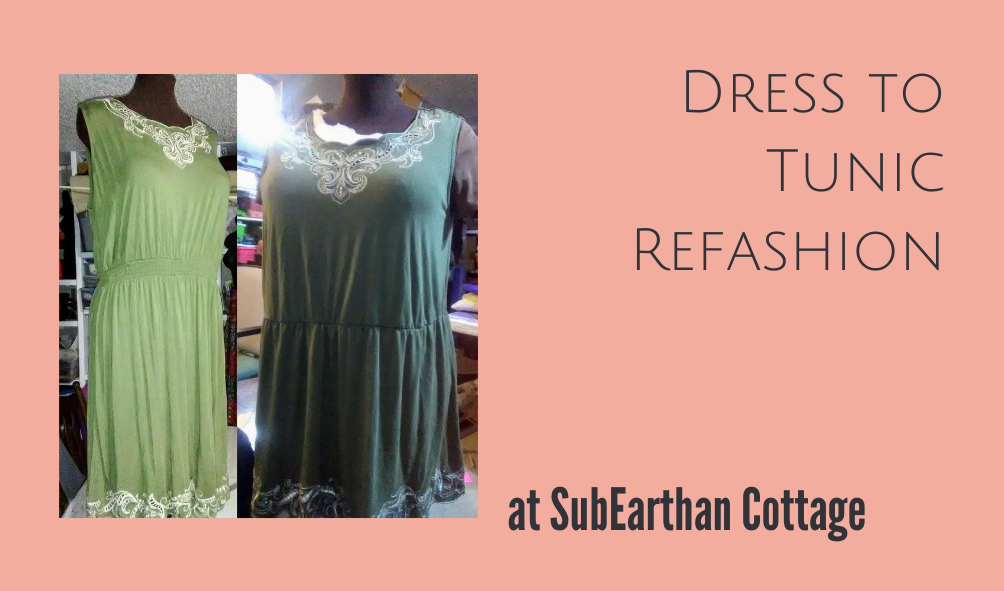
I finally got around to refashioning the green knit dress that I found at Goodwill over a year ago.
Green knit dress
What I did to the dress
I decided to shorten it to mid-thigh and take in the top for a better fit. In order to keep the pretty stitching at the bottom, I took the excess length from the middle.
I took the top in a little at the sides, but not enough to make it too fitted. It’s hot, so loose and breezy isn’t a bad thing.
To join the two parts, I added elastic to the waist of the skirt and then reattached it to the top.
Refashioned green knit dress.
End result
Here’s the result. In retrospect, I wish I had made the elastic fit a bit tighter. Right now, it just hangs fairly straight. I may go back and redo that some other time.
As it is, it’s comfortable to wear over leggings, so perfect for hanging out at home with the kiddos.
A note for homeschoolers
I’ve been cleaning the office and getting our homeschooling supplies ready for our official start to the school year. If you’re new to homeschooling, or just looking for new ideas, I’ll post photos of our setup, as well as other homeschooling tips next week.
Like this post? To make sure you never miss a future post, please sign up for my newsletter.
Making soap is like magic. Seriously, think about it: You take stuff that makes things feel greasy, mix it with stuff that would eat your face off and, if you do it just right, the end result is a wonderful bar of non-drying, skin-loving, fluffy-lathering soap.
Soapmaking is fun, but safety is a priority when dealing with sodium hydroxide, aka lye, aka the eat-your-face-off stuff. This is just a brief overview of the soapmaking process I use. Please do not use this as a complete how to guide. If that’s something you’re interested in, please, leave a comment and I will direct you to some more thorough resources on soapmaking.
Melting the Oils
Creating soap takes two basic things: oils or fats and an alkaline solution. In order to combine the oils and alkaline solution, the oils have to all be in liquid form and uniformly mixed. So, step one is measuring and melting the oils. For precision, all measuring is done by weight. Since I use a Crockpot for my hot process soapmaking, I add all my weighed oils to the Crockpot, then melt and mix them in the pot. For soapmaking, I generally use the low setting, but if I need to jump start the melting process I will start it on high then turn it down after a few minutes. This Crockpot is similar to the one I use.
Melting the Oils
Measuring the Lye
While the oils are warming in the Crockpot, I weigh the lye. It is important to be very precise when measuring the lye. Too little and the soap will be too soft. Too much and the soap could burn your skin. This is also why you need to be very careful about the soap recipes you use. If they are not correctly formulated, the end result could be dangerous.
Before I measure the lye, I measure the water or other liquid for the lye solution, also by weight. I do that first to limit the time I have the lye out.
Weighing the Lye. Gloves and goggles on.
Lye Safety
I make sure to measure the lye into glassware and all containers and utensils that come into contact with lye or the lye solution are reserved solely for that purpose. Once the lye is out, I never leave it unattended. Lye crystals resemble table salt, which would be a potentially deadly mix-up. That’s also why my soap production has slowed since Thaddeus was born. Until they are old enough to understand the importance of staying out of the room and can be trusted out of sight but in earshot for the time it takes to get the soap cooking, I only make it when they are either out of the house or asleep with Chris there to tend to them if they wake up during the process.
Mixing the Lye Solution
Once my lye is measured, I add the lye to the water and stir with a wooden spoon until dissolved. Lye fizzes up when mixed, so it is important to have the liquid in a container with plenty of room. The solution with also get really hot and put off fumes, so be prepared. I like to have a window open or fans and the vent a hood running. Some soap makers mix the solution outside, but I like to stay close to my work space to limit the chance of spills.
Blending the Oils and Lye Solution
For cold process soapmaking, it is important to have the oils and lye solution at about the same temperature. With the Crockpot hot process method I use, I find I can mix the lye solution into the warmed, melted oils without having to measure the temperatures first.
When you first add the lye solution to the melted oils, the color will change from clear to opaque. In order to properly combine the lye and oils, I use a handheld stick blender. You can stir by hand, but it is much harder to get everything properly blended and it takes f-o-r-e-v-e-r. I have had a stick blender die in the middle of making a batch of soap and it is a crazy long arm workout. I do not recommend it.
Adding the Lye Solution
Goal of Blending
The goal for all the hard mixing is called “trace”. Basically, I’m wanting to be able to lift my blender out of the mixture and trace a design on top. With cold process, there are various stages of trace that guide when to add any fragrance, essential oils or other add-ins. Since I use the hot process method, I add almost everything after the cook. Because of that, I can mix my batches to a full, hard trace where my traced design doesn’t melt back into the mix. This limits the possibility of a false trace, or the mix seeming to quickly come to trace when it isn’t thoroughly mixed. When that happens, it might separate or have lye heavy spots.
Hard Trace
Once it is at a hard trace, I stop mixing and put the lid on the Crockpot. If the mix seems too hot, for example, I had a false trace that I had to stir through, I will either turn the Crockpot to warm or off for a few minutes. Otherwise, I make sure it is on low and busy myself with cleaning up, lining my soap molds, and preparing essential oils and other additives.
Cleanup
Any lingering lye solution or soap mixture on the blender is still a risk for lye burns, so I’m cautious with the cleanup. For the whole soapmaking process, I keep a good amount of water with vinegar and a bit of dish soap ready in the sink. The vinegar helps neutralize the lye, so anything that comes into contact with lye goes directly into the vinegar solution, and I use a similar vinegar solution to wipe down my soapmaking area, just in case.
Stages of Saponification
During the cooking, the soap mix will change from an opaque, milky color to a shiny, translucent gel like texture. A pool of liquid also forms on top. that pool of liquid is glycerin, a byproduct of the saponification process. This transformation starts at the edges of the pot and happens in a wave moving towards the center. I find it really fun to watch.
Soap Waves
Finishing the Batch
When the entire soap mixture is translucent and the consistency of mashed potatoes without lumps, I turn off the heat and stir the soap by hand for just a couple of minutes to let it cool. At this point, if done correctly, the mixture completely transformed to soap. I don’t want it to cool too much, or it would be hard to add the essential oils, but too hot and it will burn off the scent.
Glycerin Pool Forming in the Middle
I then add any essential oils blended in my chosen carrier oil and any other add-ins I’m using in that batch, stir thoroughly by hand, and plop it into my molds. Since it is thick, I generally have to tap my molds on my counter firmly to eliminate air pockets.
Adding the Blended Essential Oils and Carrier Oil
Curing the Final Product
Because the saponification process is completed during the cooking, the soap is totally safe to use as soon as it is cool enough to touch. It needs to cool in the molds for 12-24 hours or so to hold it’s shape, though. Once it is firm enough to cut, I cut and wrap the bars. While not necessary, hot process bars still benefit from curing for at least a week or two to allow excess moisture to evaporate. As I discussed in my Proper Care and Feeding of Your Bar Soap post, the firmer and drier a bar of soap is, the longer it will last. That’s one of the reasons I wrap my soap in cloth rather than plastic. Cloth allows the soap to continue to harden for a longer lasting bar.
No one wants to get sick. Whether it’s the flu going around or something more unknown like the coronavirus, everyone wants to avoid catching it. While nothing is 100%, there are a few things my family does to increase our chances at staying healthy when there’s something going around.
A few notes on supplements and essential oils
I am not a doctor. Everything we do may not work for you and your family. It’s important to consult with your doctor before taking any supplements, especially if you have other health concerns.
In addition to supplements, I also use essential oils to a degree. While I do think essential oils are beneficial, I don’t believe they are a cure-all or always appropriate. If you choose to use essential oils, I recommend researching contraindications and general usage guidelines for each essential oil before using. Two of my favorite sites for essential oil safety are the Tisserand Institute and AromaWeb, particularly AromaWeb’s essential oil profiles.
There are safety guidelines to using all essential oils, such as proper dilution and not ingesting, that are important to know. There are also safety guidelines to using specific oils, such as knowing that eucalyptus essential oil should not be used on or around young children. These safety guidelines apply to all essential oil brands, regardless of whether they are “therapeutic grade”.
With that out of the way, here are my family’s tips for staying healthy when there’s something going around.
Eat right
Aside from proper hand washing, I think this is probably the most important tip of all. If you want your immune system to be able to do its job, you need to give it the proper fuel to work well. Sugars give you calories and energy but not much else. Eating a variety of fruits, vegetables and protein while limiting refined sugars gives your body energy and nutrients to keep everything working as it should.
With the coronavirus that’s going around, grocery stores are running out of some pantry staples like rice, beans and canned goods. Fresh produce and meat seem to still be readily available for the most part, though. With a little prep and planning, many fresh fruits and vegetables can be frozen to make them last longer. You can also make soups, stews and casseroles in bulk to freeze if you have the freezer room.
Get outside
Fresh air and sunshine are good for you mentally and physically. Sunshine helps your body produce vitamin D. Vitamin D has many functions in the body. In addition to helping build strong bones, there is some evidence to suggest that vitamin D helps to inhibit viruses, like those that cause the flu. (Sources here and here.)
In normal flu seasons, while everyone is healthy we frequent outdoor playgrounds unless it’s ridiculously cold or rainy. With the current recommendations regarding COVID-19, we will probably stick to hanging out in our own yard or open green spaces.
If you can, though, try to get outside every day. Children especially need an opportunity to run and play outside. Even if it’s raining, as long as it’s not too cold and there’s no lightning, let them play in the rain and get muddy.
Exercise is important, but even just sitting outside reading a book gives you the benefits of fresh air and sunshine. If you can’t get outside, at the very least open the curtains and windows to let a little of the outside inside.
Vitamins and supplements
During cold and flu season, we all usually take extra vitamin C. While taking extra vitamin C may not be a miracle cure for colds, it is important for proper immune function. The best way to get vitamin C is through eating foods, such as citrus fruits, that are naturally high in vitamin C. Since it is important for immune function, I feel like a daily supplement is worthwhile on the off-chance we’re not getting enough from out diet.
Vitamin D is another supplement I take, particularly in winter months. As I cited earlier, there is some evidence that it helps to inhibit certain viruses. We all began taking vitamin D at our doctors’ recommendations. Unlike vitamin C, vitamin D is more dangerous if you take too much. It’s definitely a good idea to consult with your doctor before supplementing with it.
Another way I like to use essential oils is to diffuse a few drops in a diffuser. To be fair, I’m not sure how much, if any, antimicrobial benefit they have in that form, partly because of the high dilution and because I haven’t had much luck finding research on that specific method of use. I like the scents better than air fresheners, though. Also, if used properly, it won’t harm even if it does little, if anything to help. Proper usage in this case means keeping it away from pets, especially cats, only diffusing age and condition-appropriate essential oils for the people in the room it’s being used, and not adding more than a drop or two to the diffuser at a time.
I do usually keep a can of Lysol and some bleach around in case something really disgusting hits our household. For the rest of the time, though, I think they are overkill.
Wash your hands to stay healthy
One of the best ways to stay healthy, of course is to wash your hands. One study showed that hand washing-even without soap-was more effective at eliminating influenza A on hands than hand sanitizer. Washing with soap further increased the benefit. According to the CDC, hand sanitizer is not as effective at removing all types of germs, such as Cryptosporidium, norovirus, and Clostridium difficile, making handwashing all the more important.
With COVID-19, wearing a mask is recommended or even mandated in some areas. The main argument for them is that they help prevent the wearer from spreading the virus, especially before they have symptoms and know to self isolate. I’ve seen many arguments against wearing a mask. If you’re wondering about the effectiveness of homemade masks, this is a good site to review https://smartairfilters.com/en/blog/diy-homemade-mask-protect-virus-coronavirus/. They did several tests, including filtration of particles smaller than the coronavirus, effectiveness of homemade masks in general, which fabric works best, and how effective a cloth mask is if worn for an extended period.
I do think mask wearing is beneficial for staying healthy if done properly. I wear them when I go grocery shopping or am in a similar situation where keeping a distance isn’t possible. A mask isn’t 100%, though, so it’s important to use them with other healthy practices.
Even if you do everything right, nothing is a 100% guarantee against viruses and other types of infection. Sometimes, despite our efforts a doctor’s visit and medication is required. By taking measures to support our immune system with proper nutrition, fresh air and exercise, and limiting exposure to germs through cleaning and hand washing, though, we can increase our odds at staying healthy.
Like this post? To make sure you never miss a future post, please sign up for my newsletter.
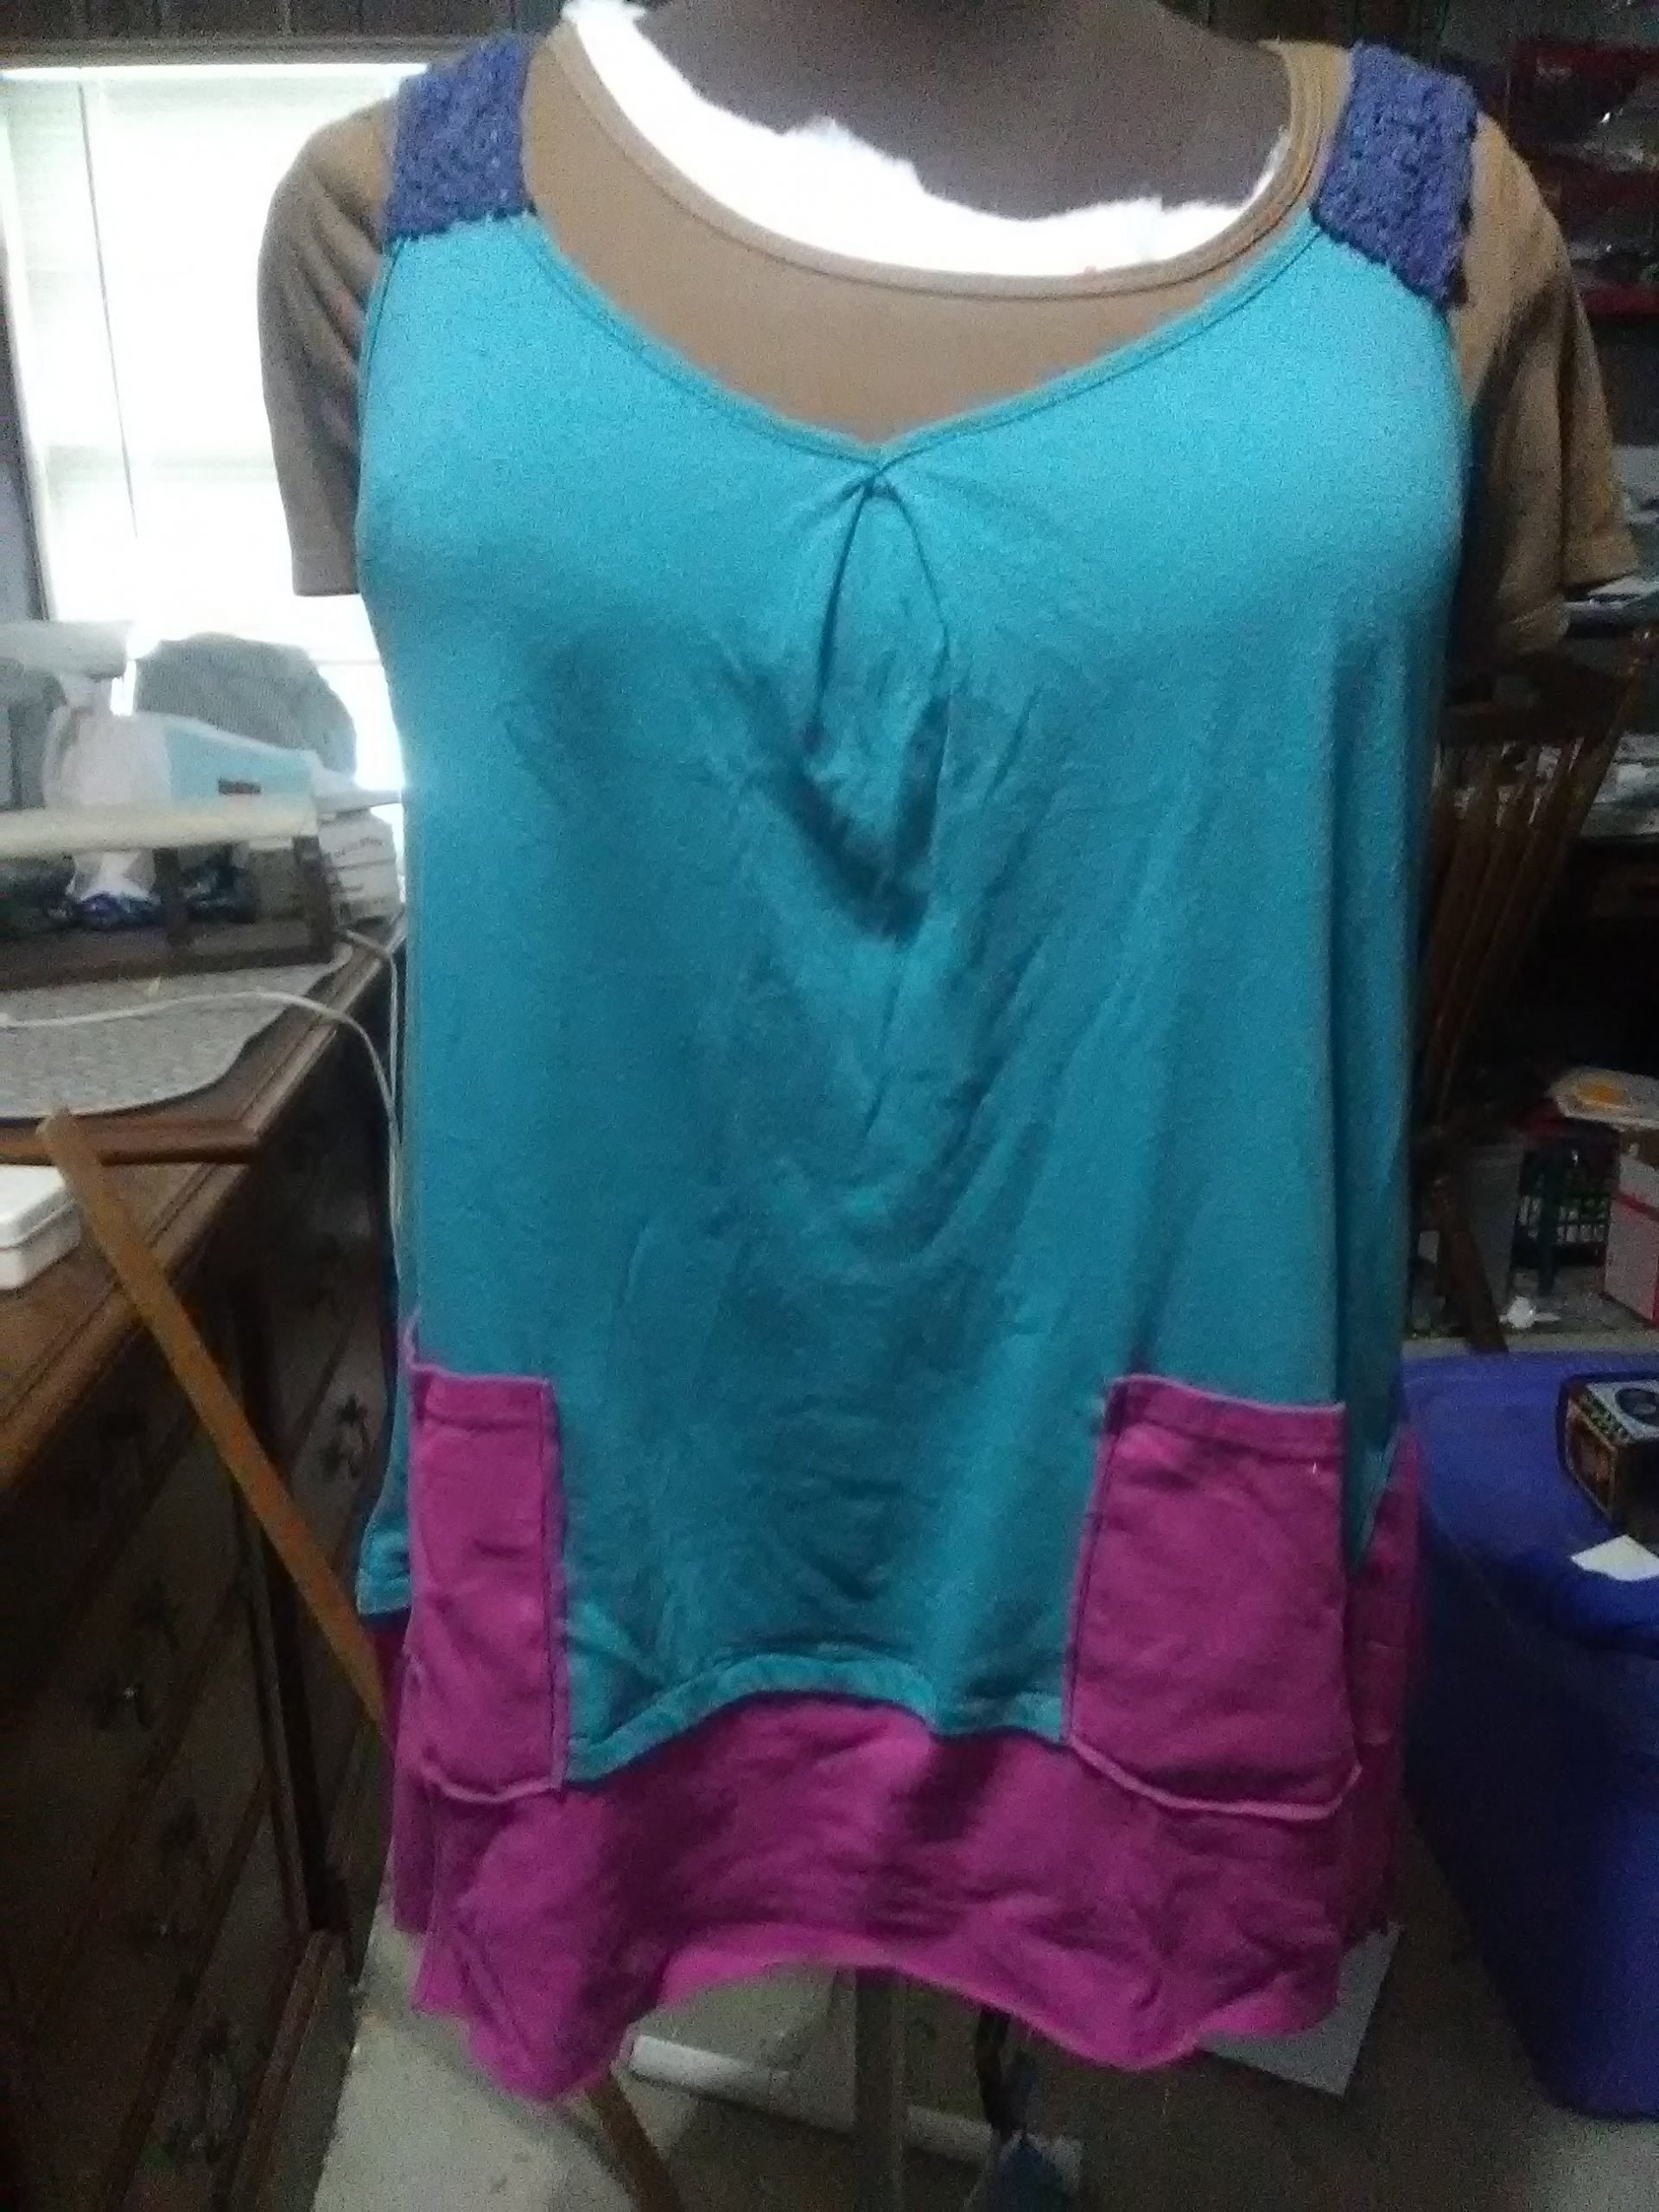
I have tons of clothes waiting for me to refashion them into something more wearable, but haven’t had much inspiration. Recently, though, I came across CreoleSha on Etsy. I love her flowy designs. Luckily, she offers classes on Teachable, so I took her free course on upcycling a sweatshirt or t-shirt into a tunic.
Almost forgot to take a before photo.
My refashion notes
It’s summer, so rather than use a sweatshirt, I started with a camisole tank that I didn’t wear much. I liked the color, but the fit was too loose to use for layering, and the skinny straps made it difficult to wear with a bra. By adapting the techniques in CreoleSha’s class, I turned it into a longer, flowing tank and then added a bit of cotton lace salvaged from an older refashion project to widen the straps.
The added material came from a t-shirt with a large logo on the front. I liked the color, but not the logo, so it was perfect and added some nice contrast.
Of course, pockets are always handy, so I added some patch pockets on the front.
Final result
It’s not perfect, but it’s something I’m more comfortable wearing now. The shirts were wrinkled from storage to the point that the wrinkles came back even after ironing. Luckily they smoothed out with laundering, so I don’t look like I just rolled out of bed when I wear it. More importantly, trying something a little on the artsy side and just jumping in has me ready to tackle more refashions.
A note on my dress form
Before working on this, I took the time to add some batting to my dressform, Athena. She’s a little less padded in some areas than I am, so the batting makes it easier to use her as a fit guide when I don’t want to try things on over and over. The brown t-shirt helps hold it all together and provides something to pin into.
Like this post? To make sure you never miss a future post, please sign up for my newsletter.
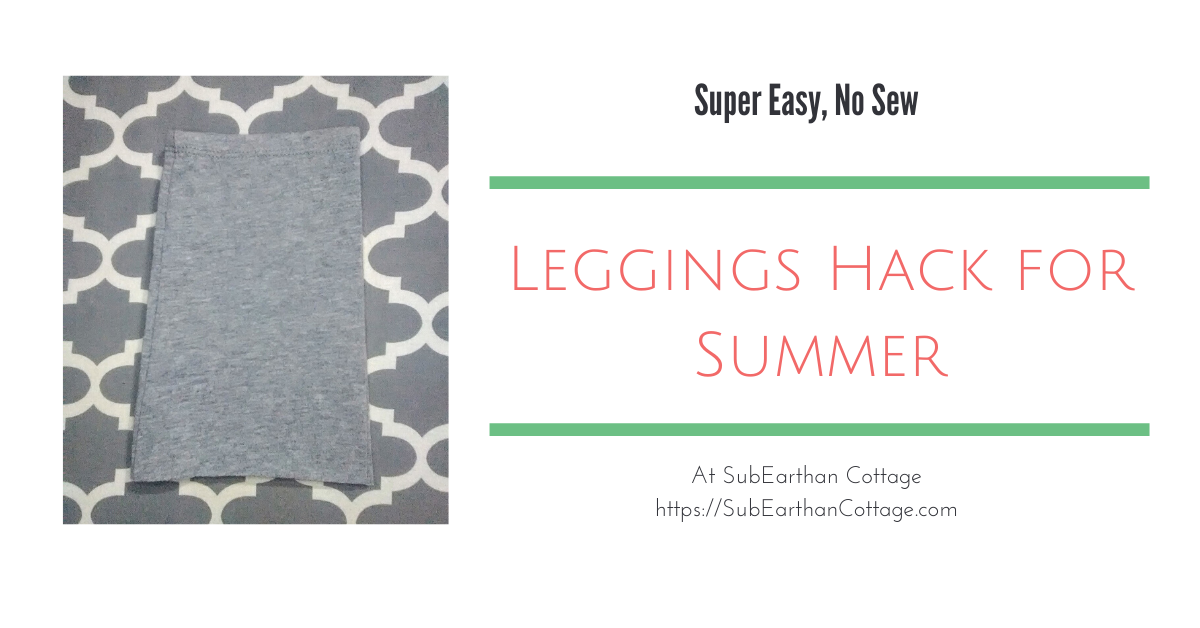
If you or your kiddos wear leggings, you’ll love this easy leggings hack for summer. While you can use any leggings, it’s perfect for turning leggings that have worn out at the knees or ended up being a little too see-through into something usable, especially when the weather turns hot. This hack is so simple, I feel a bit silly making a post about it. It’s really one of those “Why didn’t I think of that?” things.
How to do it.
All you need is a pair of leggings you want to make shorter and some good scissors. Fold them in half so that the legs lay on top of each other. Make sure the fabric is smooth and the legs match up at the hem. Decide how much shorter you want them and cut them at that length, keeping the line parallel to the hem. My scissors cut through both legs easily, but you can always cut one and use it as a guide to cut the other.
Here’s what I cut off. I like leaving mine either just above or just below the knee.
Because knit doesn’t fray, you don’t have to hem the raw edge. When stretched, the edge will roll a tiny bit and hide the edge. You may want to seal the seam that you cut through with a little fabric glue or a few stitches. I have some I cut last summer without doing anything to the seams and they’ve held up through many wearings and washings without coming apart.
How I like to wear my shortened leggings
I like wearing dresses or skirts in the summer because Texas is hot, lol. With little kids, though, I’m constantly up and down or bending to pick things up off the floor. Cropped leggings underneath give me enough coverage to make dresses practical for everyday. Leggings under my dresses also prevents uncomfortable chafing from being a bit, um, curvy in the thighs. For this purpose, I really like using this hack for leggings that I wouldn’t feel comfortable wearing without a long tunic or dress. Instead of taking up space at the back of my closet, they get used and make my other clothes more wearable.
Ways to repurpose the cut off section
The cut off sections can be repurposed, too. A really simple thing to do is make hair bands by cutting them in one inch strips parallel to the hem. Be sure to keep the seam intact so they’re a circle.
You can also make a pocket for your leggings out of the cut off section. Decide how big you want your pocket to be and add a half inch or so seam allowance to each side and the bottom. Use the existing hem as the top of your pocket to save time. Fold the seam allowance under and stitch in place on your leggings where you want the pocket. You’ll want to use a narrow zig-zag or stretch stitch to prevent the thread from breaking. A ball point needle is ideal for sewing knits, so if you have one, use it.
Here’s one pocket I’ve added.
Like this post? To make sure you never miss a future post, please sign up for my newsletter.
I, Charity Sloan, am a participant in the Amazon Services LLC Associates Program, an affiliate advertising program designed to provide a means for sites to earn advertising fees by advertising and linking to Amazon.com. Any purchases through those links will result in my receiving a small percentage in commission.
This only refers to Amazon links found in/on my blog pages. All products in my shop are 100% mine and not linked to Amazon.
Prices are the same whether you click an affiliate link or a non-affiliate link, so you will not be charged more. Thank you for your support!