If you search for refashioning ideas online, you’ll find tons of amazing examples of outdated styles being turned into trendy pieces that bear little resemblance to the original. (https://refashionista.net/ is one of my favorite refashion blogs to browse for inspiration.) It’s easy to get overwhelmed with ideas, especially if you’re new to sewing. The main goal of refashioning is to take a piece that is unflattering or unwearable and turning it into something that will be worn again. Sometimes a few simple tweaks are all that is needed to accomplish that goal.
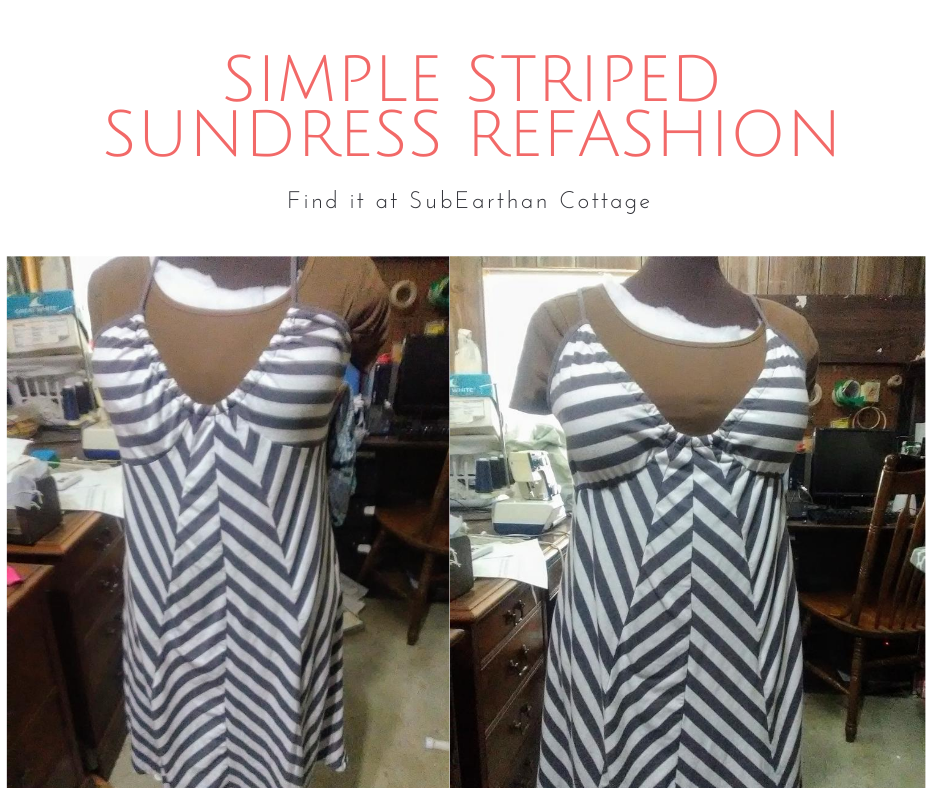
The Dress
Before
This sundress is a perfect example. In it’s original form, it was breezy and comfortable for summer, except that it required a strapless bra to be flattering. Strapless bras tend to be uncomfortable in general. When it’s August in Texas hot, they’re almost unbearable. Having to wear one took away from the comfort of this dress, leaving it regulated to the back of my closet most of the time.
The refashion Fix
In order to fix the problem, I needed to add coverage and a little support to keep the cups in place.
First, I sewed elastic into the seams under the bust. I sewed it onto the seam allowance to keep my stitches invisible from the outside.
I cut the elastic a little shorter than the length of the seam and stretched it to gather it slightly. When worn, it doesn’t look gathered, but it keeps the cups in place.
For coverage, I took the cup inserts from a soft seamless bra and hand stitched them in place. I never use them in the bras, so I have several sets sitting around. By hand stitching, I was able to keep my stitches from showing on the right side of the fabric. Rather than sew all around the cups, I strategically tacked them to keep them secure but invisible from the front.
The result
After
Those two simple tweaks only took about twenty minutes. The final result is a smoother, more flattering fit that doesn’t sacrifice comfort.
What simple refashions have you done that made a huge impact on wear-ability? I’d love to hear about them in the comments.
Like this post? To make sure you never miss a future post, please sign up for my newsletter.
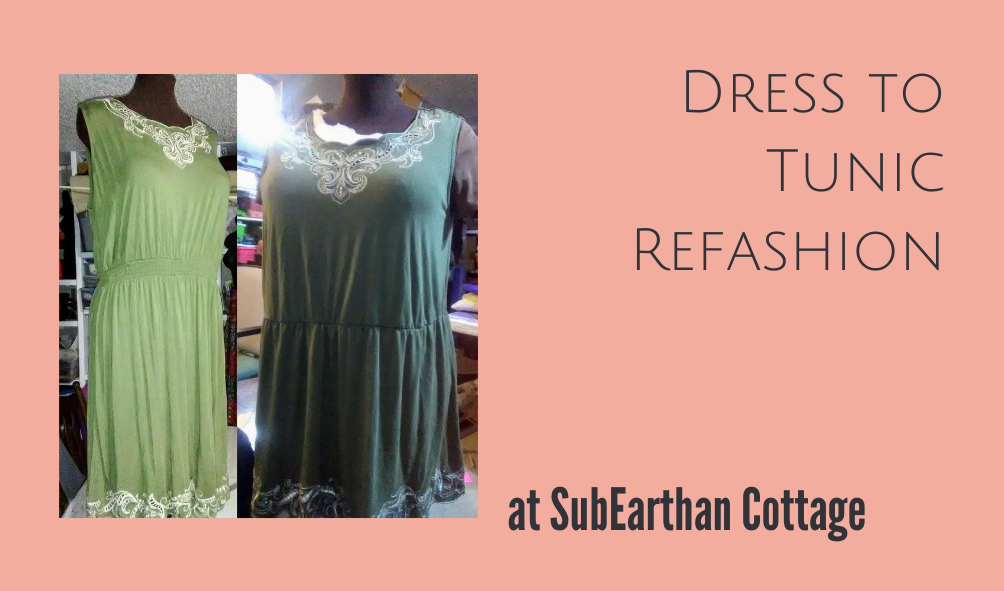
I finally got around to refashioning the green knit dress that I found at Goodwill over a year ago.
Green knit dress
What I did to the dress
I decided to shorten it to mid-thigh and take in the top for a better fit. In order to keep the pretty stitching at the bottom, I took the excess length from the middle.
I took the top in a little at the sides, but not enough to make it too fitted. It’s hot, so loose and breezy isn’t a bad thing.
To join the two parts, I added elastic to the waist of the skirt and then reattached it to the top.
Refashioned green knit dress.
End result
Here’s the result. In retrospect, I wish I had made the elastic fit a bit tighter. Right now, it just hangs fairly straight. I may go back and redo that some other time.
As it is, it’s comfortable to wear over leggings, so perfect for hanging out at home with the kiddos.
A note for homeschoolers
I’ve been cleaning the office and getting our homeschooling supplies ready for our official start to the school year. If you’re new to homeschooling, or just looking for new ideas, I’ll post photos of our setup, as well as other homeschooling tips next week.
Like this post? To make sure you never miss a future post, please sign up for my newsletter.
Today’s post is short and sweet because I’m celebrating my 40th birthday at home with my family. Birthday’s mean cake, so here is my favorite chocolate cake recipe to make from scratch. It’s dairy-free, egg-free and easy to make gluten-free as well. Enjoy!
This is a simple chocolate cake recipe that is super easy. It is dairy-free, egg-free, and if you swap the wheat flour for a gluten-free flour blend, it's gluten-free, too! To make it gluten free, I like Bob's Red Mill 1 to 1 gluten free blend because it already contains xanthan gum. If you use a different gluten-free flour without xanthan gum, I would add about 1-1.5 teaspoons of xanthan gum.To top, make a simple buttercream (with shortening and non-dairy milk to keep it non-dairy) or use your favorite store bought frosting. You could also sprinkle the warm cake with dairy-free chocolate chips, let them melt a little, then spread across the top for a rich, chocolaty treat.
Prep Time10 minutesmins
Cook Time35 minutesmins
Course: Dessert
Keyword: 9 x 13, cake, chocolate, dairy free, easy, egg free, gluten free, one bowl, simple
Servings: 292×2 inch servings
Equipment
9 x 13 rectangle pan
Ingredients
3CupsFlour see recipe summary for gluten-free adjustment
1teaspoonsalt
2teaspoonsbaking soda
2cups sugar
6tablespoonscocoa powder
2tablespoonsvinegarwhite or apple cider vinegar
1cup vegetable oilany light flavored liquid vegetable oil is fine
2cups cold water
2teaspoonsvanilla
Instructions
Preheat the oven to 375 degrees Fahrenheit
Grease the 9 x 13 inch pan, either with shortening, butter, or cooking spray
Combine the first five (dry) ingredients in a large mixing bowl and mix until evenly blended. Alternatively, sift them together into the bowl.
Add the remaining (wet) ingredients and mix until thoroughly blended. You can use a spoon or an electric mixer.
Pour the batter into the greased 9 x 13 inch pan.
Bake at 375 degrees Fahrenheit for 35 minutes or until a toothpick inserted near the middle comes out clean.
Notes
I frosted this cake with buttercream tinted blue, then used gel food coloring to paint the faces. I then piped buttercream for the eyes, facial features, outlines, writing and trim. I clearly am not a trained cake decorator, so I can’t really say which tips I used or any other details.
Like this post? To make sure you never miss a future post, please sign up for my newsletter.
I originally shared this tutorial for rainbow cupcake crayons almost ten years ago when Finn was my little preschooler and I made rainbow cupcake crayons for him using all of our broken crayons. It’s easy, and you can get little ones to help with peeling the paper off of the broken crayons, and they get fun new crayons to play with once they have cooled.
Unfortunately my photos of our project got lost, but a quick Etsy search shows lots of examples of similar multicolored crayons in fun shapes. If you like the idea but don’t have tons of broken crayons around, consider supporting one of the shops on Etsy by purchasing from them.
Photo by Kristin Brown on Unsplash
DIY Rainbow Cupcake Crayons Tutorial
Line a muffin pan with foil or a double thickness of cupcake liners. (Note: The wax will likely melt through, so you probably want to use a pan that you reserve for non-food projects.)
Remove all the paper from your crayons.
Break into smaller pieces if needed. I just broke them as small as I could with my fingers. Most pieces were about an inch long or smaller.
Sort the pieces into the lined cups. I sorted by color, but you could also mix for super swirly crayons.
Fill the cups to the top but don’t overfill.
Melt in the oven at about 200-250 degrees F. I recommend setting a baking sheet under the muffin pan. You really don’t want to have to scrape melted crayon off your oven.
Check about every 10-15 minutes. I let them cook until there were just a few solid chunks in the middle. Then I gently swirled them with toothpicks to sink the chunks and blend the colors.
When they are sufficiently melted, turn off the oven. You can carefully remove them at this point or let them cool in the oven. I didn’t need my oven, so I let them cool in there overnight.
Once they’ve cooled completely you can remove the papers and color away.
Mask Update
I made a few of the fitted masks I mentioned in Wednesday’s post. Overall, I think they fit well, but they are a little tedious to make, particularly if you have lots of interruptions.
Awkward photo of me modeling a fitted mask.
I looked into it a little more and found that it seems more hospitals are asking for a more simplified mask, so I’m switching to ones made by this tutorial. With batch cutting and then sewing two or three assembly line style, I can make 3-4 in a hour, even with interruptions.
Shop update: Freebies and a sale
Knowing that so many are stuck at home right now needing distractions, I’ve decided to make all of my machine embroidery design files free until April 7. That’s the day my area’s shelter in place order expires. If it is extended, I’ll extend the embroidery design freebies, too. If you make something with one of my designs, I would love to see it.
My full shop is still open, and will be as long as everyone in my household is healthy. I’m using extra care with handwashing and using hand sanitizer before coming into contact with products and packaging as well.
All of my handmade soaps are currently on sale for 20% off. You can find them here.
Like this post? To make sure you never miss a future post, please sign up for my newsletter.
Several weeks ago, I got an email talking about DIY cloth face masks. It provided a link to a free pattern. Honestly, I thought it was kind of silly. From what I’d heard, N95 masks were the only masks able to do anything against COVID-19.
A few days ago, I saw posts about people making masks and donating them to healthcare providers and nursing homes. Again, I was skeptical. If N95 masks were the only masks able to filter COVID-19, surely making cloth masks was just something that made people feel like they were doing something productive with little actual value. Still, I decided to look into it. As it turns out, cloth masks, while not as good as N95 masks, do offer some protection.
What protection can a DIY cloth face mask offer?
During my research, I frequently saw a Cambridge University study referenced. This page at smartairfilters.com gives a good overview of the study. In a nutshell, various household materials and fabrics offer protection ranging from 49%-86% against particles smaller than the coronavirus. At the top end are vacuum cleaner bags, but they are difficult to breathe through.
The more common types of materials used in DIY masks, such as cotton fabric, t-shirt blends and dish towels offer 57%-73% protection in a single layer. Using two or more layers increases the protection, but the increased protection varies by fabric.
Overall, it’s clearly not as much protection as an N95 mask, but a DIY cloth face mask does offer some protection. Any reduction in exposure will reduce your chances of getting sick, from COVID-19 or any other bugs out there. I’ve also heard that first responders and healthcare providers are using cloth masks over the N95 masks. This allows them to change the cloth mask and reuse the N95 masks longer. Different hospitals and healthcare providers have different needs and preferences, so if you decide to make some to donate, check first.
What I’m doing.
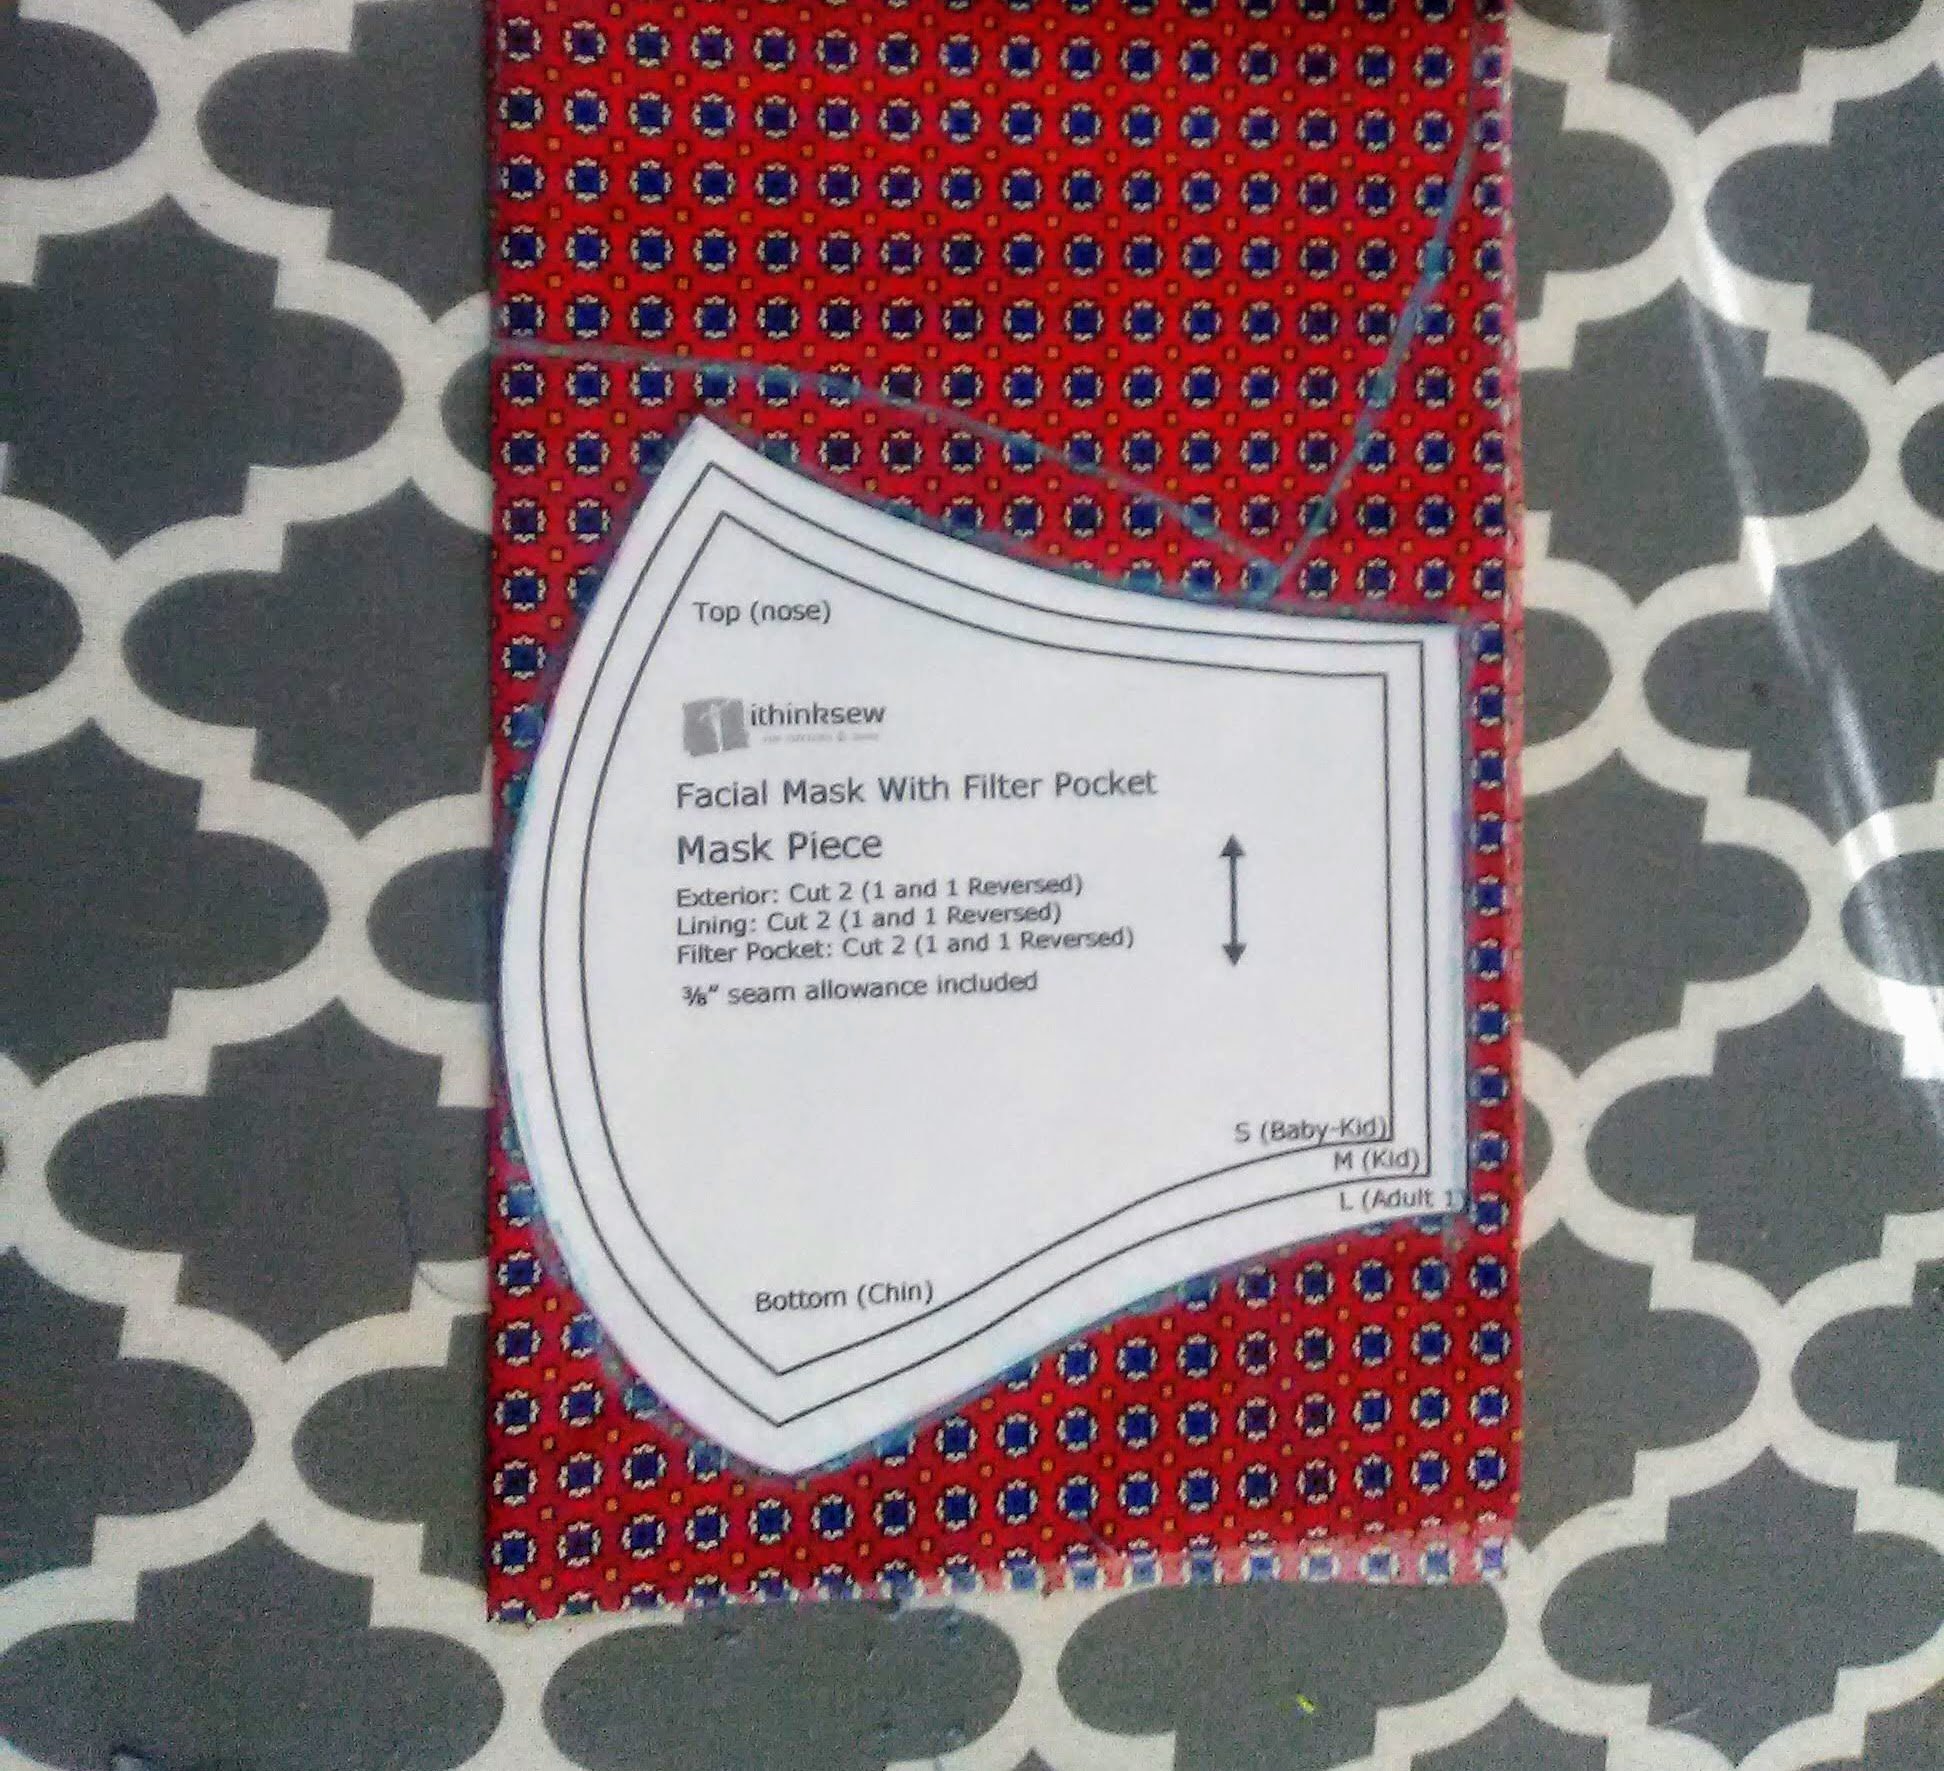
After debating and seeing interest among friends and family, I’ve decided to make a few to start. I’m using the more finished mask design from IThinkSew’s free patterns as my starting point. They also have a simplified pattern designed to be easy enough to sew by hand.
I am planning to swap the ear elastics for ties that go behind the head. I’m making that change based on seeing complaints that ear elastics are uncomfortable if used for long periods and can dislodge hearing aids. Cloth is also able to withstand higher heat than elastic, so swapping the elastic for ties allows the masks to be washed at higher temperatures. Elastic can also wear out quickly if it’s being put on, taken off and washed frequently, so cloth ties should prolong the usefulness of the mask.
The pattern I’m using has two layers and a filter pocket, making it three layers in total. Alone, it should offer some protection. For added protection, though, I’ve been looking at different filter materials. The one that seems most readily available to me is embroidery stabilizer. It has similar properties to other filter materials and is washable. There isn’t a ton of information on it as a filter substance, but I am seeing other people using it as well. It’s similar to but lighter than vacuum bags (if using cut away or tear away), and the content is the same or similar to what is used in surgical masks.
I’m not sure how many masks I’ll make. I plan to start with the people I know that have shown interest and go from there.
The IThinkSew mask patterns don’t have written instructions, but they do have fairly detailed videos for both mask designs. If you’re making masks using that pattern and having problems, please comment with your questions and I’ll try to help. I’ll try to help with other patterns, too, but I might be less helpful without my own hands-on experience.
Other sewing projects.
Knowing that so many are stuck at home right now needing distractions, I’ve decided to make all of my machine embroidery design files free until April 7. That’s the day my area’s shelter in place order expires. If it is extended, I’ll extend the embroidery design freebies, too. If you make something with one of my designs, I would love to see it.
Like this post? To make sure you never miss a future post, please sign up for my newsletter.
Embroidery Files and Freebies
Embroidery design files and freebies from SubEarthan Cottage. All designs are scaled to fit 4×4 hoops common on home embroidery machines.
Lately Christopher and I have been talking a lot about fashion. It started as a discussion about not being able to find comfortable clothes, especially pants (trousers for British English speakers) and how hard it is to find clothing that goes against the trends. Being crafty, we explored making our own clothing. The cost of fabric, supplies, time it takes to cut and sew all highlighted how impossible it is to produce clothing ethically at the low prices charged for much ready-to-wear clothing. That doesn’t even take into account the raw materials that are used to make the fabric and problems with content, pesticides, sustainability, etc.
At the same time, like many, our budget, doesn’t allow us to spend a ton on clothes. We try to make the most of our clothing budget guilt-free by shopping thrift stores and second hand shops. That way we aren’t adding to the problem by purchasing new. Most thrift shops are charity-based, so our purchases help others. We often find better quality items than what we would otherwise be able to afford this way, too.
With thrift shopping, you’re not as limited by trends. If you’re looking for something in particular, unless it’s a common item, you’re still likely to come up empty handed. That has been our problem when it comes to comfortable men’s and boy’s pants. Both Finn and Christopher would prefer something a little roomier, like karate gi pants. Unfortunately, nothing like that has been in fashion since M.C. Hammer. That means it’s time to put my sewing machines to use.
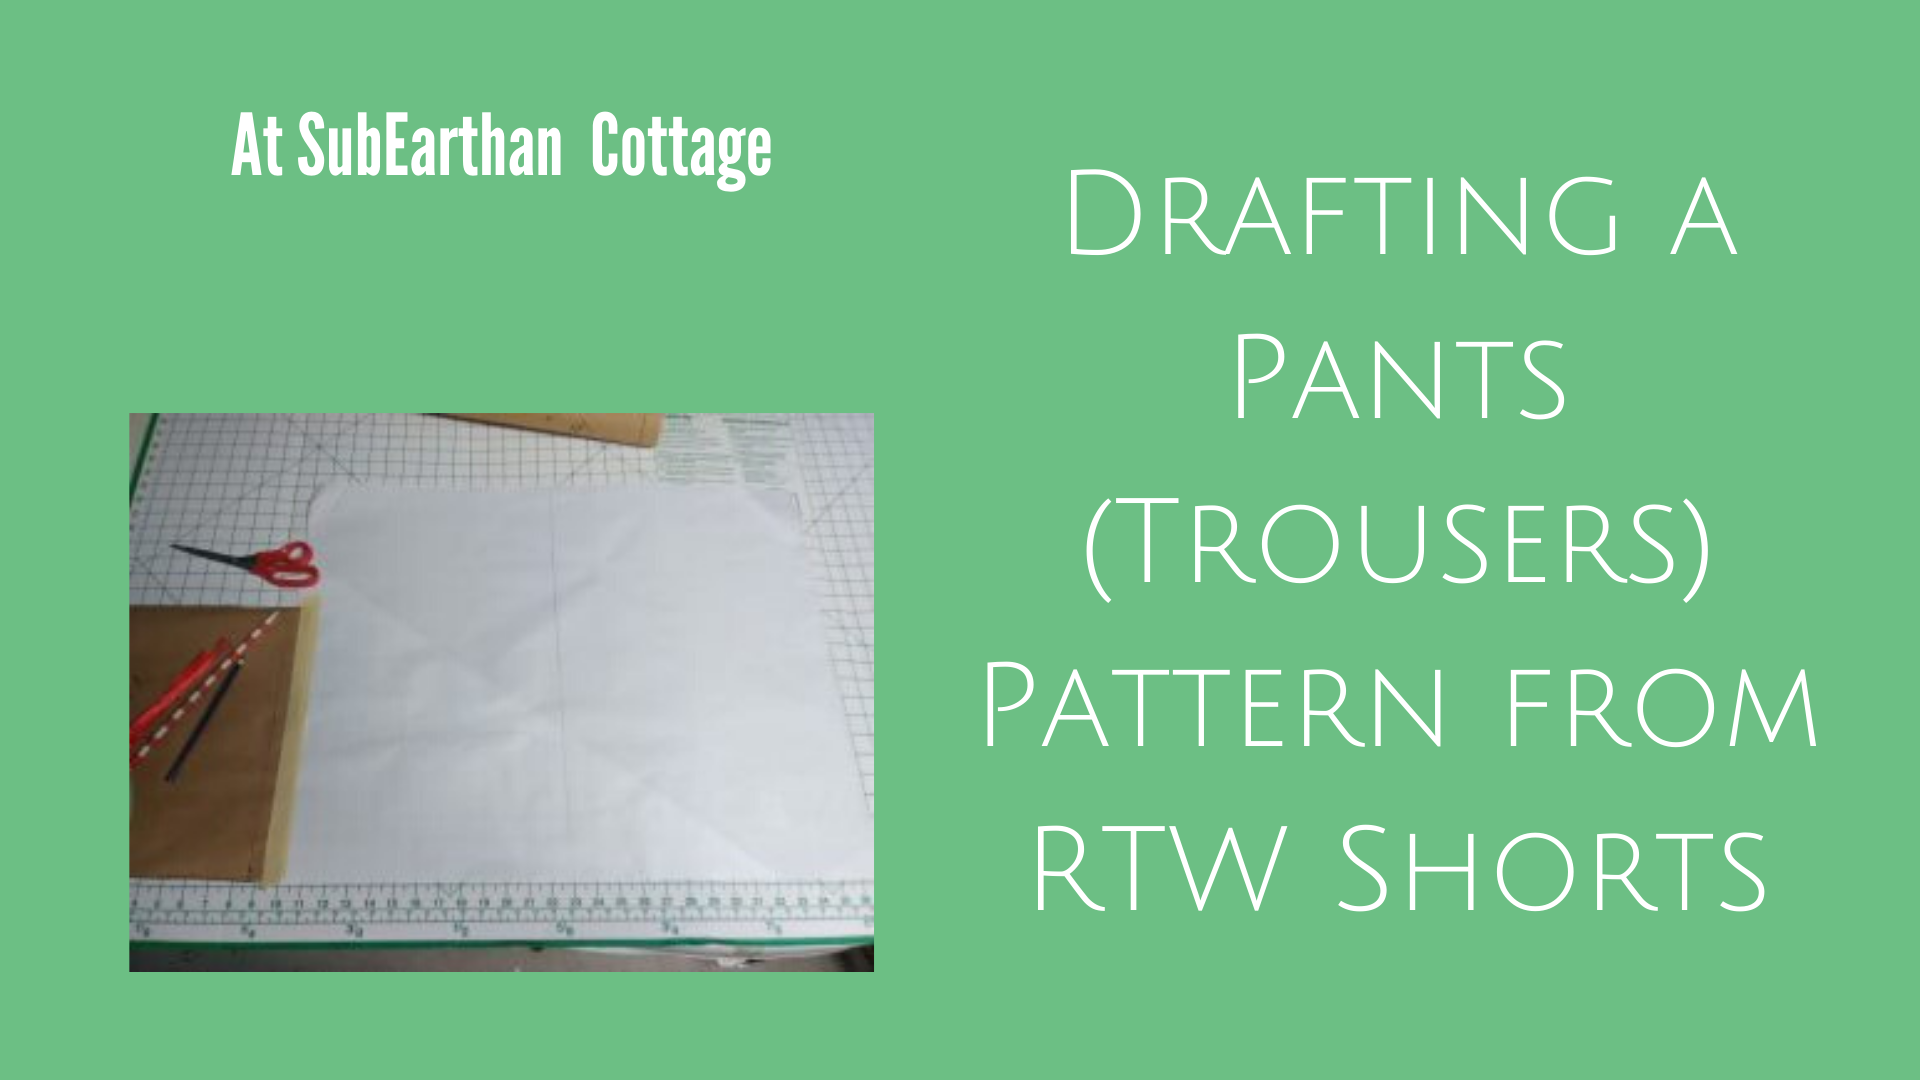
Making a Pattern from Shorts
This summer, I started by trying to copy a pair of the cotton knit gym shorts they practically lived in, adding a gusset for comfort and mobility. I used to buy bulk bags of t-shirts from Thrift Town before they closed, so instead of using new fabric, I used some XL t-shirts I had on hand. That way, if things went horribly wrong I wouldn’t feel as bad.
If you follow me on Instagram, you might remember seeing this photo with some enticing caption like, “Working on a new project!” Then, nothing else was said. Sorry.
I have zero experience with pattern making, so this was a learning experience. Here’s a brief overview of how I did it.
I laid the shorts inside out and folded in half, front to the inside, smoothing them as flat as possible. Then I traced them, adding about an inch all around. The inch is for seam allowance and to account for the fact that it’s impossible to get finished shorts to lay flat. I always err on the side of too big, because that is much easier to fix.
At the waistband, I measured the waistband and extended the pattern by that amount plus seam allowance above the waistband. This allows it to be folded down for elastic and a drawstring casing. At the hem, I extended the lines two times the width of the hem to allow enough fabric to fold and hem. On the pattern, I drew lines straight across to show where the finished hem and waistband hit on the original shorts for reference.
Then I folded them in half , backs to the inside and repeated the above steps since the back is cut differently than the front.
Drafting the Gusset
For the gusset, I drew kind of a triangle with the top point cut off. To do this evenly, I folded a piece of paper in half, drew a half inch line perpendicular to the fold, moved over about four inches and drew another perpendicular line measuring one and a half inches. Then I drew a straight line connecting the tops of the lines. I cut along the lines and opened it up to get my gusset pattern. Sewing the gusset in with the wider part at the crotch seam and using a half inch seam allowance results the gusset tapering down to a point.
Shorts to Pants
Shorts work for summer, but I needed to come up with a pants pattern for fall and winter. Chris suggested just making the shorts pattern longer, so I did by measuring the waist to floor measurement and extending my pattern the needed amount, including seam allowances.
I did this by taping the bottom of the pattern to a big piece of paper, sketching out the needed length and side seams and cutting it out.
Final Pants Result
My pattern isn’t perfect. I think I’ve tweaked it each time I’ve used it. Since the pants are made to be loose and flowy it hides the imperfections.
These are my first attempt. I made them with a linen blend, elastic and drawstring combo waistband and no pockets. I added side-seam pockets later.
My goal is to find or draft a few more basic, customizable patterns for pants and shirts that can be made in linen or a similar material. Then I can buy a bulk amount of undyed fabric and dye it as needed.
Like this post? To make sure you never miss a future post, please sign up for my newsletter.
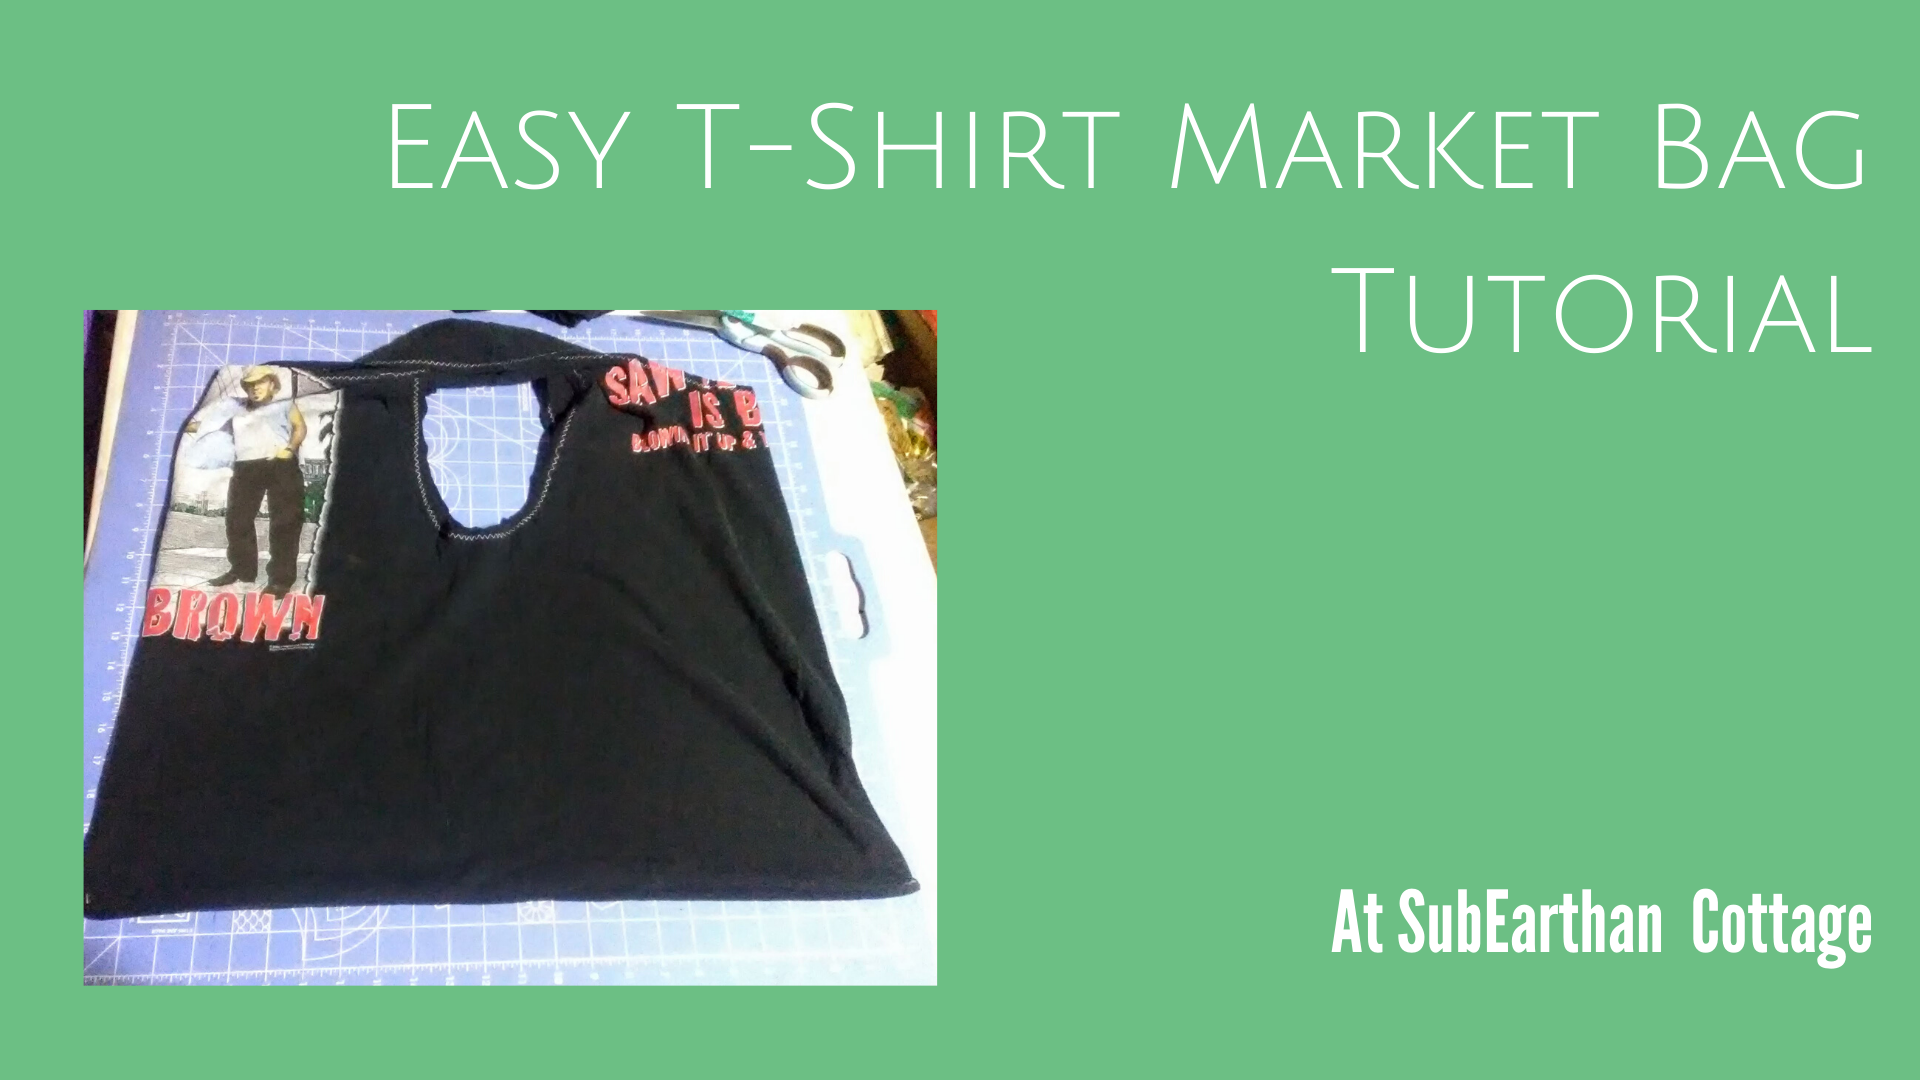
One of my lovely nieces is learning to sew with a sewing machine. To help, I thought I would do a series of beginning sewing project tutorials. Today’s tutorial turns an old t-shirt into a market bag. I’m keeping it simple today, but in the future I’ll do a post on how to make it with and enclosed bottom seam and how to box the bottom. It’s a great way to turn t-shirts that you no longer wear into something useful. If you don’t have a sewing machine, you could even sew it by hand.
Materials:
T-shirt
T-shirts with a high cotton content and no side seams work the best.
Thread in your choice of color.
Fabric scissors
Sewing machine set up with appropriate needle and bobbin threaded in your color choice.
Note: Ball point needles are generally the best for sewing with knits. This project does fine with an all-purpose needle, though, so use what you have.
Preparing the shirt:
Lay the shirt out flat and smooth out any wrinkles. Since this one is just to add to my Aldi bag stash, I didn’t worry too much about wrinkles.
T-shirt. I’m not sure where I got this one. Also, forgive the grainy photos. Lighting in my craft room wasn’t great that day.
Cut off the arms including the armhole seams.
Cut off the neck about 2-3 inches below the neckband. My shirt is pretty big, so I went three inches below the neckband. With smaller shirts you can do less.
I like to fold it in half before cutting to keep everything even. If your scissors aren’t sharp enough to go through all the layers, cut one side and then fold it in half to use as a template for the other side.
Cut straight across the bottom of the shirt to remove the hem. The hemline is often uneven on t-shirts, so focus on keeping the shoulder seams lined up, the shirt smooth and cutting a straight line that removes all of the hem.
Bottom hem removed.
At this point, you should basically have turned the t-shirt into a tank top. Now, decide if you want your bag to look like plastic grocery sacks that have the handles at the top sides (so, your tank top with the bottom sewn closed), or if you want the handles at the top middle, like a purse or market tote.
Looks like a tank top. For a grocery style bag, turn it inside out and lay it back
flat in this position.
For the grocery sack-style, turn your shirt inside out and lay it flat, just like a tank top again. For the purse/market tote, turn it inside out and match the shoulder seams and armholes together, then lay it flat. I’m making a market style tote, so you can see it in the photos.
For a purse/market tote turn it inside out and lay it flat with the shoulder seams at the top, as shown here. I find this style easier to carry on my shoulder.
Once everything is lined up, pin along the bottom to hold it in place.
Pinned hem.
Sewing the bag:
Many sewing machines have an assortment of stitches to use with knit fabric. They are useful for keeping the thread from breaking when the fabric stretches. On my machine, they are labeled “stretch” and shown in brown. Zig-zag stitches also work well on knits.
Normal stitches are in red. Stretch stitches are in brown.
You could use a stretch or zig-zag stitch for the bottom of the bag. Since it really shouldn’t be stretching much, I usually stick with a regular straight stitch set to a long-ish length of 3.
Straight stitch.
Length of 3.
Regardless of the type of stitch you choose, I recommend sewing across the bottom twice to make it nice and strong.
The seam allowance, or distance between the edge of the fabric and the stitches, doesn’t really matter that much as long as you keep it the same all the way across. For this bag, I used a 5/8 inch allowance, marked on the footplate of my machine. To keep a straight line, focus on keeping the fabric lined up with the guideline for the seam allowance rather than watching the needle.
Edge of fabric lined up on 5/8 mark.
At the start , sew about 2-3 stitches then backstitch to secure the stitching before continuing to sew to the end. At the end, backstitch another 2-3 stitches, then sew to the end and cut the threads. Repeat the seam as close to the original line of sewing as possible to make it nice and strong.
Back stitched first seam
Second line stitched for reinforcement.I tried to stay as close to the first line as possible.
Turn the bag right side out. Since knit doesn’t unravel, you could stop there and be done. I like to sew around the arm and neck holes to reinforce the t-shirts original shoulder seams and give it a more finished look.
Finishing around the t-shirt arm and neck hole handles:
I usually use a serger for this, but it’s not necessary. On a sewing machine, I do like to use either a zig-zag or stretch stitch since there is going to be more stretch on the handles so a straight stitch might break.
Zig-zag setting.
This time, I’m using a zig-zag stitch, keeping the stitch length set at 3 and using about a 1/2 inch seam allowance. If your sewing machine has a free-arm, it can make it easier to sew around the armholes if you use it. Sew around each arm hole and the neck hole separately.
Messy zig-zag backstitching.
To start and finish the zig-zag, I backstitched like normal. It looks a little messy that way. You could leave extra thread at the beginning and end, pull the threads to the back side and tie knots to secure them if you want a cleaner look.
Finished t-shirt bag.
That’s it. You now have a purse or reusable bag from what used to be an old t-shirt. Don’t throw the t-shirt scraps away. I’ll post some creative uses for them soon!
To learn how to make this bag a little more polished, read my t-shirt bag upgrades post.
If you read through the tutorial and like the concept but don’t want to diy, I still have a few left in my shop on clearance here.
Like this tutorial? To make sure you don’t miss out on future tutorial posts, sign up for my newsletter.
I, Charity Sloan, am a participant in the Amazon Services LLC Associates Program, an affiliate advertising program designed to provide a means for sites to earn advertising fees by advertising and linking to Amazon.com. Any purchases through those links will result in my receiving a small percentage in commission.
This only refers to Amazon links found in/on my blog pages. All products in my shop are 100% mine and not linked to Amazon.
Prices are the same whether you click an affiliate link or a non-affiliate link, so you will not be charged more. Thank you for your support!