I love candles. Making your own is a great way to recycle old wax into something uniquely yours. This post from Crafting a Green World shares several methods for candle making.
Whether you’re rolling beeswax candles with kids or pouring a multi-color, multi-layer jarred candle, homemade candles give you the power to fill …
Denim jeans don’t have to be tossed or cut up for crafts when they start to wear out. With a little effort, you can easily get some more wear out of your favorite jeans. For this tutorial, I’m using a pair of denim blue jeans that are still in good shape except for where my thighs touch. There they are really worn on one side and there is a hole on the other. Because of where the hole was located, I wasn’t comfortable even wearing them around the house, so I decided to try a simple fix.
Interfacing for support
First, I ironed lightweight fusible interfacing on the inside of the worn areas, making sure to completely cover all the worn out spots with the interfacing.
Reinforce with stitching
Once it fused and cooled down, I turned them right side out. Using a narrow zig-zag, I stitched back and forth over the hole and worn areas. This serves to secure the interfacing and add strength.
If you can, drop or cover the feed dogs on your sewing machine so you can move the jeans freely under the needle. The machine I used doesn’t have a way to drop them and I don’t have the special foot plate to cover them. Instead, I used a combination of repositioning and forward and reverse stitching to make it work.
Depending on the location, you could use contrasting thread and decorative stitches to turn the repair into an embellishment.
Lengthening a slightly short pair of jeans
I also have a pair of jeans I love, but they needed a button sewn back on. They were also a little short, so I replaced the button and let out the hem while watching TV one evening. These heavy denim jeans are now ready for the coming colder months.
Buttons!
These have an obvious line where the hem was. They’re really cute so I don’t care.
Like this tutorial? To make sure you don’t miss out on future tutorial posts, sign up for my newsletter.
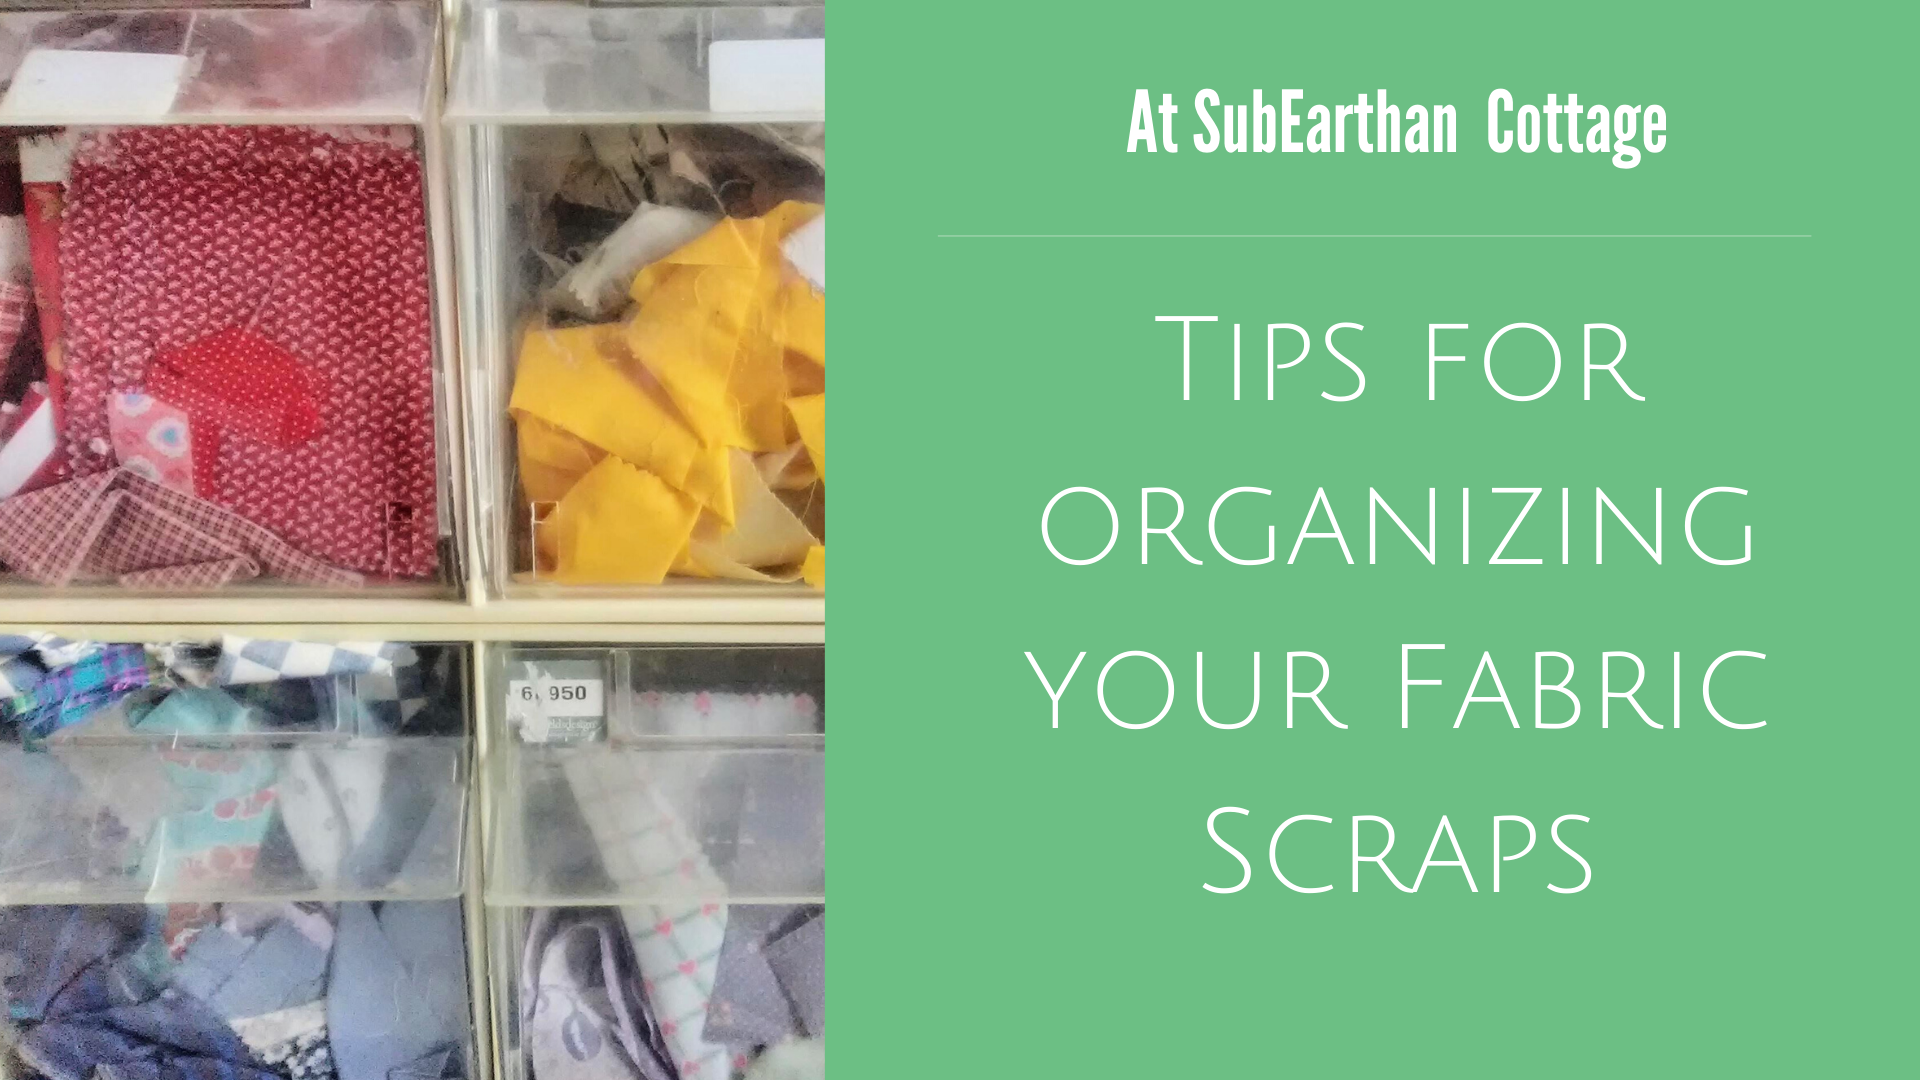
If you sew, you have a stash of fabric scraps. No matter how carefully you plan and lay out your patterns, there is almost always going to be some little extra bit. With some creativity, even the smallest scraps are useful in other projects. In order for that to happen, though, you need to be able to know what you have and find what you need. Here’s some simple suggestions to make the most of your fabric scraps.
Decide what makes sense.
I sort my scrap stash primarily by color. Most of it consists of quilting cottons, so sorting by color makes sense. For other types of fabric, I sort by fabric type more than color. For example, all flannel scraps go together.
Think about how you craft or how you naturally group things to find what will work best for you. If you focus more on prints than color family, then try group by prints. If you use a large variety of fabric weights and textures, use that to determine your groupings.
Out of sight, out of mind.
For me, being able to see what I have is the most important. I have a clear plastic sorter bin, similar to what you’d find at a hardware store, that I keep near my cutting table. I put scraps that aren’t really big enough to fold practically into the bins, sorted by color family. The front of the bins are clear, so it’s easy for me to see colors and prints at a glance.
Plastic shoe bins or similar containers would also work. You could upcycle shoe boxes or shipping boxes, but you lose the visibility with something that isn’t clear. In that case I would clearly label the outside with the color family.
This garage sale find keeps my scraps organized and visible.
Don’t forget the tiniest scraps.
Even the tiniest scraps can be used for stuffing, to strengthen handmade paper or in textile art. I keep a small bin next to my sewing machines and sergers to collect threads, clipped corners, trimmed seam allowances, etc.
Have a plan for other types of scraps.
Little bits of lace, trim and buttons from refashioned clothing get stored in glass jars. I find the variety of colors and shapes pretty, so I like having them sit on a shelf where I can see them. If I need a button or bit of embellishment I know what I have. In the meantime, it’s art.
Stabilizer scraps go into a drawer under my embroidery machine. If I’m embroidering something that needs a little extra support in an area, I use a suitable scrap instead of a whole new piece. Stabilizer scraps can also be used to reinforce buttons and button holes.
I store most of my interfacing in a shoebox. Small scraps go back into the box to use similarly to how I use stabilizer scraps.
Don’t get overwhelmed.
If you find that your scrap stash is growing larger than what you can use, sort through and pull out anything you don’t love or just don’t see yourself using and donate them. Schools, libraries, scouting groups and similar organizations will often take fabric scraps and other craft materials to use for art projects. You can also list them for free on craigslist or Facebook. As a little girl, I used scraps from my grandma to fashion clothes for my Barbies and My Little Ponies. If you have know of anyone with children, they might like the scraps to play with, too. By donating them, they still get put to use and you’re better able to see and use what you still have.
Put those scraps to use!
Once you know what scraps you have, make it a goal to use them up. If you’re stuck for ideas, Pinterest is a great place to turn for ideas. I have a board dedicated to scrap busting projects that I add to frequently. You can find it here.
I’ll be posting creative ways to use fabric scraps soon. To make sure you don’t miss it, sign up for my newsletter here. When you sign up, be sure to check your spam folder for the confirmation if it doesn’t go straight to your inbox.
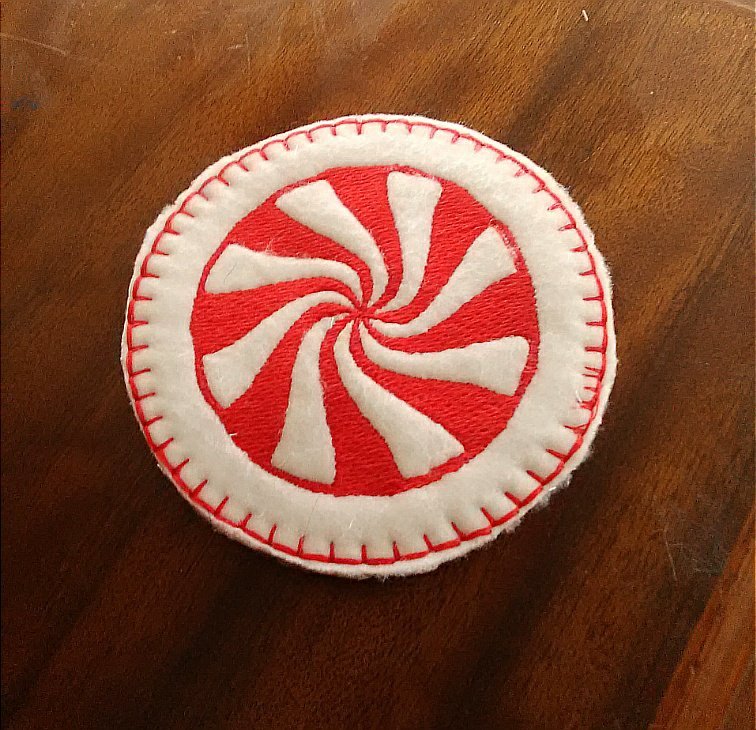
I love in the hoop embroidery projects. They, more than anything, are what make me wish my embroidery machine had a bigger stitch area than just 4 inches by 4 inches. Even with such a small hoop size, there’s still plenty of in the hoop projects available.
One of the easiest ITH (in the hoop) items to make are coasters. To make these peppermint coasters, all you need is fleece, one or two thread colors, stabilizer, the design file and, of course an embroidery machine. Once you see how they are made, you can easily swap out the design and colors to suit your needs. They are so simple to make, they are perfect for last minute gifts or as decor to match a party’s theme. You could also make a themed set for each month, season or holiday to decorate your home.
In the hoop peppermint coasters
Supplies to make one coaster
Two pieces of fleece cut to your machine’s hoop size
Place one piece of fleece on top of the stabilizer in the hoop. For small projects I sometimes just carefully hold it smooth while my machine stitches. You can also use a glue stick outside the stitching area to glue the fabric to the stabilizer, or pin the fabric to the stabilizer at the top and bottom, outside of the stitching area. I made the mistake of having a pin at the side, and even though it was clear of the design, it caught on my machine’s presser foot. Luckily I caught it quickly, but I will probably use a glue stick whenever possible to prevent that from happening again.
Decision Time: If you want the peppermint to show on both sides, place the other piece of the fabric under your hoop while placing it onto your machine. The bottom fabric usually stays in place on its own, but you could use a glue stick as I mentioned in the previous step. To only have the peppermint show on one side, skip to “Preparing your machine”.
Preparing your machine
If you want the peppermint on both sides, make sure the top and bobbin thread match. For a single-sided design, red or white in the bobbin is fine.
Place your hoop in your machine.
Upload the design file according to your machine’s instructions. The following steps are based on the Brother SE 400, so they may differ depending on your machine.
Resize your design, as desired. I wanted the peppermint as big as possible, so I followed the instructions for my machine to maximize the size. Mine maxed out at 7, which resulted in an overall size of about 6.5 cm. If your machine has a bigger capacity, you’ll need to decide how big you want the design .
Because I used white fleece, I chose to skip the white stitching and only stitch it in red. Again, I followed the instructions to skip to color 2, labeled red. Whatever color you choose, if you’re only sewing one color, skip to color two, because it has the outline. If you want to stitch both colors, skip this step.
Optional: Since fleece has a high loft, placing water soluble stabilizer is recommended. I’ve tried this project both ways, and I don’t see a big difference. For this tutorial, you’ll see the water soluble stabilizer in most photos.
Stitching your in the hoop coaster
Begin stitching according to your machine’s instructions.
If you are stitching both colors and want the peppermint on both sides, be sure to change the bobbin thread to match the top thread after color 1, white, is complete.
Continue stitching until the peppermint design is complete.
Stitching the border.
I like the border to match on top and bottom, so for this step I put red in the bobbin and for the top thread.
If you’re making a single-sided coaster like I did for this tutorial, now is when you add the second piece of fleece. Place it under your hoop as in the last step of “Preparing your hoop”.
On your machine, navigate to frames and select a circle frame.
Select the stitch type. I chose an over edge, blanket-type stitch.
Adjust the frame size. The frame size will determine the final size of your coaster. Make sure it is bigger than your design. Mine maxed out at 9 cm.
Stitch the border. I like a thicker look to the border, so once the border is done, I stitch it again. As long as you haven’t moved the fabric in the hoop, it will stitch directly on top of the first frame.
Finishing the coaster
Remove the project from the hoop.
Carefully remove any pins.
Trim thread tails.
Tear away the tear away stabilizer.
If you used water soluble stabilizer, cut away excess.
Cut fleece as close to the outside edge of the frame stitching as possible without cutting the stitching.
To remove remaining water soluble stabilizer, gently dab with a damp cloth or, swish it in a bowl of lukewarm water until stabilizer is gone and allow coaster to air dry flat.
Done!
I know that looks like a lot, but it’s really simple. I tried to be as detailed as possible, but if anything is confusing, please don’t hesitate to ask for clarification in the comments or through email.
If you notice, in the photo of the finished coaster, there’s a flaw in the border stitching on the left. That is where a pin caught the presser foot. Luckily that was the only damage. In the future, if I use pins, I will only pin at the very top and the very bottom. I really do prefer using washable glue sticks and keeping the glue well outside any stitching. That way my needle and machine don’t get gunked up, and I don’t risk hitting pins.
Finished Peppermint Coaster
Embroidery Files and Freebies
Embroidery design files and freebies from SubEarthan Cottage. All designs are scaled to fit 4×4 hoops common on home embroidery machines.
In the past, I often featured handmade or vintage shops on Fridays. Over the years, the world of crafting and blogging has changed dramatically. I would love to resume Feature Fridays, but with a broader scope.
Handmade shop and websites are still welcome. I also want to feature guest writers sharing tutorials, tips, advice, recipes, etc. Categories that I feel are a good fit for this blog are crafting, sewing, sustainability, refashioning, healthy living, parenting, hair and beauty tips for busy moms, homeschooling and homesteading. I am open to other topics as well, so if you are interested but don’t quite fit into one of the above categories, please contact me anyway with your idea.
Guest posts will be promoted across my social media sites frequently throughout the week they are published and then periodically after.
Handmade shop/website features
For handmade shop/website features, answer the questions in the following list and email them to csloan@subearthancottage.com. I will contact you before your shop is featured and if any clarification is needed. You can give as much or a little info for each section as you are comfortable with sharing. Be sure to include links to your shop, web page and blog, if you have them. If you sell your products in a brick and mortar store and would like to include that info, you may include that as well.
I also choose a favorite item from your shop on the week that you’re featured and briefly tell why I like it. The first image from your shop for both your favorite item and my favorite item will be included in the blog.
Name and Business Name
Tell us a little about yourself and your business.
What made you get started in your business?
Anything else you’d like to share?
Tell us about your favorite item listed in your shop.
Links to your shop, website, blog, etc.
Email address (This will NOT be published)
Guest posts, tutorials and everything else
Please contact me at csloan@subearthancottage.com with your idea. If you already blog, a link to your blog or site where your writings are published is also helpful. Newbies are welcome, too. I’m also not opposed to reposts if they are a good fit and your own work.
If I think your idea is a good fit for SubEarthan Cottage, I will let you know and we will work out the details from there.
Here’s a few common questions about Kombucha. I’ve answered them based on my research and personal experience.
How much should I drink?
If you’ve never had Kombucha before, you’ll want to start slowly. Kombucha can have a detoxifying effect that can be unpleasant if you rush it. It is recommended to start with about an ounce per day at first and gradually increase until you reach a comfortable level for you. If you notice any ill effects cut back or stop for a few days to let your body catch up. Drinking lots of water can help, too.
Of course, you should always listen to your body. If you feel like you can’t tolerate kombucha don’t push it. There are plenty of other ways to get probiotics. Also, I’m not a doctor, and the above might not apply to everyone depending on your personal health. If you have any concerns, definitely consult your doctor.
Can I use metal utensils when making Kombucha?
Metal tea kettles for boiling the water are fine. It’s fine to stir the tea and sugar together with a metal spoon before adding the SCOBY. What you want to avoid is the SCOBY coming into contact with metal as that can damage the SCOBY. Even then, I have heard very brief contact is ok, such as when cutting up a giant SCOBY. I prefer to peel apart the layers and avoid metal touching my SCOBYs, though.
Can I use honey/stevia/coconut sugar/some other sweetener?
The sugar is food for the SCOBY and plain white sugar is recommended because it is easy for the SCOBY to digest. I have heard of some people having success with other sugars, but I haven’t tried it myself. If you want to try another form of sugar, I would start with a small batch and keep another SCOBY in a tea/white sugar brew as backup.
Stevia or other zero calorie sweeteners will not work because they don’t provide food for the SCOBY.
Can I use flavored teas?
Not for the main brew. You can use flavored teas to add flavor in a second ferment.
Can I use decaf teas?
This is another one where I’ve heard conflicting information. Most say not to use decaf tea. If you want to try decaf, as with different sugars, I would start with a small batch and keep another SCOBY in a regular tea/white sugar brew as backup.
My SCOBY looks funny. Is it bad?
Most SCOBYs look funny. They can be smooth and creamy colored or have air pockets and brown spots. The bottoms usually have brown stringy tentacle things hanging down. New SCOBYs grow on top of older ones until they look like a stack of slimy pancakes. (Eww.) All of this is normal, and there’s probably a million variations I haven’t described.
There are two main things to watch for: mold and black. If your SCOBY molds, it will look like blue-green dusty mold, just like what grows on bread. If you get mold, throw it all out and start over.
Black means the SCOBY is dead or dying. Toss it.
My Kombucha tastes like vinegar. What happened?
Kombucha is supposed to taste vinegary, but if it’s too strong you can always mix it with something like juice to make it more palatable. You can also use super-vinegary Kombucha in place of apple cider vinegar in recipes. If it’s straight vinegar with no sugariness left, you could use it as a hair rinse or for household cleaning where you would use ACV.
To make future batches less vinegary, there’s a couple of things to try.
1. Kombucha brews faster in warmer weather. If it’s been hot, try a shorter brew time and/or increasing the amount of sugar in the brew.
2. If your SCOBY is getting super thick, split off some layers. More SCOBY = shorter brew time.
My Kombucha is too sweet. What happened?
The easiest fix is to let it brew longer. If it’s cold, moving your jar to a warmer location may help. I think the ideal range is somewhere around 70-80 degrees Fahrenheit.
You should also check the condition of your SCOBY. If it is turning black, you’ll want to replace it.
Should I store my SCOBYs in the refrigerator?
No. You want to avoid extreme temperatures because they can damage the SCOBYs. The best range is between 70-80 degrees Fahrenheit.
To store your extra SCOBYs, place them in a lidded jar with at least enough Kombucha for them to float and store in a cool-ish location, such as a pantry or shelf out of direct sunlight and away from heat sources.
When you get your homebrew timing right, kombucha is pretty yummy on it’s own. Sometimes you want something a little different, though. Or maybe straight kombucha just isn’t your thing but you still want the probiotic benefits. Luckily you can easily change the taste of your kombucha to make it more palatable or fix a soda craving. Here’s my tips for flavoring your Kombucha tea.
Mixing with juice
The simplest way to flavor kombucha is to mix it with juice or another beverage. This is a great way to get started drinking kombucha. To start, add 1-2 ounces of kombucha to a glass of your favorite juice. As your body and tastes adjust to drinking kombucha you can increase the kombucha to juice ratio.
I like to dilute 3-4 ounces kombucha with sparkling or still water, add a splash of lemon or lime juice and a bit of stevia. This makes a refreshing summer drink when served over ice.
Kombucha is also nice as an add in for smoothies. It can be fizzy on it’s own, though, so make sure to account for that when adding it to blended drinks. Leaving a little extra headspace in the blender is a good idea. Or, stir it in after everything else is blended.
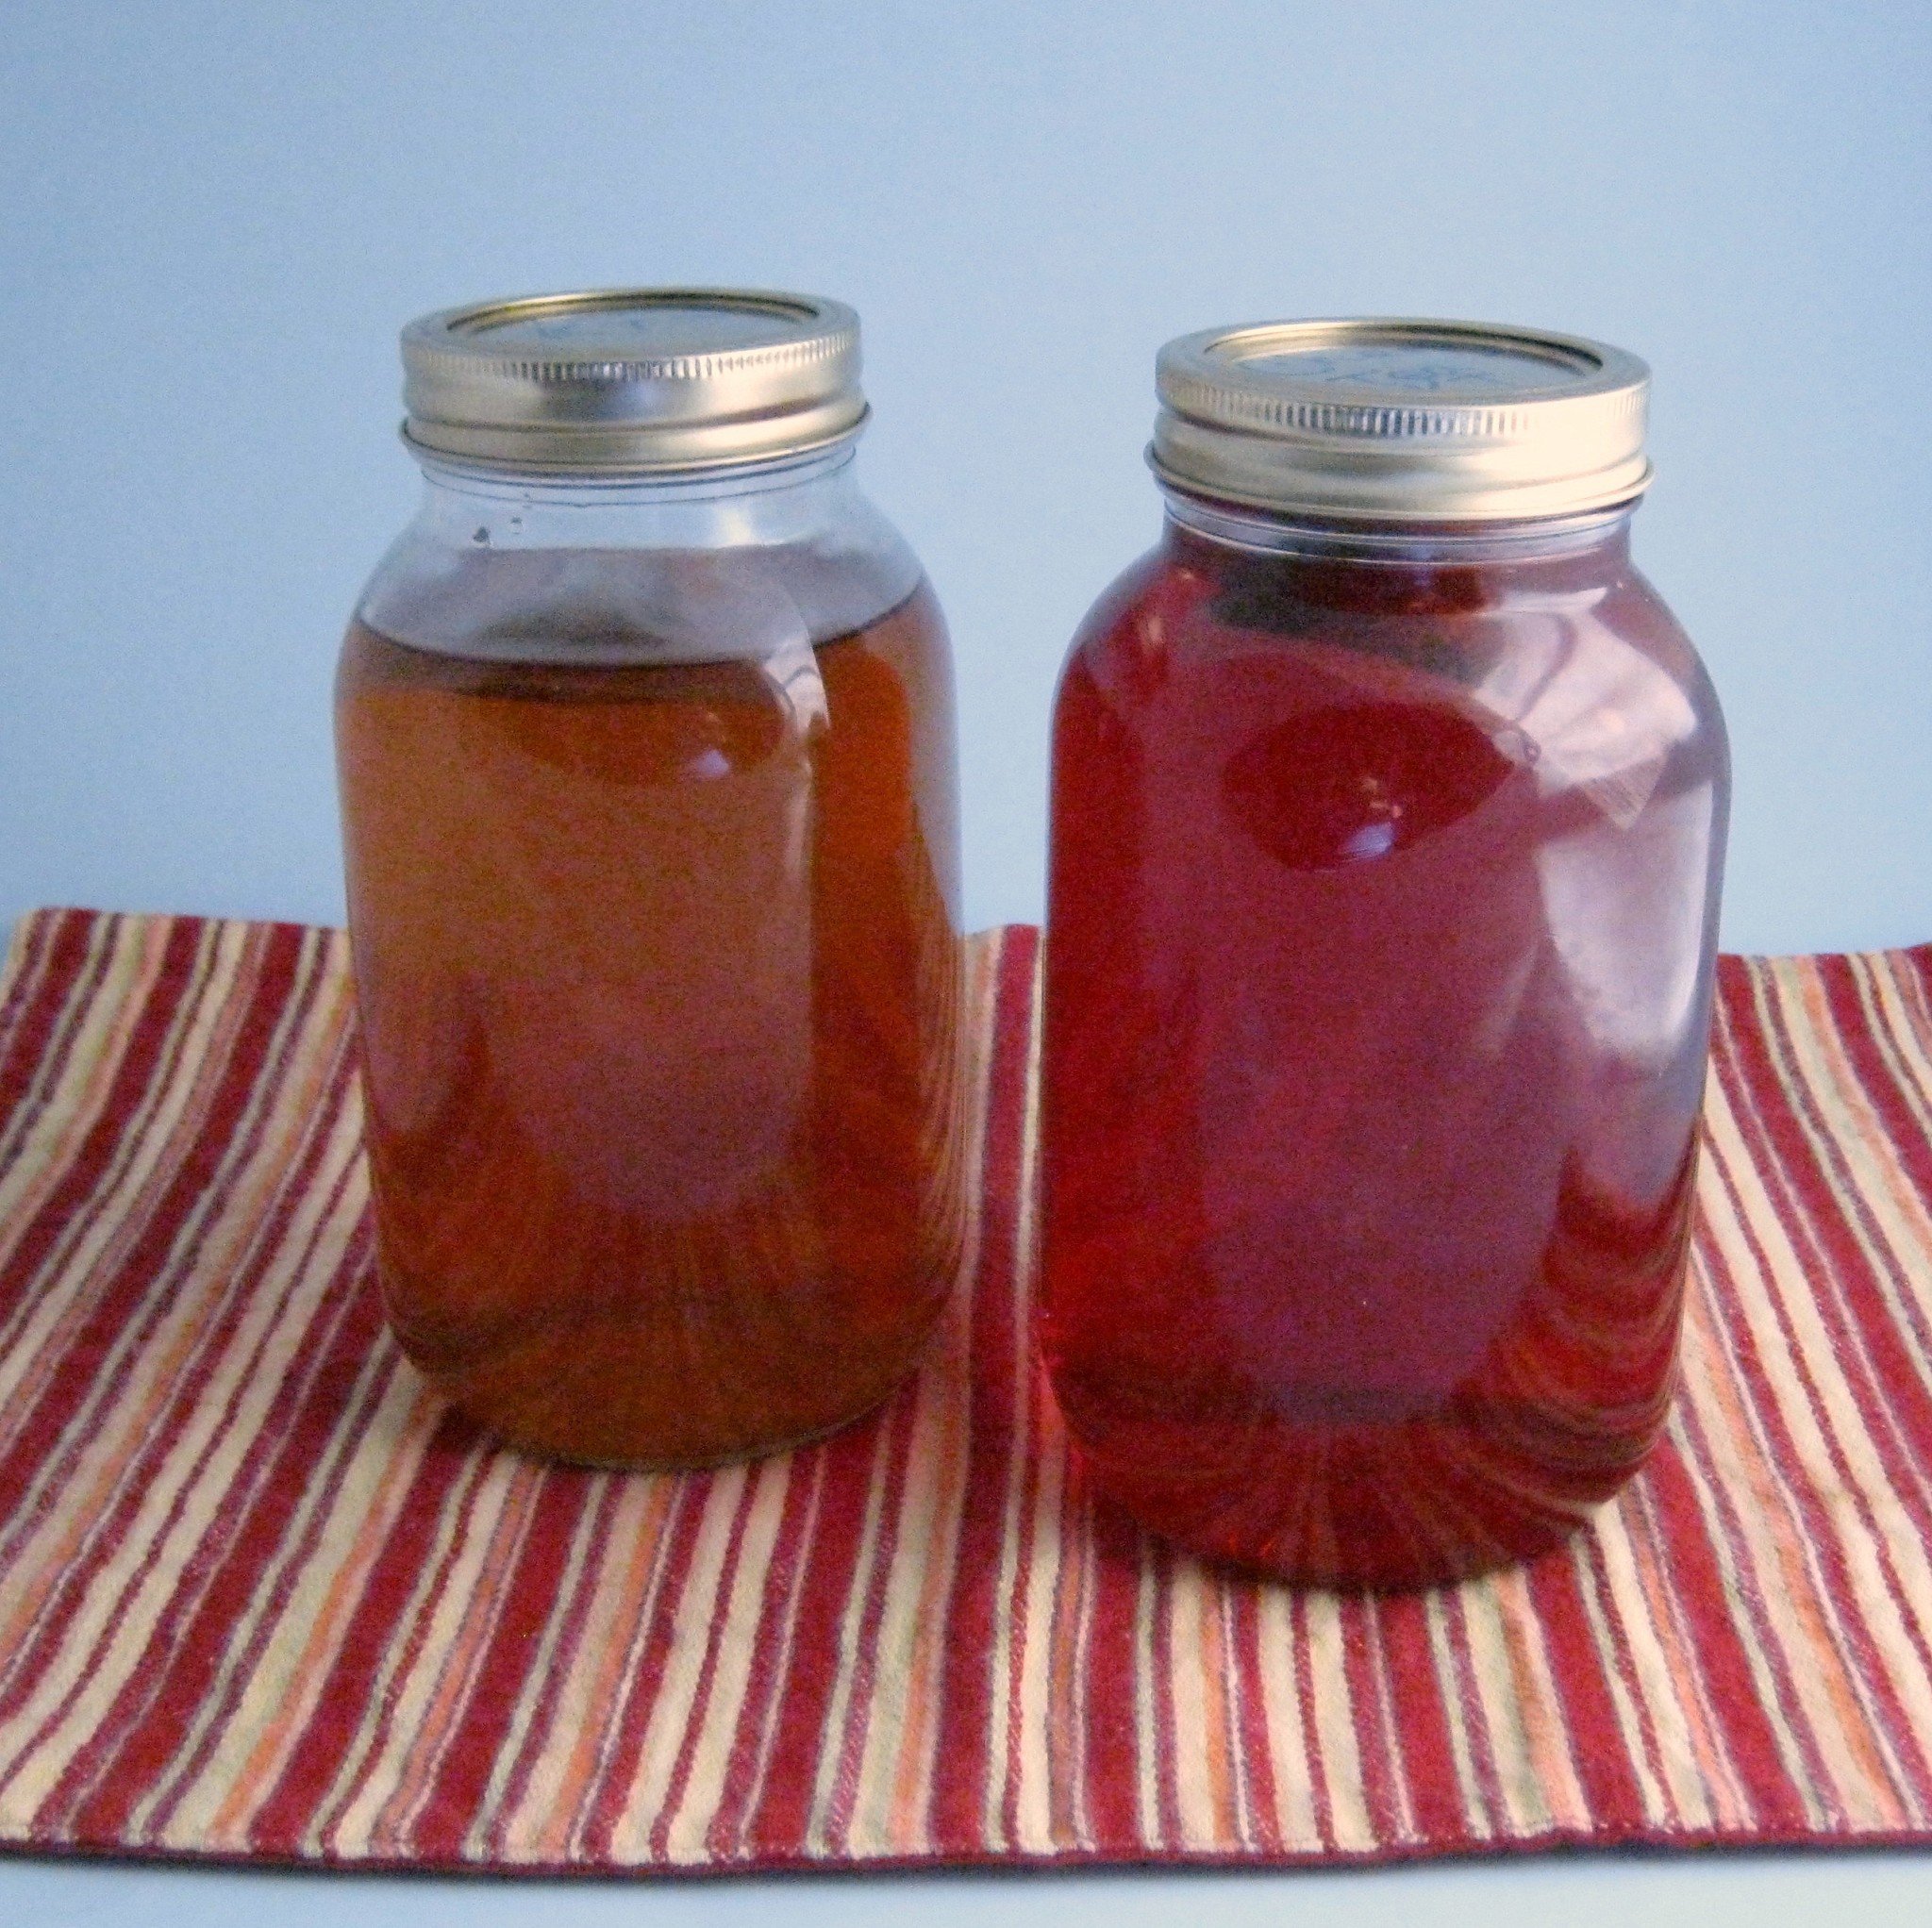
Flavored with peach and cherry teas in a second ferment.
Flavoring your Kombucha with a second ferment
You can also add flavoring in a second, shorter ferment. Basically you’ll put your flavorings in a bottle or jar (I like canning jars), fill almost to the top with your brewed kombucha and cap the jar. Leave at room temperature for 2-4 days and then refrigerate or drink.
The second ferment can increase the carbonation in your kombucha, so it’s a good idea to be cautious when opening and storing the jars. I’ve never had a jar break from the pressure, but I have had the metal disks on canning jar lids pop up in the middle. If I think too much pressure is building up, I “burp” the jars by opening them just enough to release some of the pressure and recap.
There’s a variety of things you can add for the second ferment. Really, any herbs, spices or fruits can be added. If you want to increase the carbonation, add a little bit of sugar, honey, raisins or a sweet fruit. My favorite thing to do is put enough orange peel to fill the jar halfway, add a teaspoon of sugar or honey, top with kombucha and let it sit for two days. It makes a kind of healthier orange soda and uses something that would normally have been tossed.
Orange peel and honey Kombucha
Other flavorings I’ve tried:
Lemons and limes cut into wedges, sliced or just the peels. You can also use a lemon or lime half after juicing it for another recipe.
Fresh sliced ginger, plain or with a dash of chai spice and squirt of honey.
Fruit flavored herbal teas, one bag per quart jar.
Blueberries.
If you brew your own Kombucha tea, I would love to hear your tips for flavoring your Kombucha. Please share them in the comments below.
Next week I plan to do a FAQ/kombucha myths post. If you have any questions please share them in the comments and I’ll do my best to answer them.
Like this post? To make sure you never miss a future post, please sign up for my newsletter.
I, Charity Sloan, am a participant in the Amazon Services LLC Associates Program, an affiliate advertising program designed to provide a means for sites to earn advertising fees by advertising and linking to Amazon.com. Any purchases through those links will result in my receiving a small percentage in commission.
This only refers to Amazon links found in/on my blog pages. All products in my shop are 100% mine and not linked to Amazon.
Prices are the same whether you click an affiliate link or a non-affiliate link, so you will not be charged more. Thank you for your support!