Today’s words of wisdom, brought to you by Sylvester the Cat and my favorite Yogi tea. (not sponsored) “Love is the highest of all virtues.”
Right on, Sylvester.
I’m prepping for my first market since my oldest was an only child. 😬 If you’re local, come check it out. All the details are in the second photo. I’ll have all my handmade goodies from my shop out there.
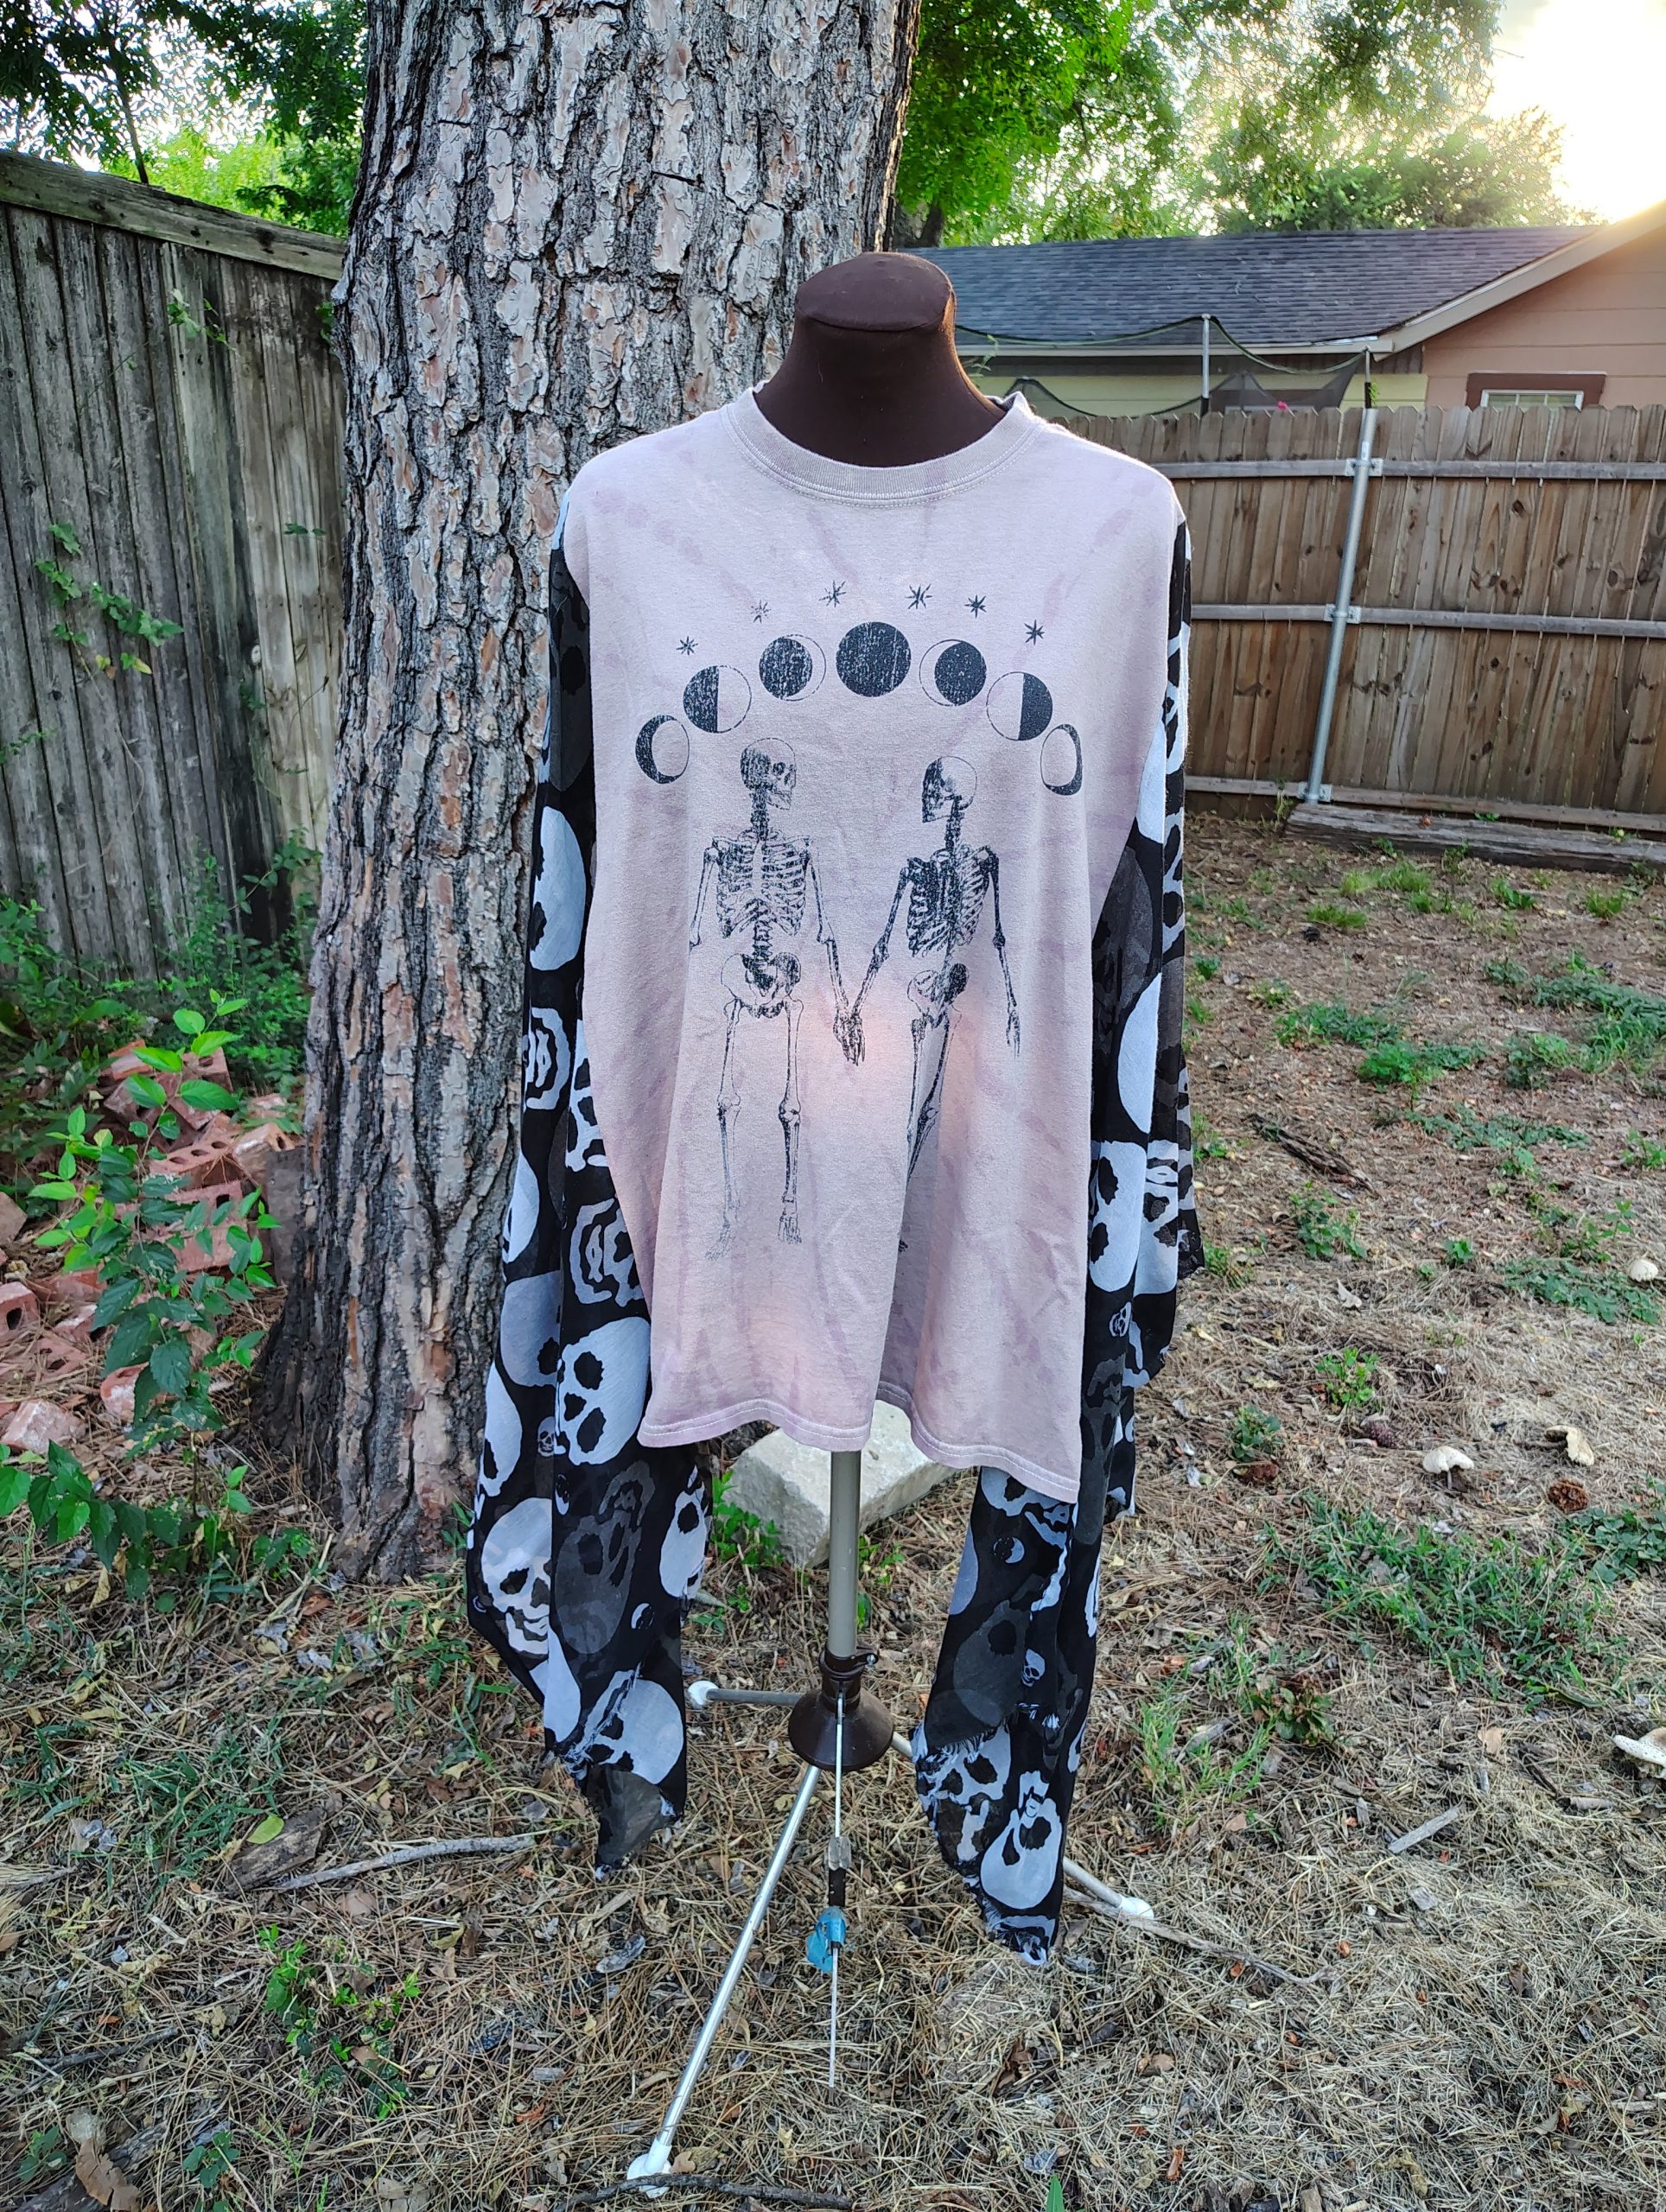
I’ve gotten a lot of questions about my upcycled kaftan or poncho shirts. I thought many of them could be best answered by seeing them on a real person. I didn’t have a model readily available, so you get me with my camera and tripod.
I want to do a product Q&A soon, so if you have any questions, please write them in the comments or send me a message.
I finally got all of the upcycled boho tops listed in the shop. I’ve been calling them poncho tops, but they’re really more kaftan-like. So Kaftan tops? Anyway.
I also finished another upcycle that I’ve been working on for over a year now. If you follow me on the socials, you’ve seen a little teaser of it. Either way, here it is!
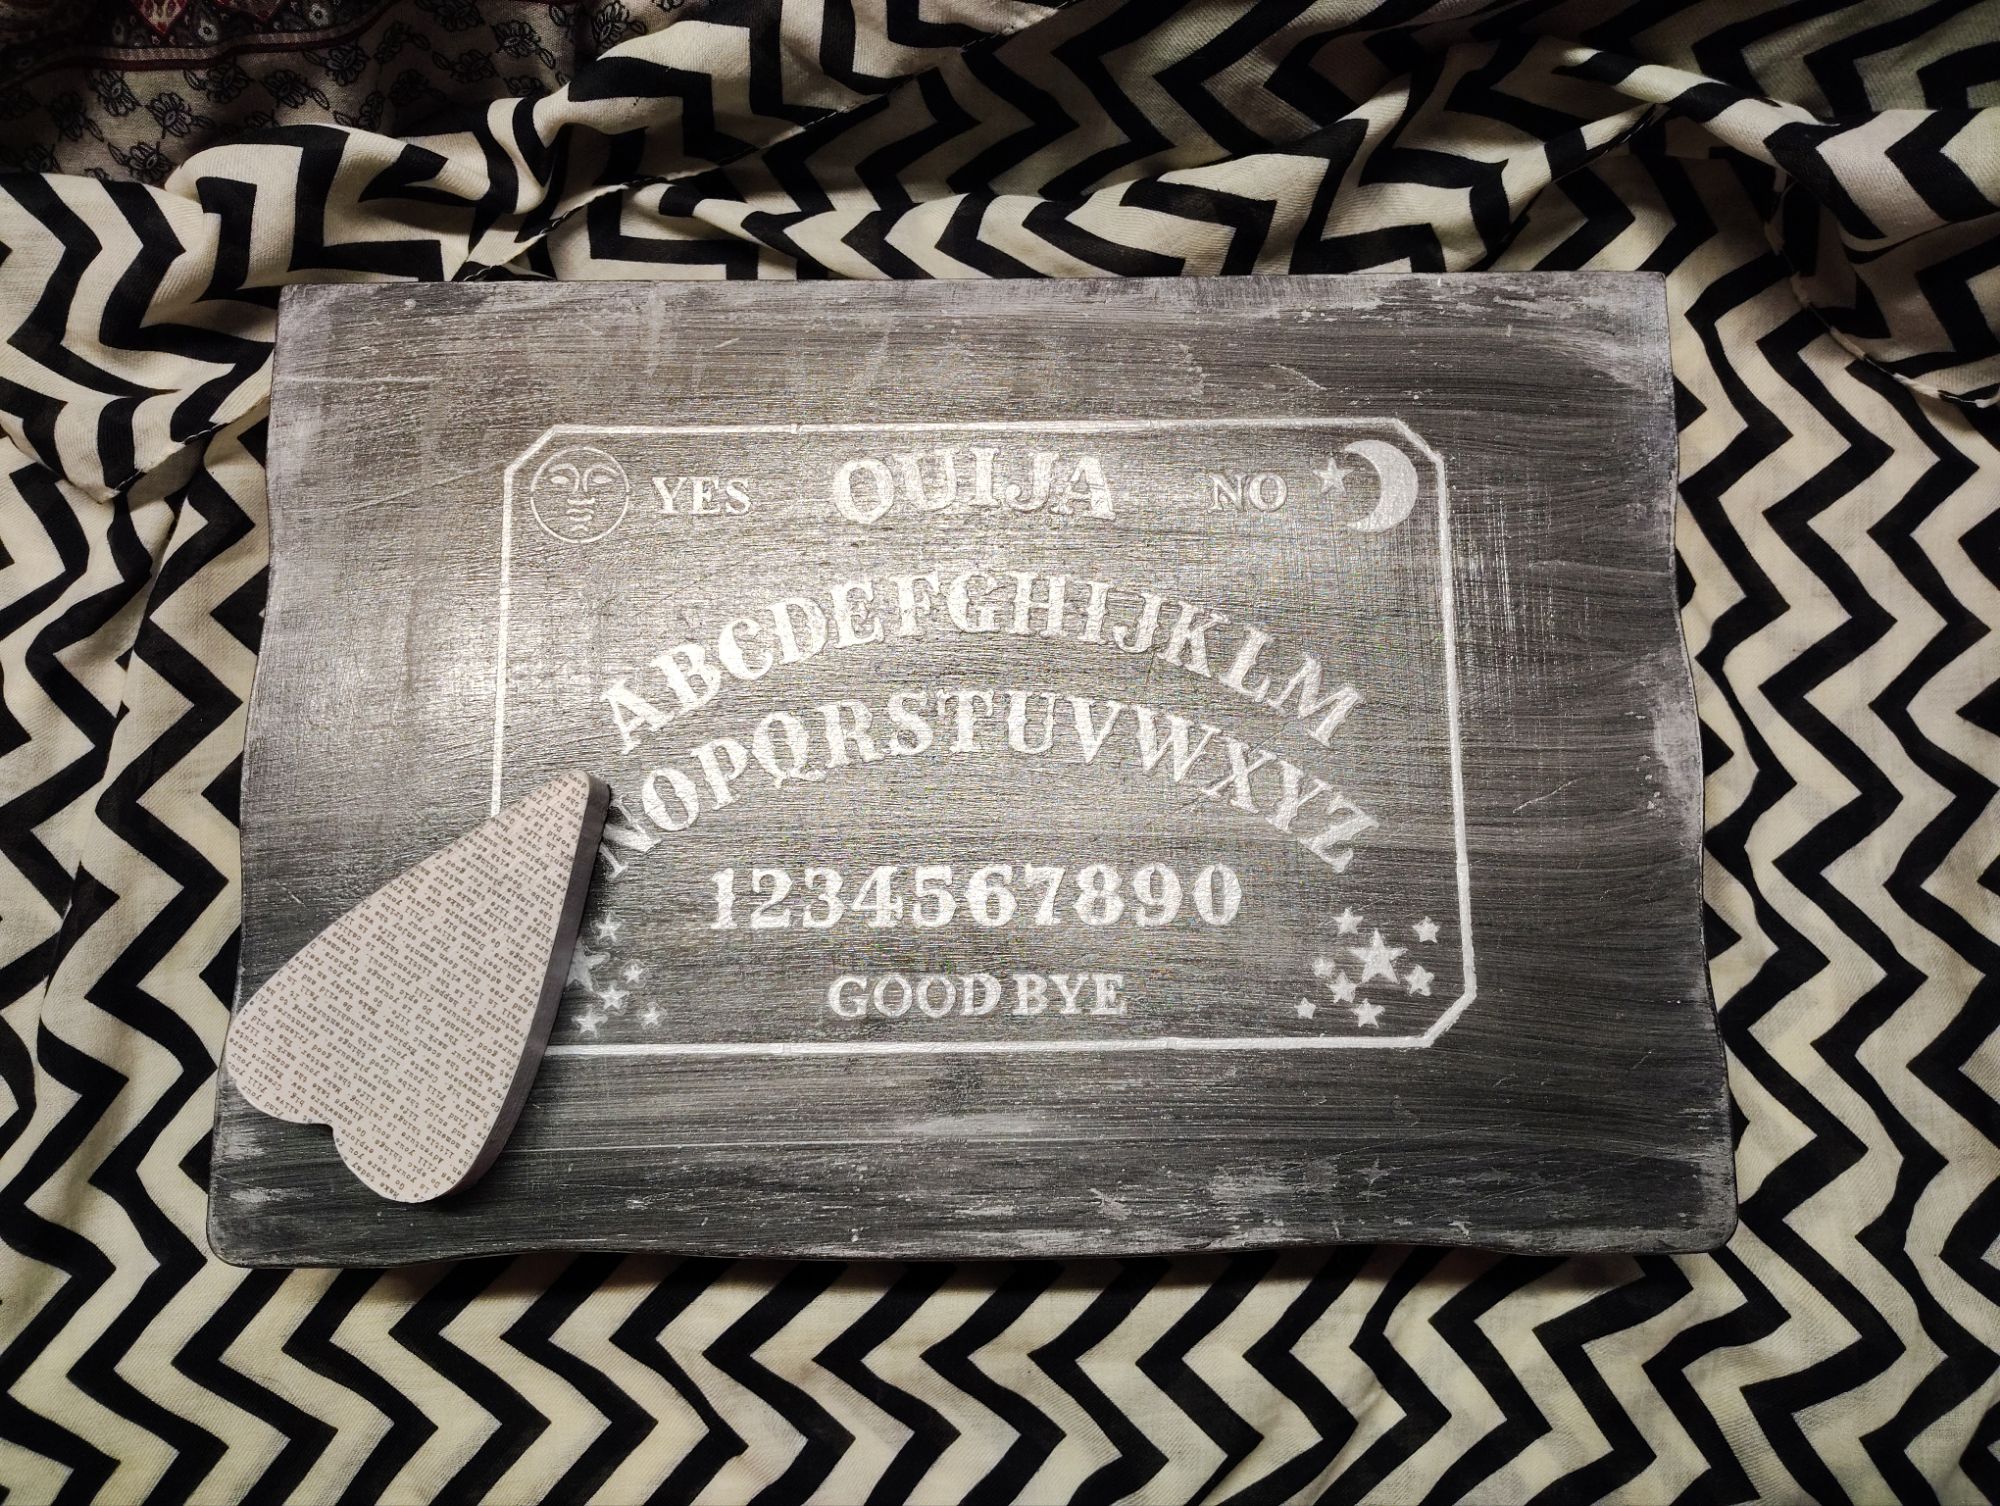
This spooky box began its life as a vintage silverware storage box that had seen better days. (Of course I forgot to take before pictures. Grrr.) I gutted it, painted it, re-lined it with some lovely purple velvet and made a cute wooden planchette to go with it. I absolutely love it. It’s great for spooky or goth decor, or for storing tarot decks, crystals and ritual tools if that’s your thing.
Here’s the inside. the purple is such a nice contrast to the black and silver on the outside.
Everything above can be found in my shop. It’s all one of a kind, though, so if you see something you like, don’t miss out.
The end of the school year and summer are crazypants in my household, so here’s an older post with some upcycling inspiration for you.
Last Christmas we received a new set of bath towels. Many of our old ones had worn through in places and were ready to be retired. I hate to throw out something that still has some life left in it, so here’s what I did:
I cut the towels to salvage the most usable material possible. Then, I serged the edge with my serger. You could also use a wide zig-zag, fold and hem, or use bias binding to finish the edges and prevent fraying.
The white towels were cut down to about half-size. This makes them perfect for wiping up big spills or as a bath mat. The green towels on the right are smaller sized for kitchen and cleaning towels. The stack of squares in the middle can be used in place of disposable cotton squares for toner, make-up remover, etc.
The small squares are also handy for DIY dryer sheets. I keep a few in a small tub on the dryer soaking in diluted white vinegar and lavender essential oil. I wring one out slightly and toss it into the dryer to add a fresh, lavender scent to our laundry.
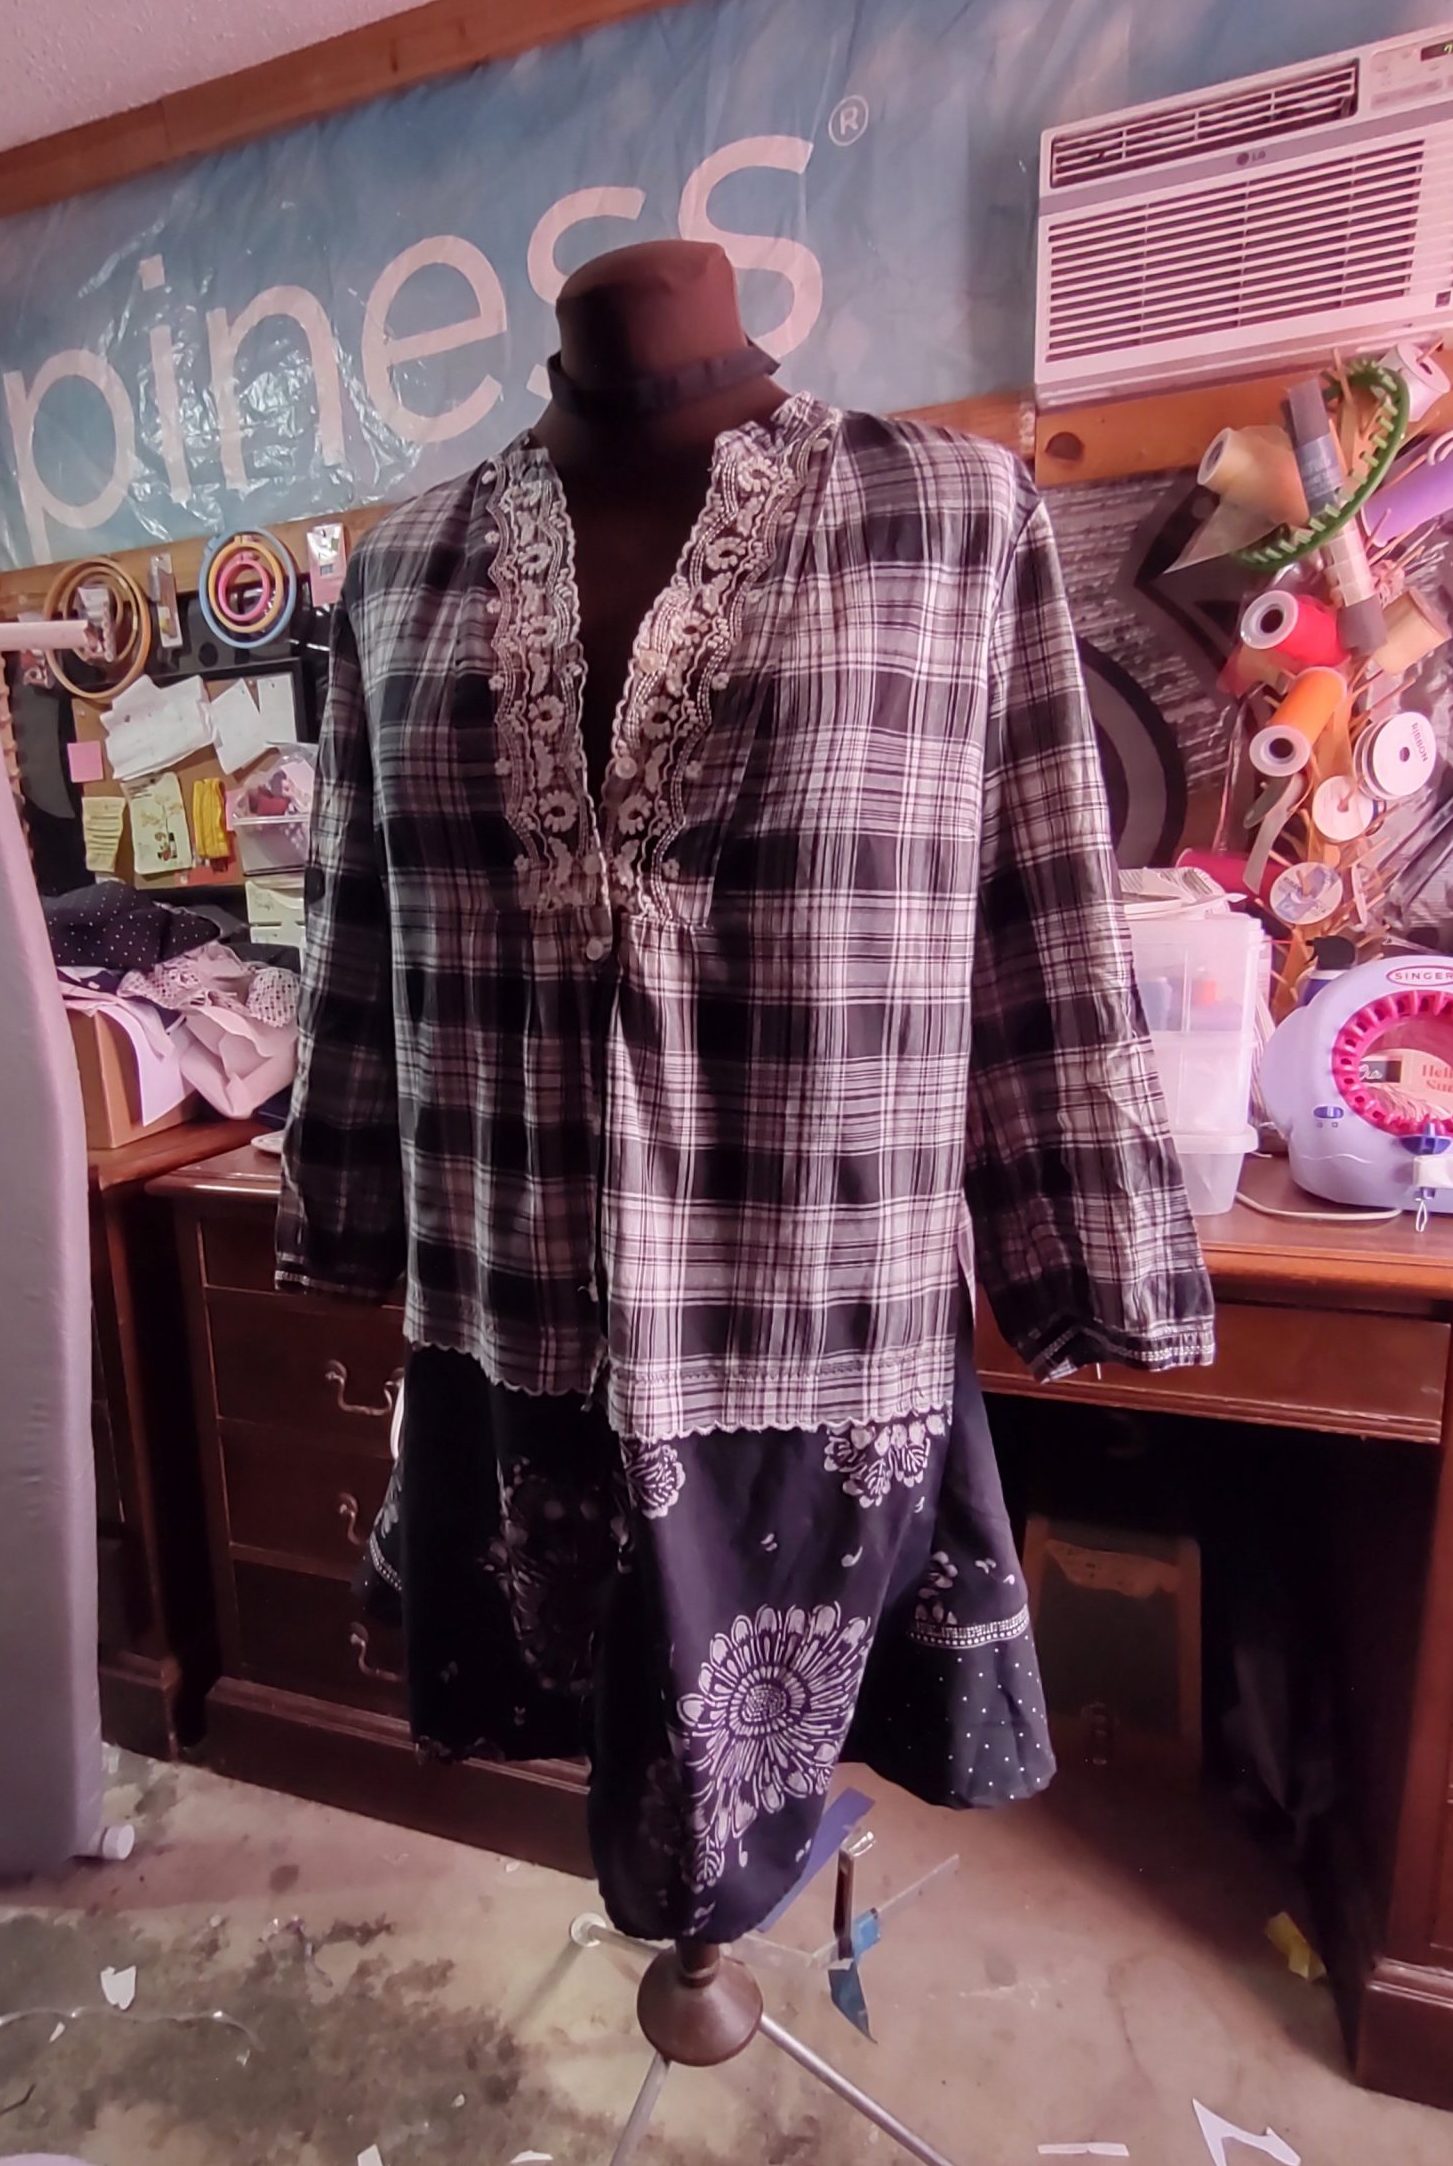
My mom gave me this blouse to play with because her puppy had ripped the bottom of it. I had already cut off the torn part and sewed the raw edge with a scalloped stitch to match the embroidery on the top. That made the shirt too cropped for my preference, so it stayed in my refashion pile.
In an attempt to eliminate said pile (who am I kidding, piles), I pulled it out, along with another black and white top with stretched out elastic and a black and white fabric remnant for good measure.
Shirt with stretched out elastic.Remnant
I decided to both lengthen it and add more room at the sides by inserting triangles of fabric. I hate wearing woven tops that are fitted, so I thought that might make it more wearable to me. Here is the end result:
FrontSideBack
I’m not sure that I’m happy with it. Looking at it now, I think I need to add something from the bottom fabric to the top to tie it all together. I may make two patch pockets and attach them at the bottom of the original shirt and overlap onto the new fabric. Maybe an applique on the back as well? Thoughts?
Like this post? To make sure you never miss a future post, please sign up for my newsletter.
I love candles and wax melts, but I hate it when there’s a little left in the bottom of a jar or the wax has lost it’s scent. I don’t want to just throw the wax away. If it’s a jar candle, I won’t throw it a way, so it ends up taking up space waiting for me to find a new use for it.
I’ve always been interested in candle making, but I honestly don’t know much about the correct way to do it. This is just my, for me, kind of chaotic, fun way of using up the leftover wax scraps and jars. If you try to join in my chaos, always take care with the melting, pouring and burning, make sure everything you use is safe for this usage and never leave anything burning or melting unattended.
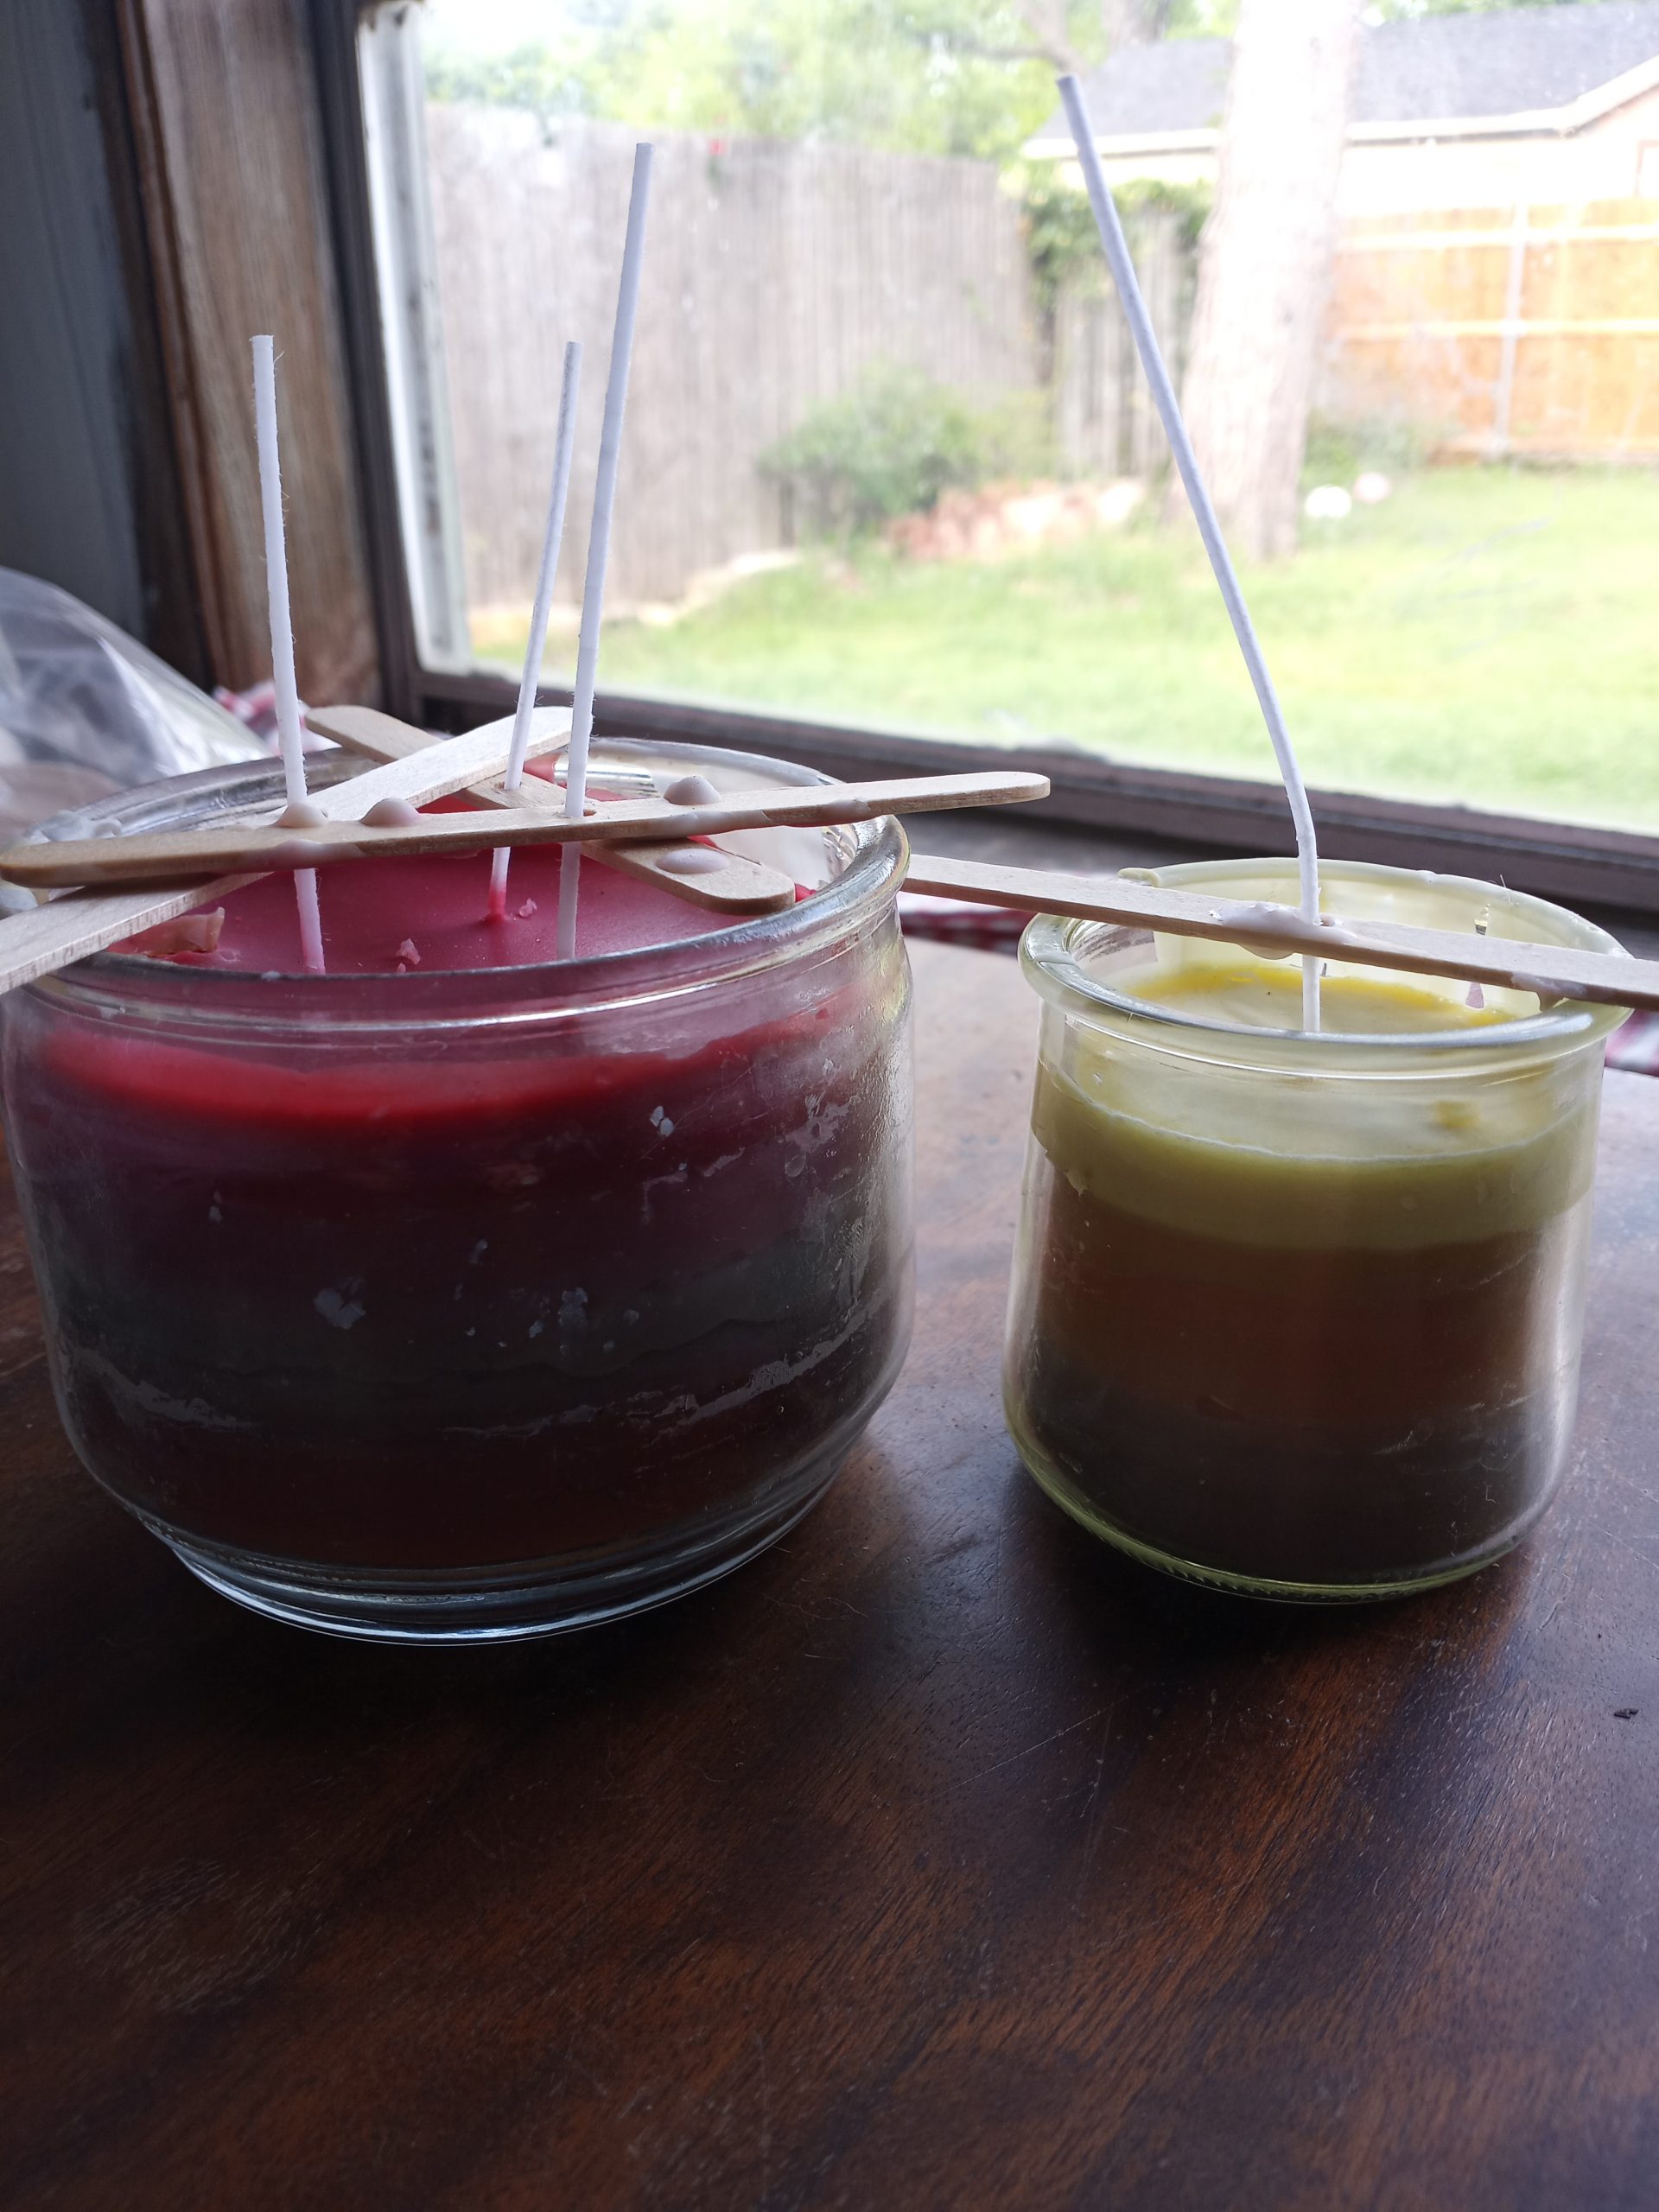
My solution is to melt down the wax and make my own candles in the old jars. I bought this wick set for the wicks. I start by picking the jar I want to use and then putting in the same number of wicks that were originally in the jar.
My candles still need a haircut. 😀
For the candles in the above photo, the one on the left was originally a three wick candle, so it got three wicks. The one on the right was a yogurt jar, so I just guessed and went with one wick.
After the wicks are in place, I melt down any scrap wax I have and pour it in. Usually, I do this a little at a time as I finish other candles, rather than all at once. That gives it the cool sand art layered look.
With jar candles, to get the last bit of wax out, if I don’t pour it while it’s still melted from the last time I burned the candle, I set the jar on my coffee warmer (do not leave it unattended!). Wax melts just get melted as usual and poured into the jar.
Coffee warmer- Not just for coffee.
I do try to keep the candles mostly the same type of wax. In the photo, the big candle on the left is made from candle wax ends. The yogurt jar candle is made of soy wax melts with a little of the tea light wax remnants added.
My one tea light warmer.
For scent, most of the candles I burn are in the same spicy or vanilla scent family. Since the leftover candle wax usually has a good bit of scent left, I don’t worry about adding my own. With the wax melts, I either just leave them as they are and have a mild to unscented candle, or I add a drop or two of an essential or fragrance oil to each layer as I pour it.
I don’t know if my chaos candle making method will help anyone else, but I have fun with it, and the resulting candles are pretty. It’s also a way to reduce waste and save money.
This post does contain an Amazon affiliate link. If you click on the link and make a purchase, I will receive a small commission at no additional cost to you.
To make sure you never miss a post, please sign up for my newsletter.
I have tons of clothes waiting for me to refashion them into something more wearable, but haven’t had much inspiration. Recently, though, I came across CreoleSha on Etsy. I love her flowy designs. Luckily, she offers classes on Teachable, so I took her free course on upcycling a sweatshirt or t-shirt into a tunic.
Almost forgot to take a before photo.
My refashion notes
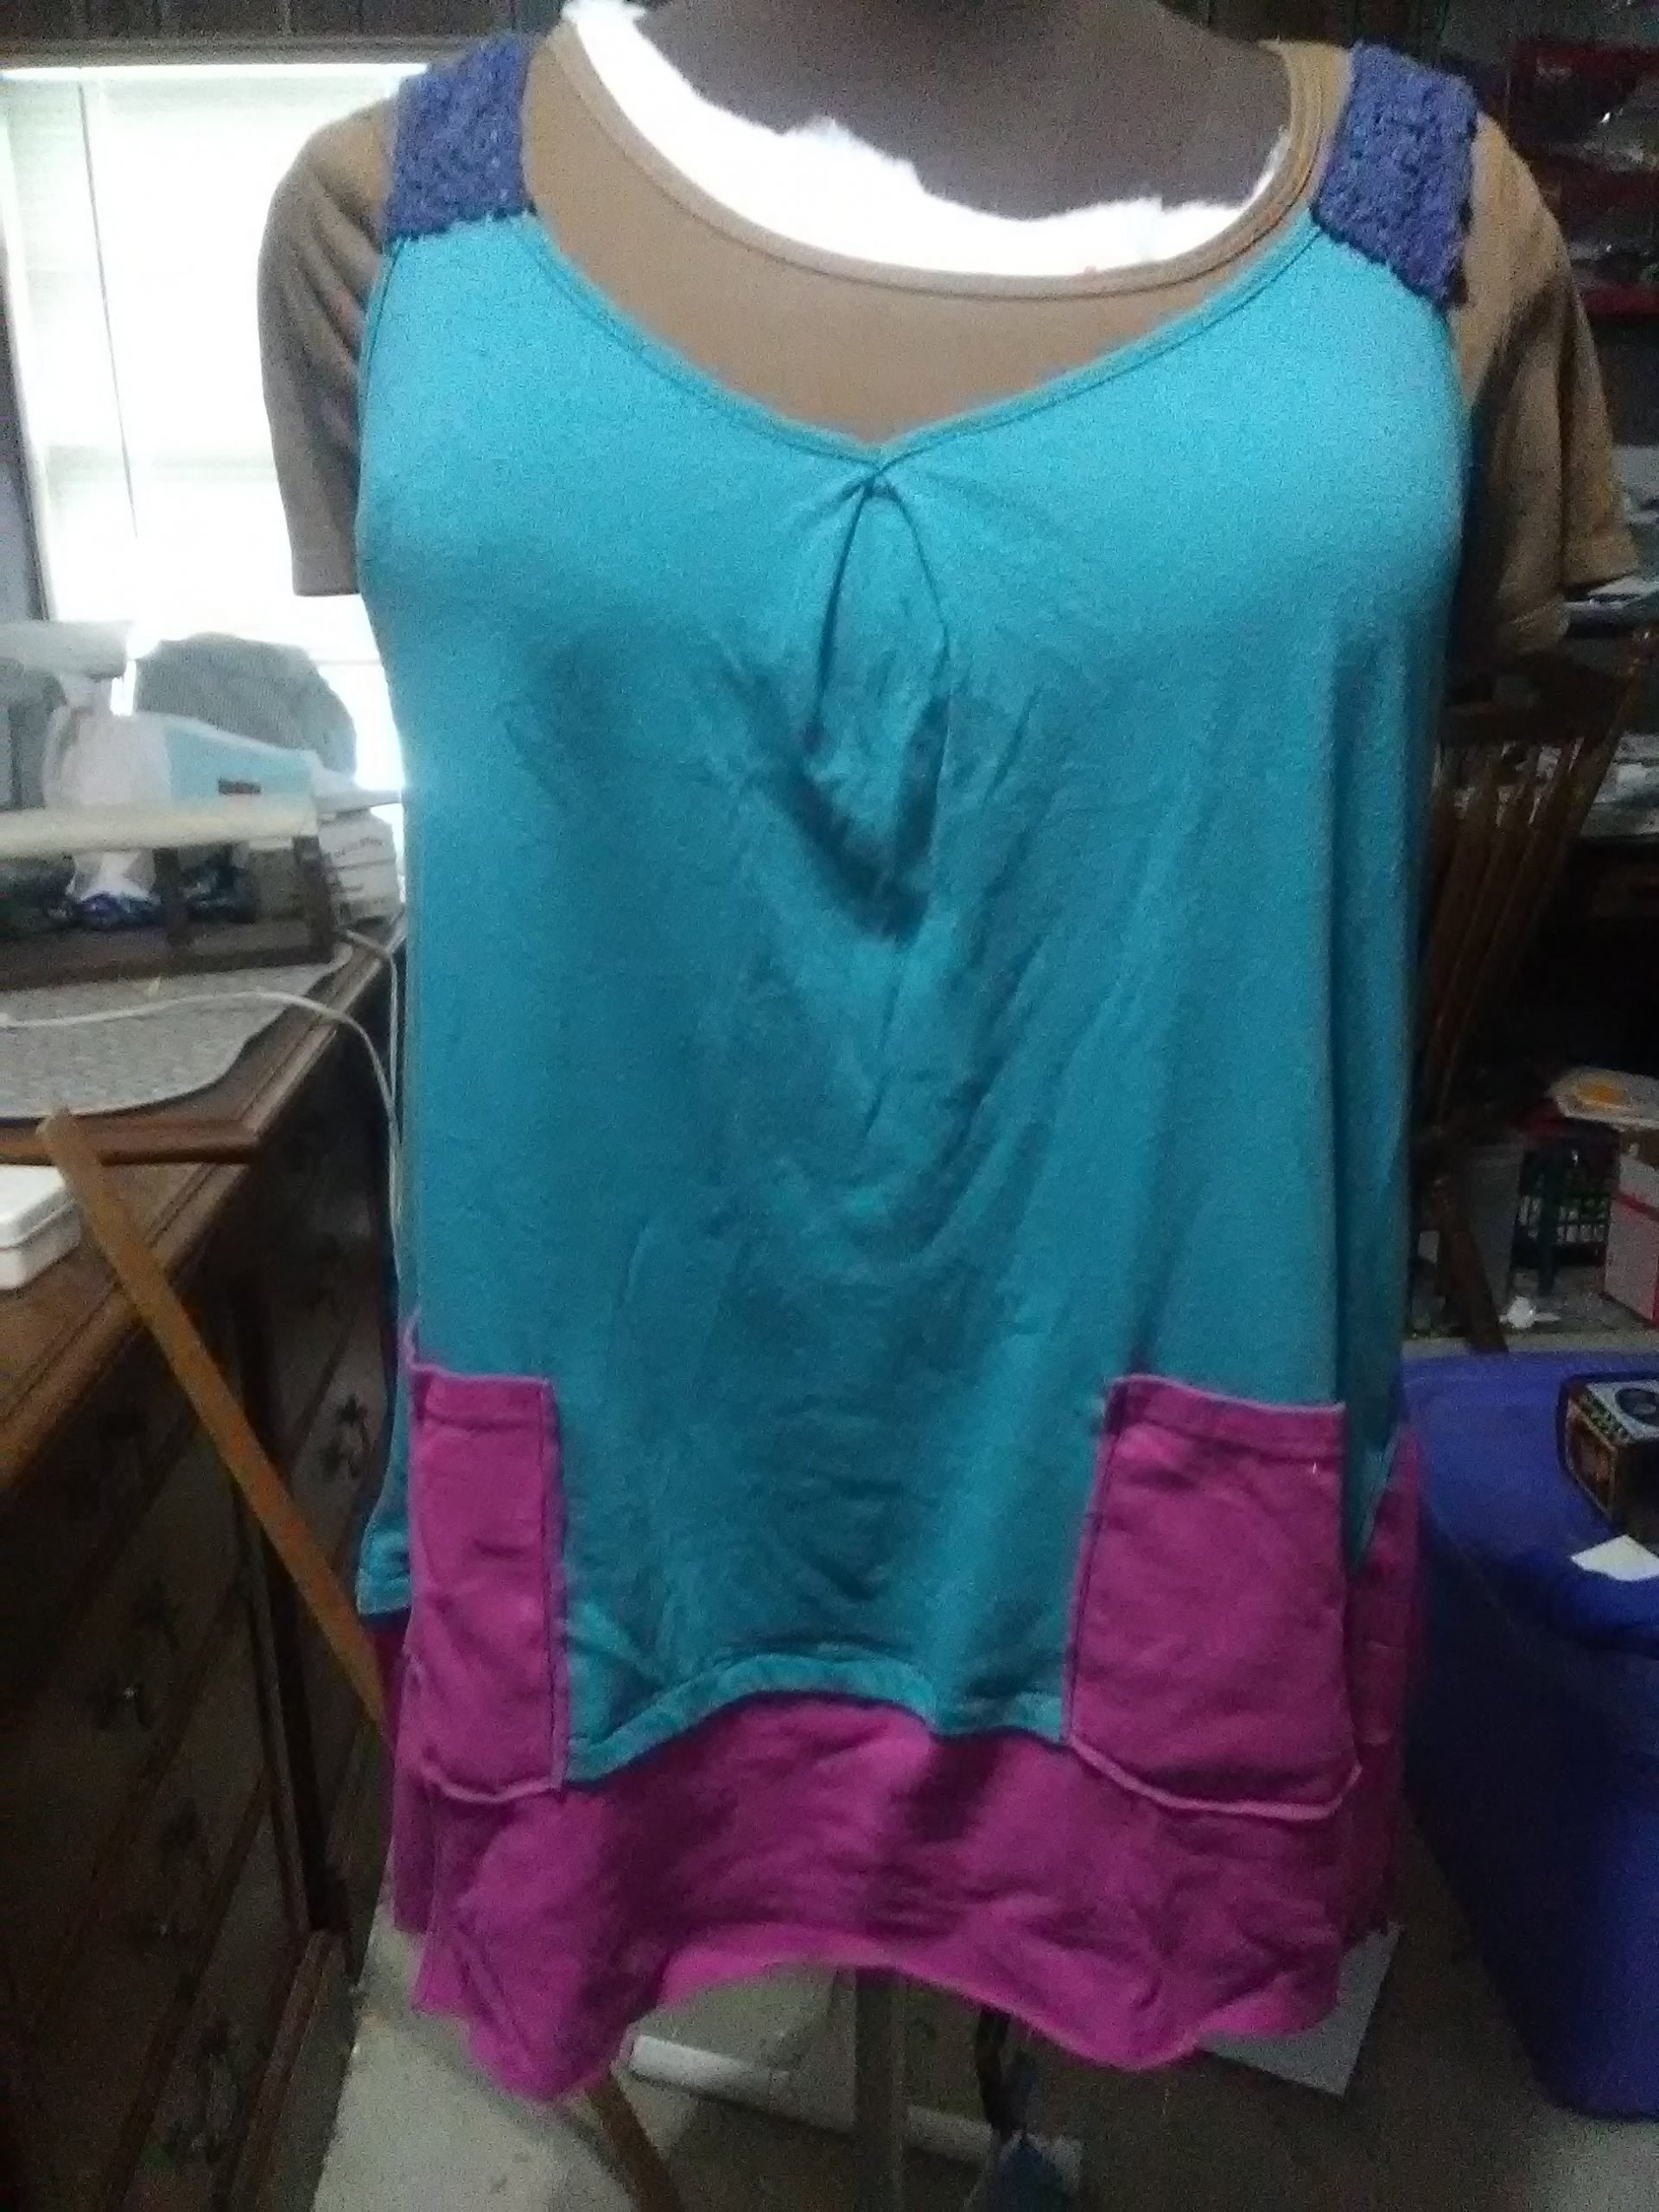
It’s summer, so rather than use a sweatshirt, I started with a camisole tank that I didn’t wear much. I liked the color, but the fit was too loose to use for layering, and the skinny straps made it difficult to wear with a bra. By adapting the techniques in CreoleSha’s class, I turned it into a longer, flowing tank and then added a bit of cotton lace salvaged from an older refashion project to widen the straps.
The added material came from a t-shirt with a large logo on the front. I liked the color, but not the logo, so it was perfect and added some nice contrast.
Of course, pockets are always handy, so I added some patch pockets on the front.
Final result
It’s not perfect, but it’s something I’m more comfortable wearing now. The shirts were wrinkled from storage to the point that the wrinkles came back even after ironing. Luckily they smoothed out with laundering, so I don’t look like I just rolled out of bed when I wear it. More importantly, trying something a little on the artsy side and just jumping in has me ready to tackle more refashions.
A note on my dress form
Before working on this, I took the time to add some batting to my dressform, Athena. She’s a little less padded in some areas than I am, so the batting makes it easier to use her as a fit guide when I don’t want to try things on over and over. The brown t-shirt helps hold it all together and provides something to pin into.
Like this post? To make sure you never miss a future post, please sign up for my newsletter.
I, Charity Sloan, am a participant in the Amazon Services LLC Associates Program, an affiliate advertising program designed to provide a means for sites to earn advertising fees by advertising and linking to Amazon.com. Any purchases through those links will result in my receiving a small percentage in commission.
This only refers to Amazon links found in/on my blog pages. All products in my shop are 100% mine and not linked to Amazon.
Prices are the same whether you click an affiliate link or a non-affiliate link, so you will not be charged more. Thank you for your support!