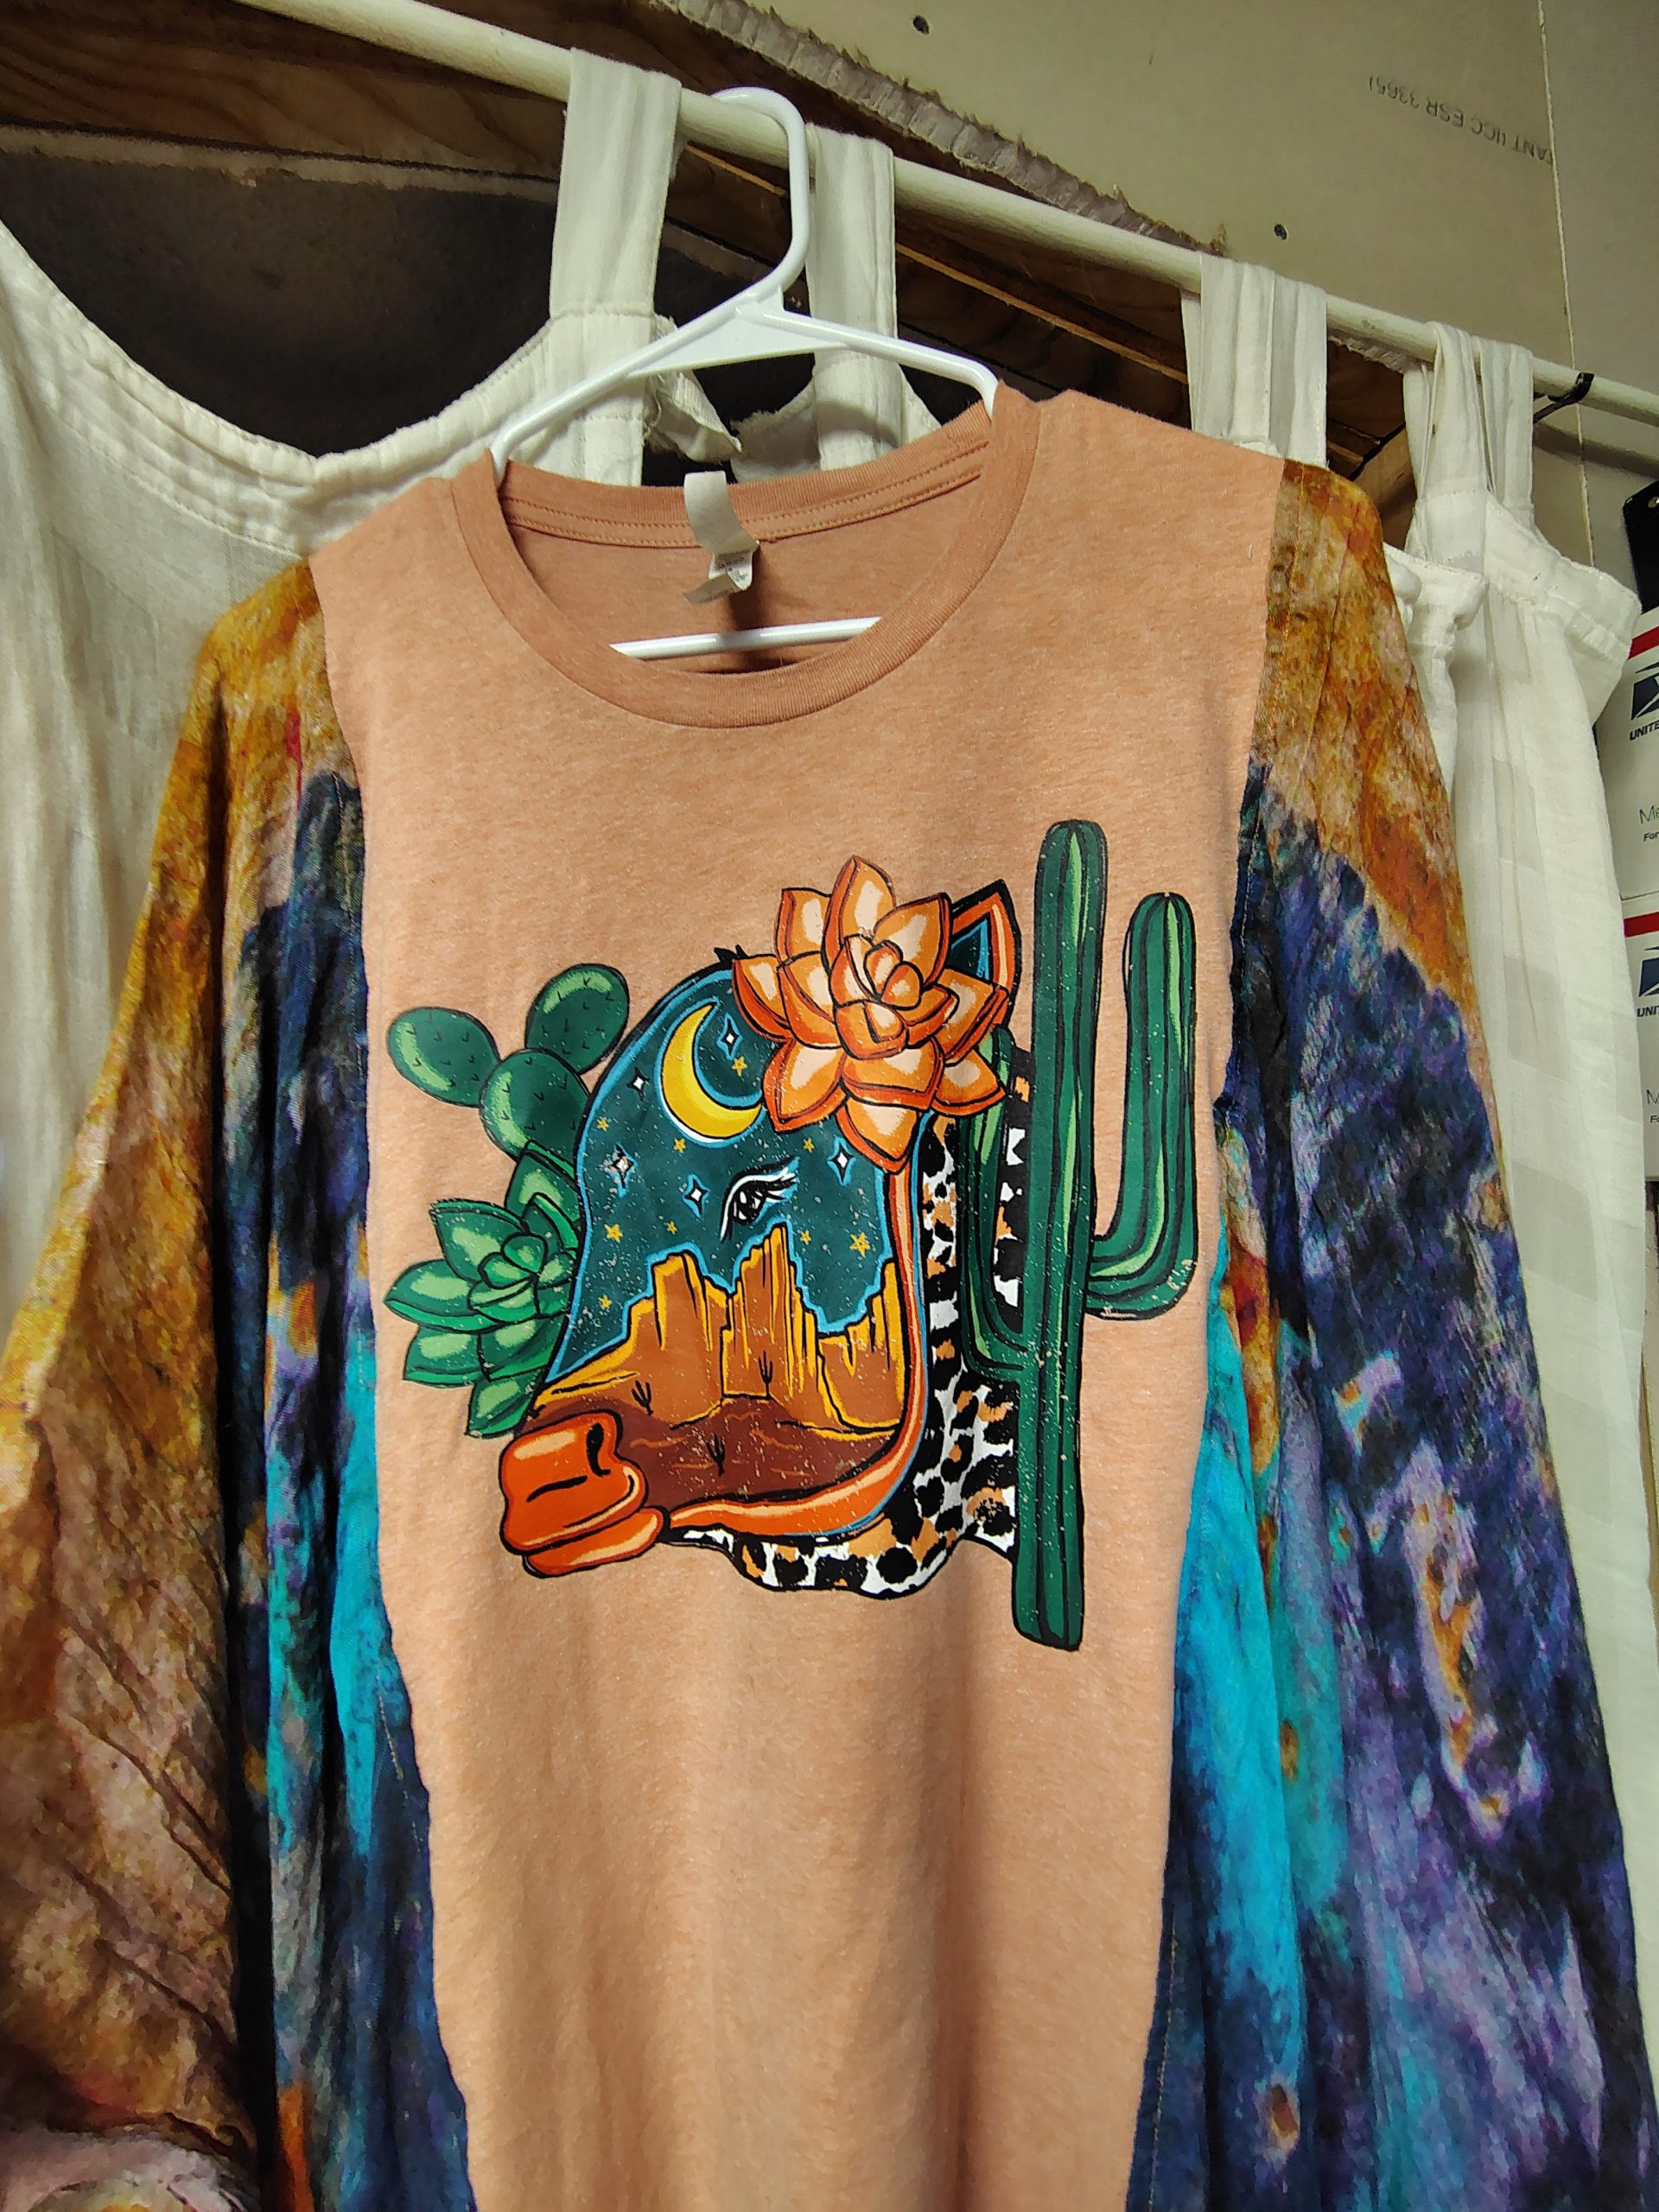
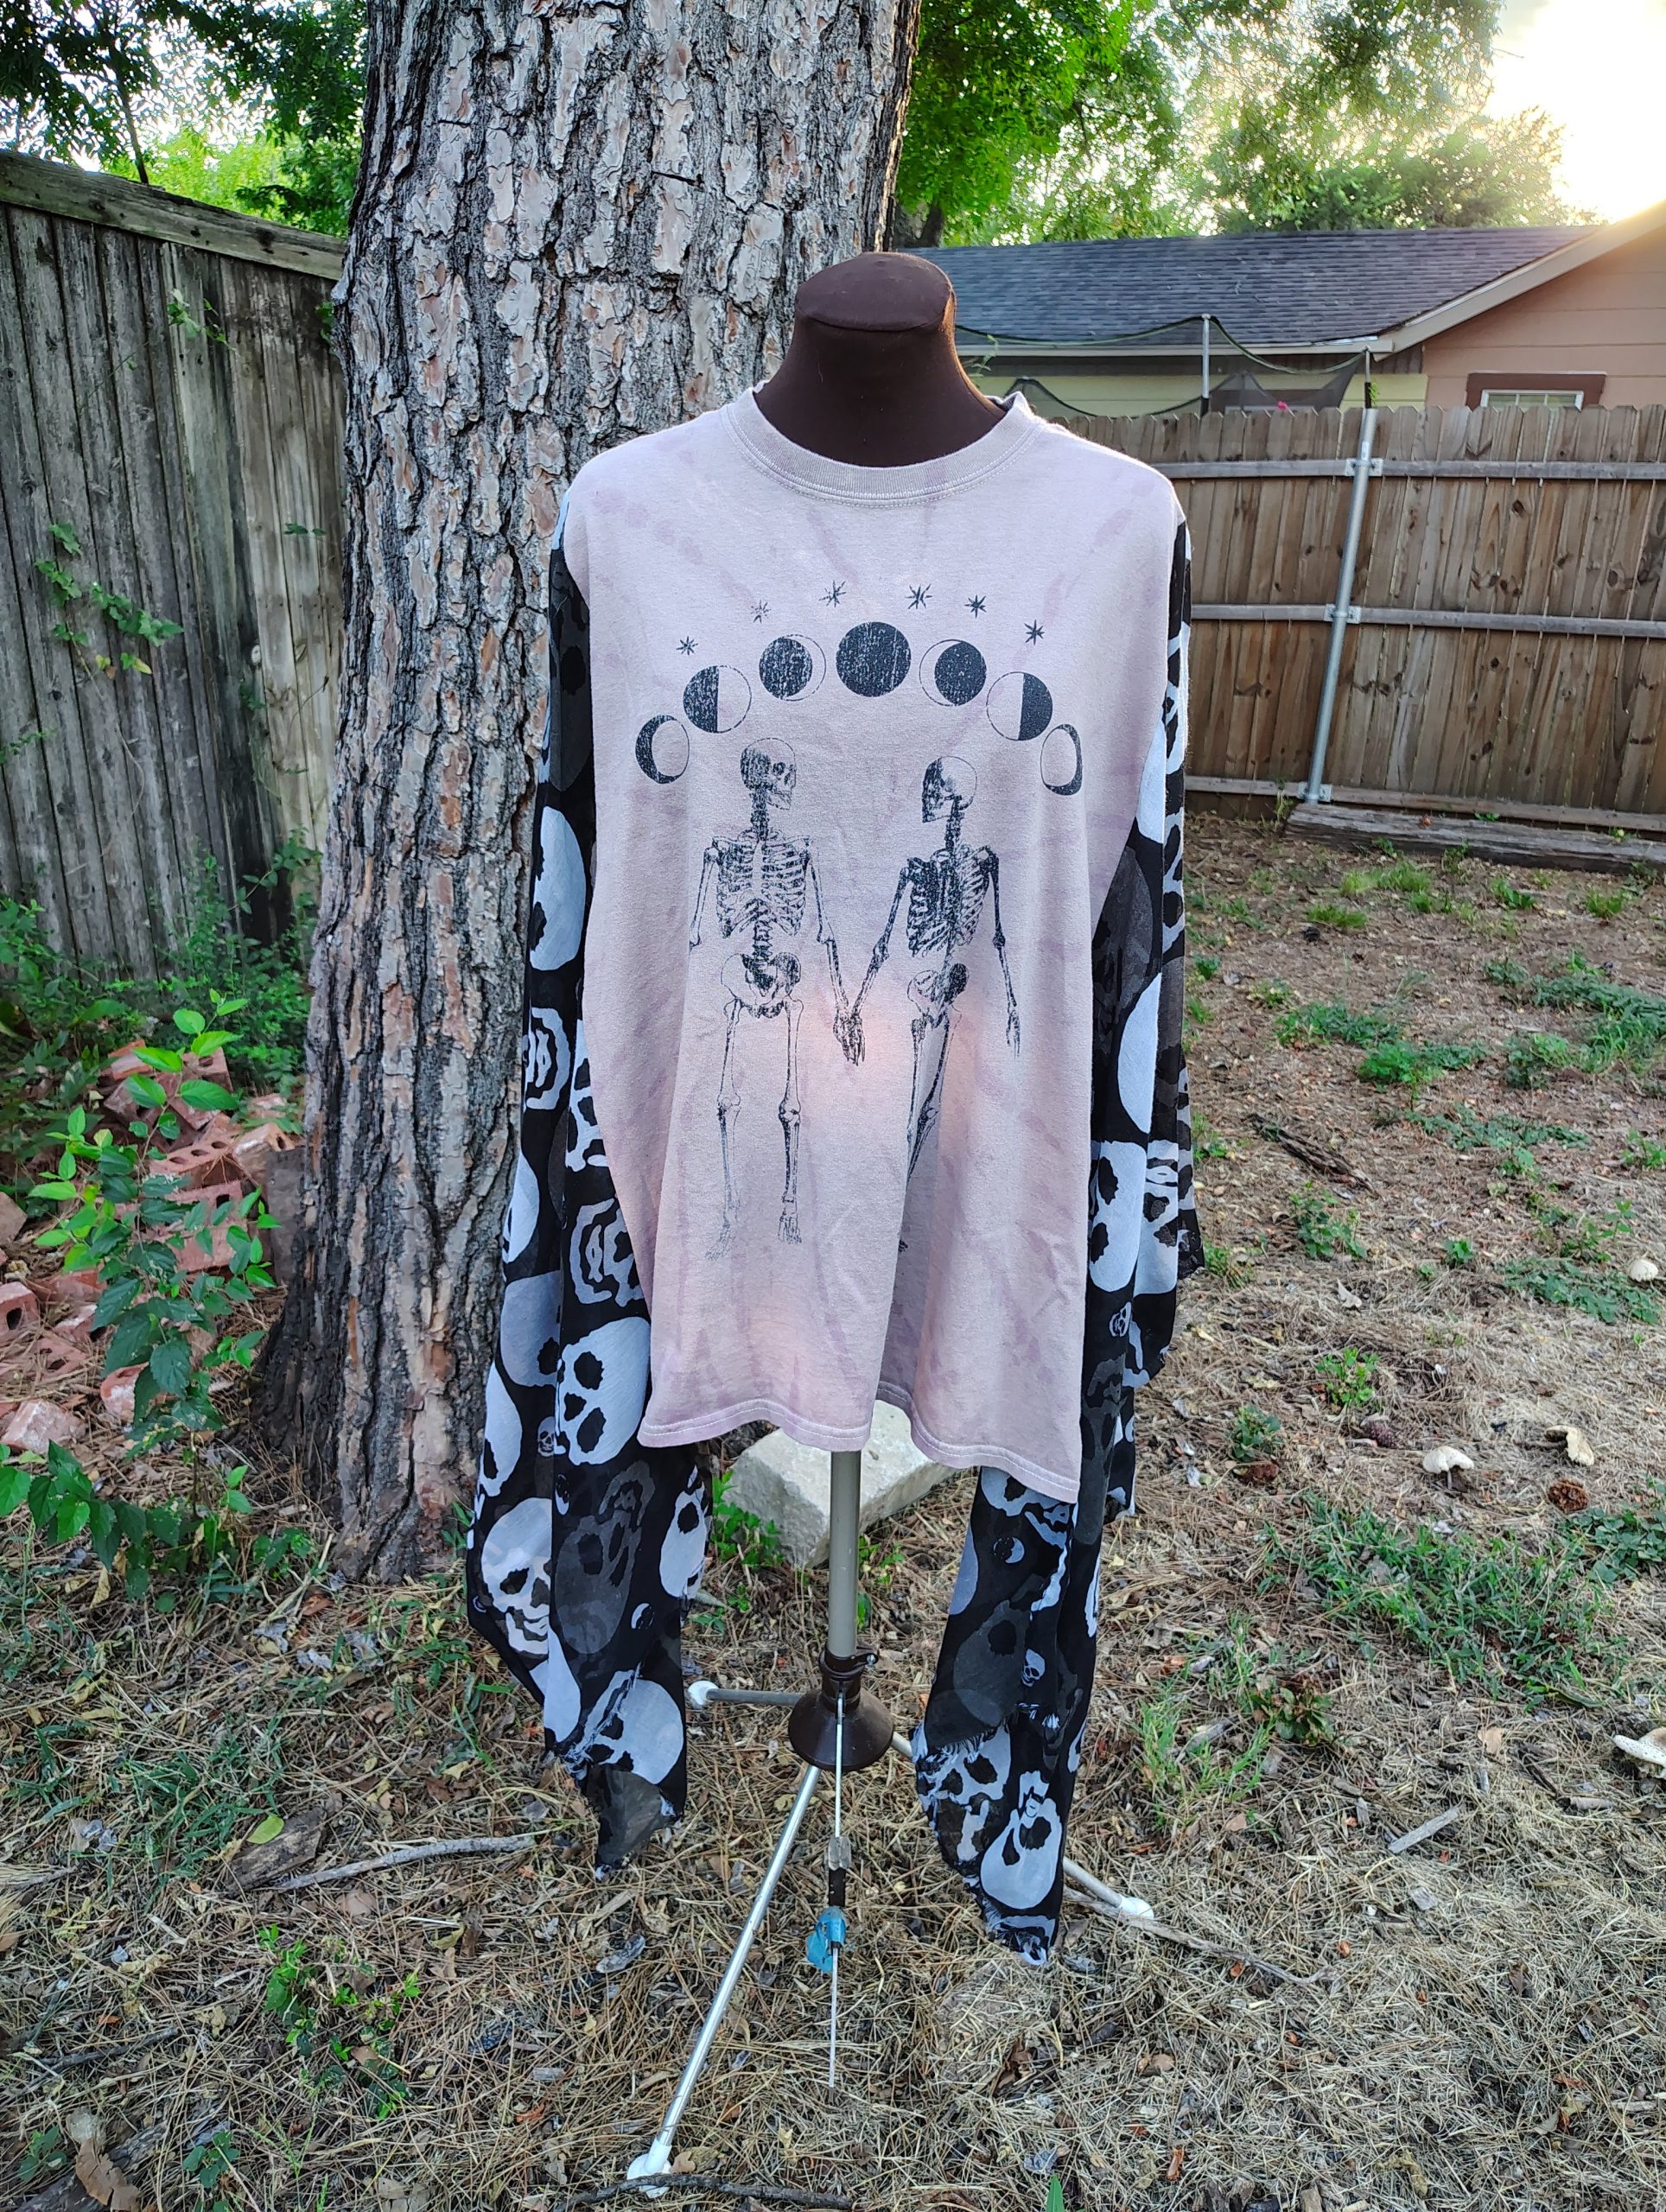
Better photos are coming soon, but I really wanted to show this one off and answer a few questions about my poncho shirts.
Sizing. My goal with these shirts is to make them so drapey and roomy that they will fit the most body types through just about everything. If you gain 15 pounds because hormones or pizza, this shirt has your back. If you get pregnant and gain 50+ pounds like I did every single time, it’s still going to be loose and drapey, although probably a little shorter. If you have that baby and choose to nurse them, it’s got you covered. Literally. If you like a little coverage while feeding your baby, this shirt will provide.
I list the measurements of these shirts flat on my website. This one is 42 inches from side seam to side seam flat. That means it has an 84 inch circumference.
The length is determined by the length of the original T-shirt and scarves. While they look adorable layered over a cami or with a little belly showing, I know not everyone likes that. I can totally add a coordinating piece of T-shirt to lengthen the middle front and back of one if you’d like.
Or, let me know your preferred length and colors and I will scour the thrift stores for a suitable shirt and scarf combo for you.
Or, and this option does make me a bit nervous, I can make a poncho shirt out of a t-shirt you send me. It only makes me nervous because WHAT IF MY WELL BEHAVED SEWING MACHINE DECIDES TO EAT SOMEONE’S SHIRT!!! I’m probably being a little paranoid. Also, I can do customs just because, not only for sizing issues.
Those custom options will only cost more if the material costs are significantly higher. That’s really only going to happen if I have to buy a brand new T-shirt or a fancy-pants brand T-shirt.
Finally, as I’ve previously mentioned, I do source my materials from local thrift stores. That makes every shirt unique and keeps clothing out of landfills. If that’s not your thing, you do you. 😘
Find all my upcycled clothing here: https://subearthancottage.com/product-category/upcycled-clothing/
If you’re interested in something like this shirt that I haven’t listed yet, please contact me about it.
Today’s words of wisdom, brought to you by Sylvester the Cat and my favorite Yogi tea. (not sponsored) “Love is the highest of all virtues.”
Right on, Sylvester.
I’m prepping for my first market since my oldest was an only child. 😬 If you’re local, come check it out. All the details are in the second photo. I’ll have all my handmade goodies from my shop out there.
I’ve gotten a lot of questions about my upcycled kaftan or poncho shirts. I thought many of them could be best answered by seeing them on a real person. I didn’t have a model readily available, so you get me with my camera and tripod.
I want to do a product Q&A soon, so if you have any questions, please write them in the comments or send me a message.
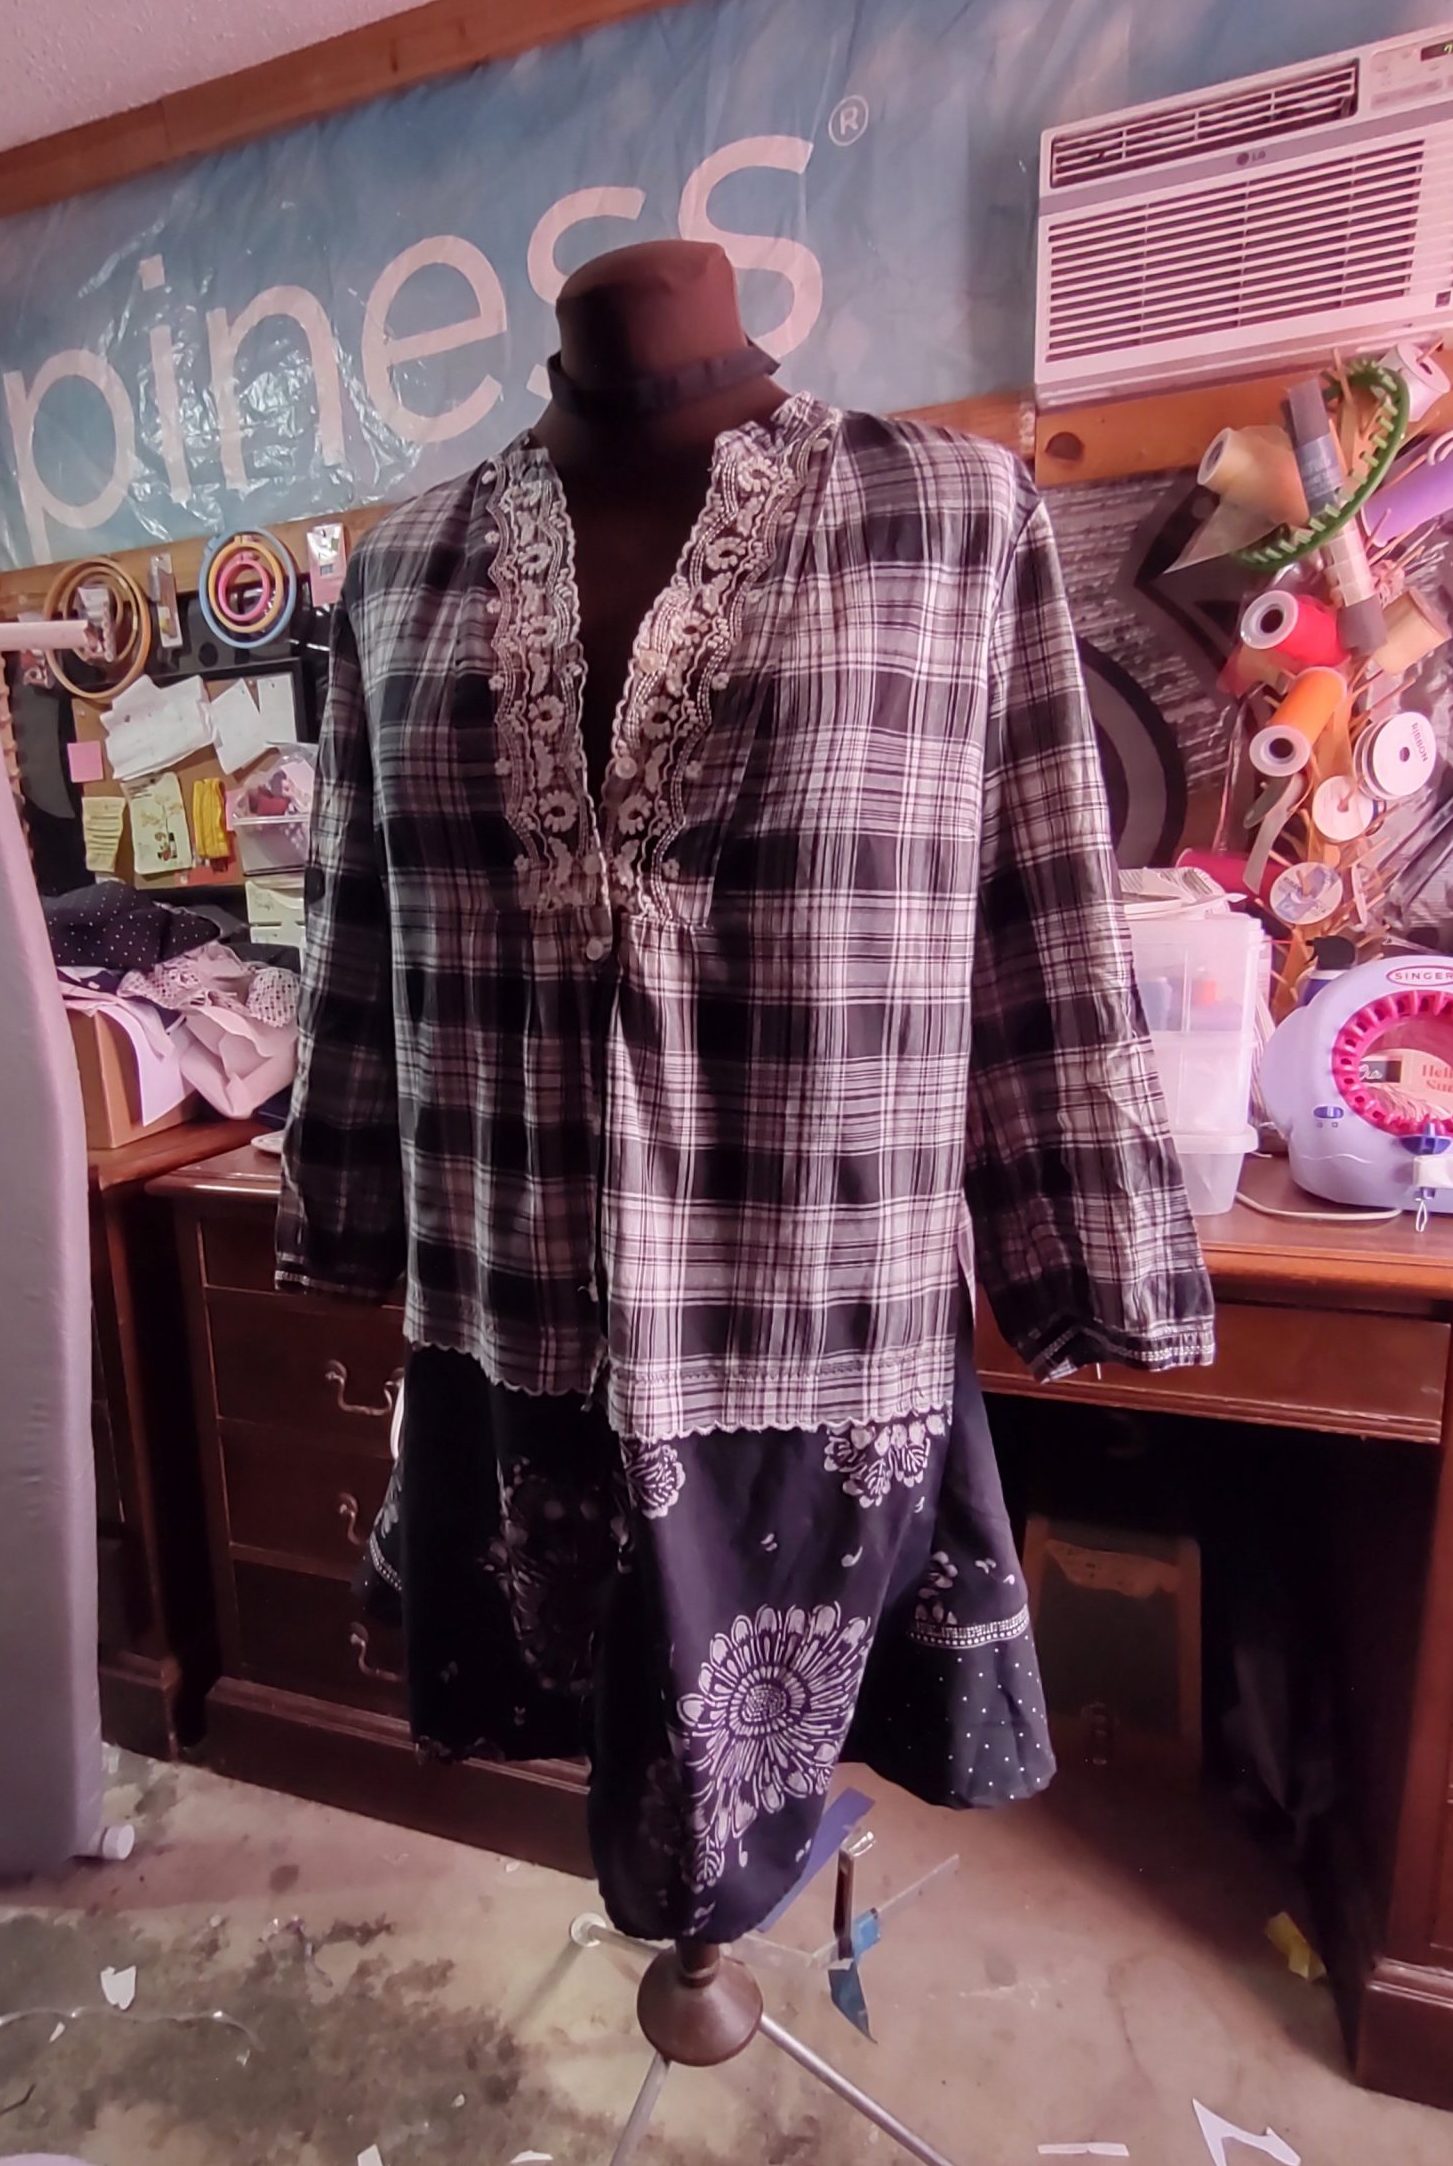
My mom gave me this blouse to play with because her puppy had ripped the bottom of it. I had already cut off the torn part and sewed the raw edge with a scalloped stitch to match the embroidery on the top. That made the shirt too cropped for my preference, so it stayed in my refashion pile.
In an attempt to eliminate said pile (who am I kidding, piles), I pulled it out, along with another black and white top with stretched out elastic and a black and white fabric remnant for good measure.
Shirt with stretched out elastic.Remnant
I decided to both lengthen it and add more room at the sides by inserting triangles of fabric. I hate wearing woven tops that are fitted, so I thought that might make it more wearable to me. Here is the end result:
FrontSideBack
I’m not sure that I’m happy with it. Looking at it now, I think I need to add something from the bottom fabric to the top to tie it all together. I may make two patch pockets and attach them at the bottom of the original shirt and overlap onto the new fabric. Maybe an applique on the back as well? Thoughts?
Like this post? To make sure you never miss a future post, please sign up for my newsletter.
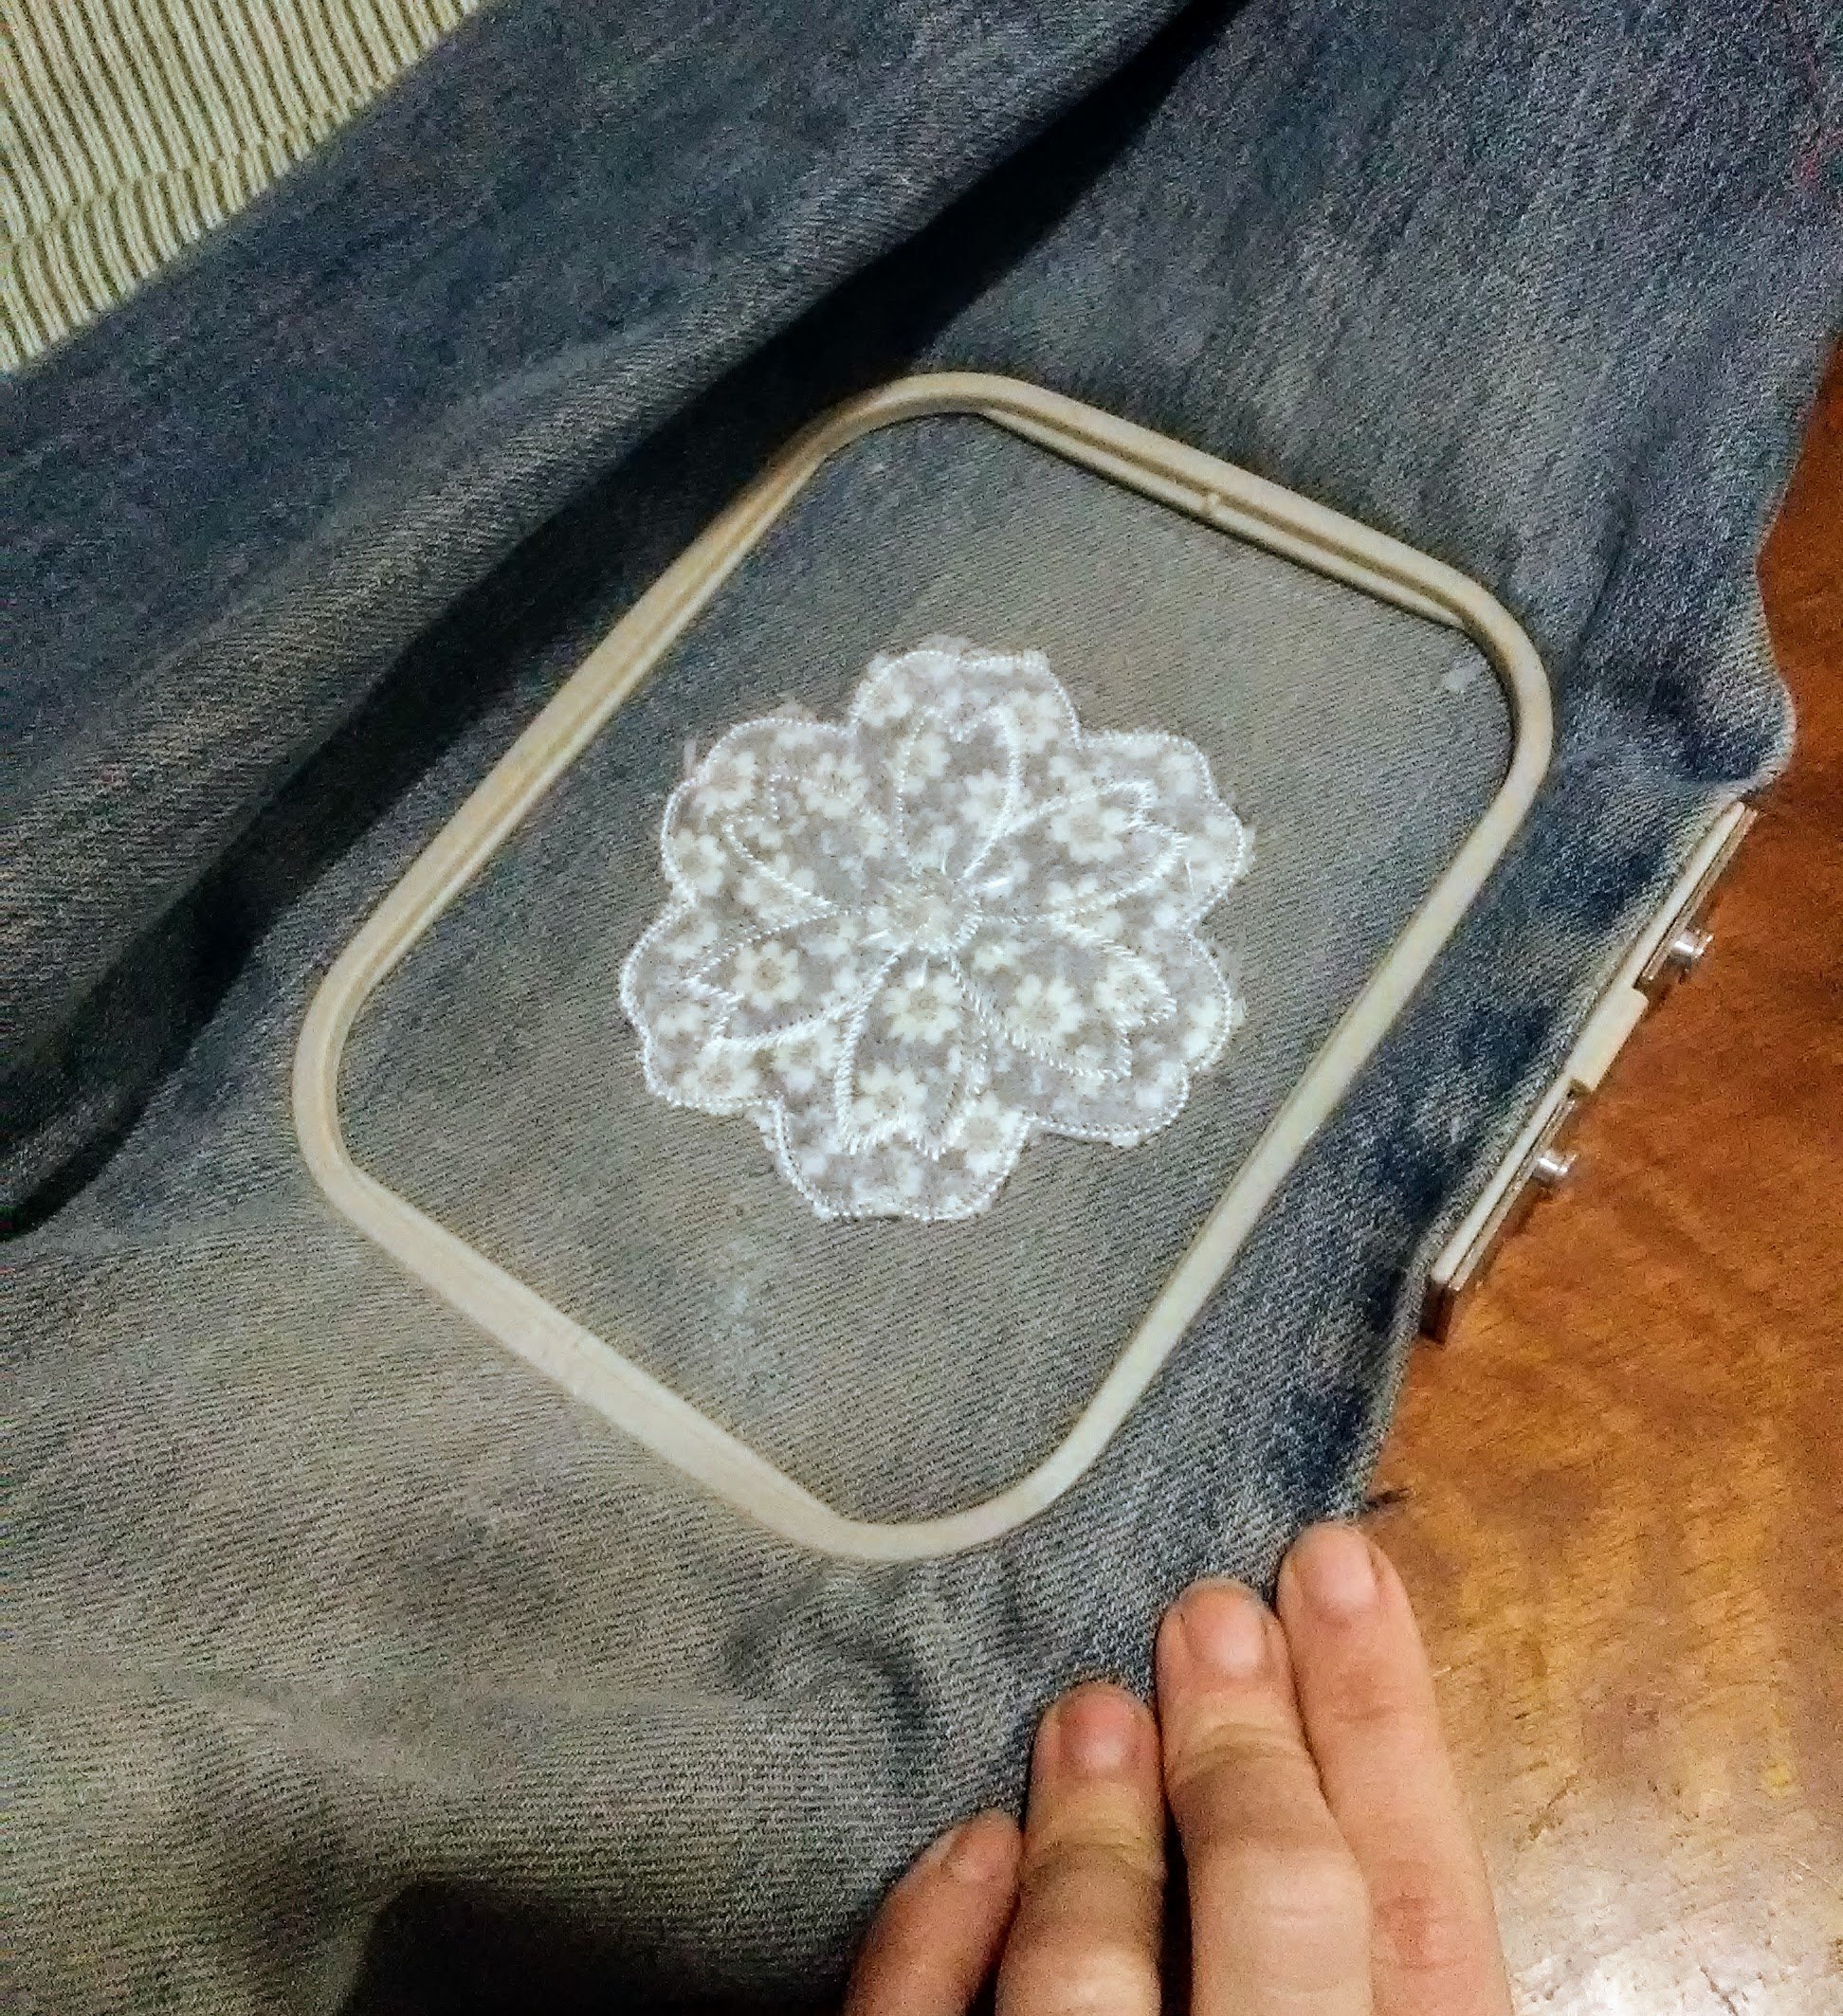
I love wearing denim blue jeans, but chasing my boys and taking care of my small zoo, they get lots of wear and tear. One of the worst things is having to scrap a favorite pair because of one too many rips. I’ve repaired rips in a utilitarian way in the past. This time I thought I’d try patching denim using my embroidery machine. I haven’t done much applique, so I learned some things along the way.
This tutorial makes use of an embroidery machine and serger. You could also adapt it to use a sewing machine or applique by hand and embellishing with hand embroidery.
Items needed
Denim jeans or other item to repair
Interfacing
Thread in colors of choice
Seam ripper or similar tool
Scrap of fabric at least 4 in x 4 inches
Stabilizers: Cut away or tear away, water soluble optional
Since I’m repairing a ripped knee, I needed to take out one of the side leg seams on my jeans. Using a seam ripper made this easy, but you could use small scissors, too. I left the seam intact at the hip and ankle, only removing what was necessary to lay the ripped area flat in the hoop without risking sewing it to the back. Leaving a little intact makes it easier to resew the seam at the end.
Step 2: Prepare the rip.
Iron the area around the rip so it’s smooth and flat. If there’s a lot of loose threads around the rip, trim them. I caught this rip before it frayed too badly, so no trimming was needed.
Side seam removed and jeans ironed flat.
I wanted the embroidered area to be solid, so I applied some interfacing to the back of the rip. I used some medium weight interfacing, but any should work, since it’s job is just to hold it together while the jeans are embroidered. This is a perfect project for using whatever scraps are handy.
Back of rip with interfacing applied.
Step 3: Hooping.
For denim, tear away or cutaway stabilizer is best. I chose cutaway for the most stability. It’s stiff, but it should soften in the wash. If not, I’ll switch to tear away next time.
I tend to float projects and only hoop the stabilizer whenever possible. This project seemed like it would work better tightly anchored in the hoop. It took a few tries to center the rip in my hoop so that all edges would be covered by my design. My machine has a 4 in x 4 in embroidery field, so the rip just barely fit. Smaller tears will be easier to fit in my small hoop.
First attempt. Once I put it in my machine and had it circle the embroidery field, I saw it needed re-positioning.
Step 4: Embroidering the patch.
Once it’s properly hooped, it’s time to sew. On my machine, the first color stop said “Applique Material”. I haven’t done much machine applique, but the ones I am used to usually follow the sequence: placement stitch, tack down the applique (then trim excess), sew the final applique stitching. So, confused I just put the applique fabric and a water soluble stabilizer (optional) on top of the rip and pushed start.
What my machine was telling me to do was to just hoop the applique fabric so I could remove it from the hoop and cut it neatly. The second color stop was the positioning stitch. That would be stitched on my jeans and then my neatly trimmed applique could be placed in position and the stitching completed. Since I did everything at once, my applique isn’t as tidy as it could be. I will definitely listen to my machine next time.
Finished sewing.
Step 5: Remove from hoop and cut away excess stabilizer
I also steam pressed over the back of the patch to start softening the stabilizer.
Patch from the back with stabilizer trimmed.
Step 6: Sew the leg seam.
To repair the leg seam, I used a lock stitch setting on my machine. You could also sew the seam twice to reinforce it or just use really heavy thread. I then serged the raw edge. If you don’t have a serger, an overedge stitch or zig-zag stitch would also work.
Finished!
Finished patch. Next time I will use heavier thread so the embroidery shows better.
Not bad. I wish I had used heavier thread so the embroidery would show up better. Listening to my machine and cutting the applique fabric to size before I sew it on to eliminate the raw edges peeking out is another improvement for the next time I’m patching denim.
If you’d like to use this applique design, you can download the file here. You can use the design on items you make to sell as well as for personal use, but please don’t sell the design file.
Floral knee patch applique design image.
Like this tutorial? To make sure you don’t miss out on future tutorial posts, sign up for my newsletter.
Embroidery Files and Freebies
Embroidery design files and freebies from SubEarthan Cottage. All designs are scaled to fit 4×4 hoops common on home embroidery machines.
If you search for refashioning ideas online, you’ll find tons of amazing examples of outdated styles being turned into trendy pieces that bear little resemblance to the original. (https://refashionista.net/ is one of my favorite refashion blogs to browse for inspiration.) It’s easy to get overwhelmed with ideas, especially if you’re new to sewing. The main goal of refashioning is to take a piece that is unflattering or unwearable and turning it into something that will be worn again. Sometimes a few simple tweaks are all that is needed to accomplish that goal.
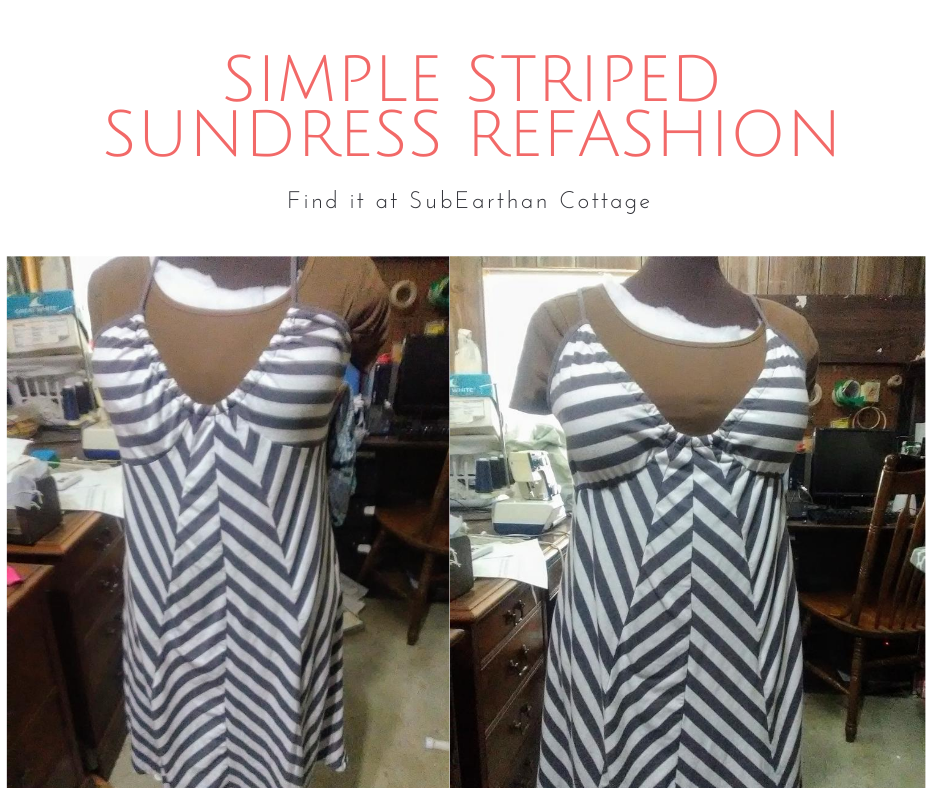
The Dress
Before
This sundress is a perfect example. In it’s original form, it was breezy and comfortable for summer, except that it required a strapless bra to be flattering. Strapless bras tend to be uncomfortable in general. When it’s August in Texas hot, they’re almost unbearable. Having to wear one took away from the comfort of this dress, leaving it regulated to the back of my closet most of the time.
The refashion Fix
In order to fix the problem, I needed to add coverage and a little support to keep the cups in place.
First, I sewed elastic into the seams under the bust. I sewed it onto the seam allowance to keep my stitches invisible from the outside.
I cut the elastic a little shorter than the length of the seam and stretched it to gather it slightly. When worn, it doesn’t look gathered, but it keeps the cups in place.
For coverage, I took the cup inserts from a soft seamless bra and hand stitched them in place. I never use them in the bras, so I have several sets sitting around. By hand stitching, I was able to keep my stitches from showing on the right side of the fabric. Rather than sew all around the cups, I strategically tacked them to keep them secure but invisible from the front.
The result
After
Those two simple tweaks only took about twenty minutes. The final result is a smoother, more flattering fit that doesn’t sacrifice comfort.
What simple refashions have you done that made a huge impact on wear-ability? I’d love to hear about them in the comments.
Like this post? To make sure you never miss a future post, please sign up for my newsletter.
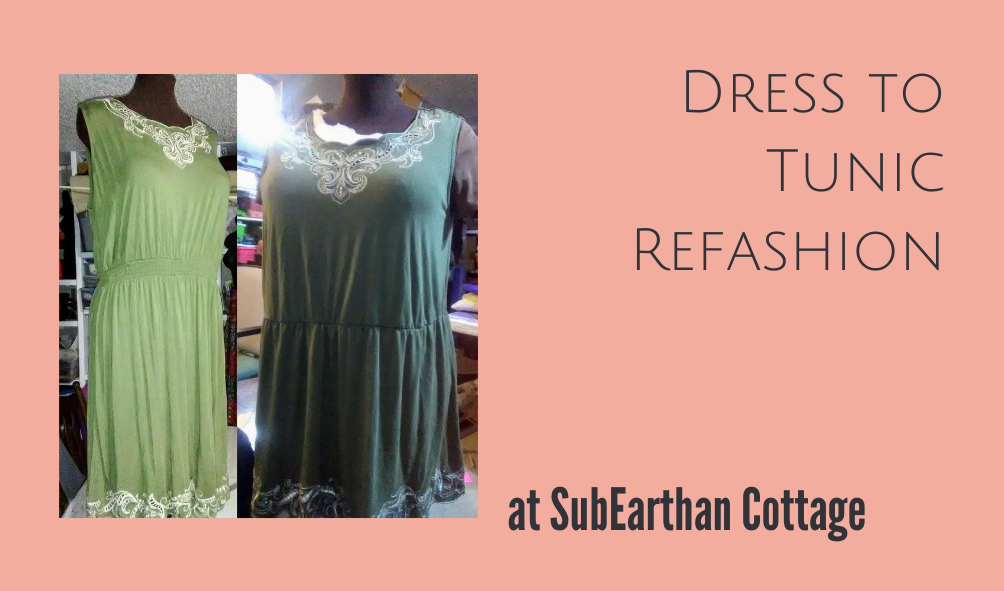
I finally got around to refashioning the green knit dress that I found at Goodwill over a year ago.
Green knit dress
What I did to the dress
I decided to shorten it to mid-thigh and take in the top for a better fit. In order to keep the pretty stitching at the bottom, I took the excess length from the middle.
I took the top in a little at the sides, but not enough to make it too fitted. It’s hot, so loose and breezy isn’t a bad thing.
To join the two parts, I added elastic to the waist of the skirt and then reattached it to the top.
Refashioned green knit dress.
End result
Here’s the result. In retrospect, I wish I had made the elastic fit a bit tighter. Right now, it just hangs fairly straight. I may go back and redo that some other time.
As it is, it’s comfortable to wear over leggings, so perfect for hanging out at home with the kiddos.
A note for homeschoolers
I’ve been cleaning the office and getting our homeschooling supplies ready for our official start to the school year. If you’re new to homeschooling, or just looking for new ideas, I’ll post photos of our setup, as well as other homeschooling tips next week.
Like this post? To make sure you never miss a future post, please sign up for my newsletter.
I, Charity Sloan, am a participant in the Amazon Services LLC Associates Program, an affiliate advertising program designed to provide a means for sites to earn advertising fees by advertising and linking to Amazon.com. Any purchases through those links will result in my receiving a small percentage in commission.
This only refers to Amazon links found in/on my blog pages. All products in my shop are 100% mine and not linked to Amazon.
Prices are the same whether you click an affiliate link or a non-affiliate link, so you will not be charged more. Thank you for your support!