I have tons of clothes waiting for me to refashion them into something more wearable, but haven’t had much inspiration. Recently, though, I came across CreoleSha on Etsy. I love her flowy designs. Luckily, she offers classes on Teachable, so I took her free course on upcycling a sweatshirt or t-shirt into a tunic.
Almost forgot to take a before photo.
My refashion notes
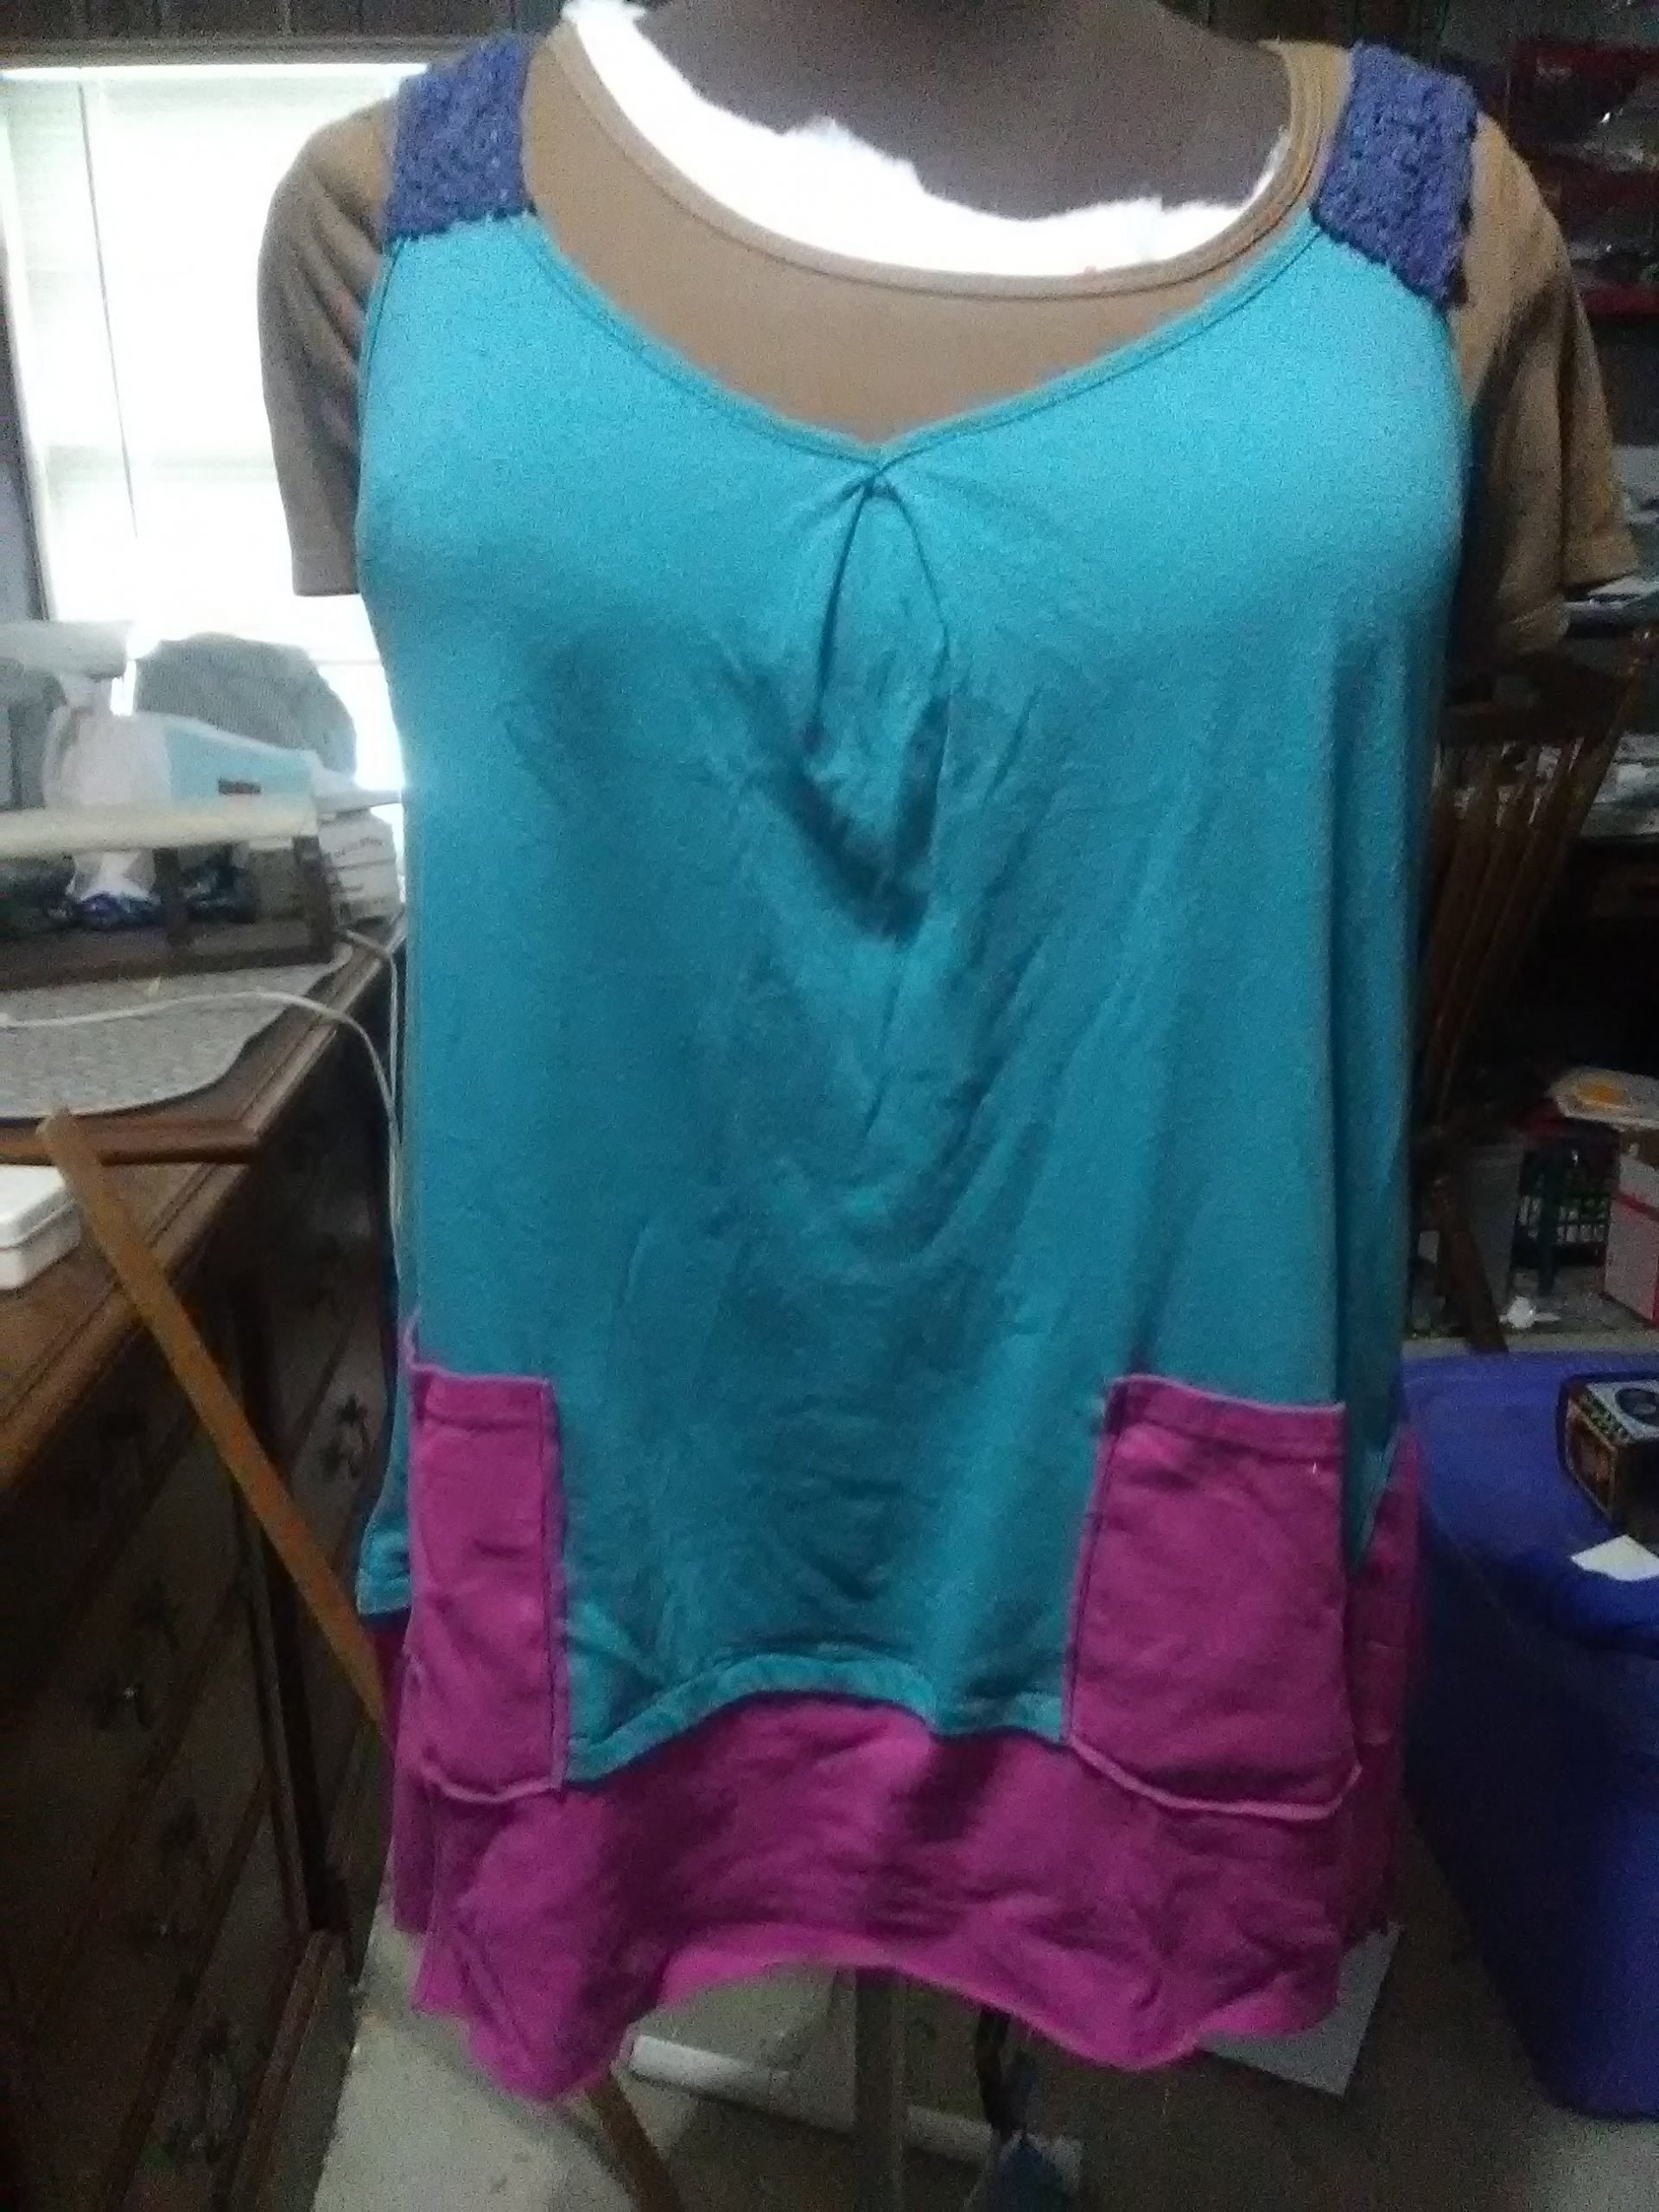
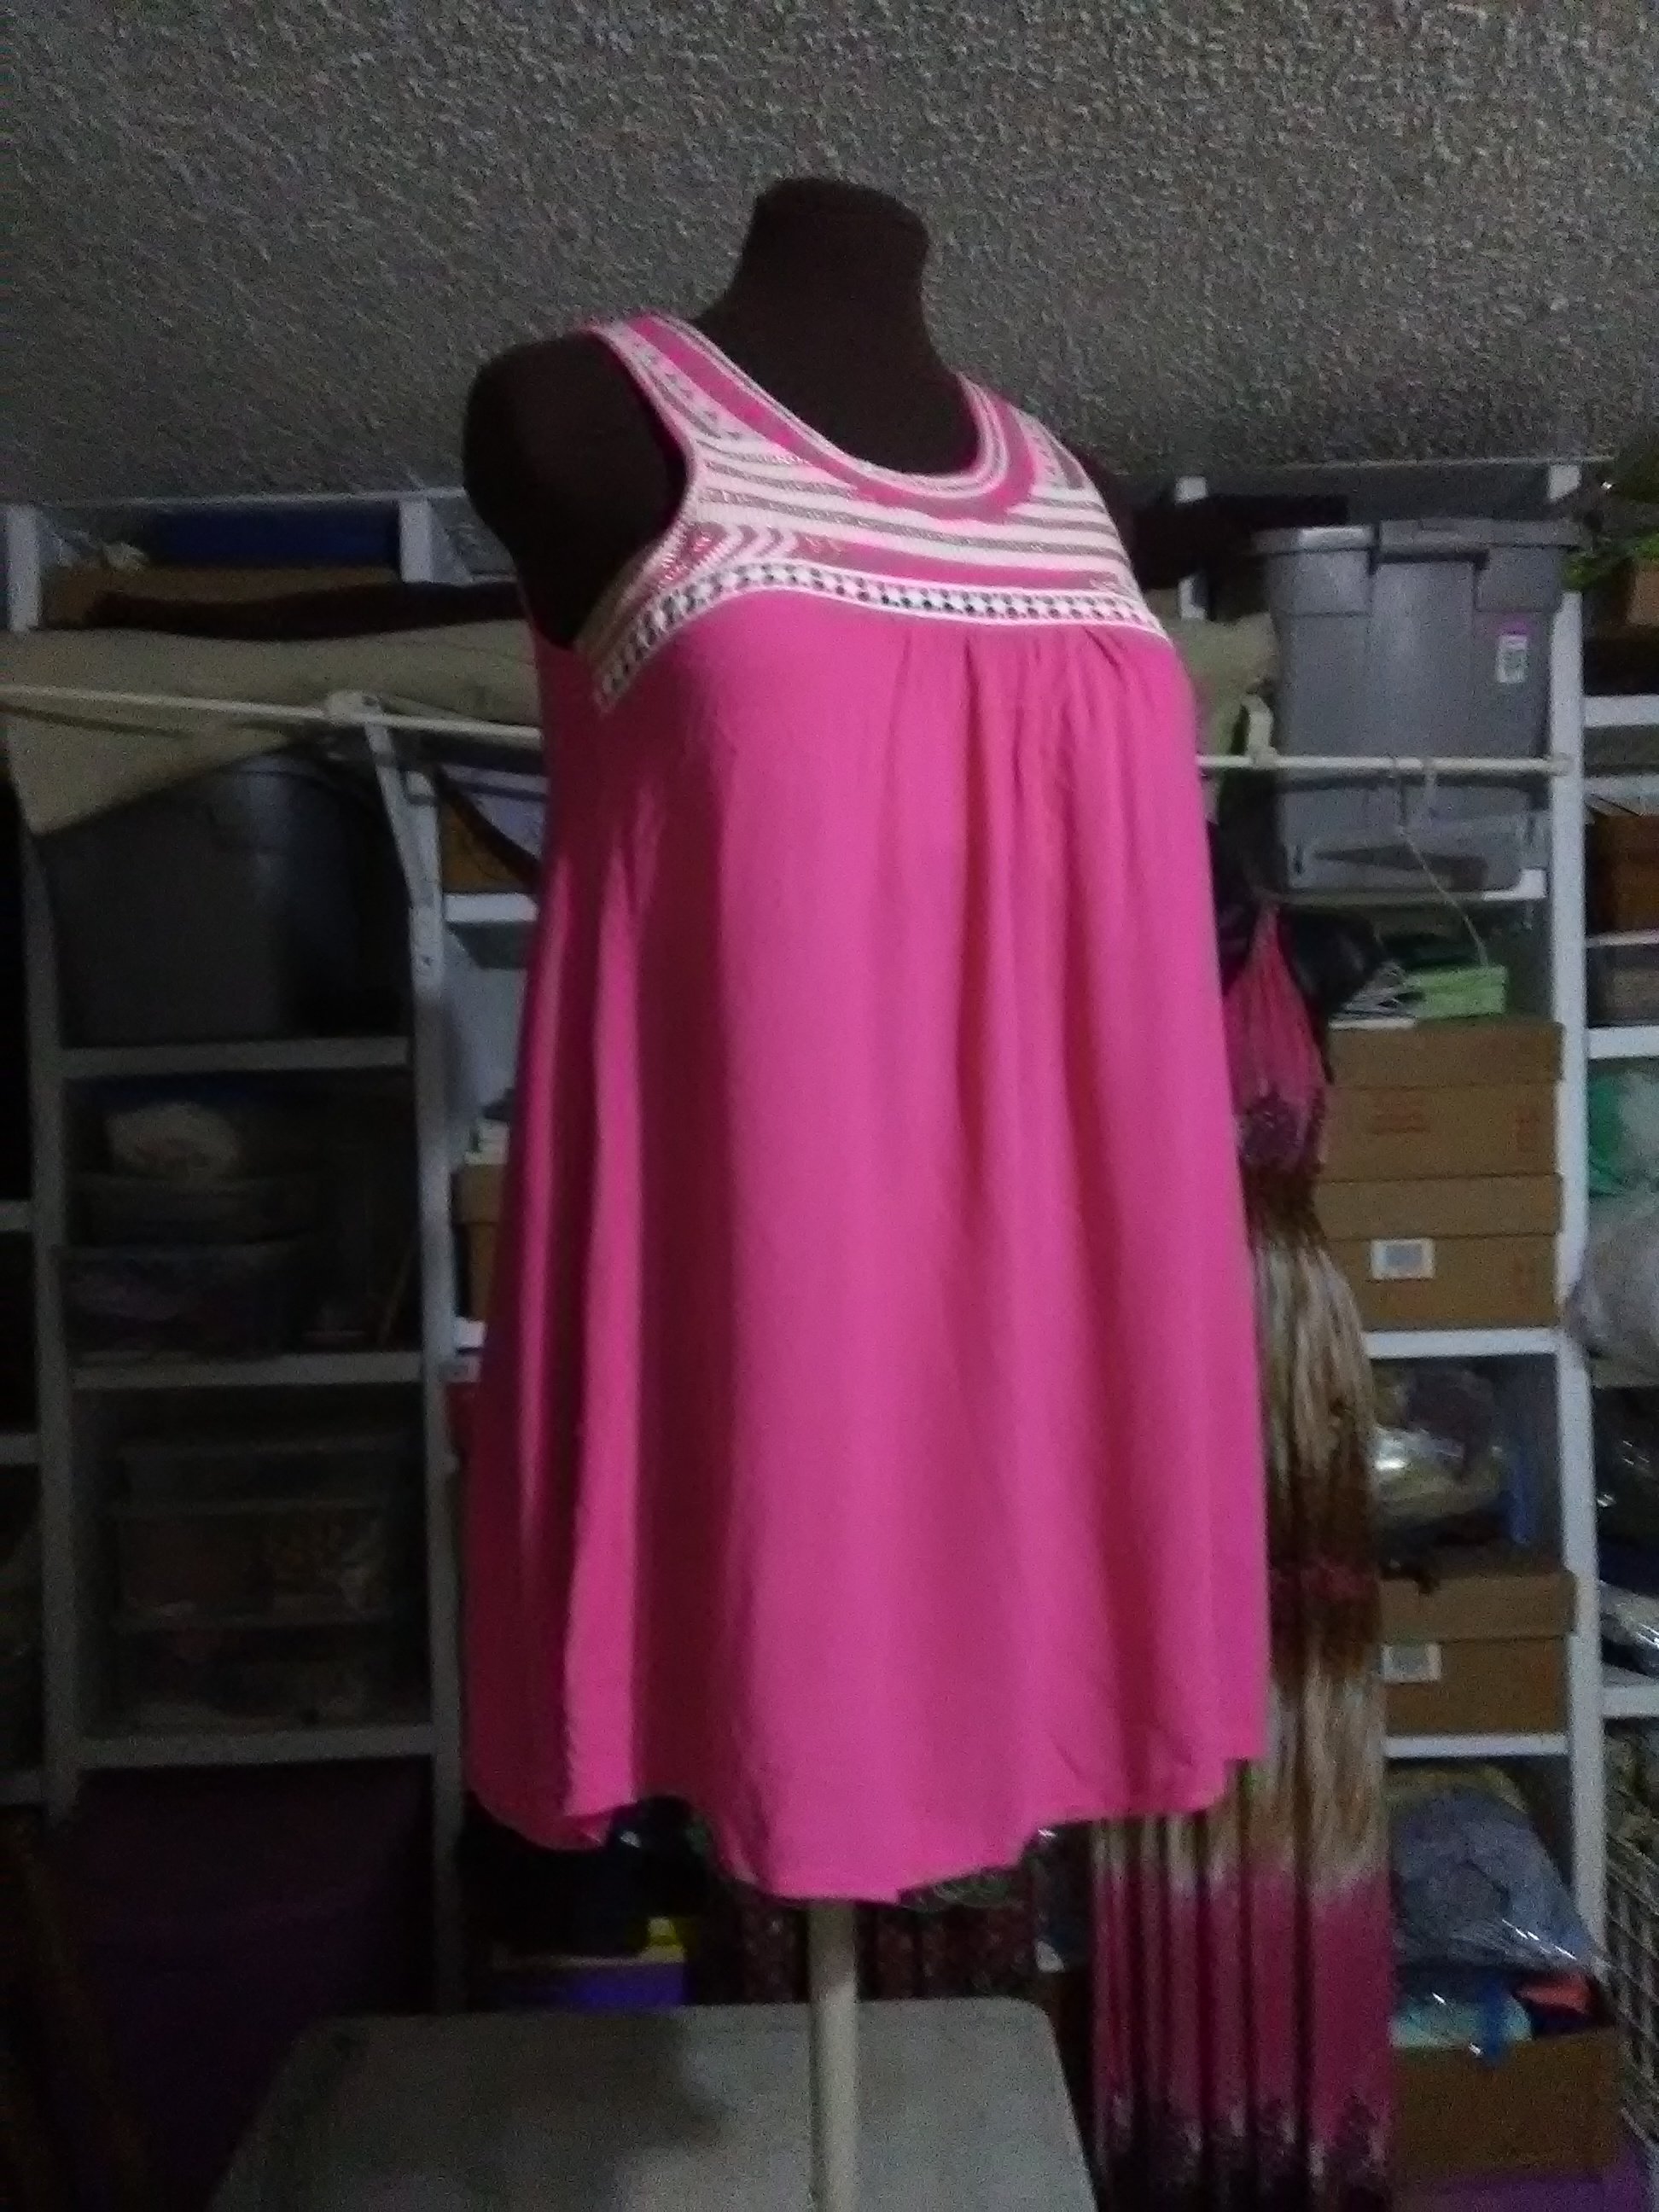
It’s summer, so rather than use a sweatshirt, I started with a camisole tank that I didn’t wear much. I liked the color, but the fit was too loose to use for layering, and the skinny straps made it difficult to wear with a bra. By adapting the techniques in CreoleSha’s class, I turned it into a longer, flowing tank and then added a bit of cotton lace salvaged from an older refashion project to widen the straps.
The added material came from a t-shirt with a large logo on the front. I liked the color, but not the logo, so it was perfect and added some nice contrast.
Of course, pockets are always handy, so I added some patch pockets on the front.
Final result
It’s not perfect, but it’s something I’m more comfortable wearing now. The shirts were wrinkled from storage to the point that the wrinkles came back even after ironing. Luckily they smoothed out with laundering, so I don’t look like I just rolled out of bed when I wear it. More importantly, trying something a little on the artsy side and just jumping in has me ready to tackle more refashions.
A note on my dress form
Before working on this, I took the time to add some batting to my dressform, Athena. She’s a little less padded in some areas than I am, so the batting makes it easier to use her as a fit guide when I don’t want to try things on over and over. The brown t-shirt helps hold it all together and provides something to pin into.
Like this post? To make sure you never miss a future post, please sign up for my newsletter.
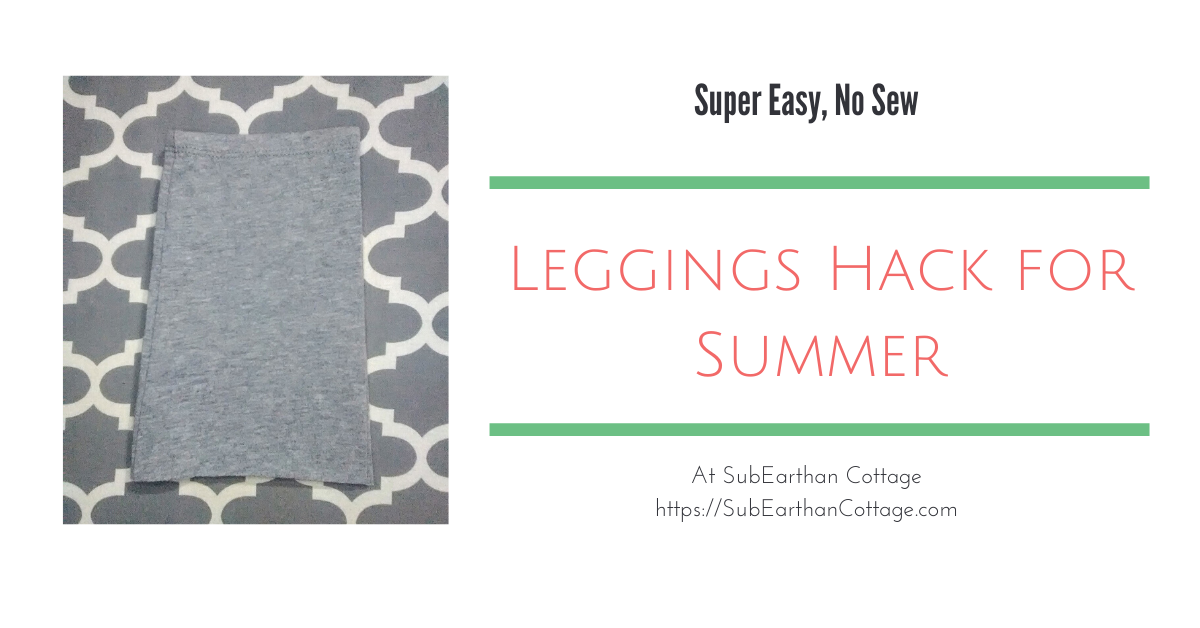
If you or your kiddos wear leggings, you’ll love this easy leggings hack for summer. While you can use any leggings, it’s perfect for turning leggings that have worn out at the knees or ended up being a little too see-through into something usable, especially when the weather turns hot. This hack is so simple, I feel a bit silly making a post about it. It’s really one of those “Why didn’t I think of that?” things.
How to do it.
All you need is a pair of leggings you want to make shorter and some good scissors. Fold them in half so that the legs lay on top of each other. Make sure the fabric is smooth and the legs match up at the hem. Decide how much shorter you want them and cut them at that length, keeping the line parallel to the hem. My scissors cut through both legs easily, but you can always cut one and use it as a guide to cut the other.
Here’s what I cut off. I like leaving mine either just above or just below the knee.
Because knit doesn’t fray, you don’t have to hem the raw edge. When stretched, the edge will roll a tiny bit and hide the edge. You may want to seal the seam that you cut through with a little fabric glue or a few stitches. I have some I cut last summer without doing anything to the seams and they’ve held up through many wearings and washings without coming apart.
How I like to wear my shortened leggings
I like wearing dresses or skirts in the summer because Texas is hot, lol. With little kids, though, I’m constantly up and down or bending to pick things up off the floor. Cropped leggings underneath give me enough coverage to make dresses practical for everyday. Leggings under my dresses also prevents uncomfortable chafing from being a bit, um, curvy in the thighs. For this purpose, I really like using this hack for leggings that I wouldn’t feel comfortable wearing without a long tunic or dress. Instead of taking up space at the back of my closet, they get used and make my other clothes more wearable.
Ways to repurpose the cut off section
The cut off sections can be repurposed, too. A really simple thing to do is make hair bands by cutting them in one inch strips parallel to the hem. Be sure to keep the seam intact so they’re a circle.
You can also make a pocket for your leggings out of the cut off section. Decide how big you want your pocket to be and add a half inch or so seam allowance to each side and the bottom. Use the existing hem as the top of your pocket to save time. Fold the seam allowance under and stitch in place on your leggings where you want the pocket. You’ll want to use a narrow zig-zag or stretch stitch to prevent the thread from breaking. A ball point needle is ideal for sewing knits, so if you have one, use it.
Here’s one pocket I’ve added.
Like this post? To make sure you never miss a future post, please sign up for my newsletter.
I’ve been sewing lots of masks lately. Apparently my sewing machine needed a break, so it decided to skip time again. Thankfully I’ve done it a few times now, so I should have it up and running soon.
Hook timing is a fairly common problem that sends many sewers running to the repair shop. When it happened the first time on my older Kenmore, I decided to try to repair it myself first. My thinking was, since it’s a mechanical machine with mostly metal parts, as long as I was careful, I couldn’t really hurt anything. I probably would have thought twice before attempting it on a computerized machine.
All machines are a little different, so what worked on mine may not work on yours. Something I recommend to everyone who wants to work on their own sewing machine, is getting a copy of the service manual. Honestly, I still need to do this. There’s tons of info online, but having the actual service manual is even better. You should have an owner’s manual on hand, too. It covers basic care and maintenance. For repairs, though, the service manual will give you technical instructions and confidence.
Once you’ve tried the easy fixes, if it still isn’t working right, look at how the needle and the bobbin hook intersect. This page, https://tv-sewingcenter.com/general/sewing-machine-timing-hook-timing, has illustrations, photos and descriptions for where they should meet on both rotary and oscillating machines.
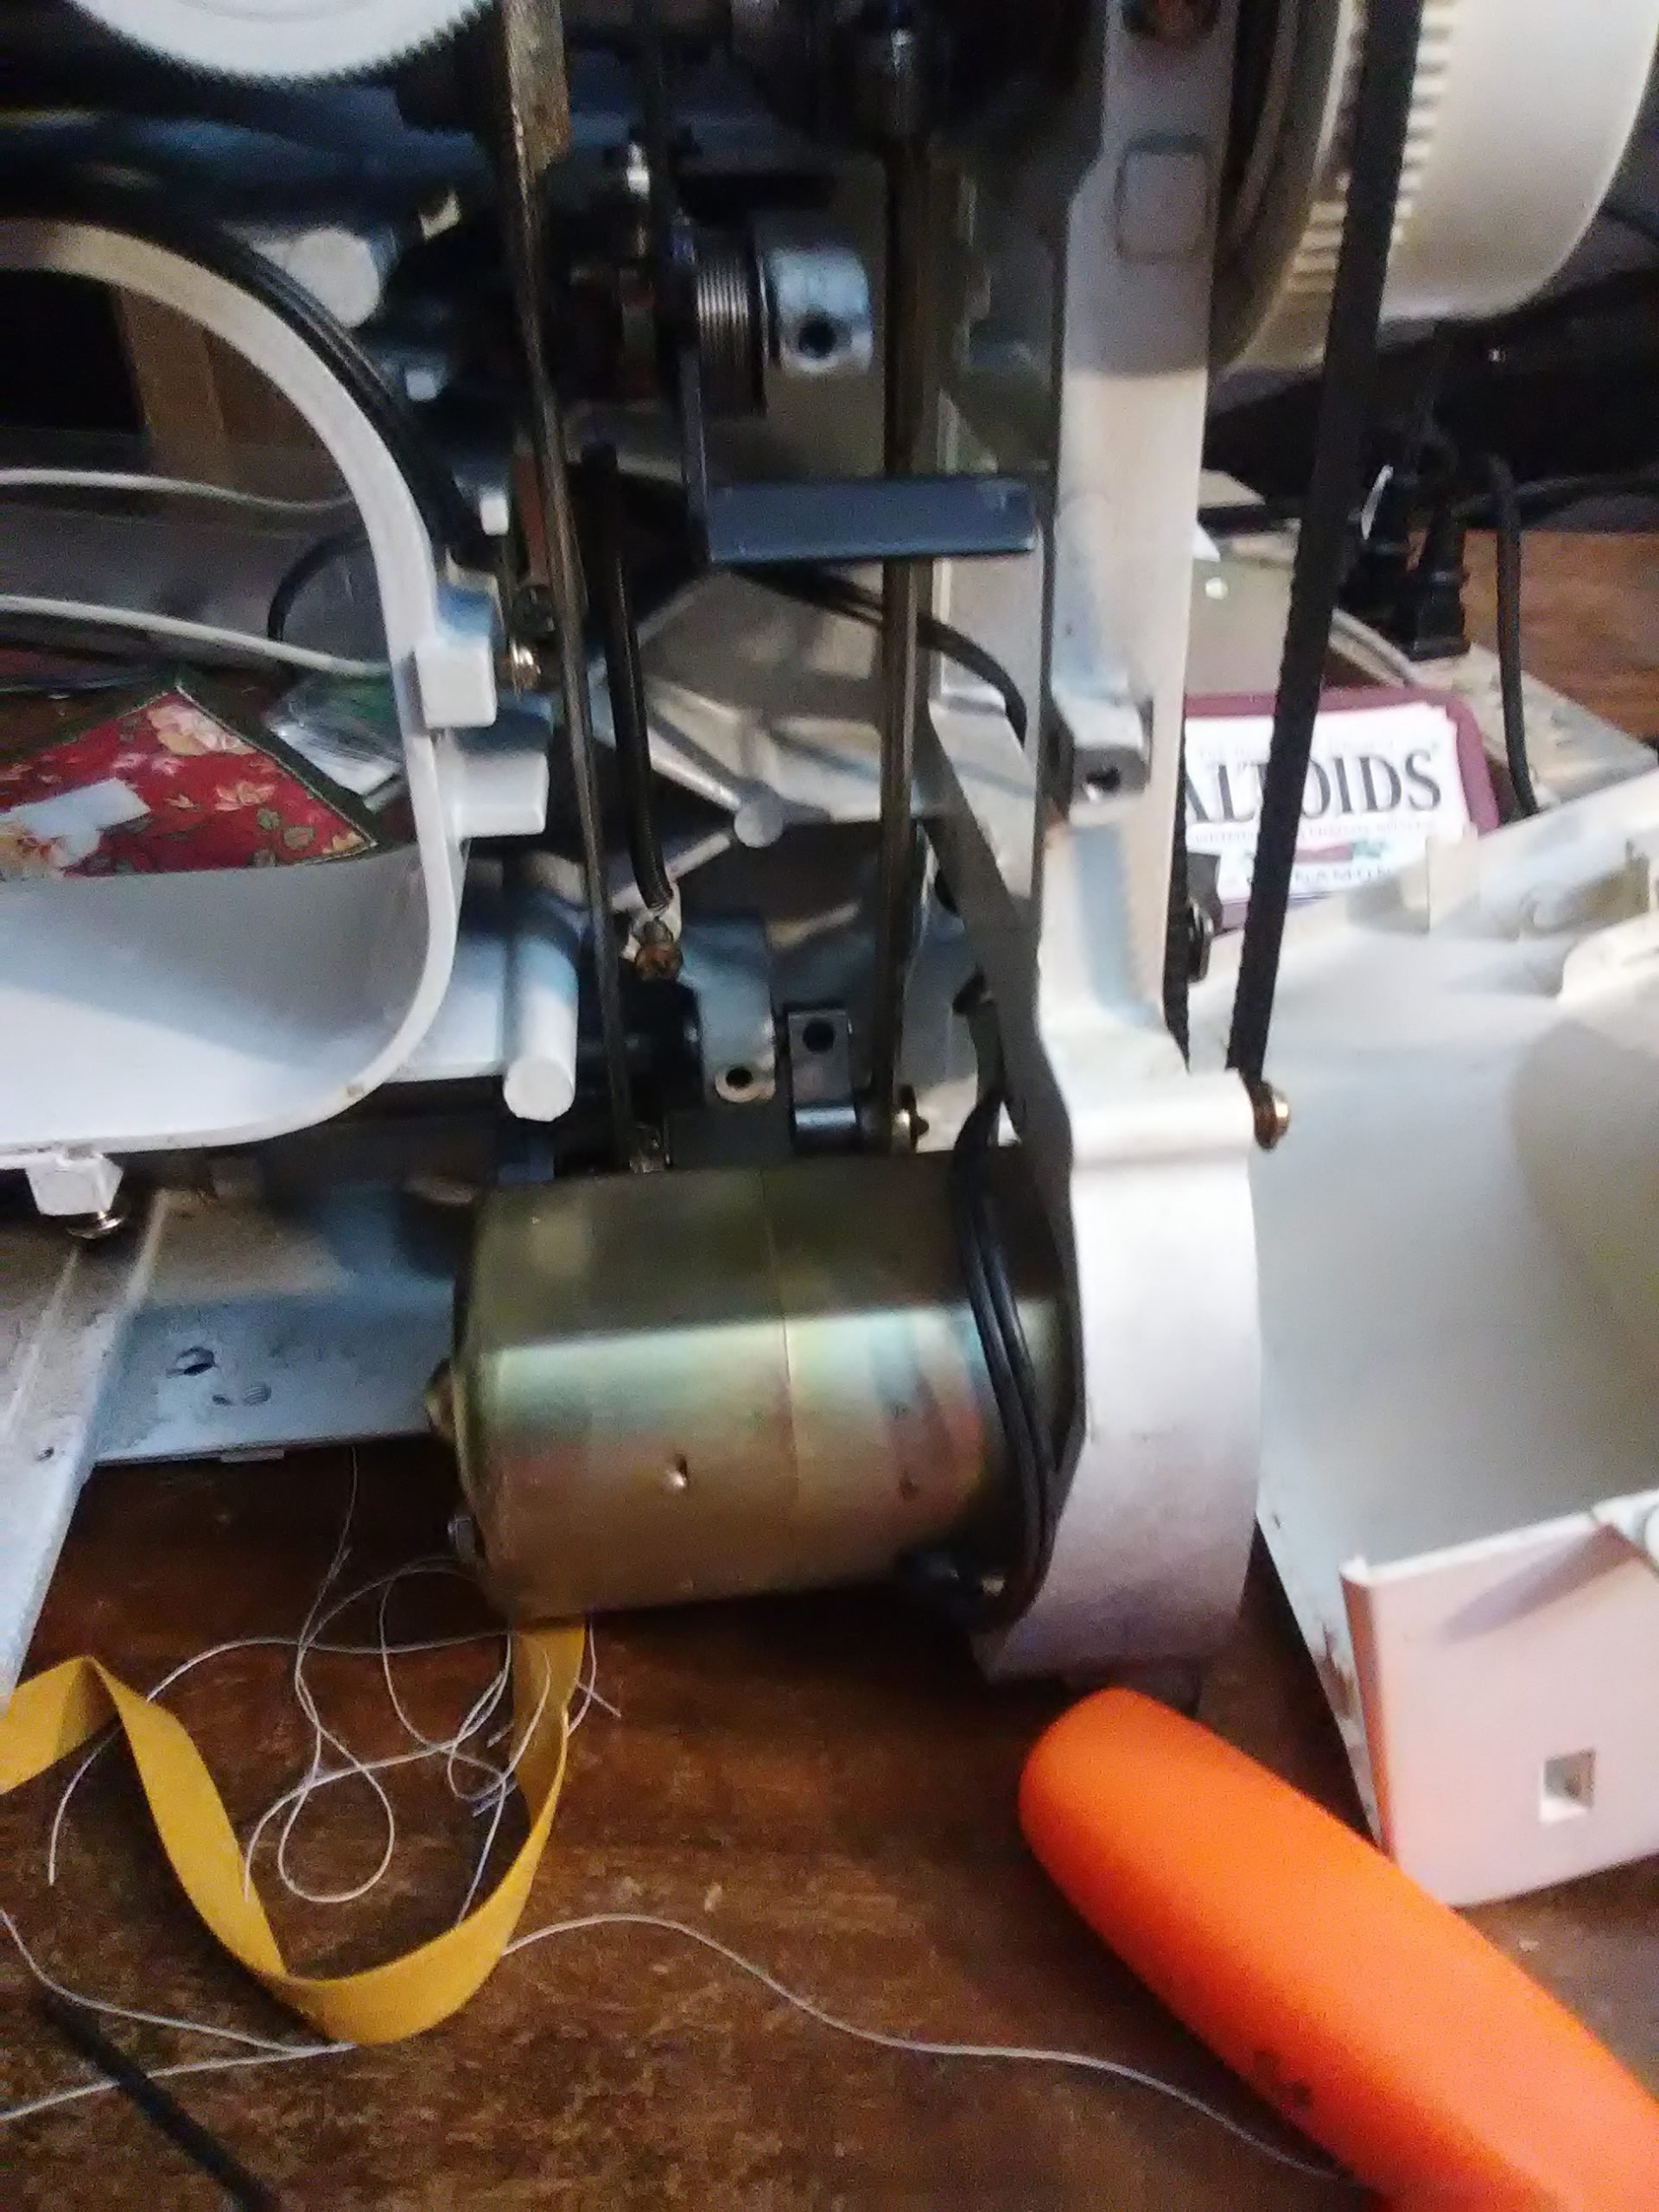
Taking a look at my oscillating hook.
My machine is an oscillating machine, so the hook tip should pass just above the eye of the needle. Mine was passing below the needle’s eye, so clearly the hook timing needed adjustment.
Open it up
The first and honestly the hardest step was figuring out where all the screws were that I needed to remove to take off the casing. (Actually, the first step was to turn off and unplug the machine. If you’re attempting this at home, do not skip this step!) On my Kenmore, I have to take off the side by the hand wheel, a plate on the bottom, and the front panel.
More cleaning
While I have my machine open, I like to take the opportunity to clean it out and oil it. Oiling a linty machine, using the wrong oil or putting it in the wrong places can cause tons of problems, though, so if you’re not sure, stick to dusting only.
Find and adjust
Next, I tilted the machine on to it’s back so I could get a good look at the mechanism that rotates the hook. Once I had isolated that, I found a hex head set screw. Loosening that allowed me to gently adjust the hook position so that the tip passed just above the needle’s eye.
About in the middle, just above the motor is a silver piece with a round, black screw near the top. That is the set screw I loosened to adjust the hook timing.
When I was sure I had it properly positioned, I tightened the set screw. I turned the hand wheel a few more times, making sure everything still looked good before I put the casing back. A quick test run showed everything was working properly again.
Done!
It’s so satisfying to be able to make simple repairs to my machines myself, especially when most repair shops start around $75 and go up from there, depending on what needs to be done.
My electric pressure cooker is such a lifesaver when it comes to getting fast, healthy meals ready. It’s almost like having someone else do the cooking. With so many working from home with kids right now, those minutes saved in the kitchen are valuable. Here’s five of my favorite electric pressure cooker dinner recipes.
1
Honey Glazed Chicken for Electric Pressure Cookers like the Instant Pot
This honey glazed chicken is made in an electric pressure cooker with just minutes of prep. Sweet and juicy, it will satisfy even picky eaters.
Electric Pressure Cooker (Instant Pot) Whole Chicken and Potatoes
This is my method for cooking a flavorful whole chicken and potatoes in an electric pressure cooker. After a little prep work, you can walk away and let the pressure cooker do it's job without having to check on it or worry about overcooking. I'm using an 8 quart electric pressure cooker. If yours is smaller, you may need to adjust the size of the chicken and other ingredients accordingly.
Dairy and gluten free sausage potato soup inspired by Olive Garden's zuppa toscana. I prefer making it in my electric pressure cooker but it could easily be done in a slow cooker or on the stove top.
Instant Pot Chicken and Vegetable Quinoa is a quick, last minute dish that is great hot or cold. Customize it by swapping out the protein or vegetables depending on what you have on hand.
Knowing that so many are stuck at home right now needing distractions, I’ve decided to make all of my machine embroidery design files free until April 30. That’s the day my area’s shelter in place order expires. If it is extended, I’ll extend the embroidery design freebies, too. If you make something with one of my designs, I would love to see it.
My full shop is still open, and will be as long as everyone in my household is healthy. I’m using extra care with handwashing and using hand sanitizer before coming into contact with products and packaging as well.
All of my handmade soaps are currently on sale for 20% off. You can find them here.
Like this post? To make sure you never miss a future post, please sign up for my newsletter.
Whether you want to make your own clothes or home decor or just be able to mend and tailor the things you already have, a sewing machine makes it much easier. If you don’t have much experience with sewing on a machine, though, it can be daunting looking at all of the choices out there. While it really is up to personal preference, there are a few guidelines that will help you to find a solid sewing machine that meets your needs.
Determine your stitch needs
What are you planning to do with your sewing machine? For most sewing, you really don’t need a huge variety of stitches. Almost everything can be done with a machine that sews straight and zig-zag stitches, and has a button hole option. A blind hem stitch, an overedge stitch and a smocking stitch round it out nicely for garments and decor construction. If you plan to do decorative top stitching, then look for a sewing machine with decorative stitches you like.
Computerized sewing machine?
Honestly, I avoid computerized machines. A sewing and embroidery combo machine like my Brother SE400 (this is the updated version) is the exception. If you really want to do machine embroidery you will need a computerized embroidery machine. Otherwise, a purely mechanical machine is my recommendation. Even though my embroidery machine is also a regular sewing machine, I prefer to keep my embroidery machine for embroidery only and use another sewing machine for standard sewing. Computerized machines have more things that can go wrong, and I like to keep things simple.
This is my model of embroidery machine. It is computerized and scary, lol.
Presser feet
To me, having a variety of presser feet is more valuable than having a variety of stitches. While most things can be done with a standard zig-zag foot, a zipper foot makes sewing in zippers a lot easier. A rolled hem foot makes it easier to sew tiny narrow hems. Button hole and button feet round out the basic feet that make sewing garments easier and with more professional looking results. Those are many other presser feet available, and, while usually not required, they each make their specific task easier.
Most new sewing machines use a universal snap-on presser foot system, so it’s not hard to add more presser feet to your collection. Older machines use a thumb screw to attach the feet, but you can usually screw on a snap on adapter and use snap on feet on them, too. This page gives a good rundown on how to know if a presser foot works for your machine.
Vintage foot. I think it is a knit foot.
Construction
For a long-lasting machine, the less plastic the better. I prefer vintage machines for this reason. A good metal vintage machine will last forever if maintained properly, whereas machines with internal plastic gears and other mechanisms is more likely to break. If you buy a new machine, it’s more likely to have a lot of plastic components, but you can still look for quality. Check out the display model, if possible. Is there anything already broken just while on display? While the break may have just been a previous too-rough customer, it’s also likely a weak point. Do the knobs, levers and buttons operate smoothly and feel solid? How heavy is the machine? I personally would lean toward a heavier machine.
Used or vintage sewing machine
It’s not hard to find used sewing machines at thrift stores, garage sales or on sites like craigslist in the $20-$75 range. If shopping for a used machine, see if you can test it before buying. If not, gently turn the hand wheel to see if it moves smoothly. They usually turn towards the front. Don’t force it if it feels stiff or resistant. If it turns, are there any weird sounds like something hitting or rubbing that shouldn’t. Are the plug and visible wiring in good shape? Does it pass the construction tests previously mentioned?
With a used machine, you may not have the manual or attachments for the machine. Most manuals can be found online, but if you can, do a quick search for it before buying it. Things like presser feet and bobbins are easy to replace, unless it is a really old machine. Even then, there are still parts out there on ebay and similar sites, but try to check first.
It’s a good idea to get a used machine tuned up at a repair shop, especially if you’re not familiar with sewing machine maintenance. On average, a tune up runs $75-$100. If it turns out further repair is needed, then that will add to the cost. Depending on the purchase price and the solidness of the machine, though, even with the tune up cost, you may spend about the same as a lower end new model, but the machine will last a lot longer.
A word about Singer sewing machines
I personally haven’t owned a Singer. All of mine are either Signatures (Montgomery Ward brand), a Kenmore (Sears brand) or my new Brother embroidery machine. They all are low shank machines, so the feet are interchangeable, and, except for the Brother, the bobbins are the same. Older Singers have either a Singer-exclusive slant shank or, if I’m not mistaken, a high shank, which has deterred me from owning one. The older Singers are good, solid machines, though, so if you aren’t worried about being able to use the same feet on another machine, they are a good choice.
Newer Singers are another matter. I’ve had friends purchase a brand new Singer that had it break just after the warranty ran out. The cost of repair made it better to replace the machine. Looking online, the general consensus is that Singers aren’t made to last anymore. For low-cost, entry-level machines, Brother tends to have a better reputation. Again, I haven’t owned a Singer, but, from what I’ve heard, I would stick with vintage models and avoid the new ones.
Questions?
These are just a few basic guidelines. If you have any other questions relating to sewing machines, ask in the comments and I will answer them as best as I can. If you have your own guidelines to add, feel free to comment those as well.
Like this post? To make sure you never miss a future post, please sign up for my newsletter.
This post contains affiliate links. If you click through any of the Amazon links and make a purchase, I will receive a small commission. There is no added cost to you.
This weekend, we visited a local Goodwill store. Unlike the other Goodwill’s in our area, this one has everything in big bins and they charge a flat, by-the-pound fee. Thrift stores always have unique items, but this one seems to have some really good finds, if you’re willing to dig.
In addition to a few household odds and ends, I found a couple of dresses and a shirt that need a little bit of refashioning, and a pair of skinny boyfriend cut jeans that are like new and fit perfectly. I also found a pretty floral vintage bed sheet. Vintage linens are somewhat in demand among crafters, and I rarely have luck finding them, so it was a nice surprise.
Vintage Pink and Purple Floral Bed Sheet
Green Dress
The first dress is a casual, green knit dress with interesting cutwork and stitching at the neckline and hem.
Green knit dress
Pros: It’s comfortable, easy to wear and chase after kiddos, and I like the color and detailing. Cons: It’s a size or two too big. This makes the underarms gappy and the waistline droopy. It’s too short to be a maxi dress, but not short enough to not be frumpy. I could wear it as is around the house, but I think I can make it into something better.
My plan: Separate it at the waist into the bodice and skirt. Tighten the bodice at the side seams. Reattach the skirt to the bodice after removing a few inches from the top of the skirt to make it somewhere between tunic and knee length. Add new, tighter elastic at the waist.
Long, Floral Shirtdress
The pretty blue and floral pattern is what caught my attention with this dress.
Blue, long floral shirtdress
Pros: The print is very pretty, and there is a lot of fabric to work with. Cons: The fabric is a stiff, non-breathing 100% polyester. It’s a size too small through the middle.
My plan: I have a few ideas for this one. The top (bodice) fits pretty well. The only fit issue is right through the middle. I could separate the bodice from the skirt, raise the skirt so that a wider section that fits me better is at the waist and reattach. Factoring in the button placket might make it tricky, but not that difficult.
I’m not sure I would wear it enough to go through that trouble, though. Option two is to use the skirt portion to make a slip-style nightgown by shaping a neckline and cutouts for armholes, then adding bias tape trim and snaps. I would probably use it more this way, but I still worry about the feel of the fabric. I usually avoid things without at least some natural fiber content. Texas is hot and I need my clothes to breathe.
My final idea is to salvage the buttons and use the fabric for things like bag linings, makeup pouches or other accessories. I will probably try one of my first two ideas before this one. I can always use option three if one or two don’t work out.
Pink Tunic Shirt
I think the flowiness of the outer layer and the stitching around the neckline is what made me grab this tunic shirt from the bin.
Flowy Pink Tunic Shirt
Pros: Flowy, comfortable fit. Detailing at the neckline keeps it from being too plain. Nice, bright color. Cons: The top layer seems to have shrunk, exposing the lining layer. The lining is 100% polyester knit, which is stretchy and comfortable, but doesn’t breathe.
My plan: This one was so simple, I actually did it in about five minutes this morning. I thought about shortening the lining by a few inches. The top, gauzy layer didn’t really have to have a lining, though, so I decided to remove the lining altogether by simply cutting it out. This made it super easy, and now the tunic is lighter and more suitable to Texas summers.
Pink tunic after removing the lining.
It’s not the most dramatic refashion, but it fixed a problem and made it so much more comfortable to wear. I wore it Sunday over my new-to-me Goodwill blue jeans to The Modern art museum and then to Central Market with the family for a treat and playtime on their playground. Without the lining, the tunic was lightweight, and the drapiness of the fabric kept it from feeling frumpy. I totally see it becoming one of my new favorites.
Speaking of The Modern, if you’re on Instagram, I’ve shared a video to @subearthancottage of Thadd and Beckett having fun with the crazy acoustics inside the Vortex sculpture out front. It was so much fun to watch them play, as well as just about anyone walking by. Few people passed without stepping inside to stomp their feet or shout.
This weekend we held a rather slow garage sale. It was still fun, though, and we met some nice people, including a gentleman who shares our fondness of TBI Suburbans.
Chris took full advantage of the time to create a few billboard art pieces he’s been picturing for months.
Queen of Hearts
I think this is my favorite. I love the weathered door.
Show Stopper
This is the one everyone slowed down to see. He may decide to shorten it from the bottom to make it more manageable. As it is, though, in the right space it is impressive.
Coca Cola
This one just screams Americana. We held it up to see what it looks like on the outside of our house. I loved the pop of red against our brown. I can totally see this alongside other signs in rustic decor.
I, Charity Sloan, am a participant in the Amazon Services LLC Associates Program, an affiliate advertising program designed to provide a means for sites to earn advertising fees by advertising and linking to Amazon.com. Any purchases through those links will result in my receiving a small percentage in commission.
This only refers to Amazon links found in/on my blog pages. All products in my shop are 100% mine and not linked to Amazon.
Prices are the same whether you click an affiliate link or a non-affiliate link, so you will not be charged more. Thank you for your support!